beginners project

How to Clean Wood Carving -Burning Projects

Antique Road Show may call it patina … but I call it dirt!

A.K.A.  The Joys of Murphy Oil Soap

In wood crafting – wood carving and wood burning – patina is the natural color change that any wood surface goes through with age because of oxidation.  This darkens the wood because the iron in the wood begins to rust over time.  A clean, fresh piece of white pine will turn into a deep golden-orange color as its patina develops.

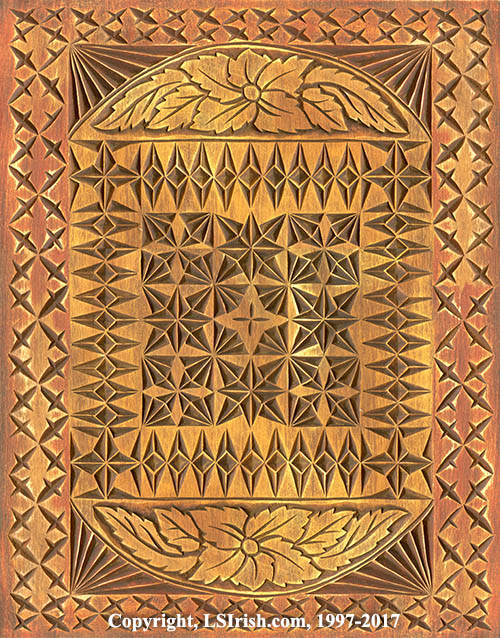
This morning I have been taking photos for my next book with Fox Chapel Publishing and needing a backdrop I grabbed one of my very first relief carvings – a photograph box.   But even before I got it to the photography table I knew that carving desperately needed a good cleaning.  What I am posting is the same procedure that I use of my wood burnings.

Because we display our carvings, handle our carvings, and use many of them on a daily bases our artwork does begin to pick up an ugly layer of common household dirt that both dulls  the surface finish and begins to fill in that fine detail carving that you worked so hard to achieve.

This project was carved in butternut, circa 1995, and used in my first book Classic Carving published by Taunton Press.  Over the twenty years of being used as either a jewelry box or photo box, the lid had become quite dingy.

Note here, this is not some precious 200 year old antique … at least not yet!

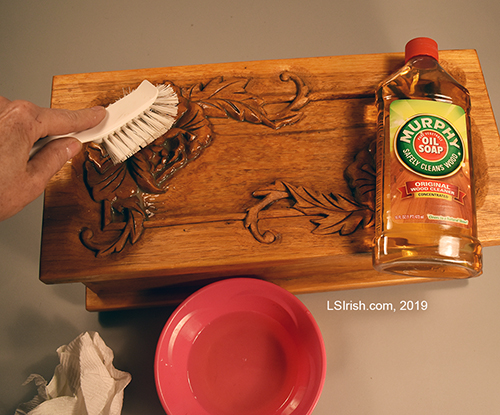
I use Murphy’s Oil Soap.  Murphy’s is a concentrated wood cleaner that is safe to use around children and pets. Not only can it be used on raw wood but also over most of your polyurethane or acrylic sealers.  Remember to do a small test on the bottom of your project before you work the carving.

  1.  Dust your work well before you begin.  Use condensed air to clean what you can out of the deep details.
  2. Mix about 1 cap of soap with 1 1/2 cups of warm water.
  3. With a kitchen dish washing brush, work one coat of soapy water over the surface of your carving.  Let the soap mix sit on the wood for a few moments so that it can loosen the dirt.
  4. Gently scrub over your carving or burning with the kitchen brush to lift the dirt.
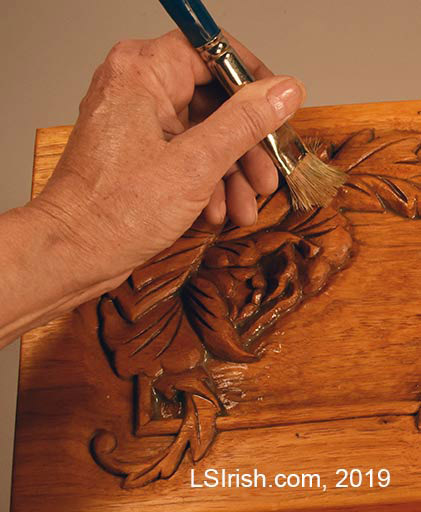
  5. With a large ox-hair brush, work the puddles of dirt out of the crevices and corners.
  6. Use a clean, lint-free cloth to rub away the dirty soap.  You do not need to or want to rinse your work after you have wiped the wood.  The oil in Murphy’s will refreshes your wood surface.
  7. Repeat if necessary.


After my jewelry box thoroughly dried it was ready to be returned to my dresser as my family photo box.  The shine you see on the box edges and carving curves directly comes from Murphy’s Oil Soap.


How to Clean Wood Carving -Burning Projects Read More »

Lora S Irish blog Site Map

L S Irish.com Site Map

Discover the numerous free online projects, patterns, and tutorials available at LSIrish.com.

Wood Carving, Relief Carving, Whittling, Fish Decoy Carving, Wood Spirit Carving

Pyrography, Wood Burning, Gourd Art Burning

Pages

Posts by category

Powered by "WP Sitemap Page"

L S Irish.com Site Map Read More »

Free Chip Carving Projects by L S Irish

Let’s take an in-depth look at the chip carving technique by creating several chip carving practice boards, and working a classic needlepoint sampler layout, shown above, that you can use to carve multiple chip carved projects.  The pattern and photo sampler for this  Needlepoint Layout is available in both our  Chip Carving Pattern Package and in the Chip Carving E-Project.

Here is the link list to our Chip Carving Seminar by Lora Irish.

Chip Carving Seminar
Chip Carving Supplies
Chip Carving Graphed Patterns
Chip Carving Hand Positions and Grips
Chip Carving – Triangles and Square Chips
Chip Carving – Straight-Wall Chips
Chip Caved Game and Chess Board
Chip Carving Sampler Pattern Layout
Chip Carving Common Mistakes
Chip Carved Shortbread Cookies


We will explore:

free Irish chip carving patternSupplies needed for chip carving
Creating basswood chip carving practice boards
Wood preparations
Knife sharpening
Transferring a chip pattern to your board
Knife angle
Common problems
Positive and negative space
How to cut the different styles of chips
Learn triangles, square, straight-wall, curve-edge, free form, and accent chips
Using chip styles in your patterns
Work a set of chip progressions
How to turn a corner


Learn how to prepare your wood board, three methods to transfer your pattern, and how to set up a chip carving practice board.

Please stop by Art Designs Studio, (a.k.a. CarvingPatterns.com) Lora Irish’s wood carving, pyrography, and chip carving pattern website.

Chip Carving Basics E-Project, Everything from this Chip Carving Seminar and more!  Learn how to create a wide variety of chip carving designs using different styles of easy-to-cut chip motifs, by Lora S. Irish.  37 page, PDF file format, easy to print e-project and the full cp015 Chip Carving Pattern package with 110 ready to print chip carving patterns.

On sale through March 31, 2019 at only $7.95


Free Chip Carving Projects by L S Irish Read More »

painted blue jeans

Painted Blue Jeans, Free Patterns

What could be more perfect for our Free Doodle Patterns than a pair of blue jeans?  How about the fact that I picked up these brand-new, never worn jeans at my local church thrift shop for $1 !

Doodle Days #13 –  Blue Jean Painting, Wood Burn Spoons, Wood Carved Spoons, Leather Work, Free Lora S. Irish Patterns to Download, DIY Bookmaking, Bullet Journals, Scrap Booking, Card Making, Applique Quilting, Pyrography, Wood Carving

free painted blue jeans patterns

Why wear your slogan or favor designs on the sleeve of your t-shirt when you can paint them onto the legs of your favorite pair of blue jeans?


Supplies:

1 pair of pale-blue or medium-blue blue jeans
1 fine-point black fabric pen
medium-point fabric marking pens – black, medium-blue, and pale-blue
1 set of assorted color fabric marking pens
several 6 1/2″ squares of white cotton fabric
needle and thread
1 piece of scrap cardboard, large enough to slide inside the pant’s leg
steam iron

These are the specific sets of colors that I used to create my Painted Blue Jeans:

Colore Dual Tip Fabric Markers

Super Markers Fabric and T-Shirt Permanent Ink Pens

Best 24 Colors Fabric Markers

Sharpie Fine Point Markers, 36 piece set

Apple Barrel Acrylic Paint Set, 18 Piece


free painted blue jeans patterns

Step 1:  Pre-wash your jeans to remove any starch or stabilizing chemicals.  Dry the jeans thoroughly before you begin painting.

Step 2:  Download your copies of our Free Doodle Patterns, here on LSIrish.com.  Type doodles into the search box in the header.  We are on numbers 040 to 042 today, which should give you a nice selection of designs to use.

Step 3:  Cut the scrap cardboard to fit inside of the pant’s leg, so that one end of the cardboard comes out the pant’s leg at the bottom.  You can move this cardboard as you work to protect the jeans from color blending through to the other side of the jeans.

Step 4:  With a black fabric marking pen begin doodling … use a light pressure on the pen tip for the smoothest and fullest line coverage.  Mix your main designs with long flowing line breaks and fill patterns.

Step 5:  With the pale-blue fabric pen, fill the areas around your main designs with a tight dot pattern.  Let the space between the dots increase as you move away from the central line of the design.

Step 6:  With the medium-blue fabric pen, re-work the central area of the background with tightly packed dots.

Step 7:  Using a fine-point black fabric pen, work a fill pattern over the pale-blue and medium-blue dot patterns.  I used small, tightly packed circles.

Step 8:  Set your fabric pen colors according to your package directions.  My set only required a hot, steam pressing to become permanent coloring.

Step 9:  Flip your jeans over and do the back side of the leg.

Step 10:  You can create doodle designs on  the 6 1/2″ square white cotton fabric pieces using this same method.  Fill in some areas of your pattern with the bright colors from your set.  After the patch has been hot, steam ironed it is ready to sew into place, anywhere on your doodle jeans.

free painted blue jean patterns


Free Doodle Pattern #040


Free Doodle Pattern #041


Free Doodle Pattern #042


Art Designs StudioFor more great pattern ideas for your painted blue jeans, please visit ArtDesignsStudio.com


Painted Blue Jeans, Free Patterns Read More »

Doodle Wind Chimes, Free Craft Project

Doodle Days #12 –  Wood Burn Spoons, Wood Carved Spoons, Leather Work, Free Lora S. Irish Patterns to Download, DIY Bookmaking, Bullet Journals, Scrap Booking, Card Making, Applique Quilting, Pyrography, Wood Carving

Irish Doodle Pin Cushion Wind Chime

Doodle Days Clay Pot Wind Chimes

This wind chimes will add a touch of country delight to your back porch.  Its quick, easy, and fun to make a large set using graduated sizes of clay pots.

Supplies:

3 1/2″ clay pot
2 1/2 yards of 1/2″ wide burlap ribbon
2 yards of thin gray-brown twine
3 1/2″ gold-colored bells
1 – 3/4″ twine bead
acrylic glue
1 – bamboo kitchen skewer
fine-point marking pen
gold glitter glue

Step 1:  Download your free doodle patterns, here at LSIrish.com.  To discover more free patterns type doodle into the search box in the header of this page.

Step 2: Using a fine-point permanent marking pen, doodle around the lower section of the outside of your clay pot.  For contrast, leave the rim of the pot without decoration.  Work over some of your pattern lines several times to create a thick-and-thin outline effect.

Step 3:  Wrap the thin twin around the bottom edge of the rim three times.  Tie the twine tightly.  Use a few drops of acrylic glue to hold the knot and twine into place.  Allow the glue to dry.

Step 4:  Cut a 2 yard long piece of thin twine.  Thread the three gold-colored bells onto the thread, and move them to the center point of the thread.  Bring the two ends of the thread together, tie a knot with the two  threads about 1 1/2″ above the bells.

Step 5: Slide one 3/4″ twine bead onto the two threads and position the bead above the knot made in step 4.  Tie a knot in the threads that sits on top of the bead.

This wind chimes follows the same step-by-step instructions as
our Doodle Wind Chimes.  The free doodles where printed
on card stock paper, cut, and double-stick taped into place.
This is a quick wedding decoration.

Step 6:  Tie the two twine threads into a third knot the height of your clay pot  away from the top of the bead.  If your clay pot is 3 1/2″ tall, this third knot is made 3 1/2″ away from the bead.

Step 7:  Cut two 1 1/4″ long pieces from the bamboo kitchen skewer.  Tie one piece with a knot tightly above the third knot.  Slide the twine, from the inside to the outside, through the hole in the bottom of the clay pot.  Lay the second bamboo piece between the two twine ends, on the bottom of the pot, and secure with a tight knot.  These two bamboo sticks hold the bell clapper in place.

Step 8:  Hold one end of the burlap ribbon between your thumb and the side of your palm.  Open your fingers as wide as possible.  Wrap the ribbon over your fingers four to five times, leaving at least a 4″ long end.

Step 9:  Carefully remove the wrapped burlap ribbon from your hand and place it, centered, between the two twine threads.  Tie a tight knot in the twine to secure the burlap ribbons.

Step 10: Tie a knot in the twine threads 4″ to 5″ from what is now the top of your wind chime.  Clip the ends to about 1/2″ long.

Step 11:  Working one burlap ribbon loop at a time, turn each loop inside-out.  This gives your ribbon that lovely curl.

Step 12:  Use gold glitter glue to add little dots of bright, sparkling accents to your doodle pattern.  Allow  the glue to dry thoroughly, and your wind chime is ready to hang.

free tracing pattern
Free Doodle Pattern #037
Irish Doodle Pin Cushion Wind Chime
Free Doodle Pattern #038


Irish Doodle Pin Cushion Wind Chime
Free Doodle Pattern #039


Landscape Pyrography Techniques and Projects by Lora S Irish

Doodle Wind Chimes, Free Craft Project Read More »

Scroll to Top