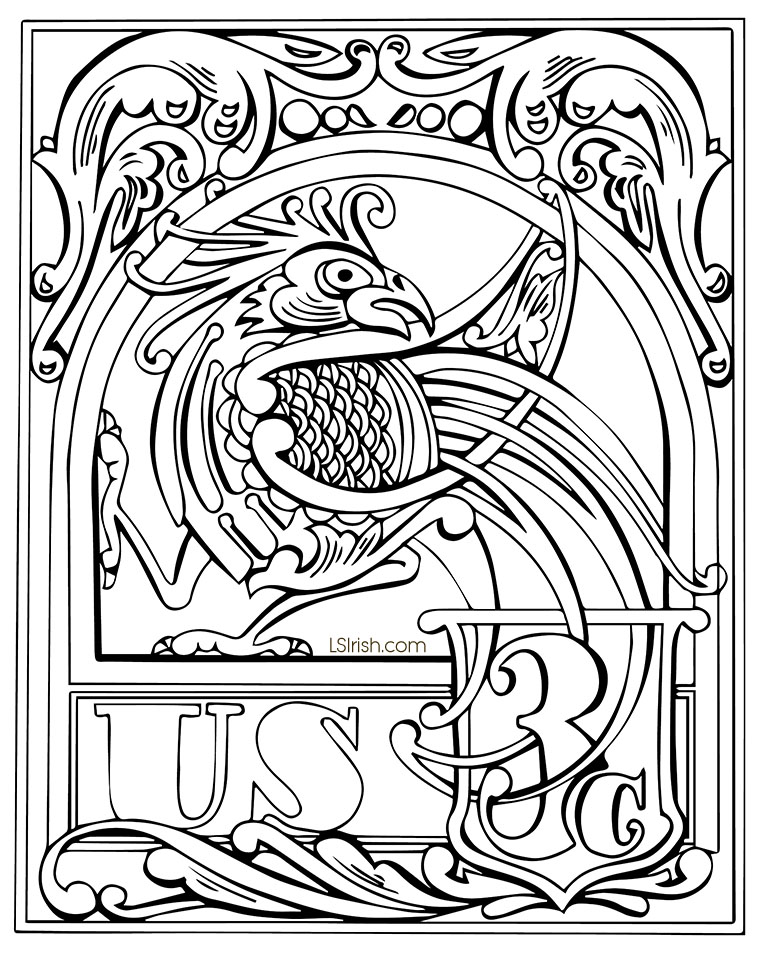
ROOSTER CELTIC KNOT COMPLETED BURN
Worked as if it were an 1800’s American stamp, this Rooster Celtic Knot pattern
will let us explore the basic steps used in most pyrography projects –
Outlining, Mapping, Backgrounds and Voids, Texture, Strengthening, and Detailing

Please click on the pattern, below, for a full-sized printable pyrography pattern.

BOARD PREPARATION
The pattern for this Rooster Celtic Knot is worked on a live-edge, basswood, 3/4” thick plaque that needs to be 9” x 12” or larger.
As shown in the Tracing Steps, I have allowed the extra room on the plaque to fall at the bottom of the wood, which will give me a space to add decorative cup hooks when the burn is complete.
Basswood is easy to obtain at most large craft stores. Although classified as a hardwood, this pure white, fine grain wood performs as a softwood, accepting very pale tonal values and extremely fine detail. At high temperatures and solid fills you can achieve solid black areas in your work.
The postage idea is a very forgiving subject for new pyrographers as the early 1800’s stamps, on which this is based, often were printed on coarse paper with somewhat ragged printed colors that could bleed into surrounding areas.
If your shading is a little uneven or your detail lines a little wobbly as you learn to control the wood, temperature setting, pen tip, and stroke, it will just add to the impression of an old collectable stamp.
So, relax and have fun!

1. Sand the surface of the wood to create as smooth a burning surface as possible.
Trace the pattern to the wood using a graphite pencil rub on the back of the pattern.
OUTLINE

2. Use the ball-tip pen on a low temperature setting of 4 to 5 for a very pale tonal value. Outline the tracing lines of the pattern. This light burning is to permanently set the pattern line so that your hand and work does not accidentally wipe away the graphite lines. This first outlining is not meant to be seen once the burning is complete, it is a guideline for you in your work.
Not all pattern tracings need to be outlined nor is it appropriate to do it for every burning theme. Obviously, clouds in a landscape scene do not have outlines nor do petals and leaves in a floral design. But as a beginner using a very pale outline step makes your first projects easier as you can’t lose the pattern as you work.
SAND, TRACE, & CLEAN

3. When you have completed the pale value outlining clean your entire piece of wood with an artist’s eraser, gum eraser, or architect’s eraser pad to remove any graphite left from the tracing steps.
Your hot tipped pen can permanently set those small graphite smudges or pattern lines into the work as you begin the burning. The outlining step just done (step 1) allows you to remove all that dirt before you begin your art.

4. After cleaning the wood, remove the eraser dust with a dry, clean cloth.
MAPPING THE SHADOWS AND SHADING

5. Mapping let’s you determine where you want your shading and shadows early in the work. Use the loop tip pen and a low temperature setting of 4 to 5, working the scrubbie stroke. Work a pale tonal value burn to those elements that lie underneath other elements. The tail feature beginning burned in the photo come from under the bird’s body. Next it tucks under the frame for the 3-cent area. Both of these areas are shaded. Where this same tail feather rolls forward and over the 3-cent frame it becomes the highlighted area that receives light, so you will be shading the frame as the underneath element.
These areas of pale value will be strengthened as you do further work on your art. This step let’s you think through where your shading will fall before you burn an area so dark that it can not be removed or altered.
WORKING THE BACKGROUND AND VOIDS

6. Use the loop tip tool on a medium-hot setting of 5 to 7, using a tight scrubbie stroke. Fill in the void behind the rooster that is inside the curved, top frame area.
Decide how you want to treat the background area of your pattern. Is that background part of the theme as mountains and sky behind a barn, or is it a void area – an area without design, pattern, or even importance to the work?
There are several options on how you treat your background and void spaces.
A. Leave the area un-burned, un-worked, and in the raw wood coloration.
This choice, in essence, ignores these areas totally as shown in the
second stamp project we will be doing tomorrow.
B. You can blacken the background with a solid, high temperature fill stroke.
This also, in essence, ignores the area as part of the pattern but can push
the pale and mid-tone value work of your design forward visually.
C. You can chose to use a static texture, repeat texture, or dot pattern as is worked in pointillism,
worked in a mid-range tone that contrasts to the main pattern elements.
Step 6 uses option B by blackening the background to the rooster to a dark-medium tonal value.
ADDING INTEREST

7. Large solid fill areas do not need to be absolutely even in tonal value work. Allow some areas to develop a slightly darker tone or paler tone than other areas to add a little extra interest to the overall area. In our sample I am darkening the background around the rooster’s head fathers and along the left side of the area where it touches the frame. This is meant to be a work of art, so remember perfection can be boring.
CROSS HATCHING

8. Use cross hatching , worked with the spear shader, set of a medium-hot setting of 5 to 7 for the US frame background. By working the background of this lettered area with a defined texture of overlapping, crossing lines I can identify the area as a separate piece or element from the surrounding elements. The cross hatched US frame is an independent subject from the solid fill rooster area of the stamp.
MID-TONE VOIDS

9 There is a large void area that surrounds the outer scroll work of the stamp design. Use a medium-hot temperature setting of 5 to 7, and your loop tip pen to work an open dot pattern in this area.
SEPIA SCALE CHECK

10 At this point in the burning that most of the tonal values remain on the paler side of the sepia scale. You can always darken an area later as needed. You can’t easily lighten an area that you initially worked into a dark tone.
WIDEN THE TONAL VALUE RANGE

11 Widen your tonal value range by establishing several areas of solid fill black. Use your loop tool on a hot temperature setting of 8 to 10. Fill the areas with a tight scrubbie stroke. For our project these areas are the background to the 3 cent frame and the area above the top scroll design.
STRENGTHEN YOUR SHADING

12 At this point you have clearly created areas of un-burned pure white to solid fill black. Its time to strengthen your shadows and shading to fill in the mid-tone values. Working over the mapping areas worked in step 5 add more mid-tone shading to intensify your design.
Note this shading still follows the simplest shadowing step of darkening an element that is underneath another element. The closer that area is to the under tuck the darker its tonal value. As you move away from the under tuck area the shading will move to paler values. Use the tool pen that you originally used for each area.
DETAILING

13 The final step in the burning of this Rooster Celtic Knot stamp pattern is to work the detailing of the design. The tonal value work that you have already done should have covered most of the outlining done in step 2. By detailing the pattern you establish crisp separation lines between elements, divide areas of similar tonal value, and give emphasis to particular parts of the pattern.
Don’t completely outline your original tracing lines. Instead work fine lines where one area needs more definition. Allow breaks in your detailing and allow changes in your tonal value so that some lines will be mid-tone while others near the black range.
For major line work, as the top of the 3 cent frame where the rooster feathers intersect, I use the ball tip pen on a hot setting of 8 to 10. The ball tip tool also is used to add the spaced dot pattern along the outer edge of the stamp pattern. For very fine, very dark, short lines as seen in the rooster’s feather work, use your spear shader on its edge in a touch and lift motion.
14 Clean your project with your white artist eraser or architect’s eraser pad to remove any hand dirt or oil. Remove the eraser dust with a clean, dry cloth. Seal the wood with several light coats of acrylic or polyurethane spray sealer.

TABLE OF CONTENTS
1 Definition of Pyrography – posted Nov. 17, 2020
2 Safety
3 Basic Tool Kit
4 Wood Burning Systems – posted Nov. 17th, 2020
5 One-Temperature
6 Rheostat Tools
7 Variable Temperature Tools
8 Wood Burning Pen – posted Nov. 18, 2020
9 Hand Grip Positions – posted Nov. 18th, 2020
10 Loop Tip Pen – posted Nov. 18th, 2020
11 Ball Tip Pen
12 Spear Shader
13 Spoon Shader Pen
14 Practice Board – Nov. 19th, 2020
15 Wood Burning Media – Nov. 22nd, 2020
16 General Kit Supplies – Nov. 22nd, 2020
17 Cleaning Your Tips – Nov 22nd, 2020
18 Grain Direction – Nov. 24, 2020
19 Sanding the Wood Blank
20 Transferring the Pattern – Nov. 24, 2020
21 Graphite on an Irregular Shape
22 Pencil Graphite Rubbing
23 Pattern Re-Alignment Marks
24 Tonal Values- Working the Celtic Blue Bird Pattern
27 Finishing
25 Patina
27 Working a Sepia Value Pattern
28 Rooster Celtic Knot Project – Dec. 7th, 2020
29 Double Dove Celtic Knot Project
30 Bonus Patterns

