Artist morgue files are more than just a pile of pattern ideas. Your morgue file is a great place to keep those project ideas that catch your interest.
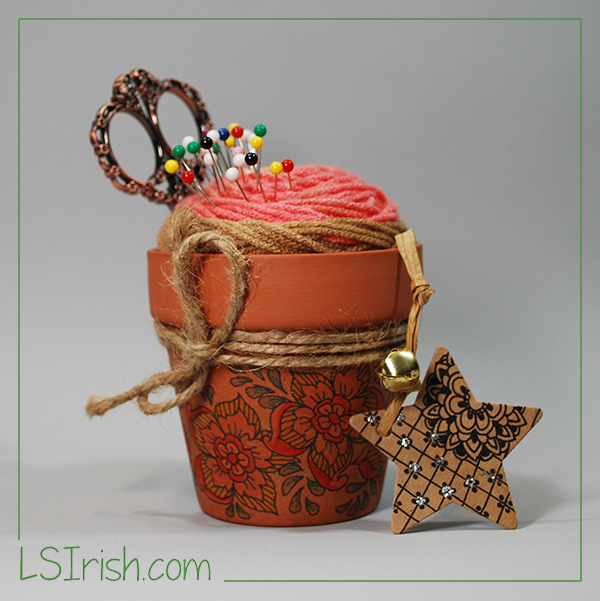
DIY Gift Pin Cushion Project
Supplies:
a ball of scrap yarn a 3 /12″ clay flower-pot 2 yards of burlap twine acrylic glue 6 rubber bands assorted marking pens assorted glitter gel pens.
Instead of hot glue or white glue, we will be using the rubber bands around the yarn ball to hold the yarn in place against the inside wall of the clay pot. This secures the yarn tightly into the pot, yet allows you to remove and replace the yarn ball if necessary.
For more free LSIrish.com Doodle Patterns type ‘doodle’ into the search box in the header of this page.
Step 1: Using a fine point permanent marking pen, doodle assorted designs onto the lower section of your clay pot.
Step 2: Accent the doodle designs with colored marking pens and with glitter gel pens. Allow the gel pen work to dry for about 10 minutes before you move to the next step.
Step 3: Wrap the burlap twine around the underside of the clay pot rim three times. Tie the ends into a bow and clip the ends to about 2″ long. Use several drops of acrylic glue to secure the bow and to hold the twine to the pot. Allow to dry.
Step 4: Grab those little bits of scrap yarn that you have been saving. Wrap the yarn into a semi-tight ball … tighter than you would normally wrap for knitting or crochet, but not so tight that the ball becomes excessively hard. You want your yarn ball about 1/2″ wider in diameter than the opening of your clay pot. Tie off the end of the yarn.
Step 5: Place five to six rubber bands around the center of your yarn ball. Slid the yarn ball into the top of your clay pot so that the rubber bands are about 1/2″ below the pot rim. Tuck in any loose yarn loops with your scissors.
Step 6: Your loose straight pins, needles, and safety pins will sit nicely in the yarn ball, while your doodling will add a little sparkle and decoration to your sewing table.
Step 7: Make another one for your favorite sewing friend!
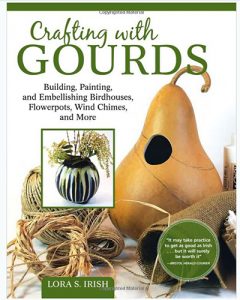
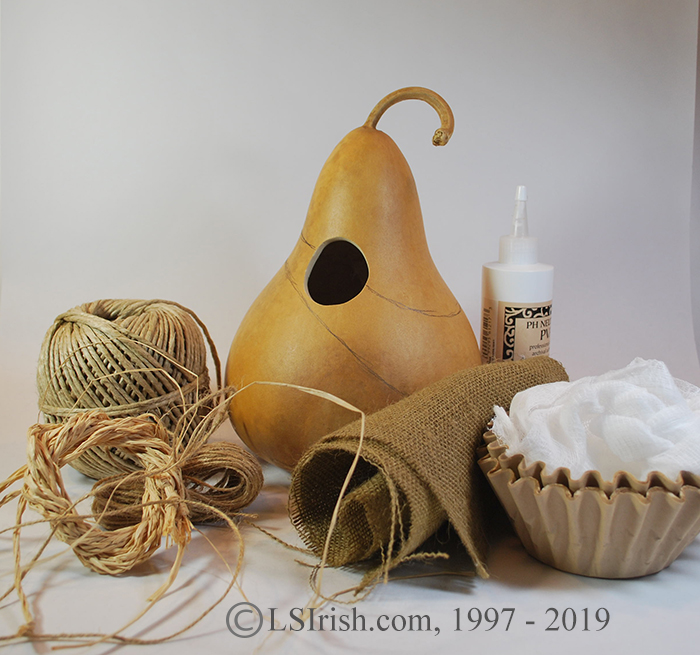
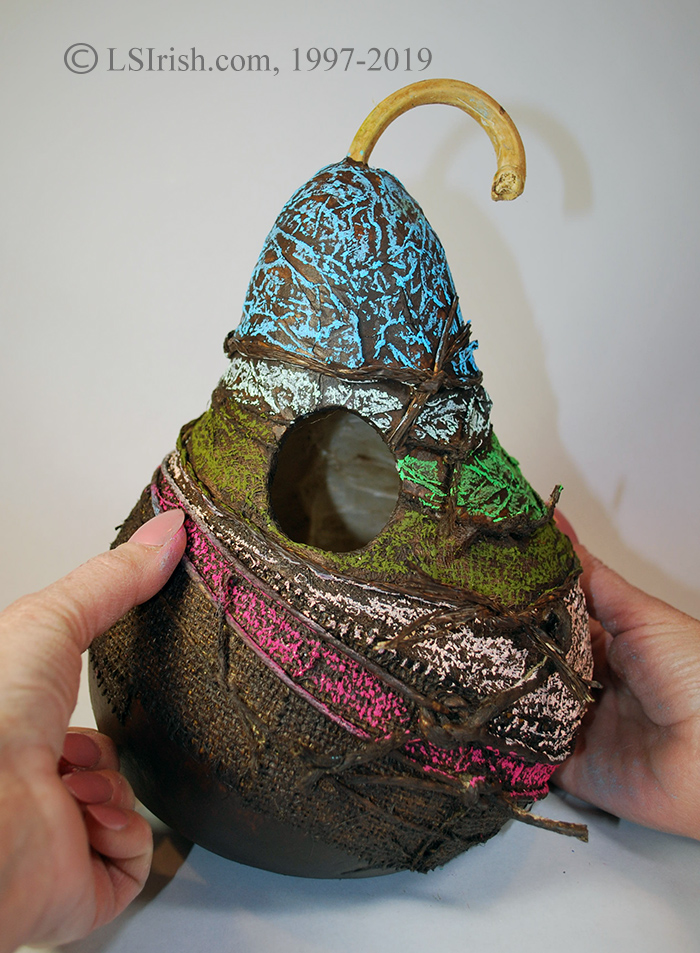
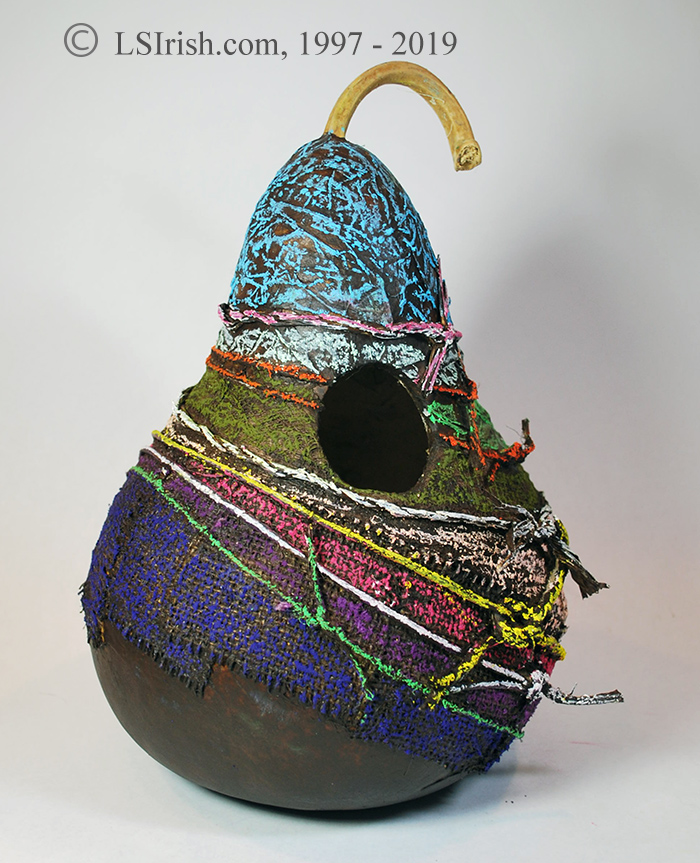
Sometimes I love being concise, careful, and controlled in my art … and then sometimes I just want to get down dirty, messy, slimy, anything goes, and hands-on. This String House is one of those ‘dirty up to the elbow’ fun projects from my newest book, Crafting with Gourds.
Introduction Any natural fiber material can easily be collage to the surface of your gourd using archival white water-based glue. This fun bird house uses paper coffee filters, cotton cheese cloth, burlap, garden twine, and cotton cord to create a riot of texture. When the collage work is dry we will use oil pastels to brightly color the high ridges of the texture.
Preparation Wash, clean, and cut a 10” high, 8” diameter, 23” circumference kettle gourd following the general preparation instructions.
Supplies 10” high, 8” diameter, 23” circumference kettle gourd #2 to #6 graphite pencil wax-coated paper cups archival white water-based glue plastic mixing spoon bowl of water for dipping large #6 to #12 square brush latex gloves coffee filters cheesecloth burlap assorted string, cords, and twine scissors
Acrylic craft paint dark brown – bird house black – mobile
set of 12 to 24 oil pastel sticks spray sealer
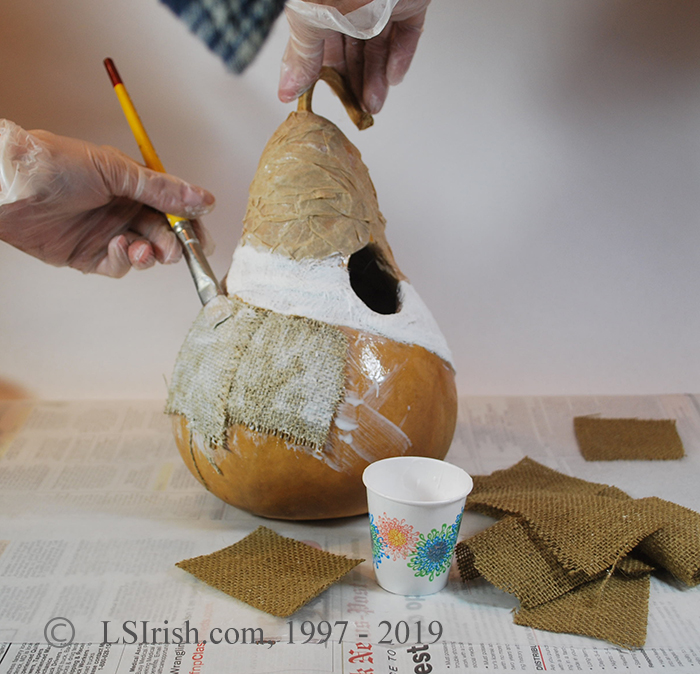
Step #1 Divide the gourd into three sections.
Divide the outside of your gourd house into three sections using a pencil to create the guidelines. The top section will be worked with coffee filters, the second section with cheesecloth, and the bottom section with burlap.
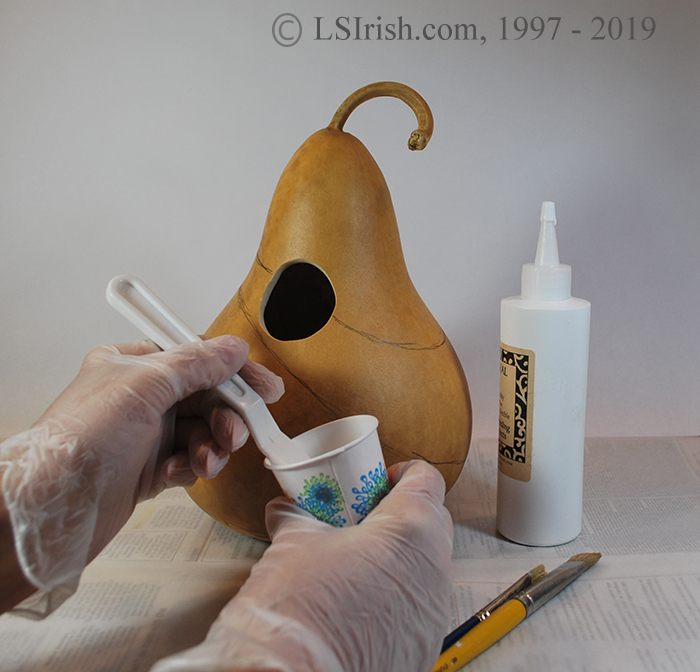
Step #2 Mix your glue
In a wax-coated paper cup mix three tablespoons of archival white water-based glue. Add one tablespoon of water, mix well.
Work the top section with coffee filters. Work one coffee filter at a time. Dip the filter into clean water, then wring out any the excess water. You want the filter damp, but not dripping.
Step #3 Gluing the coffee filters into place
Apply one coat of glue mix the top section. With a large square brush, apply one coat of the glue mix to the top section of your gourd. Place the filter onto the glue and press firmly with your brush.
Add more glue if needed. Apply more glue with your brush to the filter as necessary to secure the coffee filter into place. Use the palm of your hand to press the thickest wrinkles into place.
Step #4 Add the cheesecloth
Work the middle section with cheese cloth. Mix a second batch of archival white water-based glue if necessary. Cut your cheesecloth into small 3” to 4” squares. You can work several overlapping layers of cheesecloth at a time to increase the texture for this area.
Dip the cheesecloth squares in clean water, then blot well on paper towels. Brush a coat of the glue mixture to the central area of the gourd. Place several layers of cheesecloth onto the glued area and use your brush to press it into place.
Step#5 Work the top half of the bottom section with burlap.
The bottom section of the gourd is covered with 3” squares of burlap. Dampen and blot the burlap pieces on a paper towel. Coat the bottom section of the gourd with your glue mix. Lay one piece of burlap onto the gourd and apply a second coat of glue mix over the burlap. Continue working along the pencil line for this section, overlapping each new burlap piece on the last piece applied. Work just one ring of burlap pieces along the bottom.
Step#6 Leave an area of the gourd un-worked.
Visual contrast is important when you want to artistically emphasize texture. The un-worked bottom area for this bird house gives your eye an area of smooth gourd surface to compare to the textures you have created.
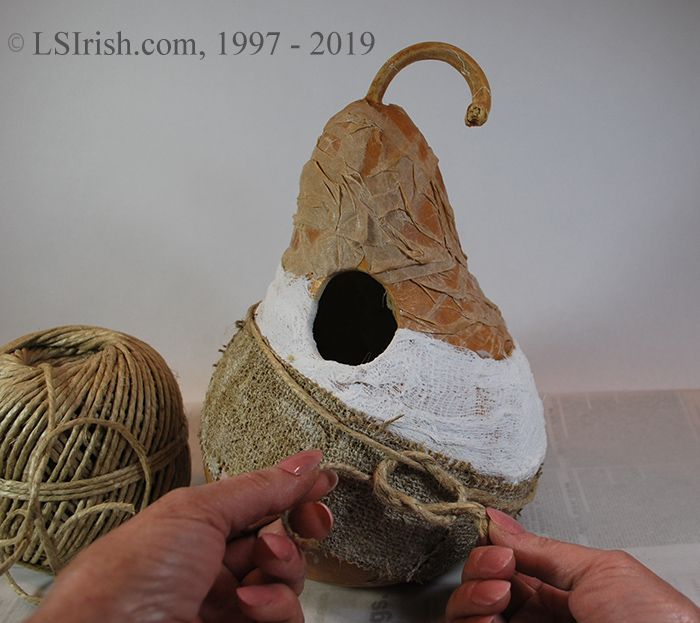
Step #7 Gather a variety of cotton and twin strings.
While you can use just one type of string, using a variety adds to the textured effect of this collage.Cut and tie a string at each intersection of the textures.
Lay a long piece of twine around your gourd. Move the twin to an intersection between two of your textured areas. Tie a square knot and cut the excess twine from the knot to about 1” long. Brush a generous coat of the glue mix to the twine to hold it into place. The twine wrapping does not have to fall exactly on the joint, let it fall where ever it may.
Let your strings go over the bird house hole as you add then. Glue the string, including that area that is over the hole. After the glue has dried overnight you can cut the small sections of the string that cover the hole without effecting the string at the hole sides.
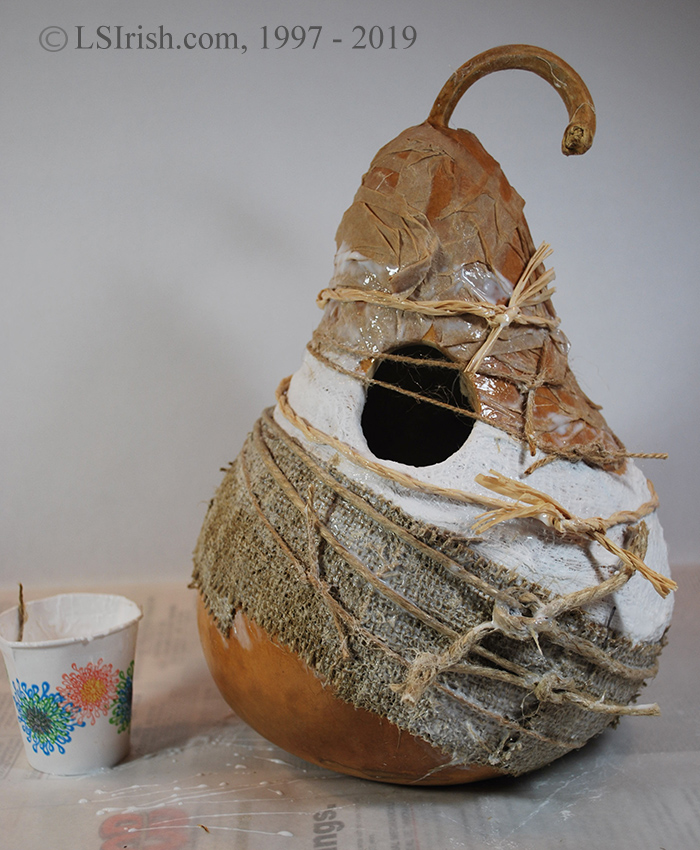
Step #8 Add one more, even coat of glue mix.
Let your gourd dry for about an hour, then apply one more glue and water mix to all of the textured areas. Dry overnight. Even though the glue is well dried it will have a slightly tacky feeling to the surface. This will diminish with the spray sealer step at the end of the project.
Apply one to two coats of burnt umber brown or black acrylic paint to the entire surface of the decoupaged gourd. This creates a dark background for the color that will lie on the high texture in the next step.
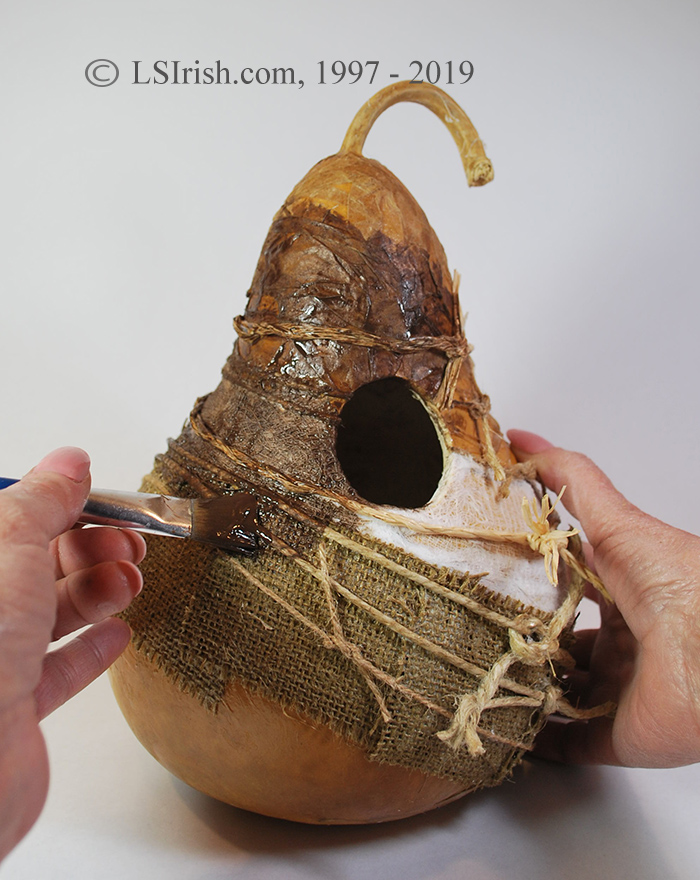
Step #9 Playing with oil pastels.
Oil pastels are ground pigment that is compressed in an oil-based stick. They are available in set that have a full color range.
Using one oil pastel stick at a time, rub your pastel over one of the textured areas. The pastel will adhere to just the highest areas of your texture, leaving the deep areas in the dark brown paint.
Although not shown in this project you can blend oil pastels by laying one color over another lightly. This lets a little of both colors show and creates the new blended color.
You can clean off any pastel color that has gotten into the next area by rubbing the area with your fingers.
Step #10 Apply oil pastel to the strings.
Use contrasting colors for your strings by rubbing the oil stick along the top edge of the string.
Finish this bird house with two to three light coats of spray sealer.
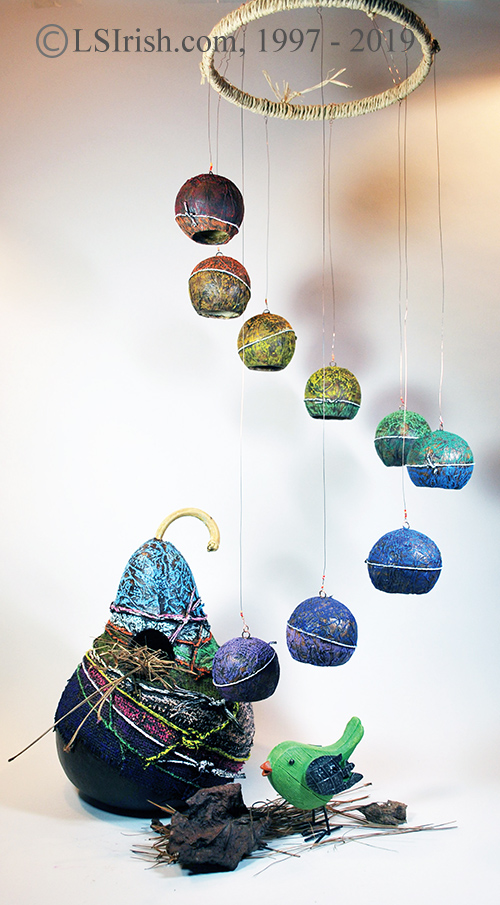
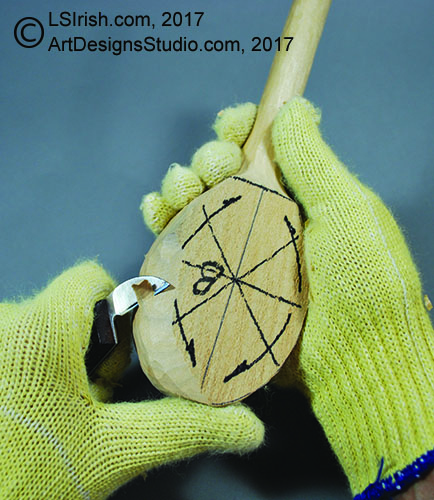
Step #11 Making a wind chime Shown in the top photo
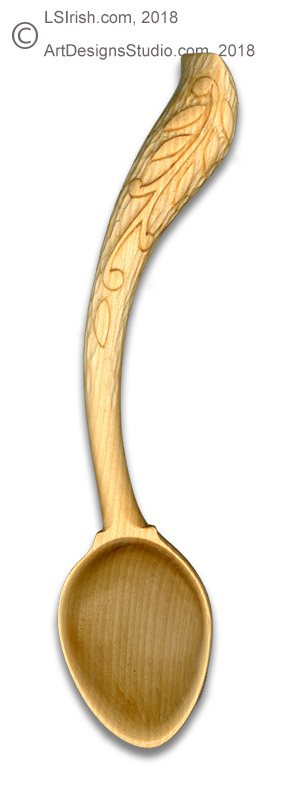
While getting the Monday, January 7th free doodle patterns post ready I came across all of these links on wooden spoon wood burning, and wooden spoon wood carving. Since I had them all in one place I thought I would share them with you.
If you wood burn wooden spoons I think you might have some fun learning how to wood carve your own. Basswood blanks are a great wood to start your spoon carving journey. As your carving skills grow you can then move onto poplar, maple, and beechwood – all of which burn well.
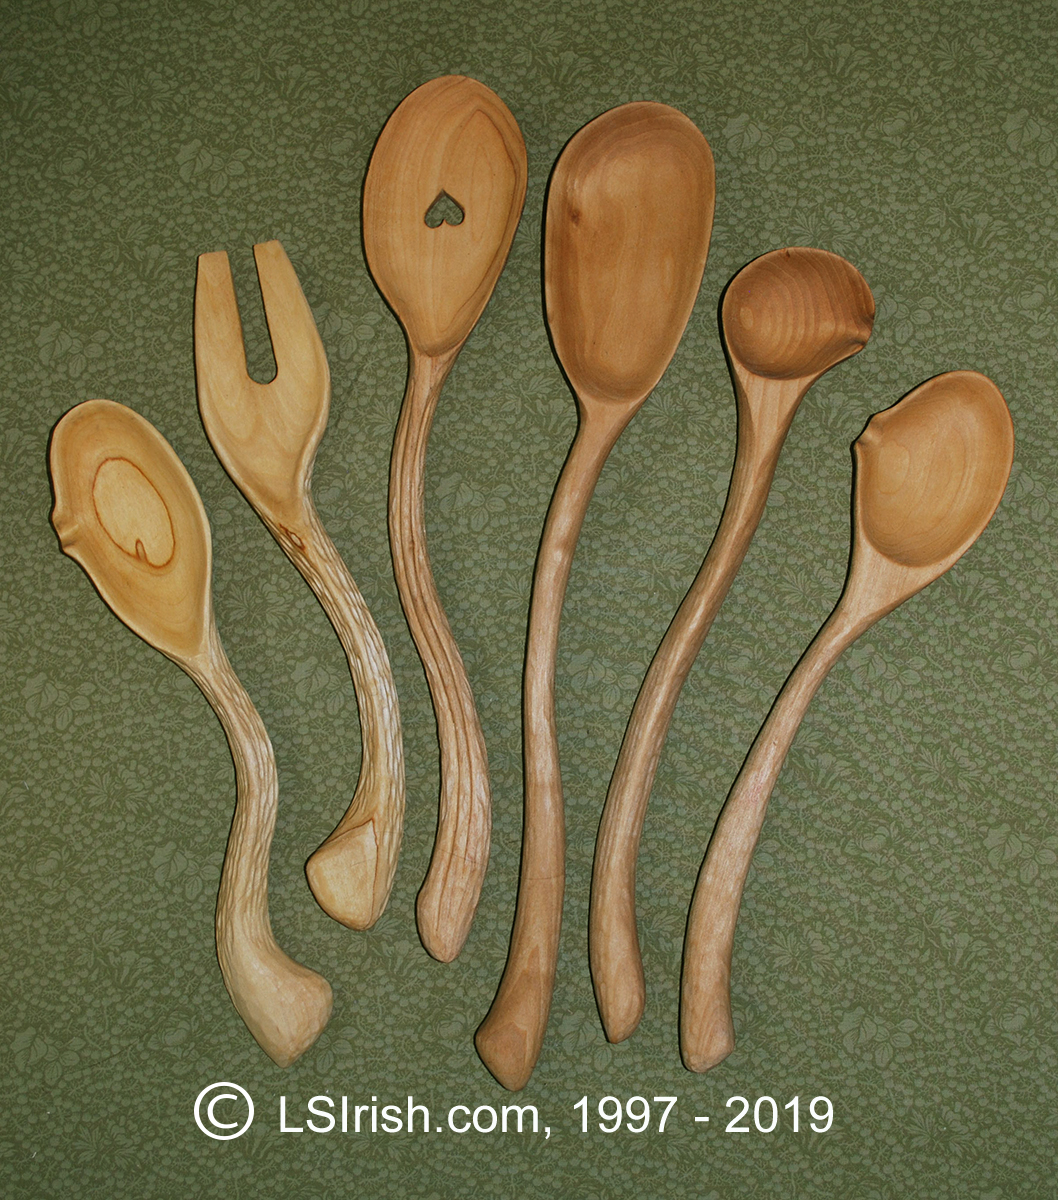
If you are a new wood carver there is nothing more fun than creating your own kitchen spoons. Anything goes from the classic straight handle oval-bowled spoon to intrigue Welsh Love spoons, even modern twisted handle pouring ladles. Spoons are one of those ‘guaranteed’ success projects.
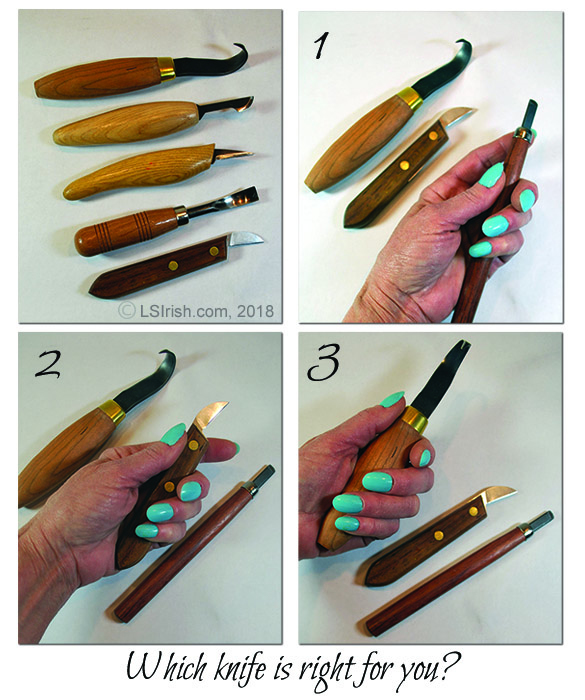
In an Amazon review a reader was distressed that I don’t teach spoon carving using a Sloyd knife, a very traditional knife used in this craft. I believe this is a fair and honest question that I could address here.
There are many different styles and shapes for the straight cutting knife that we often group under the name of ‘bench knives’. Some bench knives have long blades that may extend up to 4″ from the handle, others as chip knives may only have a 1″ long blade. Some blades are flat – straight – along the cutting edge from handle to knife tip while others may have a curve at the top 1/3 of the blade. Some are sharpened on one side only while others are sharpened on both sides.
While Sloyd knives are a traditional, Old World technique tool for spoon carving, why don’t I use or recommend them … because they don’t fit my hand! More at the bottom of this page ….
What is important in your choice of bench knives?
There are two specific aspects to your bench knife that determine which is best for you.
1. The quality of steel which determines the quality of the sharpened edge that you can achieve and keep during a carving session.
Cheap steep will never sharpen to a bright, clean edge and if you do achieve a usable sharpened edge that edge will not last very long during any carving session. Be prepared to pay about the same amount for one good bench knife as you would a full 5 to 6 piece beginner’s carving set.
2. The fit of the handle inside of your hand.
No knife, no matter how wonderful the steel, who manufactured it, how sharp an edge it keeps, or how it has been traditionally used in wood carving is worth a tin dime if it doesn’t properly rest inside your hand.
Notice here that I did not mention the piece or project that you are carving or the length of the bench knife blade. A good bench knife, one with high quality steel and a proper fit, will carve about 90% of the straight cuts that you need for any project. While many wood carvers have a variety of bench knives in their kits, most return over and over again to just one or two favorite tools.
What length of bench knife do you need?
For most carving projects today your bench knife only needs to make a clean slice of wood 1/2″ or less wide. If you need to take larger slices then you most likely need to move to a draw knife. Today’s carvers are working with milled wood that has been kiln dried. The bark has already been removed and the heartwood cut away from the blank. Few of us need to rough cut a split piece of bark wood that needs to be dressed down to a flat, squarish shape before we begin carving either of which could require a longer blade length.
Let’s return for a moment to the discussion about using a Sloyd knife as compared to a standard bench knife or chip carving knife. A Sloyd knife is wonderful if you are de-barking a long walking stick that you have cut from a sapling. The extra long blade does allow you to glide the cutting edge down the sapling, releasing very long strips of bark. This is very important if you are removing the bark after the stick has dried.
You can also debark while the stick is green using a shorter bladed knife by lifting the top edge of the bark and pulling the bark off the stick.
If I am carving details in my work, as shaping the side of a spoon bowl or cutting the facial planes of a wood spirit that long blade on the Sloyd pushes my hand several inches away from where I am cutting. A short blade, as a 1″ chip blade, places my hand, and therefore my control of the cut, right at the point of the cut.
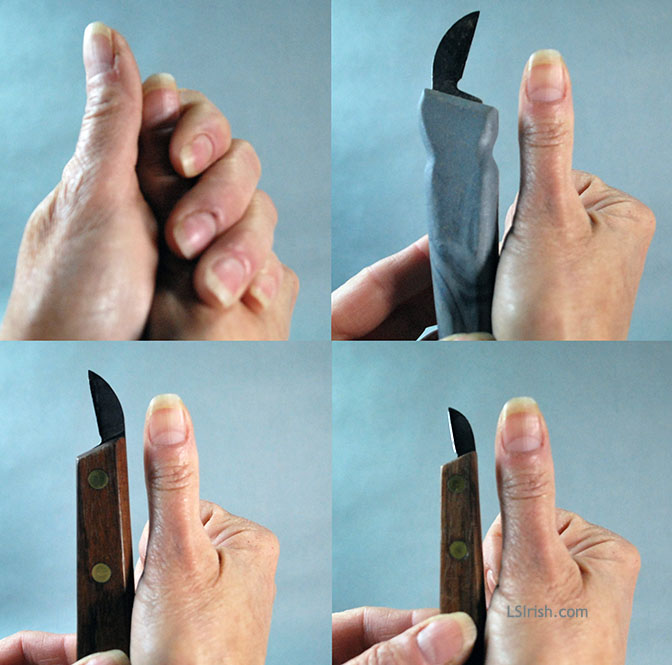
Does it fit your hand?
For me this is as important as the quality of the steel. If a knife does not properly fit your hand I will guarantee that it will spend most of your carving life in the box of your tool kit … quietly rusting away!!
A well-fitting knife handle lays across your palm between the major fold wrinkle of the fingers and the major fold wrinkle of the thumb palm. The fattest part of your thumb rests nicely into this space, which means that the fattest width of your thumb is an excellent gauge for the thickness of your bench knife handle.
In the photo, right, the bottom left knife handle is the most appropriate for the size of my hand. The top right shows a handle that is too wide, and the bottom right one that is too narrow.
When you roll your hand around the handle, the tips of your long and ring finger should just lie about 1/4″ away or just against the side of the thumb palm. This fit lets you have free motion of your fingers, your thumb, and your wrist during any cut – not too tight, and not too open. Your fingers hold the knife handle to the palm without the need of excess pressure.
Too narrow or to thin a handle and your finger tips will need to curve into a clenched shape to hold the knife steady. That clench causes extra tension in the hand which over time becomes tiring.
Too wide a handle and your finger tips will not touch the thumb palm area. With this grip you need extra pressure to steady the knife through the cuts. Again, this can cause fatigue and stress on your hands.
Looking at the first photo on this post.
Upper left shows five different tools and knives that are commonly used in spoon carving. From top to bottom are a FlexCut Carving Hook, a FlexCut hooked skew, a FlexCut bench knife, a wide bent round gouge, and a Moor Chip Carving knife.
1 Upper right – Shows a bull nose chisel with a narrow handle. The handle sets forward in my hand, allowing the fingers to move the tip of the blade through detailing work.
2 Lower left – Shows a Large chip carving knife that fits my hand perfectly. The finger roll completely around the handle without the need for extra tension to secure the handle in my palm.
3 Lower right – Shows a large handled carving hook which is too large for a good fitting grip for my hand. The handle has been pushed into the palm area and my finger need a tighter grip to secure the handle during use.
Old World v. Modern Day
Yes, sloyd knives, carving hooks, and scoops are traditionally used in the Old World style of spoon carving. Traditionally these knives and tools have extra wide handles as shown in the top three tools in the upper left photo above. Those wide handles were made to fit a medium to large man’s hand, because until about 100 years old traditionally woodworking and wood carving was done by men.
Today what is necessary is having and using a bench knife that fits your hand properly. Today it is reasonable to estimate that one half of all carvers are women, with smaller hands and therefore narrower grips than men.
While writing this and talking with my husband, a long time woodworker, we did a small comparison. His hand, a medium-sized man’s hand, measures 7 3/4″ long from the finger tip to the wrist bone of the thumb … mine measures 6 1/2″. His hand measures 3 3/8″ wide across the knuckles, mine measures 2 7/8″. While his hand is large enough to comfortable hold a Sloyd knife, mine simply isn’t.
Humans are a dimorphic species – males tend to be about 10% larger than females. Therefore in general what was used for centuries by a male population of woodworkers and wood carvers may not be appropriate for today’s mix of hobby carvers.
Conclusion
It’s not what knife you use, it’s not about a particular manufacturer’ or Old World style … it’s all about whether that knife fits YOUR hand.
PS … And that is why I never recommend ergonomic grip tool handles as they only fit one person’s hand, he who made the handle mold in the first place.
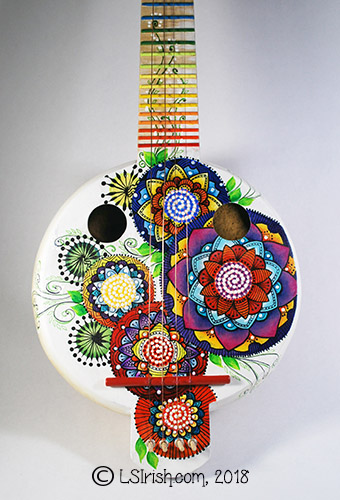
…you unite the joy of gourd art crafting, the joy of bright and vibrant colors, and the joy of music? You create this joyous gourd banjo with copper wire strings.
An extra large kettle gourd with some damage around the stem area inspired this fun gourd musical instrument project. While I did not take step-by-step photos … I was too involved in the fun of creation to remember … I will share four easy ‘secrets’ that made the construction quick and accurate.
Supply List:
The general supply list is posted on the image below. Please click on this image and save it to your desktop.
1. How to cut any gourd along a perfectly level, accurate circumference line.
Clean and prepare the outer surface of your gourd as you normally would. Wipe any sanding dust from the outer surface with a damp cloth, then allow the gourd to dry completely.
Visually estimate where you want the cut line along the circumference. Make a mental note as to which area of the gourd you will be using (the down side) and which area you will be removing (the up side).
Fill your kitchen sink 2/3’s full of water. Hold your gourd throughout this step as level to your visual cut line as possible. Place the down side – the side of the gourd that will become your project – into the water. Push it down until the bottom is covered with water and the surface of the water is at your visual cut line.
Lift the gourd up from the water carefully. Your gourd will have a perfectly level, perfectly straight, perfectly even wet line around the circumference of your gourd. With a soft #2 to #4 pencil mark the edge of the wet line. You are ready to cut.
This is a great technique when you have an odd shaped gourd that has an un-level top. Plunge your gourd into the sink water until the bottom sits firmly against the bottom of the sink. The water line will now be an even measurement from the bottom of the gourd, making a perfectly level cut line.
2. How to sand any gourd top cut evenly and level.
While you are at the hardware store buying birch plywood for the face of your banjo, purchase three or four extra pieces. You will also need two sheets each of 100-, 150-, and 220-grit sandpaper, spray adhesive, and 1″ wide masking tape.
Work in a well ventilated area. Lay a strip of masking tape along one edge of the plywood. Your plywood is 12″ wide, while your sandpaper is only 11″. The tape protects the extra plywood from the spray adhesive.
Spray an even coating of adhesive over the 12″ x 12″ sheet of plywood. Lay one sheet of 100-grit sandpaper onto the board, aligning along the top edge – opposite of the tape. Lay a second sheet of 100-grit sandpaper against the first, so that the entire board is covered with sandpaper. Press firmly into place. Remove the masking tape. Let the adhesive dry well.
Cut off the extra 4″ strip of extra sandpaper that extends off the board.
Repeat these steps for your 150- and 220-grit sandpapers.
Clamp the board to a firm surface, your work table. You can lay your cut edge of the gourd onto the board and move the gourd in circular motions to evenly, and quickly sand the edge perfectly flat. Work the gourd through the three stages of sandpaper grit, starting with the 100-, then the 150-, and finishing up with the 220-grit.
3. How to fill the joint line between the gourd’s cut edge and the plywood face.
Even with the most careful cutting and sanding you can have small gaps in the joint between the plywood face and the gourd walls. Fill the gaps with Modeling Paste, also called Sculpture Paste. This is a water-soluble, acrylic-based, medium thick paste that dries quickly and can be sanded smooth.
Follow the directions on your jar. I prefer to lightly dampen the area that I will be filling. I let the area dry until there are no shiny, wet spots then fill the area with a light layer of modeling paste. Let this layer dry completely and lightly sand. If the area is not completely filled I repeat the application. Thin layers are easier for me to control, shape, and sand. Plus thin layers dry more evenly than thick applications.
Modeling paste – sculpture paste – can be painted using your craft acrylic colors. It’s perfect for those gourds that have rough or pitted areas on the surface!
A quick trick to insure that your jar of modeling paste lasts a long time is to thoroughly clean the jar rim and the inside of the lid after every use. Cut a square of plastic clinge wrap about 2″ larger than the jar opening. Place the plastic clinge wrap onto the jar’s opening, then put on the lid. The wrap seals along the jar’s rim, preventing your paste from drying out.
Like many crafters you have only so much limited time to create and craft. Do you want to spend that time actually working on your project or on researching, designing, and refining the pattern you will use?
We have over 3000 line art and craft patterns, ready to download directly to your home computer, in a huge variety of themes, ideas, and designs – Wildlife, Celtic, Wood Spirits, Architectural Accents, Landscapes, and so much more.