beginners project

Quick Wood Carving & Pyrography Clamps

My Dad, an avid wood worker and gun stock carver, always insisted that nails and screws were only little clamps to hold the wood together until the glue dried!  Words of wood wisdom.

Glue is the agent that gives any joint its strongest bond.  But for the best joint the wood pieces need to be clamped tightly until that glue is thoroughly dried – for many wood glues that is at least 24 hours.

But what do you do when your wood, or gourd shape does not fit any of your regular wood clamps and you don’t want to use nails or screws?

Let’s look at a few quick clamps that can be made out of common household items and that can be adjusted to fit any size or shape.


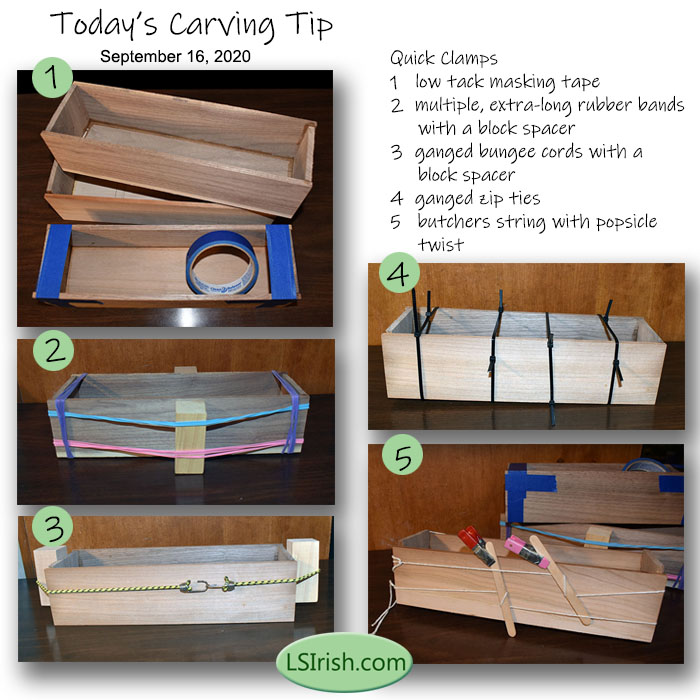
This is a set of 3 pound molds for handmade soap
that I was ‘quickly’ throwing together – too big for my
small wood clamps, but perfect for this Today’s Carving Tip!


Low tack masking tape makes a great, disposable clamp.  Available in many widths, up to 4″, the tape can be wrapped multiple times around your project to make a tight tension on the joint.  Because it is low tack it does not leave glue residue to the project surface, which is wonderful when working gourd art.

2 Large rubber bands can be purchased from most office supply stores, usually by the pound box.  They come in a variety of lengths and can be used over and over again.  Look for extra wide bands when you go shopping, 1/2″ to 1″ wide bands are available and provide greater strength.

3 Bungee cords can be ganged to become a flexible clamp for your work.  I use smaller bungee cords, and simply lock one to another until I have a nice tightness.  Spacer blocks, as the  1 1/4″ basswood carving block shown here, can now be slid beneath the bungee cords to give you the tightest pressure.

4 Zip ties have become an every day item around the house and they use as wood clamps is invaluable.  Gang zip them, tighten them a little at a time so each tie is even, and simple cut them off when you are done.

5 Butcher’s string is thick, cotton, two to three ply twist cord which is perfect for really odd shapes, such as a gourd art project.   Wrap the string around your project and tie as tightly as possible.  Repeat, so that your clamp has several independent strings tied around the joint.  Working one string at a time, slide a popsicle stick, tongue depressor, or 1/4″ or wider dowel rod under the string.  Gently twist the stick to wrap the string around the stick’s center.  When you have the string as tight as you can twist secure the stick with a small clamp or with several clothes pins.

Next time you are cleaning those kitchen drawers or odd boxes, make up a quick clamp kit to keep in your wood, gourd, or pyrography studio – on hand and ready to go.

Quick Wood Carving & Pyrography Clamps Read More »

Pyrography Cleaning Graphite Tracing Lines

September 15, 2020

This morning I am working on getting your supply list ready for the Feathered Green Man Leather Journal Pyrography Project and came across a few photos on how to clean the graphite tracing lines from your wood burning project that I thought I would share.

I prefer to either use a  graphite tracing paper or graphite pencil lead rubbed over the back of my pattern my paper as my tracing media.  Graphite leaves a pale to medium gray line on our working surface that has no oil or wax, and therefore is not a permanent marking.


I do like to remove those tracing lines as early in the burning as is reasonable and will even do an extremely pale tonal value burned line before any shading work is done just so that I can erase the graphite right away.

A white artist eraser works wonderfully for wood and gourds.  These are our rougher wood burning surfaces.  Do not use an eraser that has any coloring ( that pink one on the end of your bright yellow #2 pencil) to it as the color dye can rub off onto your project.

An architect’s eraser pad – a fine mesh cloth bag filled with eraser grindings – is perfect for our finer medias as paper, leather, and chipboard (paper mache).  Since the eraser bag is flexible it works well for wood carvers that want to remove any carbon build-up from their wood burning details on the carving.


A dry ‘Magic’ eraser not only removes the graphite lines from your leather or wood project, it also picks up any oil and dirt that has been left from moving your hand across the surface.

In the photo sample above, Feathered Green Man Leather Journal Pyrography Project, I first cleaned the graphite tracing using my Architect’s eraser pad.  Then I followed up with a light cleaning using the dry ‘Magic’ eraser … and,wow!, was I surprised at how much more dirt I picked up …

That ‘Magic’ eraser is now a permanent addition to my pyrography tool kit.


Pyrography Cleaning Graphite Tracing Lines Read More »

Wood Carved Ice Fishing Decoys

During the  America Depression ice fishing decoys were a major way to put food on the table.  Today they are a fun, delightful carving subject that lends themself to brilliant coloring.  This post will look at a coloring/painting technique called Rouging, as shown on our middle red-orange metallic goldfish.

Below are three samples of ice fishing decoys, all worked off the general body shape of a comet goldfish.  Measuring between 6″ x 4″ to 7 1/2″ x 4″, worked in basswood, the top fish is sprayed with a copper metallic finish.  Our second fish has been roughed using oil paints and linseed oil over the same copper metallic, and the bottom fish is painted using craft acrylics over a lime green spray base.


Ice decoys were made from what ever materials the carver had on hand.  A scrap of wood, maybe an old license plate or piece of scrap metal for the fins, and roofing nails for the eye; these decoys are a major part of American folk art.

My carved samples are worked in basswood for the body shape.  The fins are cut from 30 gauge copper sheeting, which can easily be cut using a pair of craft scissors.

To insert the fins into the body I use my shading tip of my wood burning tool on my hottest temperature setting to literally burn a thin trough into the decoy.  While I have my burning unit on the table I can add small details to the body as scales, center lines, and even cross hatch patterns.

Remove any burned dust from your fin troughs then insert and set the copper fins with super glue.  To fill in the small gap between the burned trough and the metal fins I use Liquitex Modeling Paste – an air-dry polymer mixture that dries extremely hard without shrinking.   You can see the white line of modeling paste between the top fin and body, below.

After the decoy was thoroughly dry, sanded and dusted, I gave the fish two light coats of copper metallic spray paint.  Allow that primer layer to dry for several hours. I used t he spray paint as my base to avoid any brush strokes that might come from a hand-brushed primer.

Rouging is worked over a heavily antique project or a metallic base using artist oil paints, boiled linseed oil, and gloss acrylic spray sealer.

Place a small amount of each oil paint on a palette – I am using lemon yellow, cadmium yellow, cadmium orange, and cadmium red.  Oil paints are transparent colors that have no white, black, or gray base.  So as we work the color of the paint will clearly allow the color and sheen of the metallic spray to show through.

1  Lightly dampen your ox-hair brush in boiled linseed oil.  Blot as much of the oil off the brush as you can.  Next, pick up a very small amount of color on your brush tip.  I like to rub the color into the tip on the same area of paper towels as I just blotted the oil from my brush.

2  Gently rub one coat of linseed oil thinned color onto each area of your project.  I use a circular motion where the brush just barely touches the fish … just like applying your make-up rouge.  You should barely be able to see any color application with this first coat.  Let the oil paint dry for about 15 minutes.

3  Now, give your fish a light coat of gloss acrylic spray sealer.  Let the sealer dry for about 1/2 hour.

4  Repeat steps 1 through 3 over, and over, and over again.  And now repeat some more.

With each repeat you add an extremely thin layer of transparent oil color followed by a layer of gloss shine all on top of your metallic base.  The decoy below has about 8 to 10 coats at this stage.


The finished technique gives you this deep layering of bright color, sparkle and shine, that also allows the metallic sheen to come through the work.  This is similar to Chinese lacquer ware or enameling, in its effect.

For a little contrast I did add solid acrylic black eyes, black and white dots along the spine, and a little splatter of metallic gold paint to the fin ends.  With one last coat of gloss spray sealer this little bit of folk art is ready to hang.


Wood Carved Ice Fishing Decoys Read More »

Free Chip Carving Wood Carving Pattern

You can add color and paint to your chip carving projects to create a vintage look to your wood carving.  This is especially effective for chip carving projects that developed minor flaws as chip outs, double cuts, and wobbly lines.   Begin by painting a primer coat of acrylic craft paint to your entire project.  Here I am using a loose mix of ochre, mustard, and white to give my primer coat variations in tones.

Chip Carving E-Project at ArtDesignsStudio.com

FREE CHIP CARVING WOOD PROJECTS

removable spray adhesive chip carving patternSharpening Your Chip Knives
Positive and Negative Space in Chip Carving
Chip Carving Seminar
Chip Carving Supplies
Chip Carving Graphed Patterns
Chip Carving Hand Positions and Grips
Chip Carving – Cutting Triangle and Square Chips
Chip Carving – Cutting Straight-Wall, Curve-Wall, Free Forms
Chip Carved Chess and Game Board
Chip Carving – Sampler Layout Pattern
Chip Carving Common Mistakes
Chip Carving Shortbread Cookies


Individual motif areas of your chip carving can be painted in complementary colors to emphasis the change in the chip shapes, depth, and design.  Again, note that since we want a vintage look I am not working towards a solid, opaque coloring anywhere on the chip carving plaque.

Allow the base acrylic color to dry thoroughly.  You can at this point give your plaque several very light coats of spray sealer, which limits how much of the oil stain can grab into the wood.  For my project I applied one coat of burnt umber oil paint mixed half and half with boiled linseed oil.

With a clean cloth, wipe off the oil stain working with the grain direction of your wood.  You can dampen your cloth with turpentine to remove any excessively dark stain on the high areas of the chip carving.


Let your stain coat dry completely.  This can take several days depending on how thick the oil is in the deep chip cuts.  Using 220-grit sandpaper lightly begin to sand your chip carving.  The sandpaper will clean the high ridges between the chip cuts and distress the large, un-carved areas, creating a wonderful vintage look.

Clean the sanding dust with a tach cloth and apply your favorite finish.

This little chip carved fish decoy is found in our
Whittle Fish Decoy Carving E-Project, and in
Finishing Techniques for Wood Crafters.


Free Chip Carving Wood Carving Pattern Read More »

Wood Burned Pyrography Free Bird Pattern

This little “Let the Stress Begin” Bird Pattern for pyrography and wood carving is worked on a mini-clipboard that measures 6 1/2″ high by 4″ wide.  The outer 1/2″ edge of the clipboard was covered with painter’s tape after the pattern was traced.  This protects that area of wood from being burned and when it is removed you have a clean, straight-lined border.

This is a simple silhouette burn on a high setting for your wood burning tool for the bird’s outline and body fill.  The background grass was worked using a ball-tip pen on a medium temperature setting.

The white and yellow were added after the pyrography was completed using acrylic craft paints.  After they dry finish your wood burning using your favorite spray sealer.

Please click on the image above to open a new window with the full-sized – 7″ x 10″ – pattern.

Please click on the image above to open a new window with the full-sized – 7″ x 10″ – pattern.

Wood Burned Pyrography Free Bird Pattern Read More »

Scroll to Top