Crafting with Gourds
 Gourd Art at LSIrish.com Gourd Art at LSIrish.com
Gourds make a wonderful base for many of our favorite crafts – wood carving, wood burning, decoupage, and sculpture painting. In these projects we will learn how to clean, cut, prepare, and decorate dried craft gourds. |
 Bee, Bug, and Seed Gourd House Roof Decorations Bee, Bug, and Seed Gourd House Roof Decorations
Begin this free, online dried craft gourd art project with our Basic Constructions step-by-step page. Then enjoy how to create your roof accents on our Bee House Roof Accents page, and the Bee House Gallery page. |
 |
 |
 |
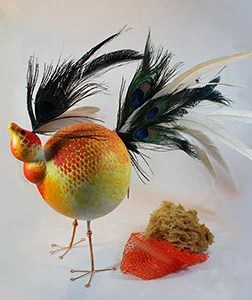
| In-depth tutorial coming soon! I am working on posting over the weekend – March 29, 2024 Discover how easy and fun it is to cut and glue gourd together to create new shapes. In this free online project we will explore the basic steps needed to make your own crafty bird gourds. |
||
 |
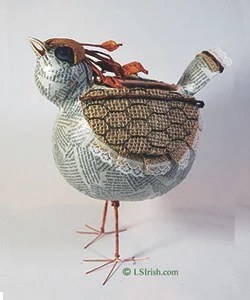
| String House Decoupaged Gourd Art
Free online gourd art beginner’s project Any natural fiber material can easily be collage to the surface of your gourd using archival white water-based glue. This fun bird house uses paper coffee filters, cotton cheese cloth, burlap, garden twine, and cotton cord to create a riot of texture. When the collage work is dry we will use oil pastels to brightly color the high ridges of the texture. |
 Crafting with Gourds Crafting with GourdsLora S Irish Available at Amazon.com |
Crafting with Gourds Building, Painting, and Embellishing Birdhouses, Flowerpots, Wind Chimes, and More (Fox Chapel Publishing) 14 Step-by-Step Projects for Natural, Seasonal Décor from Lora S. Irish Paperback – October 8, 2018Transform ordinary gourds into extraordinary art!14 step-by-step projects with bright, beautiful project photography Learn to make delightful wind chimes, birdhouses, pitchers, flower pots & decorative figures Covers a variety of color media, including colored pencils, watercolor, acrylics, oils, pastels, gel pens, & more Explains all the gourd basics including selection, cleaning, cutting, shaping, surface prep, transferring designs, & finishing Crafting with Gourds will teach you an amazing array of techniques for creating unique and attractive décor! This complete artist’s guide to gourd crafting provides useful tips & techniques on a wide range of color media, from craft acrylics and artist’s oils to pastels, watercolors, colored pencils, gel pens, and more. |
| Braided Raffia Gourd Rim This step-by-step Autumn Bird Nest Gourd project focuses on a simple braided raffia rim that you can use for your gourd art. |
 Free online gourd art projects Free online gourd art projects |
| Wood Spirit Gourd Mask Some hot glue, copper foil, electric wires, vintage and damaged jewelry pieces, some thick cotton yarn, and a pair of old glasses quickly turned a practice gourd scrap into an Urban Warrior Gourd Art Mask. |
|
| Wood Spirit Gourd Pencil Jar This Wood Spirit Colored Pencil Gourd is worked along the same technique as our free online gourd art project, Wood Spirit Gourd Mask, an in depth tutorial that will take you through all of the steps to create your own acrylic paint and colored pencil face painting. |
 |
Creating Gourd Art Musical Instruments – Banjo
What happens when you unite the joy of gourd art crafting, the joy of bright and vibrant colors, and the joy of music? You create this joyous gourd banjo with copper wire strings. An extra large kettle gourd with some damage around the stem area inspired this fun gourd musical instrument project. While I did not take step-by-step photos … I was too involved in the fun of creation to remember … I will share four easy ‘secrets’ that made the construction quick and accurate. |
| Coloring Wood Carving, Pyrography & Gourd Projects
Our navigation page for all coloring instructions for wood carving, pyrography, gourd, and craft projects
|
Color Theory by Irish Free PDF Download Free PDF Download |

 Wildlife Elk Patterns Wildlife Elk Patterns |
 Mushroom Spirits Mushroom Spirits |
 Architectural Icons Architectural Icons |
| Visit our pattern website ArtDesignsStudio.com for more fun patterns, ideas, and designs to use in your next craft project. |
||
Crafting with Gourds Read More »


