wood burning

mallard duck wood burning

Fading Wood Burnings
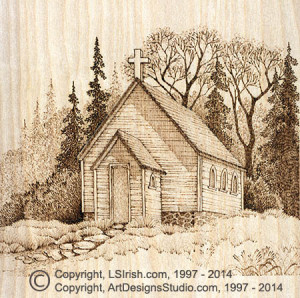
Country Church Wood BurningWith time and age your wood burning and pyrography designs appear to fade into the wood, losing those sharp, dramatic contrasts and very pale tonal values.  Recently, while cleaning our studio, I came across several of my very first wood burned projects, which are perfect examples of how as wood ages it develops a distinct patina which directly affects to look of our wood burning tonal values.

This Country Church, right, was burned in 2004 for the Great Book of Woodburning.  It is worked on birch plywood using a variable temperature burning unit and a looped tip pen.  The image that you see is from the original scan made for this book.

Notice how clean and white the background wood appears.  The burning shows as a neutral dark brown to pale beige hue, and there is a wide range of tonal values throughout the burning.
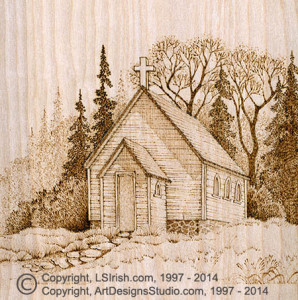
Country Church Pyrography ProjectHere is a scan, made this morning, of the same wood burning, ten years later.    The birch has taken on a rich pale red hue and a darker tonal value in the grain lines.   With age and time, wood naturally darkens in tonal value, and the results of that darkening process is called patina.

When the wood grain is exposed to air the wood literally begins to rust through oxidation.  The minerals in the natural oils and sap begin to darken into deep orange, red, and rust tones, changing the coloring of both your wood and your wood burning.

In the 2014 scan of this Country Church pyrography you can see the red tones of the oxidized patina.  Because that patina is behind the burned lines and shading of the pyrography work, the burned  design has also taken on a reddish tone.

Since all of us wish for our pyrography projects to last the test of time, at the very start of your next project you need to consider and adjust for the patina that your wood will develop in the years to come.  Sugar pine will darken to a deep, rich orange coloring.  Your fresh white basswood will move into the yellow-beige tones, and the neutral beige of your birch will become a medium rusty-red with time.  Poplar can move into golden-yellow hues and a freshly cut piece of pink-beige mahogany can become almost black-red within a decade or two.

By knowing what patina color your wood will finally develop, you can plan ahead to work your tonal values in the darker ranges to adjust for aging.  You may also need to adjust your pale tonal values.  Notice in the two images, right, that the fine grass in the foreground, just below the church door is beginning to disappear.  The original temperature setting for this grass created a pale burn line that now is close to the patina tonal values of the wood.
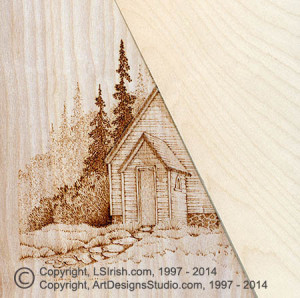
Country Church wood burning projectWhile the two burned images, above, may not seem that dramatic, when I do a side-by-side comparison of the ten-year old Country Church burning against a new, fresh piece of birch plywood you can see it’s not the burning that has faded but the wood that has darkened.

You can not avoid a wood developing a darker patina with time, but you can delay it.  Which wood finish you use can change the coloring of the wood.  Oil finishes and some varnishes create a pale yellow cast, polyurethane and acrylic sealers then to be very clear.  Use a sealer that has UV light protection.

Do not hang or display your finished projects in direct sunlight, nor directly near a heat source as the furnace vent or under a high wattage lamp.

Normal accumulation of dirt and oil can added to the effects of aging.  Lightly wash the surface of your projects with a damp, slightly soapy cloth, then rinse with a lightly dampened cloth.  For heavy dirt use Murphy’s Oil Soap.  It’s excellent for both wood burnings and wood carvings.
 

Fading Wood Burnings Read More »

Color Chart for LSIrish.com

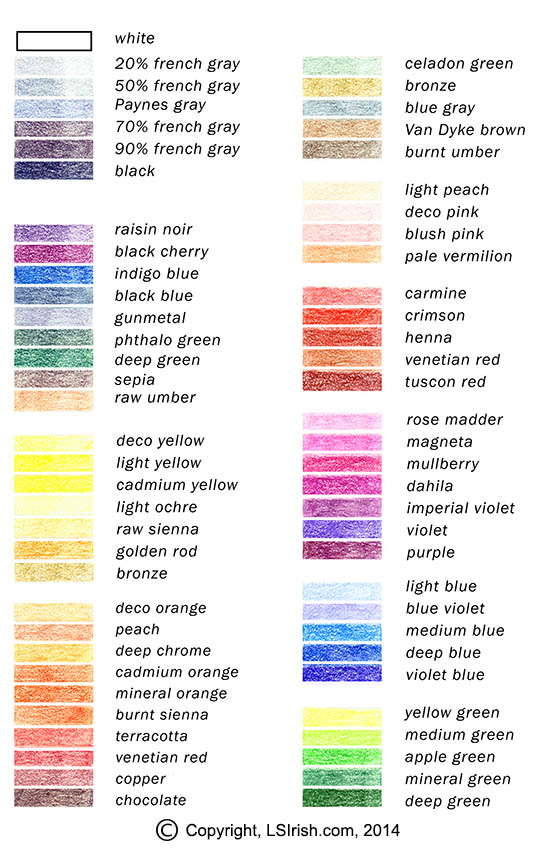
Mike A.,  Hooker green is equal to the phthalo green shown in the left column, second grouping.  A medium red-brown earthtone is equal to the venetian red, right column, third section!

Mike A. and his wood carving club are currently working as a group through our Canada Goose Relief Wood Carving Project – a great step-by-step project for any beginning wood carver.  He sent an email yesterday asking several questions on the paint colors used in this tutorial.  So, I am posting my favorite color chart guide here on our blog for Mike.

The chart is grouped into several areas for easy reference.

Left hand column, top shows the basic gray tones for neutral shading.  French gray tends towards a beige-gray or brown-gray coloring, and Paynes gray tends towards a glue-gray or gunmetal tone.  The second group shows the dark color tones used in colored pencil work for complimentary shading, where the compliment of the final color of an area is used to create the shadow tones.  The third section is my favorite graduated colorings for yellow.  The bottom group in the left hand column shows my skin tone colors.

In the right hand column, the top section shows my muted tone shading colors.  The remaining sections show my chosen graduated tones for pink, red, purple, blue, and green.

Every paint, pencil, and pastel company has their own unique names for their colors. I would recommend that you keep a copy of this painting guide on your computer.  You can print a copy, then write the manufacturer’s names of the paints you already own beside the matching color swatch.

To learn more about working with colors – hues, compliments, tones, and values – please visit our tutorial Who is R.G. Biv?  For working with watercolors for your pyrography projects, please see Watercolors and Wood Burning.  For more information on how to paint your wood carvings, you will want to take time reading our Painting Your Wood Carving tutorial.

Click on the color reference chart for a full-sized image.  Right hand click to save to your Desktop.

Lora Irish color chart

Color Chart for LSIrish.com Read More »

pyrogrpahy doodles project

Pyrography Doodle #7

Today we will put our Mushroom Pyrography Doodle project together to create a desktop note board.  The finished project also makes a great recipe holder for your kitchen.  If you are just joining this project, please follow the links below for the free step-by-step insturctions and pyrography pattern for this free Lora S. Irish wood burning pattern.

Pyrography Doodles
Pyrography Doodles #2
Pyrography Doodles #3
Pyrography Doodles #4
Pyrography Doodles #5
Pyrography Doodles #6
Pyrography Doodles #7

Please drop by our carving and pyrography pattern website, Art Designs Studio, to get your free mushroom pyrography patterns that complement this project.  The pattern package is on our home page.  The links to the previous posts for this free project are below.

Pyrography Doodle Mushrooms Project, step 15Step 15:Finishing Your Project

1. Lightly sand your work using a fine grit nail foam core pad or board. Wipe any sanding dust with a dry cloth.

2. Cut your cork board to 5 1/2” wide x 10 1/2” high, using a sharp craft knife. Round the corners using a jar or bottle lid as your guide.
Cut a sheet of computer paper the same size and shape as the cork. We will use the paper to protect the cork during the sealing steps.

3. Spread an even layer of yellow carpenter’s glue to the back of the cork board. Lay the cork onto your plywood, 3/4” from the right side of the plywood and 1/2” inch from the top – aligning it with the burned design.

4. Lay several heavy books on top of the cork, to apply pressure, and allow the glue to dry completely.

5. Using hot glue, circle the outer edge of the cork board with one strand of sea grass. Begin your gluing at the center of the bottom edge of the cork.

6. Using hot glue, circle the outer edge of the plywood with one strand of sea grass. Begin your gluing at one lower corner of the plywood.

7. Lay the cut computer paper over the cork area of your project.  Thumbtack into place. Use a spray sealer, following the directions on the label, to seal your burning. The computer paper will protect your cork from the spray application.

8. Cut your basswood board to measure 12″ long by 3 3/4″ wide. Draw a diagonal line from corner to corner on the basswood. Using either a small cabinet saw or your craft knife, cut along the line to create two triangles. Sand the cut edge of each triangle piece of basswood. Using yellow carpenter’s glue, glue the triangle supports to the back of the plywood to create legs. Place the basswood legs 2” from the sides of the plywood, with the long diagonal cut edge against the plywood.

Thank you for joining me in this fun pyrography, wood burning project.

Pyrography Doodles Pattern Pack by Lora IrishThat’s it!!!  If you are ready for more great patterns and designs that you can use in your pyrography doodle projects please see our new Lora Irish pattern package, Pyrography Doodles at Art Designs Studio.  This exclusive package includes 300 doodle designs that you can use in your pyrography, 26 carving and pyrography patterns, 10 finished doodle samples, and 3 border patterns.

Pyrography Doodle #7 Read More »

pyrography doodle project by Lora Irish

Pyrography Doodles #6

Let’s finish up the pyrography wood burning steps for our Doodle Mushroom design.  During these steps we will fill the large mushroom’s stem, work the foreground mushrooms, and then work a general check of the work accomplished.


Please drop by our carving and pyrography pattern website, Art Designs Studio, to get your free mushroom pyrography patterns that complement this project.  The pattern package is on our home page.  The links to the previous posts for this free project are below.

Pyrograhy Doodles Page 1
Pyrograhy Doodles Page 2
Pyrograhy Doodles Page 3
Pyrograhy Doodles Page 4
Pyrograhy Doodles Page 5
Pyrograhy Doodles Page 6
Pyrograhy Doodles Page 7

Pyrography Doodle Mushroom, step 12Step 12: Pattern Fill the Stem

The large mushroom stem uses a large flower design with a curve-sectioned center, a ring of small spirals, and then layers of serrated petals.  Use the serrated petals to fill the space between your flowers.


Pyrography Doodle Mushroom, step 13Step 13: Working the Front Mushrooms

Follow the doodle pattern placement guide and work the foreground mushrooms.  Use a dark-medium setting throughout this burn.


Pyrography Doodle Mushroom, step 14Step 14: Finishing the Shading

Check your shading to strengthen any area that needs deeper tonal value work.  Also check your doodle patterns for tonal value.  You can re-burn any doodle pattern to add more value, if needed.


Tomorrow we will do the finishing steps to turn this Pyrography Doodle Mushroom wood burning into a desktop note board or kitchen recipe board.  See you then and thank you for reading.

Pyrography Doodles #6 Read More »

mushroom pyrography doodles by Irish

Pyrography Doodles #5

Today we will fill the top of the mushroom cap with a large doodle pattern, then adding graduated shading to the cap.  Please drop by our carving and pyrography pattern website, Art Designs Studio, to get your free mushroom pyrography patterns that complement this project.  The pattern package is on our home page.  The links to the previous posts for this free project are below.

Pyrograhy Doodles Page 1
Pyrograhy Doodles Page 2
Pyrograhy Doodles Page 3
Pyrograhy Doodles Page 4
Pyrograhy Doodles Page 5
Pyrograhy Doodles Page 6
Pyrograhy Doodles Page 7

Pyrography Doodle Mushroom Project, step 9Step 9: Doodle the Top Cap

The pattern on the mushroom cap is a very large flower pattern with long leaves, butterflies, and small daisies.  Begin the large flower at the top of the mushroom cap.  As you work the doodle pattern towards the outer edges of the mushroom cap begin filling using small daisies.  Add as many butterflies as you would like.


Pyrography Doodle Mushroom Project Steo 10Step 10: Shading the Cap

A second shading is worked over the entire large mushroom to deepen the tonal value along the outer edges and behind the leaf curl.  Leave the mushroom spots unworked, the white of the wood.


Pyrography Doolde Mushroom Project, STep 11Step 11: Working a Second Layer of Shading

To push the background leaves even deeper into the design, a third layer of shading is added.  Please follow the shaded drawing guide for your shading placement.

Please remember these are large images that you can right-hand click and save to your desktop.

See you tomorrow!

Pyrography Doodles #5 Read More »

Scroll to Top