wood burning

Pyrography Doodles by Lora Irish

Pyrography Doodles #4

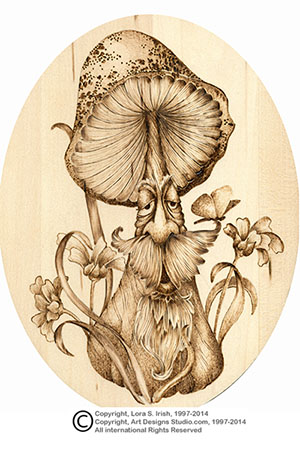
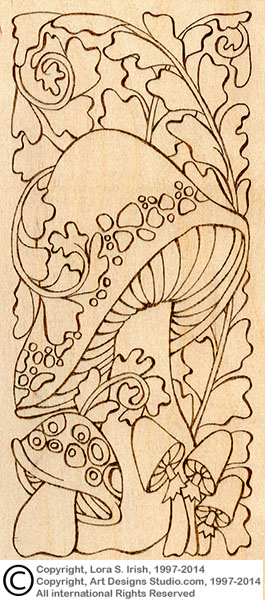
Small doodle patterns can be used to create the fill textures inside the sections of any pattern, adding delightful little designs to your work.  Those doodles can be repeat patterns, random fills, or large, fully complete designs.  In today’s step we will work a large floral pattern in the underside of our mushroom cap.

To provide a clear, easy-to-follow, easy-to-print image, the photos on this page are fairly large.  Please be patient as they load to your browser.  Click on any of the images to open them, full sized, in a new window.  Right hand click on the image and save it to your desktop.


Pyrography Doodle Mushroom by Irish, step 6
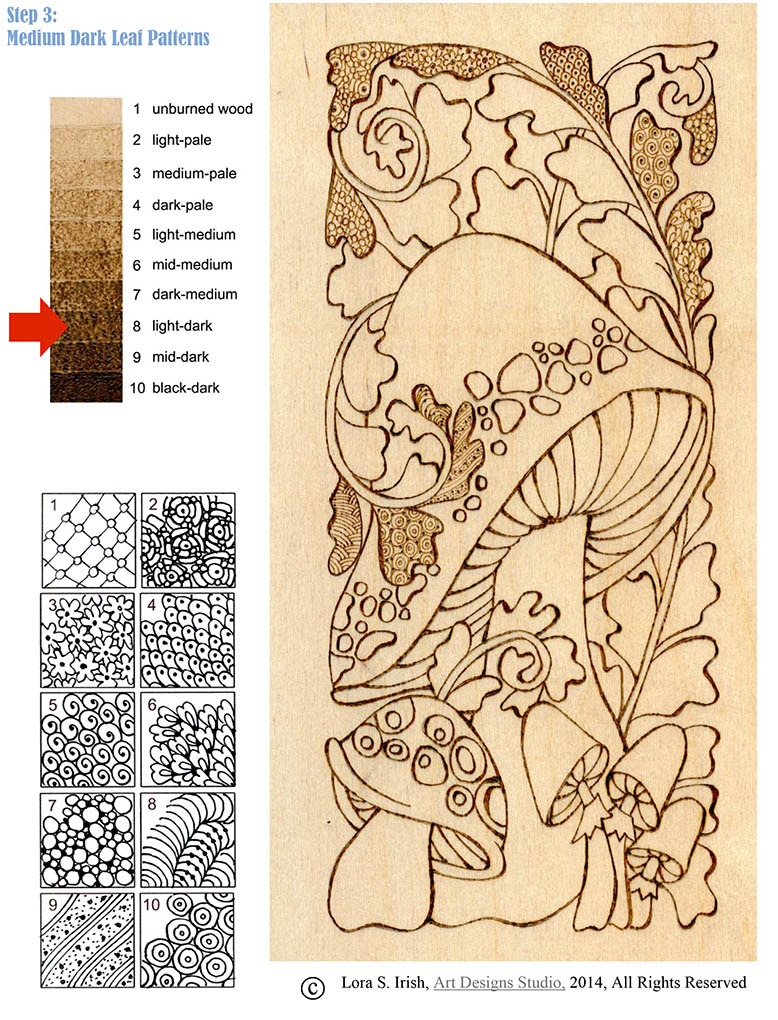
Step 6  Completing the Leaves

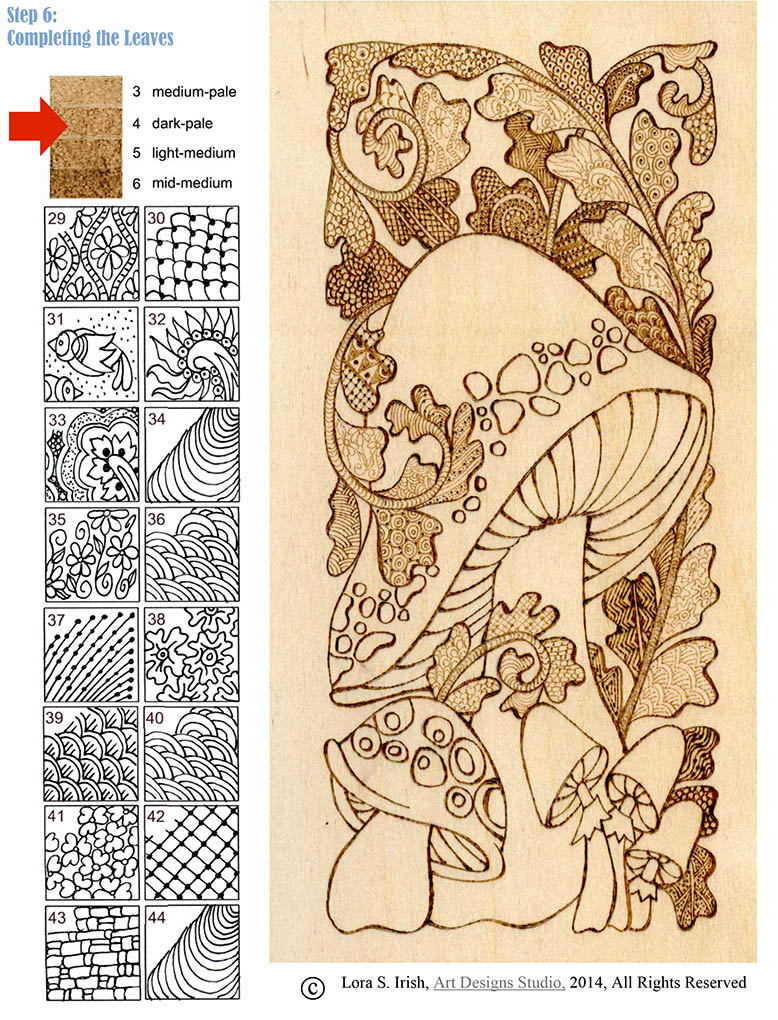
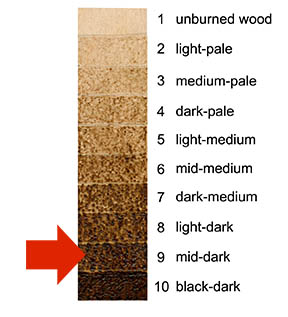
To create more tonal values in the overall mushroom design, turn your temperature setting down to a dark-pale setting. Work the doodle fill patterns into each section, following the pattern guide. Note that the designs and patterns of the doodles are still strong even though they are worked at a pale value.

If you missed the beginning posts to this free pyrography project:
Pyrograhy Doodles Page 1
Pyrograhy Doodles Page 2
Pyrograhy Doodles Page 3
Pyrograhy Doodles Page 4
Pyrograhy Doodles Page 5
Pyrograhy Doodles Page 6
Pyrograhy Doodles Page 7

Pyrography Doodle Mushroom by Irish, step 7
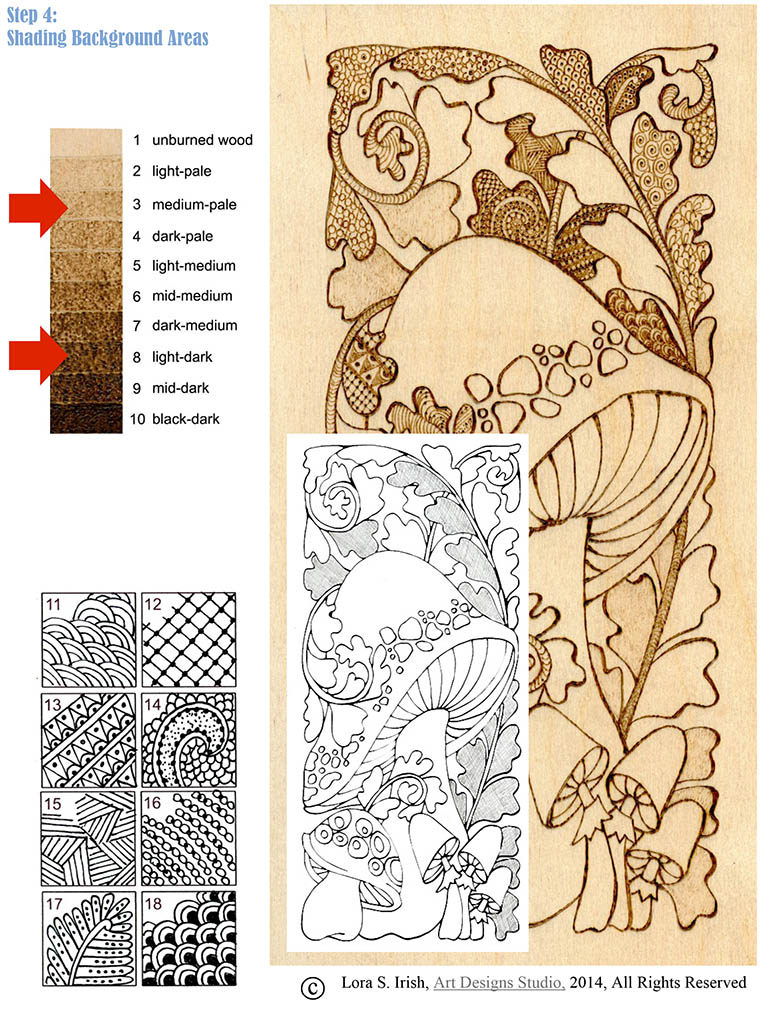
Step 7: Shading the Mushroom

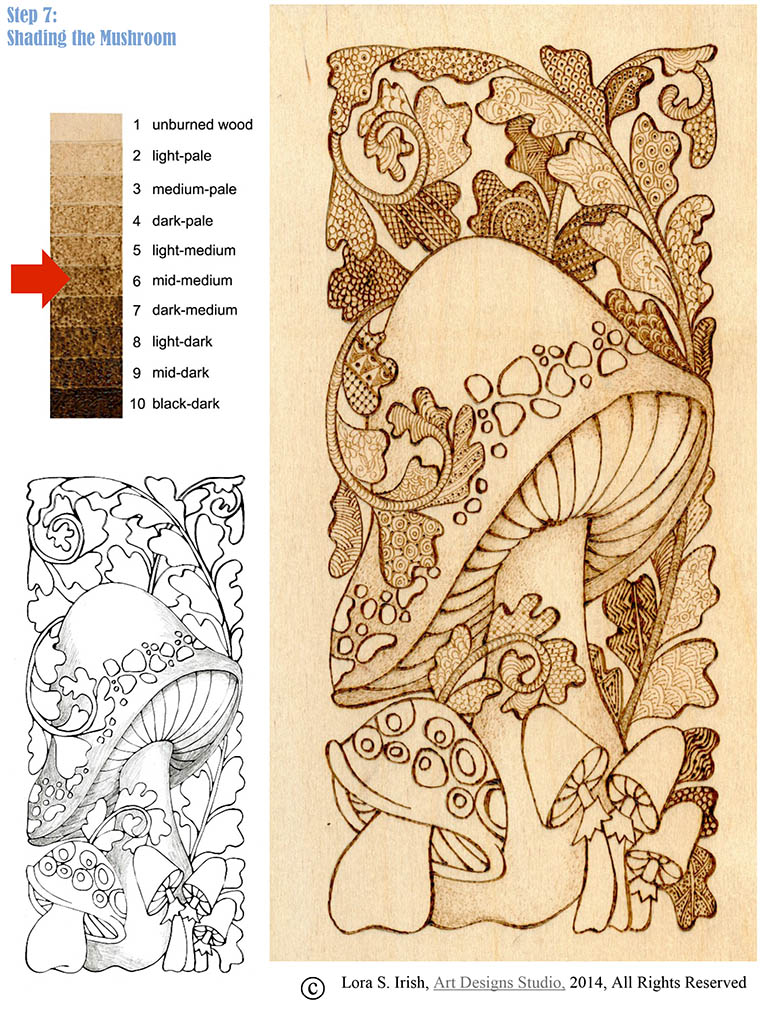
Using a common fill pattern, shade the mushroom cap, underside, and stem. Work the shading on the left side of each area, with the darkest tonal values along the outer edge of each area. Follow the shaded drawing for placement.


Pyrography Doodle Mushroom by Irish, step 8
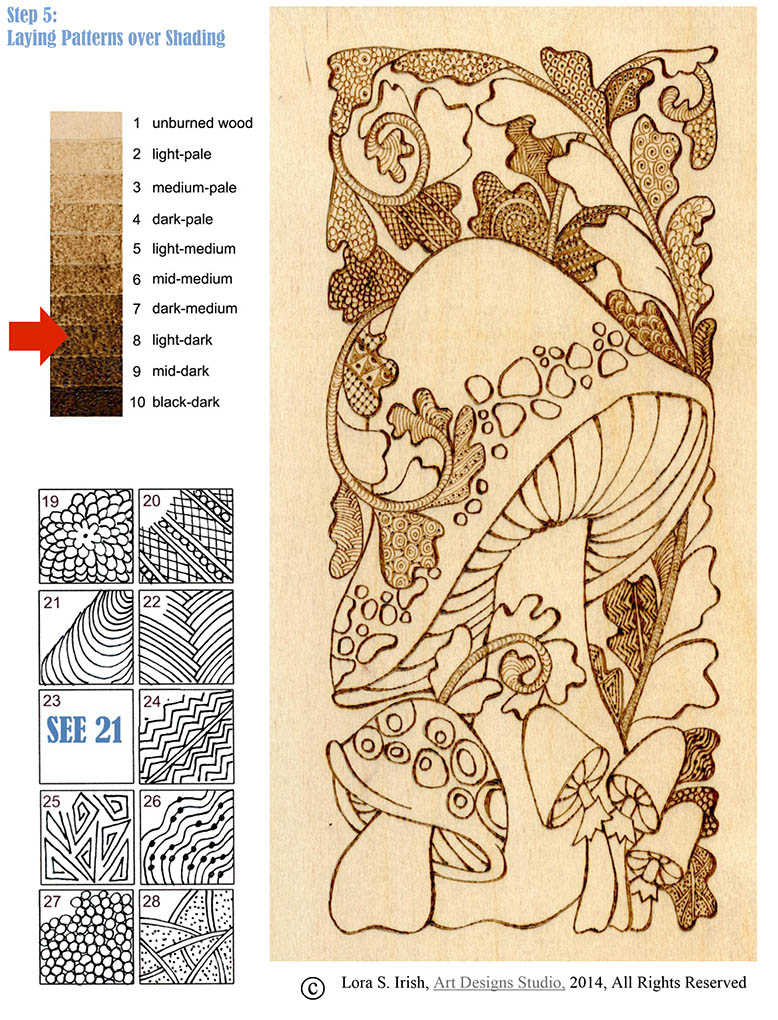
Step 8: Fill the Underside of the Cap

Fill the underside of the mushroom with the large flower pattern shown on that step page. This pattern features a double scroll center with an inner ring of five petals and an outer ring of scalloped petals. Add more scalloped petals between the flowers to fill the space between each flower.

For more great patterns to use with this project, please visit our Pyrography Doodles Pattern Package on our pattern website, Art Designs Studio.

Pyrography Doodles #4 Read More »

Pyrography Doodles by Lora Irish

Pyrography Doodles #3

Pyrograhy Doodles Page 1
Pyrograhy Doodles Page 2
Pyrograhy Doodles Page 3
Pyrograhy Doodles Page 4
Pyrograhy Doodles Page 5
Pyrograhy Doodles Page 6
Pyrograhy Doodles Page 7

The images on this page are sized to print an 8 1/2″ x 11″ guide sheet which includes your sepia temperature setting, a close-up of the burning, the pyrography shading guide, and the doodle patterns used in that step.  Please be patient as the image loads.  Click on the image, allow it to load in a new window, right-hand click on the image, and choose Save to your Desktop.

Pyrograohy Doodles Mushroom Project by IrishStep 3: Medium Dark Leaf Patterns

To establish the mid-range of your tonal value, begin your pattern burns using a medium-hot setting on your tonal value scale.
Each fill pattern is a complete, small design within the boundaries of that section of the larger pattern.  Work the patterns with a fine line tip – either a ball tip or looped tip pen.  Work the patterns right to the edge of each section to give the impression that were the outlines not there the pattern would continue into the background.

For the first doodle patterns, shown in this step, I used simple repeats of small flowers, scales, and spirals.

Mushroom Pyrography DoodlesStep 4: Shading Background Areas

An unshaded background for your pattern fills allows the white of the wood to show through your line work.  You can work a common, shading fill over a section first, then lay your pattern work over that shading to darken the tonal value of the entire section.  This technique allows you to have a mid-toned background with a dark line doodle.

You can also burn your doodle pattern first then shade over that section to darken the total tonal value of that section.  This technique will darken both the background and the line doodle.

After these sections are shade the dark fill leaves are worked at a medium-hot setting to create the tonal value of pattern fill at the same color depth as the outlines of your pattern.

Pyrography Mushroom Doodles ProjectStep 5: Laying Patterns over Shading

Continue your pattern fill doodles over the shaded leaf sections noted in this step.  Work towards creating even thickness lines and consistent tonal values.

We will continue our Pyrography Mushroom Doodles on Monday, see you there and then.  We will continue to fill this mushroom pyrography doodle pattern with fun and easy to create doodle designs.  Please slip over to our craft, carving, and pyrography patterns website, Art Designs Studio, to get your free patterns for this project.  The download link is on our home page.

Pyrography Doodles #3 Read More »

Thin to Thick Outlines for Pyrography

Pyrograhy Doodles #2

The traced pattern lines of your pyrography pattern can be approached in several ways.  Let’s look at a few ideas before we begin the next step of the Mushroom Pyrography Doodle Project by Lora S. Irish.

If you are just joining this free online pyrography project please slip over to our craft, carving, and pyrography patterns website, Art Designs Studio, to get your free patterns for this project. Its the Spring 2014 package in the right hand navigation widgets. The download link is on our home page.

Pyrograhy Doodles Page 1
Pyrograhy Doodles Page 2
Pyrograhy Doodles Page 3
Pyrograhy Doodles Page 4
Pyrograhy Doodles Page 5
Pyrograhy Doodles Page 6
Pyrograhy Doodles Page 7

Defining the Boundary Lines of Your Pattern

Greenman Wood Burning by Lora IrishA simple outline burning along the tracing lines will define the pattern for you, but it can give your finished project a stiff, rigid look.  In the Green Man burning, right, all of the tracing lines were burned at a hot temperature, using an even, thin line.  This pyrography was worked to create a wood cut effect.  The entire burning was worked at one temperature setting, limiting the tonal values to just two tones – the white of the wood and the black of the burned line.


Shaded Mushroom Pyrography Project by Lora IrishThe traced lines of your pattern are just guide lines and do not need any burning.  You can define an area, without outlining it, by bringing your shading up to the line.  In this mushroom sample the shading touches the pattern line.  Where the shading stops defines the boundary of that area.  The few outline strokes in the finished work are accent lines only.

For our Mushroom Pyrography Doodle project we are using a full outline for all of the pattern lines.  This will create a boundary line around each of our doodle fill patterns.  To make that outline more interesting the line is worked in a thin to thick to thin width, changing the weight of the line as it moves through the pattern.


Temperature Setting and Pen Tips

Each variable temperature wood burning unit has its own settings for the different temperatures used to create your tonal values.  Create a sepia scale tonal value chart, using your burning unit and your pen tips, to establish the exact settings your unit used.  To learn more about tonal values please go to Wood Burning Sepia Values.

sepia scale for wood burningFor the outline burn that we will be working I have set my temperature setting to a high or hot setting.  I want a setting hot enough to burn a rich, dark brown line but not so hot that the pen tip scorches the wood outside the line.  If your pen tip is creating a light brown halo outside of the line, in the background area against the line, your burning unit is set to high.


ball tip wood burning penPen Tips for Fine Line Burning

I have two favorite tips that I use for my line work.  One is a medium-sized ball tip pen and the second is a medium-sized loop tip pen.  Both work excellently at any temperature setting.

loop tip wood burning pen

Keep your pen tip clean of any carbon build-up as you work.  A clean, bright tip burns a thinner, more even line.  Use a leather or synthetic strop and honing compound to clean your tips.

Mushroom Doodles Pyrography ProjectStep 2: Burn the outlines of the pattern tracing.

Using your finest line burning tip, set your temperature setting to a hot setting.

Burn along all of the pattern lines to set your design.  You want a dark, even line.

Work a second burning over the pattern lines to create a thick to thin effect in your outlines.  This adds strength to the outline, giving the line extra emphasis in the finished work, as well as interest in the changing dimensions of the line.  A close-up of the thick to thin outline is shown in the header image in this post.

Using the fine nail sanding board, lightly sand over your board to remove any rough areas caused by the hot temperature burn.  Wipe the board with a clean cloth to remove any dust.


Pyrograhy Doodles #2 Read More »

Contrasting Tonal Values

Old car wood burning by Lora IrishTonal values, the shades of sepia from pale coffee with cream to dark chocolate, create the shading colors in our pyrography work.  By planning in advance areas of your work that place one very pale tone against an extremely dark tone you can give an area dramatic contrast, impact, and added depth.

Let’s use the wood burning, Grandpa’s Old Car, as our example of how contrast adds  depth to your pyrography designs. Please click of the finished burning and pattern for full sized printable images.

In the finished wood burning you see an old, abandoned car near a foreground tree and old fence line.  This is our foreground area of the pattern.  Directly behind the car stands a small clumb of trees and a gently rising hillside, this becomes our mid-ground area of the work. In the backgroud, along the hill ridge is a barn and tree line which falls in the background area of the pattern.

For a moment take a look out your window.  Notice that those items or elements that are nearest to you are also the items that have the strongest color and shadow contrasts to them.  The closer an element is to the viewer the stronger the color hues will appear. Foreground elements have distinct white highlights and crisp dark shadows.

Move you eye to the mid-ground area of you window view.  The elements or items in this visual range still have coloration, but the colors are not longer as bright and bold.  Shadows in the mid-ground area lose their white and black tones and move into the middle range of gray or brown.

Move your eye farther into the window view, try and find some distant point.  Notice tWoodburning Free Pattern by Lora Irishhat the background areas have lost much of their coloration.  Most coloring in the background falls in the gray-brown muted tones.  There are few distinct shadows in the distant background of any view.

Air – atmosphere – is not crystal clear.  Air contains fine water particles that when viewed close up, in the foreground of our designs, are invisible.  But the farther we look into a designs as a landscape the more the water particles whiten or cloud the view.

So the farther back we look the more ‘white’ from the water particles cover the elements of the scene. You can see that used in Grandpa’s Old Car pyrography.  The barn scene that is in the background is worked in a narrow range of pale tonal values to give the effect of looking through water laden air.  The mid-ground trees, just behind the car, have more contrast in the tonal values, but those values all fall in the mid-range of our tonal value scale.  Only the foreground had dramatic tones of white and black.

The tonal value placement matches the actual tonal value ranges of each area of a landscape.

Drama can also be created by placing one white tone directly in contact with one full black tone.  Notice along the bottom edge of the car.  The wheel wells and fender area have solid black tones.  In contract the grass in front of the car, that touches the car are unburned, white areas in the design.  That black and white contrast area directly sets the car on the ground in the grass.    This black and white contrast area is so bold that it pulls your eye, over and over again, to that area of the pyrography.

Contrasting Tonal Values Read More »

Ceremonial Mask Pyrography Project

Pyrography Mask Project by IrishStarting Monday, Nov.  4th, I will be sharing my latest pyrography project with you in this free online wood burning class – Ceremonial Mask Pyrography Project.   This is a 17 step project that includes lots of photos, lots of instructions, and lots of wood burning basic information.  I hope that you will join me.  Please share with your friends on Facebook, Twitter, Pinterest, and your favorite pyro forum that we are holding an Online Seminar here on my blog so that they can join the fun!

Ceremonial and Ritual Masks use strong geometric line patterns and abstract shapes to create the facial features and to express emotions that are proscribed to the myths and legends of the culture.  Often they are carved from wood with open holes for the eyes and mouth of the mask.  Raffia, dried reeds, nuts, seed pods, and even sea shells may decorate the geometric patterns on the mask or surround the outer edge of the wood shape.  Animal hair and fur has historically been added to enhance the human or animal impressions they portray.

Ceremonial Mask Pyrography Project 1
Ceremonial Mask Pyrography Project 2
Ceremonial Mask Pyrography Project 3
Ceremonial Mask Pyrography Project 4
Ceremonial Mask Pyrography Project 5

They make a perfect subject for any pyrography project.  My sample pattern is worked from the Masks Pattern Package, available at ArtDesignsStudio.com.  But Wait!  We are working on a special Project Bundle just for you that will include my new 36-page Introduction to Pyrography e-book which covers the basic techniques used in any wood burning project and my new 24-page Ceremonial Mask Pyrography Project e-project which gives you extra large, extra clear photo images of every step used to complete this mask burning – all bundled up with three Irish Pattern Packages, perfect for use in with this technique.

As soon as we have our Project Bundle posted I will post its announcement here on the blog!

Get your burning tips bright and clean, gather your supplies, and chose your favorite wood species so that on Monday you can pull up your computer chair to my virtual classroom!

Take a moment and sign-up for my blog so that you can add your questions, ideas, and share your own techniques as we work through this step-by-step lesson plan.

Ceremonial Mask Pattern by Lora IrishBurning Supplies:
Variable temperature burning unit
ball tip or looped tip pen
spear shader pen
curved shader pen

Wood Pyro Blank:
*  9” x 9” poplar practice board
*  9” x 9” poplar pre-cut heart

Pyro Pen Cleaning Supplies:
leather strop
rouging compound
1500 grit emery cloth

General Supplies:
220- or 320- grit sandpaper
clean, dry dusting cloth
graphite paper
#2 to #4 soft pencil
ruler
masking or painter’s tape
8” square of brown paper bag

Optional Finishing Supplies:
watercolor paints
watercolor colored pencils
spray polyurethane or acrylic sealer

*  This project was worked in poplar, but any non-toxic wood can be used, including basswood, birch plywood, and mahogany.   Also consider working this Ceremonial Mask of natural toned chipboard as a scrapbook album cover or on vegetable tanned leather as a cut out wall display.  You may wish to work a dried craft gourd, cut to become a sand candle vase. Whichever wood or burning surface you chose, we will work a Reference Guide Sepia on the same material.


Ceremonial Mask Pyrography Project Read More »

Scroll to Top