Not sure what tools, knives, or carving sets will get you started in the craft of wood carving, chip carving, and whittling? Are you wondering what general woodworking and craft supplies you might need for your first carving project? Have fun browsing through Lora Irish’s carving kit which includes wood carving beginner sets, sharpening stones and honing boards, rasps, rifflers, sanding and tracing paper, compasses, rulers and t-squares, and so much more!
A basic relief carving or whittling tool set contains far more than just your carving tools and knives. Let’s take an in-depth look at some of the common supplies you may use in your carving craft. All photos in this article are large-sized and labeled, just click on any image to show the full-sized photo.
Plus there are lots of links to Amazon.com, so that you can do a little window shopping as you prepare and plan your own wood carving supply kit.
Over the last two days we have been exploring how light, shadows, color, and tonal value are created in a photograph and how they affect the sepia pyrography wood burning. Today we will look at repeated tonal values, black and white contrast, and adjacent mid-tone in our gray-scale photos. Next we will take a look at how your eye and brain sees and interrupts images.
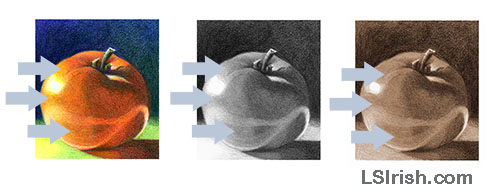
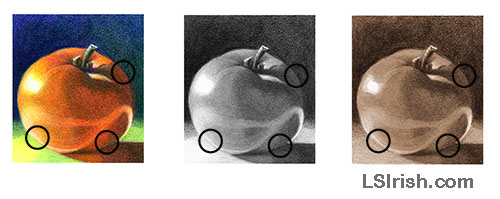
A shade of tonal value will be repeated several times throughout any image or photograph. In the tomato drawing three areas that been marked that all share the same tonal value. Each of these areas would receive the same pyrography burning to keep the tones equal.
You will find similar or equal tonal values throughout your gray or sepia toned image even though those same areas show different hues in the color photo. A medium green, medium red, and medium blue may share the same medium sepia tonal value.
Black and White Contrast
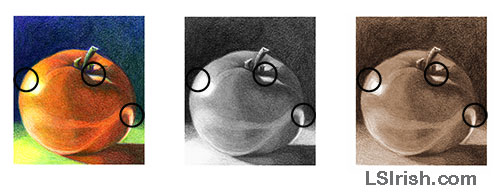
Placing one or two areas of the extreme tonal values next to each other gives the eye a place to compare the darkest and palest tones. The brightest highlight on this tomato lies in the upper left and is adjacent to the blackest tone of the drawing, found in the background area. These two tonal value areas set the whitest and darkest tones of your tonal value scale.
Working an area of high contrast – white against black – creates a visual boundary for your tonal value scale. All mid-tones must fall between these two extremes. The boundary tones do not need to be pure white or pure black; a gray-scale can be created starting with a pale gray and ending with a dark gray.
Adjacent Mid-Tone Values
In any gray scaled photo you will discover adjacent areas in two different elements that have the same tonal value. In these areas the defining line between the two elements seems to disappear. In our sample there are three areas where the body of the tomato and either the table surface or background share the same tonal value.
When two areas share one tonal value you can adjust one or both of the mid-tone values in a burning to create some contrast. Even a very small change in one area, either going a bit lighter or darker, is enough to redefine your boundary lines.
How the Brain Interrupts an Image
Notice that I did not say how the eye sees an image. The eye receives information about an image or photo in two distinct manners, it is only when those two pieces of information are combined by the brain do we see an image. So where the eye gathers information it is the brain that interrupts that information into one image.
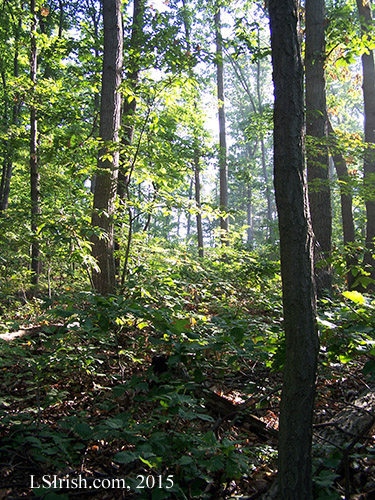
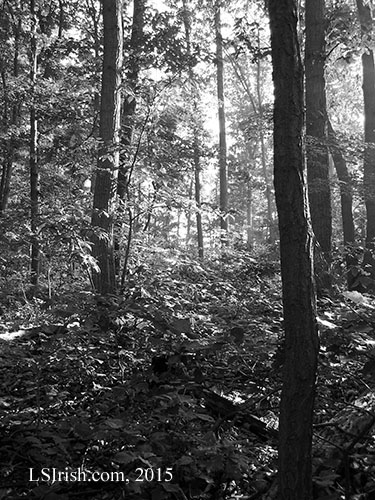
Inside of the eye are two receptors – the cones and rods. The cones of the eye gather information about color, it determines if an objects is red, yellow, or blue. The rods, the second eye receptor, evaluates the amount of light each area is receiving; the rods create the gray-scale tonal values that we use in pyrography. Our sample photo for this section is a wooden hill just after sunrise.
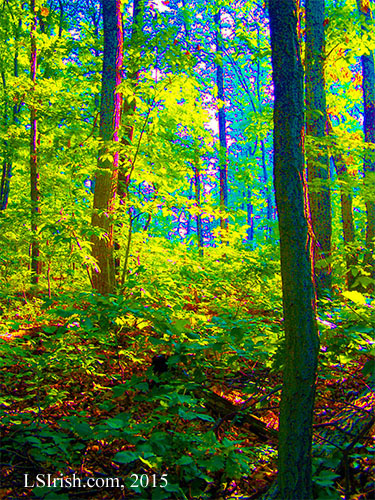
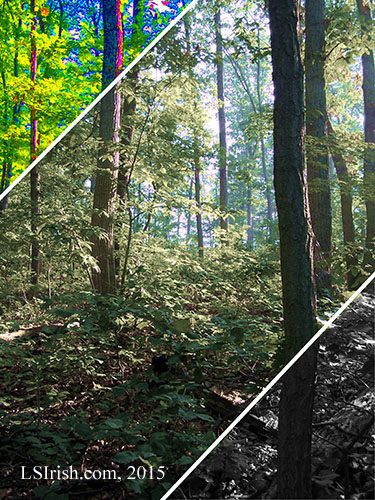
Color Receptors – Cones
The sample photo has been altered to remove as much shading as possible while emphasizing the color hue of each area. The gray-green leaves of the forest are now broken into areas of yellow, yellow-green, deep green, and blue. The tree trunks show greens, reds, and yellows.
You can see the colors contained in light when you view a rainbow created through a prism, called a spectrum. Each color in the spectrum has its own specific wave length. When light strikes an object most of those color waves are absorbed by the object. Those that are not absorbed bounce off the object to be received by our eye.
So the color of any object and therefore the color that our eye cones receive are the light wave lengths that the object rejects. We don’t see green leaves, we see the green light waves that have bounced off of the leaves.
Sepia or Gray Scale Receptors – Rods
What the tonal value receptors, the rods, see is equivalent to a sepia or black and white photo. Rods record the amount of light an area is receiving – whether it is in pure highlight or the darkest shadows.
Combining the Cones and Rods Images
The brain combines the information sent by the cones and rods to create one image that has color hues and tonal values.
In the photo sample, left, the color image has been superimposed over the sepia tonal value image, exactly as the brain compiles the information it receives. The resulting photo is an excellent copy of the original camera photograph.
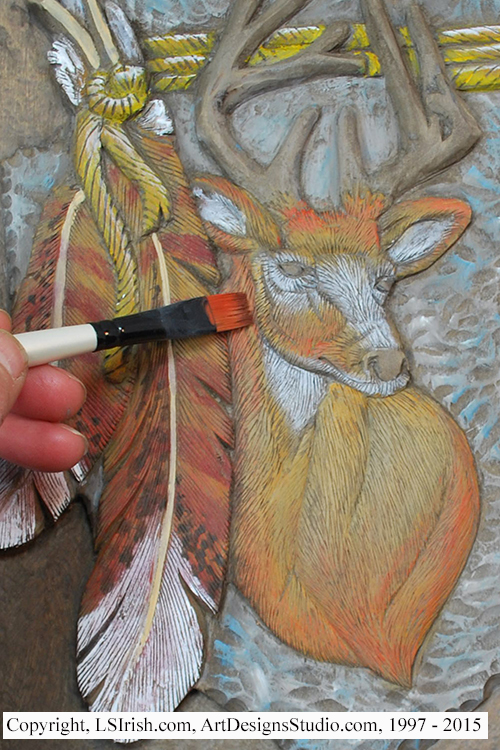
The complete Mule Deer Wood Carving Relief Project, with the step by step instructions, free patterns, and painting steps is now posted here on LSIrish.com. Please drop me an email if you have any questions, or feedback on this in-depth free project by clicking of the Contact Us link in the top right ofthe nav bar.
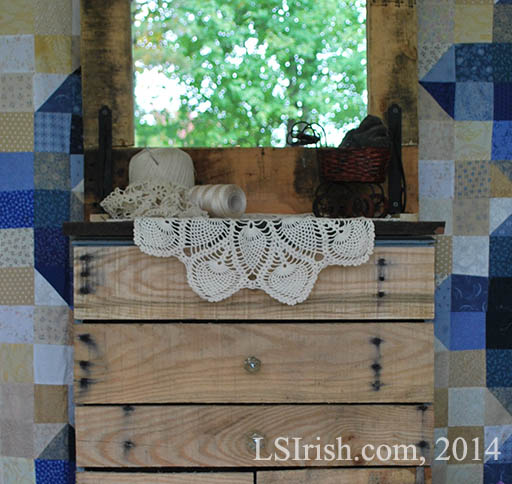
Eclectic means to derive an idea, style, or taste from a broad and diverse range of sources. In this case, my primitive bureau is a conglomeration of some of the many ‘someday’ bits, pieces, boards, and hardware that have accumulated in the shop over the years. You probably have boxes of them, those little parts that you know someday you will need or want.
Over the many years of wood carving and wood working I have enjoyed trying my hand at a smattering of furniture projects. Our woodworking shop is well equipped with the basic power tools, as well as many fun specialty tools that are used to create precision cuts and glass smooth finishes. Unfortunately with my husband’s illness and my Mom’s advanced age I seldom can take the time away from the family to dedicate to the hours of work that it takes to produce a classic piece of furniture.
But I will admit that I have missed that part of wood working tremendously. So this weekend I decided to indulge myself in a little back porch wood butchery … grin!
This all began with a Friday afternoon yard sale purchase of a 24” wide, 36” high, 8” deep used, battered bookcase. It was painted wedgewood blue, with lots of scratches and dents, and had a broken kick board (toe board). I knew I didn’t need another bookcase when I bought it, but it is solid wood and priced at only $5.
Sunday morning came and I headed to the shop to grab a board to replace the kick board … that seemed a good place to start. Passing the tractor shed, which is an add-on to the workshop, I noticed a bunch of old pallets that I had picked up somewhere for one of those ‘someday’ projects. I stopped, looked the pallets over carefully, and made the decision that today was that someday! That yard sale bookcase did not have to stay a bookcase, it could become the carcass for a set of dresser drawers made out of the pallet wood.
Since I really couldn’t hide out in the wood shop this weekend I grabbed up the zaw-zaw, the jig saw, and the disc sander. With a few hand tools – dovetail saw, rough cut saw, screw drivers, that sort of thing – I turned the back porch into a weekend work area where I could be close at hand for the family while doing some fun wood butchering.
The first goal was to convert the bookcase into a chest of drawers without purchasing anything – I wanted to use the wood and hardware that I had on hand. My second goal was to accept that this would not be perfect – I knew that using the tools that I could carry to the porch I would not be making precise, accurate cuts or joints. So this project started out as an eclectic primitive project.
Using the zaw-zaw, hammer, and a crow bar, I cut the pallets apart. A nail set and hammer removed the cut nails from the boards. A light sanding with 80-grit paper removed the worst of the splinters and fuzz bunnies.
I decided that I wanted a series of small drawers, so I used some ½” x 1” framing strips to make the drawer supports. These strips were left-overs from a repair for a door frame. The bookcase has three shelves, so I divided each shelf area into space for two drawers. Some wood glue and a few screws secured the drawer supports to the inside of the bookcase.
The drawers are just simple butt-joint boxes with ¼” plywood floors. I made each box ½” less wide than the inside width of the shelf and ½” shorter than the height of the drawer area. No two drawer areas turned out to be the same. The drawer sides were made out of pallet wood and the plywood was left-over from my pyrography projects.
The drawer fronts were cut from pallet wood at the full width of the bookcase and tall enough to cover the ½” of the shelf support. I tried to allow about ¼” air space between each drawer. The fronts were attached with screws, working from the inside of the box.
Because pallet boards are often cracked, split, or broken, I quickly realized I would not have enough boards to create six 24” wide drawer fronts. But going through the cut pieces left from the first several drawers I did have enough to turn one large drawer area into two small drawers.
I removed the broken kick board and replaced it with pallet wood.
I needed drawer pulls, so while rooting through my someday boxes I came across five old glass knobs from Mike’s father’s woodworking days. Two ceramic knobs turned up in one of my Dad’s boxes.
The top of the bookcase was in very bad condition, so I cut a new top from an old walnut table leaf. The table was long gone, but I had held onto the extension leaf for years. The top is held in place with screws working from the inside of the bookcase – dresser carcass.
While looking for drawer knobs I stumbled across an old, discarded bathroom mirror and then found a pair of wrought iron shelf brackets. The brackets were so old the plastic packaging had turned yellow, and cracked. A simple butt-joint frame made from pallet wood scraps became the mirror support. Two long pallet boards were mounted to the back of the frame to attach the mirror to the back of the case. For a little added pizzazz I used the iron shelf brackets on the top of the dresser to also attach the mirror.
So … the photos show you where I am. The woodworking is done except to sand off a few really rough areas. I know that I am going to paint over the wedgewood blue with first a medium tan and then black. With sandpaper I will rough up the corners and edges to let all three paint colors show.
The whole family has become involved in this project. Mom would like to see me paint lettering to the pallet boards – fragile, this side up, or even hazardous waste. I am thinking adding luggage stickers or packing slips to the boards, then roughing them up so it looks as if the dresser is made from antique shipping crates. Mike, my beloved hubby, wants me to remove the glass knobs and carve wood spirit faces as my drawer pulls and he wants it for his knife collection storage. All my son will say is, “Gee, that will look awfully good in the corner of my room!” I’ll let you know when we decide where this project goes from here.
I just may keep this one for me. Whosits! A gal needs some special place to store her doily crochet books, hooks, and pineapple work.
In the meantime, have some fun this coming weekend doing your own eclectic primitive pallet wood project! Oh, and the total cost of this project was $5 for the bookcase and a full day of absolute fun, plus the joy of putting some of those ‘someday’ bits and pieces to work.
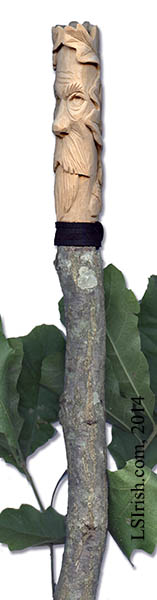
Walking Sticks and canes are a favorite wood carving project for both beginning carvers to the most advanced woodworker. This free, online project by Lora Irish will take you through the basic techniques used in choosing your wood staffs and sticks, wood carving cane toppers, cane construction, and finishing used for walking sticks. Learn how to use wood burning in your cane carving to clean the joint lines of your carving and add fine details. Explore the different steps you can use to add bright, bold painted coloring.
This free Irish project will be posted over the next several weeks, and will include how to carve the planes of the wood spirit face. So please check back often to see what new techniques, patterns, and ideas Lora has posted.
Harvesting Walking Sticks – Learn how to harvest, store, and dry your tree saplings and branches for cane carving.
Common Tree Species – Take a look around your own backyard to discover which tree species you can use for walking stick and cane carving.
Adding Extras – Make your walking stick stand out by adding a small ‘What If’ bag to your staff.
Our next lessons will focus on Cane Construction Techniques!