Over the last few days we have discussed light and shadow, and how the eye and brain interrupts visual information as related to photographs that we use in pyrography projects. Today we will be exploring how to layout and plan your still life photos to create the strongest image possible for your wood burnings.
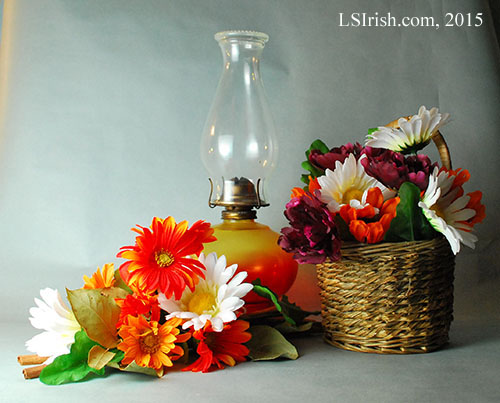
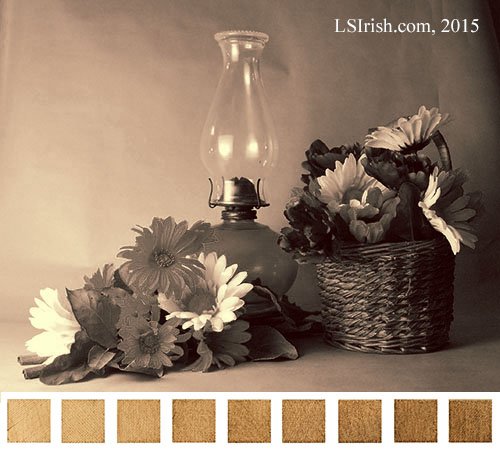
For this photo sample I have laid my arrangement on the table with my focus on tonal value instead of hue. I chose silk flowers that had strong amount of black or white to add to the arrangement.
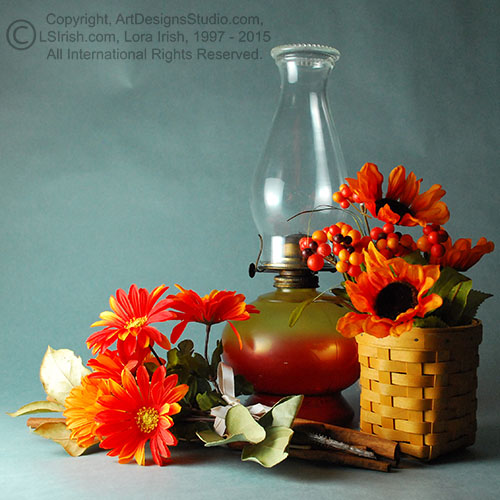
The addition of a few pure white flowers in both the foreground arrangement and in the basket adds highlight tonal value to the final photo. Compare the visual arrangement line created by the white flowers in this photo with the original photo, below, that used the red flowers for the arrangement layout. White is the purest of tonal values and therefore has the strongest visual impact.
A few dark red flowers were also added to the basket. Since dark red is created using pure red hue and black I know that these flowers will have a dark tonal value. By adding black tonal values through these deep red flowers I can carry the visual impact from the white flowers into the deep shadow areas of the basket.
The glass globe still places some transparent glass in the final image but as the base of the lamp is color toned so that this area in the arrangement will take on a mid-tone value.
Note in the two layouts the difference in the tonal value of the background blue-gray paper. In our new photo layout I have changed the direction of the light source to create a graduated tonal value scale from one overall mid-tone value. Now the mid-tone red and orange flowers in the foreground will stand out from the pale toned background.
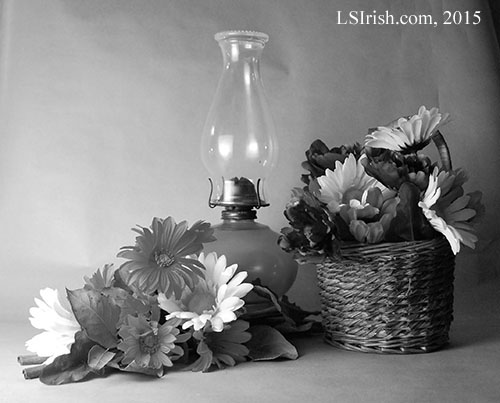
The gray-scale image has a nice balance of white, mid-grays, and black tonal values. The brightest areas of the gray-scale photo are now in the white foreground petals instead of in the background glass elements. The black tones under the flowers and between the floor arrangement and basket are stronger because there are more strong areas of white with which to contrast.
In the original arrangement the strongest asset was the diagonal line of bright orange flowers. In the new arrangement color photo that line is not as strong with the addition of new flower colors – the dark burgundy and pure white flowers break the orange line.
Yet the gray-scale photo has a strong diagonal line in the same position. This new line has extra strength because the flowers now create a gray-scale – working from pale tones to the lower left, mid-tones at the center oil lamp, and dark tones in the basket.
Finally I have sepia toned my photograph to give a clear, easy to follow map for my burning project. On to the photo I have laid a cross-hatch sepia tonal value scale. As I work this photo into a pyrography burn I can compare my cross-hatch scale to the tonal values of the photo to create a realistic styled wood burning.
Tomorrow we will finish up this look at using photographs for your pyrography, how color effects visual impact, and how the eye sees with a free Lora Irish pyrography pattern for the Derringer.
Yesterday we took the day off from this free online pyrography project to take a look at Toxicity in the Pyrography and Wood Carving. If you have not read this article, please take a moment to browse through the simple, common sense ideas about how to avoid health hazards in your art studio.
Today we will be exploring several photographs that were created as pyrography still lifes to learn about direct highlights, reflected highlights, cast shadows, and reflected shadows. Tomorrow we will discuss contour tonal values, black and white contrast, and adjacent tonal values.
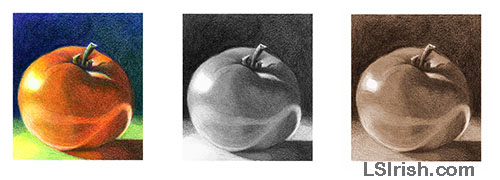
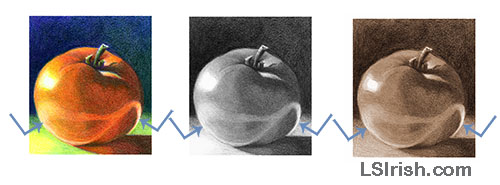
In pyrography we often work with colored photographs or images. Yet we burn in shades of brown to black. By gray scaling your photo you can remove all of the color information, creating a working image that matches your pyro palette. In this sample I have converted the original color drawing into a gray-scale and sepia image.
Most computer graphics or photo editing programs will allow you to gray-scale an image. Many also feature a sepia or vintage command that will create a brown toned photo.
In pyrography the amount of white or black in a color is created through tonal value burns. After the burn is complete pure color can be applied over the pyro tonal value work to create pale toned pastels to dark jewel tone colors.
The number of tonal values that you will use in creating a tonal value scale is usually limited to 6 to 12. This range allows for white, black, and middle gray will a few values on either side of the mid-tone.
Highlights – White Tonal Values
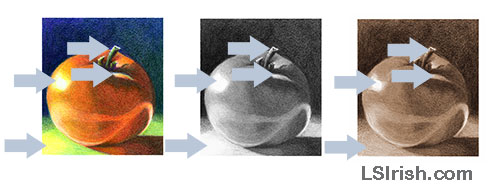
Highlights are created when the light source directly strikes the element, creating a pure white area or spot. This tomato has three strong highlights – one on the left side of the tomato body, one on the upper middle of the tomato, and one along the left side of the stem.
In all three of these areas the light overpowers the color of the element. In pyrography highlights are created by leaving that area of the design un-burned, allowing the color of the burning media to show.
Highlights tell your eye where the light source is in relationship to the elements in your pattern. Some photos can have multiple light sources which reduce the impact of any highlight within the finished design. If an element in your photo has several bright highlights or more than one cast shadow, the still life has more than one light source. When possible work with one light source only to increase the dramatic effects of both. highlights and shadow.
Reflected Highlights
Where the highlights fall in your photo establishes where your light source lies. In our sample note that all three highlights are on the upper left side of the tomato. This places the light source coming from the upper left corner of the image.
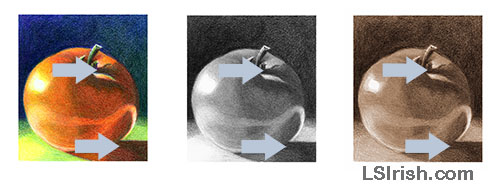
A reflected highlight is created when the light bounces off a surface to fall upon your element. There are two examples of reflected highlights in the tomato drawing.
The highlight on the middle left of the tomato body is created when the light hits the table surface and bounces onto the tomato body. A second reflected highlight lies on the shadow side of the tomato where the light again bounces off the table onto the tomato. Note that this second highlight rings the dark area on lower right of the tomato. The light has struck the table beyond the cast shadow of the tomato then bounced back onto the tomato, creating a highlight halo. Reflected highlights are not as strong or pure white as direct highlights.
Reflected light tells us more about the surface upon which the element rests than it does the element itself. Glossy surface reflect both highlights and shadows, matt or dull surfaced do not. So in this drawing the reflected highlights show that the tomato is resting on a high gloss surface.
Cast Shadows
Shadows are created when one element or one area of an element blocks the light source from reaching another area or element in the design. In this drawing the stem of the tomato blocks the light from reaching the lobe of the tomato directly to the right of the stem. The body of the tomato blocks the light from reaching the table surface on the right side of the tomato.
The stem’s shape defines the shape of the cast shadow. The contour of the tomato where the cast shadow falls defines the curved edges of the cast shadow. The location of the light source in relationship to the element determines the length of the cast shadow. A low-positioned light source casts a long shadow where a high-positioned light will create a short shadow.
Reflected Shadows
Shadows can bounce off the surrounding surfaces onto another area or element just as highlights can. For our tomato the dark cast shadow that the tomato creates on the table has bounced back from the table’s glossy surface onto the lower right section of the tomato body.
Just as with reflected highlights, a bounced or reflected shadow states that the surface from which it bounced is glossy in finish. Dull or matt surfaces and textured surfaces do not reflect shadows.
Highlights and Shadow Still Life
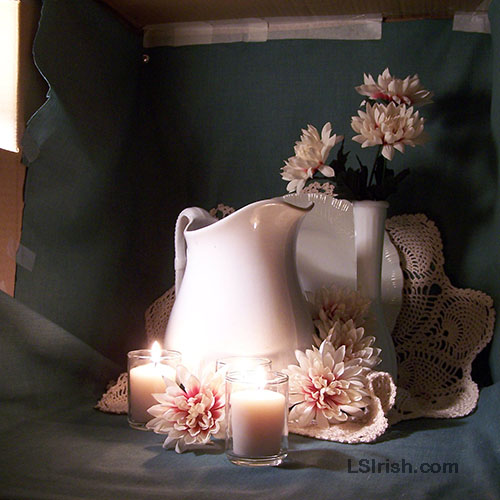
The still life, shown right, is a simple light box photograph that allows me to control the direction of the light source through a cut hole in one side of the box. Because there is only one light source this still life has simple highlights and shadows.
By selecting all white objects and a gray background for this still life I have removed the color information we can concentrated on the light source, highlights, and shadows.
Light Source Direction – Direct Highlights and Direct Cast Shadows
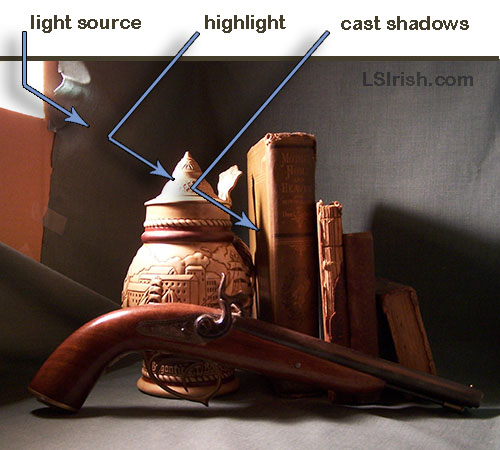
This derringer and book still life also uses one light source. The first blue arrow shows the direction of light rays, the second shows a direct highlight on the tankard lid, the third arrow notes the cast shadow from the tankard lid. Notice that all three arrow align perfectly from the original light source.
Also of note in this photo is that a direct highlight can be so powerful that you lose the contour detail in the area of the object that the light strikes. The white light reflected to your eye is so strong that you can not see the actual object in that area. Cast shadows are also powerful enough to delete or minimize any contour detailing in their darkest area.
Colors in Highlights and Shadows
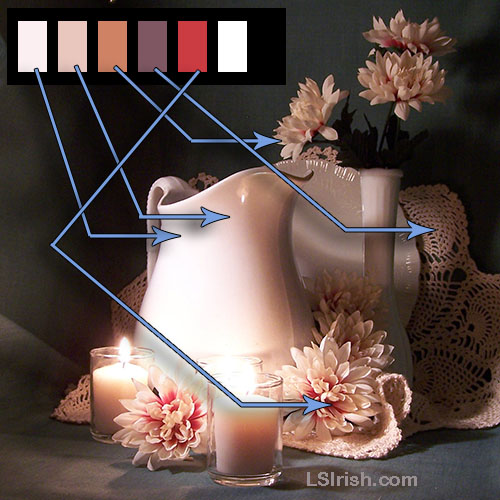
This photo sample and the one above are the same photograph. As noted above all of the objects are white – a white glazed pitcher, a white milk glass vase, a white milk glass plate, white candles, clear glass candle cups, and a white crocheted doily. They are arranged on a neutral gray photo paper backdrop.
The only color source in this set-up is the deep pink inside the silk flower petals. That little bit of pink coloring affects the highlights and shadows throughout the entire photo. The color scale above the set-up are color picks taken directly from the photo. Please notice how the shadows in this still life are not brown or gray – they are all shades of pink!
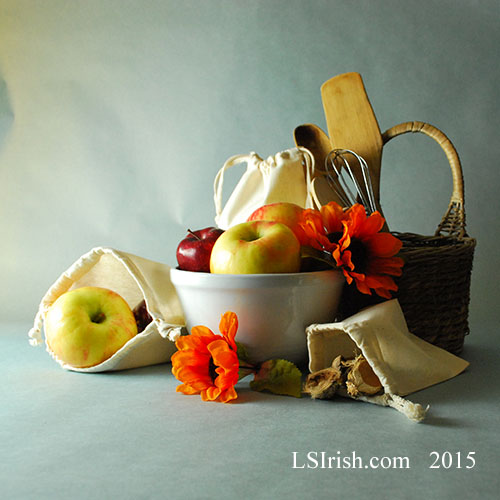
A Simple Still Life
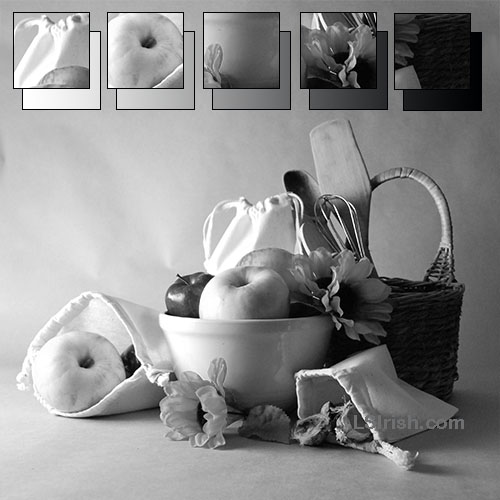
This fruit bowl still life is full of bright reds, yellows, and cream color hues. The first visual impact area is the bright red of the silk flowers, and the second is the yellow-green-red hues in the apples. When the color information is removed both of those areas are overpowered by the bright white highlights on the bowl and background cloth bag, and by the black shadows of the wicker basket.
Color Found in reflected Shadows
When we take a small close-up out of the larger photo above you can see that the reflected shadows on the side of the white bowl that are cast by the red silk flower contain a small amount of red hue. Also notice the medium beige shadow on the inside of the cloth bag top that is reflected from the brown-beige coloring of the nut hulls.
Except for the most direct highlights – pure white – and deepest shadows – pure black, highlights and shadows carry color information from the object from which they are created. If the light bounces off a red flower petal, it will create a reflected pale red highlight. If the light is blocked by a medium green leaf, the shadow of that area will be in the green tones.
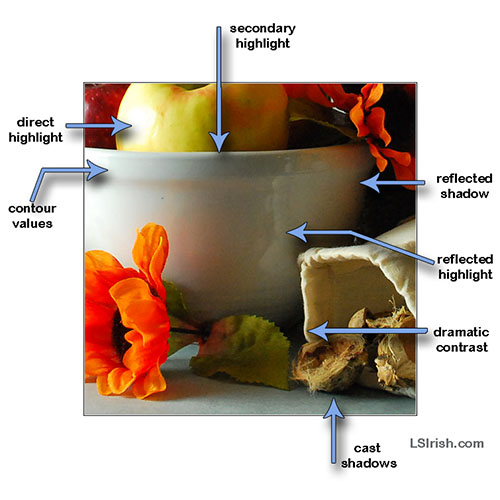
Details of the Close-Up Still Life
The photo, right, shows which highlights are direct or reflected, and which shadows are direct cast and which are reflected.
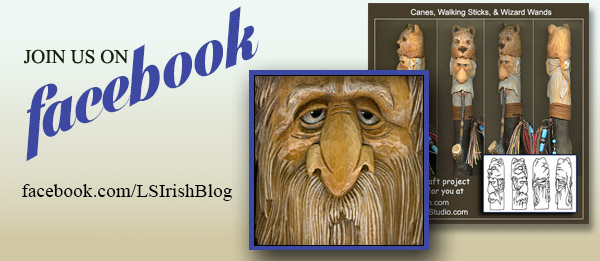
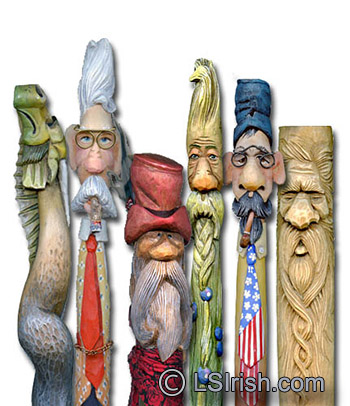
To learn more about Wood Spirit Facial Plane carvings, check out our E-Project – Wood Spirit Mushroom Carving E-Project – which takes you through all of the steps to create the facial planes, plus gives you eight full sized 3D patterns. If you want to focus on the Wood Spirit face, check out Wood Spirit Carving E-Project, which takes you through the face carving as well as how to paint your wood spirit walking stick.
Use our discount code – facebook – for ArtDesignsStudio.com for $5 off that can be used for each Cane, Walking Stick, and Wizard Wands Pattern Packs or E-Projects above. Save up to $20 on your next wood spirit carving project!
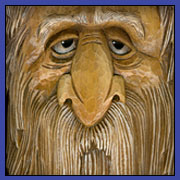
As a new wood carver you would think that the classic wood spirit face would be difficult to create. Yet, it is one of the simplest, method-technique topics that wood carvers and whittlers can work.
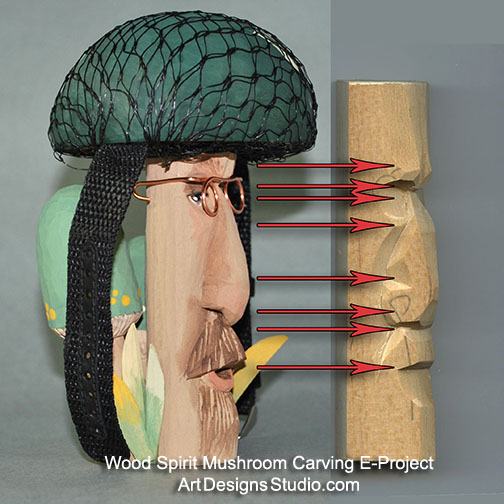
Face carvings, as the wood spirit, or as shown above as a Mushroom Wood Spirit, begins with a series of simple angled cuts to establish the planes in the face. These planes create the depth, width, and feature areas as the rise of the eyebrow ridge, the deep set of the nose bridge, and the angle and slant of the mouth.
Where you create the planes and angles determines the finished look of the face. In this sample the nose plane is exaggerated and the eye depth plane is minimized. When the shaping steps are done, this Mushroom spirit has an extra long nose that fills up the needed space to create the mushroom stem.
To learn more about Wood Spirit Facial Plane carvings, check out our E-Project – Wood Spirit Mushroom Carving E-Project – which takes you through all of the steps to create the facial planes, plus gives you eight full sized 3D patterns. If you want to focus on the Wood Spirit face, check out Wood Spirit Carving E-Project, which takes you through the face carving as well as how to paint your wood spirit walking stick.
And, if you stop by our new Facebook page you will discover a discount code for ArtDesignsStudio.com for $5 off that can be used for each of the Pattern Packs or E-Projects above. Save up to $20 on your next wood spirit carving project!
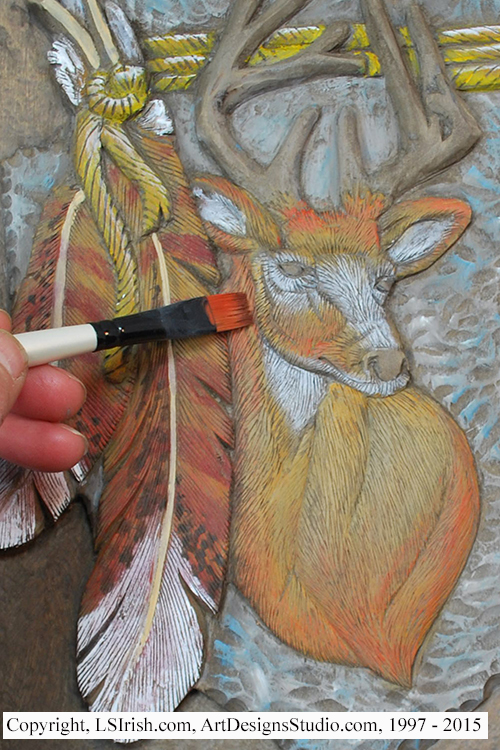
The complete Mule Deer Wood Carving Relief Project, with the step by step instructions, free patterns, and painting steps is now posted here on LSIrish.com. Please drop me an email if you have any questions, or feedback on this in-depth free project by clicking of the Contact Us link in the top right ofthe nav bar.