
Color, Shadow and Light in Pyrography
 Let’s take a close look at how your photographs can be used for your next pyrography project, and how the color, shadow, and light of those photos affect the tonal values of your wood burning. Today we will start by defining the important terms that are used in describing light, shadows, colors, arrangements, and designs that we use in wood burning.
Shadow and Light in Pyrography Photos – Day 1
Shadow and Light in Pyrography Photos – Day 2
Shadow and Light in Pyrography Photos – Day 3
Shadow and Light in Pyrography Photos – Day 4
INTRODUCTION
As pyrographers we often use photographs as the base for our wood burning projects. Home photos of family and friends, a landscape photo of an old hip roof barn, and pets playing with their favorite toy are all possibilities for a realistic, finely shaded pyro burn.
Today’s digital cameras makes using photographs even easier as your image can quickly be uploaded to your home computer for instant printing.
Although a photograph accurately captures the scene or still life our eye does not necessary see what that photo truly caught.
During this tutorial we will look at how the human eye sees, how the brain interrupts the information from the eye, how color and gray-scale effect visual impact, and how you can learn to use this knowledge to create strong, bold, realistic pyrography images.
 FIRST IMPRESSIONS
The brightly colored silk daisies grab the attention in the photo and are complimented by the ruby-red base to the antique oil lamp. Shades of golden-yellow are found in the dried leaves, left, the golden orange background daisy, and in the oak basket. Mossy green flows through the central elements of the dried leaves, upper oil lamp base, and in the silk leaves in the basket. Overall this still life has a nice triangular layout with bold dark shadows along the floor of the elements.
 It seems a perfect photo for the base of a pyro project until you gray-scale the image. Suddenly those bright orange and yellow flowers disappear into the background area. What appeared to be a bright highlighted area on the oak basket is now a dull mid-tone value. There are very few white highlights.
The flowers on the floor of the still life have little definition between one flower and another as all have taken one the same tonal value. This is also occurs in the basket flowers. The gray-scale of the flowers nearly matches the gray-scale tones of the background behind the flowers.
Having gray scaled the photo we discover that it was the hue – the pure colors – of the photo that carried the visual impact. Without the color hues the flower tonal values disappear into the background tonal values.
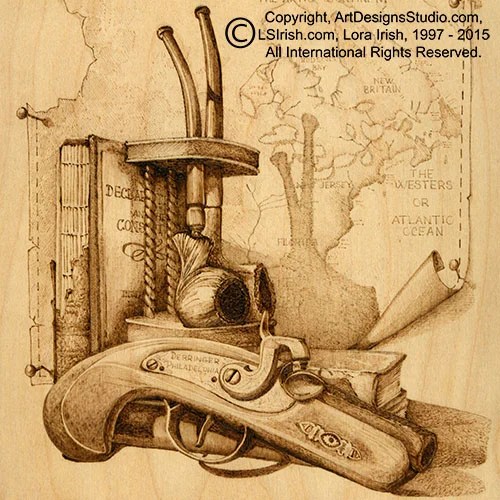
As we work through this tutorial we will take an in-depth look at why this bright, colorful still life is not suitable as a sepia toned pyrography painting.
 A VERY SIMPLE DRAWING
As you look at the photo and colored pencil drawing to the left you may see a common tomato, unremarkable, and not something that you might choose as the base for your next pyro project. Yet, this simple tomato holds a fast amount of information on how your eye sees an object, how light effects the tonal value of that object, and how color and shadow interact to create an image.
In this tutorial you will explore the differences between color and tonal value; direct and reflected light, cast and reflected shadows; and how to put those aspects to use in your wood burning. This tutorial will focus on the colors, gray-scale tones, and sepia tones found in photographs and colors.
TERMINOLOGY
 Cast shadow – a shadow created because an object blocks the area from the light source
Contour – the curvature of a shape
Gray scale – a tonal value scale worked from white to black
Highlight – an area of direct sunlight
Hue – pure color, as red or blue, without white, gray, or black tones
Primary color – red, blue, and yellow; colors that can not be created by mixing other colors
Profile – the outline of a shape
Reflected light – a highlight created from light that has bounced off another surface
Reflected shadow – a shadow that has bounced off one surface onto the main object
Secondary colors – colors created by mixing two equal parts of two primary colors
Sepia scale – a tonal value scale worked in shades of brown
Tertiary colors – colors created by mixing two parts of one primary with one part of another
Tonal value – the amount of white, black, or gray contained in a color tone
Tones – a color with white, black, or gray added
EXPLORING THE BASICS OF YOUR PHOTOGRAPH
Any pyrography pattern, design, or photo will hold eight basic ingredients – form, arrangement, depth, texture, color, light, shadows, and focal points.
Form – the basic shape of each element within the design. For this photo we have the shape of the flowers, the shape of the flower centers, the shape of the lamp, the shape of the basket, and the shape of the dark shadows on the floor of the layout.
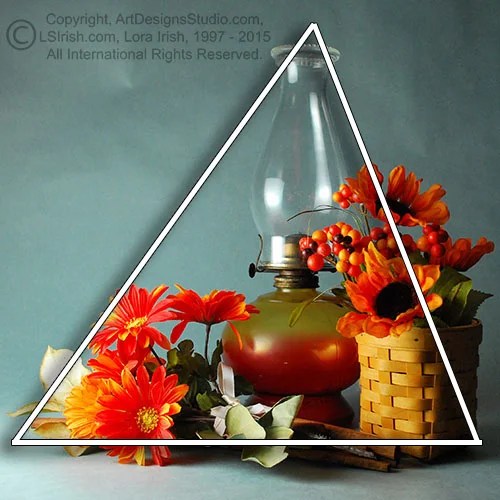 Arrangement – this describes the boundary lines that hold the main elements of the design. For our photo the elements can be captured in a triangle, making this a triangular arrangement. The elements in this photo can be contained in a large triangle that starts on the left at the tip of the most extended leaf, to the top edge of the glass globe, and then to the blackest shadow point behind the basket.
Texture – the physical characteristics of the surface of each element – the weave of the basket reeds, the ribbing in the flower petals, and the smoothness of the glass globe.
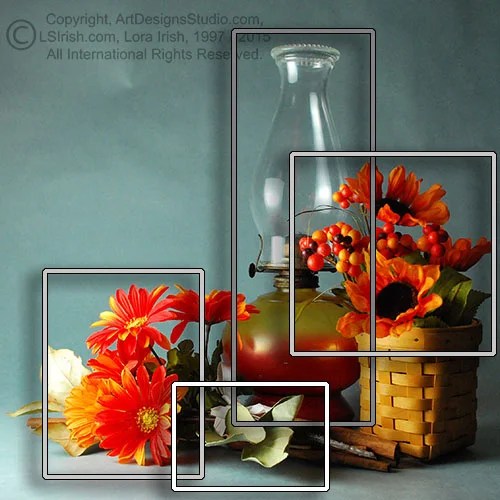 Depth – includes the air space behind the elements, the elements that are deepest in the layout – background elements shown in the deep gray boundary lines, the elements that fall in the middle of the designs – the mid-range elements shown in the light gray boundary lines, and the elements that are in the front area of the design – the foreground shown in the white boundary lines.
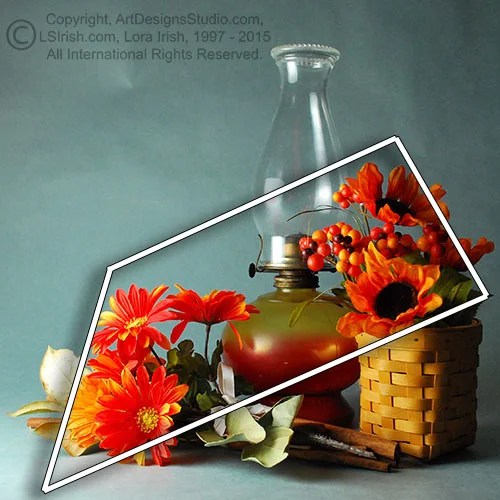 Color – the hues of each element – red, blue, or yellow primary colors. Colors can create their own boundary or arrangement lines within your photo as shown in the rectangular arrangement of the red tones of this photo.
 Light – those areas that are directly hit by your light source – the bright and mid-tone whites of your wood burning. Highlights can fall at any depth in your designs. In the photo the brightest highlight falls on the glass globe which is in the background depth area of the photo.
 Shadows – this describes the darkest tonal values of the wood burning that are created because those areas are blocked from direct light.
 Focal Points – a focal point is the area of the design that first catches your attention. There can be multiple focal points in any design, with one dominate point and other minor points. The focal point of our practice photo is the bright white highlight that falls on the chimney of the lamp. It becomes the focal point because it is the brightest, purest color in the photo, because it falls in the center of the arrangement boundary triangle, and because it falls on top line of the color boundary.
Tomorrow we will work through the color wheel, color groups, highlights, reflected highlights, cast shadows, reflected shadows, and contour tonal values … see you then!
 Lora is the author of the Great Book of Wood Burning,
available at Amazon.com. For more great craft books by
Lora Irish, please visit our Book Gallery.
Color, Shadow and Light in Pyrography Read More »

 With time and age your wood burning and pyrography designs appear to fade into the wood, losing those sharp, dramatic contrasts and very pale tonal values. Recently, while cleaning our studio, I came across several of my very first wood burned projects, which are perfect examples of how as wood ages it develops a distinct patina which directly affects to look of our wood burning tonal values.


