pyrography

Sepia Tonal Value Crayons for Pyrography

Crayons are a quick and easy media to use on your printed patterns when you want to test your tonal values before you begin your pyrography burn.

While browsing through the Back to School supplies at my local big box store I came across Crayola’s 24 pack of Colors of the World skin toned crayons.  This same palette of colors is also available from Crayola as marking pens –  Crayola Ultra Clean Washable Multicultural Markers, Broad Line, 10 Count,  and in colored pencil media – Crayola 24 Colors of The World Skin Tone Pencils.

(These are Amazon.com Affiliate links above.)

All these packs hold a range of yellow-brown, red-brown, and neutral brown color giving us, pyrographers, a full sepia scale to compliment our burnings.


Before you touch your wood watercolor paper, or gourds with your pen, use can use these color packs to establish exactly where you want your shading and how light or dark you want it.


Any mistakes or any decisions to change an area’s value is worked out on paper, not on your expensive basswood plaque.

Free LSIrish.com pattern


Sepia Tonal Value Crayons for Pyrography Read More »

Seminars – Chip Carving, Pyrography, Spoon Carving.

Current, free online seminars for Chip Carving, Pyrography, and Spoon Carving.

Please remember to bookmark your opening page to the seminar, and please share the links.

CHIP CARVINGPYROGRAPHYSPOON CARVING
Chip CarvingChip Carving Workshop

Free Chip Carving Wood Carving Pattern
Free Chip Carving Projects by L S Irish
Back to the Basics of Wood Carving
Chip Carving Common Mistakes
Chip Carving – Sampler Layout Pattern
Chip Carved Chess and Game Board
Chip Carving – Straight-Wall, Curve-Wall, Free Form
Chip Carving – Cutting Triangle and Square Chips
Chip Carving Hand Positions and Grips
Chip Carving Graphed Patterns
Chip Carving Supplies
Chip Carving Seminar
Free Chip Carving Pattern
Sharpening Your Chip Knives
Positive and Negative Space in Chip Carving
Chip Carving Shortbread Cookies
Sharpening Your Chip Knives

PyrographyLandscape Pyrography

1 Definition of Pyrography
2 Safety
3 Basic Tool Kit
4 Wood Burning Systems
5 One-Temperature
6 Rheostat Tools
7 Variable Temperature Tools
8 Wood Burning Pen
9 Hand Grip Positions
10 Loop Tip Pen
11 Ball Tip Pen
12 Spear Shader
13 Spoon Shader Pen
14 Practice Board
15 Wood Burning Media
16 General Kit Supplies
17 Cleaning Your Tips0
18 Grain Direction
19 Sanding the Wood Blank
20 Transferring the Pattern
21 Graphite on an Irregular Shape

22 Pencil Graphite Rubbing
23 Pattern Re-Alignment Marks
24 Tonal Values-
27 Finishing
25 Patina
27 Working a Sepia Value Pattern
28 Rooster Celtic Knot Project

Spoon CarvingArt of Spoon Carving

Four Methods to Cutting a Wooden Spoon Blank
Spoon, Fork, and Ladle Styles for Wood Carving
The Art of Spoon Carving by Lora S. Irish
Wood Carving a Basic Wooden Spoon
Styles of Wood Carved Spoons
Welsh Love Spoons
Welsh Love Spoons Introduction
Basic Cutting Techniques
Carving A Chain and Ball
Ball and Cage Carving

LSIrish.com is an Amazon Affiliate

Seminars – Chip Carving, Pyrography, Spoon Carving. Read More »

Working with Pure Color Hues

I have been working on three brand new e-projects for my pattern website at ArtDesignsStudio.com and in today’s work of one of these new e-projects I realized I had a set of images that taught the power of working with pure color hues.

I’d like to share these images with you !!!  Please click on any image for a full-sized photo.

We work with three types of color in relationship to their tonal values – pastels, pure hues, and jewel tones.

Pure hue = a color that has not been altered by the use of white, gray, or black as red, yellow, and blue.
Tonal value = the amount of white, black, or gray in a color as a pale gray tone to a dark gray tone.
Pastels = pure color hues that have white added as pink, pale yellow, and baby blue.
Jewel tones = pure color hues that have black added as maroon, deep gold, and gunmetal blue.

Tonal values in pyrography are what we use to shade and contour an area of the design, working in sepia (brown) tones.

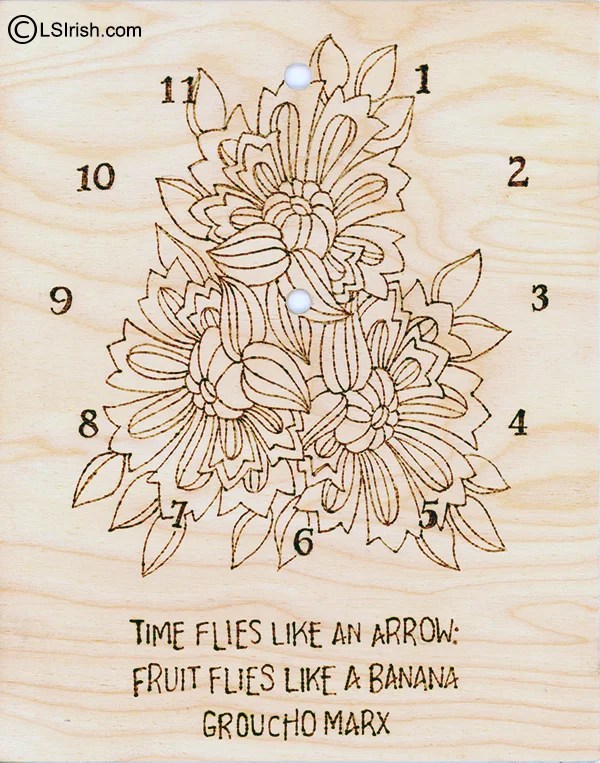
1  The images below show my pyrography shading for one of my upcoming new projects.  I am working on birch plywood using my Colwood  burner with my loop-tip pen and a soft, scrubbie stroke.  The image to the right is the gray scaled photo of this shading which shows the black tonal value range.


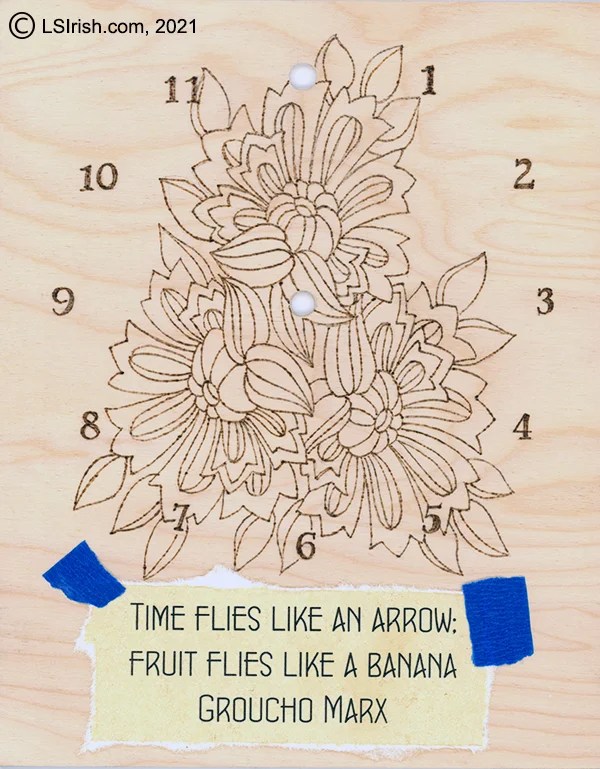
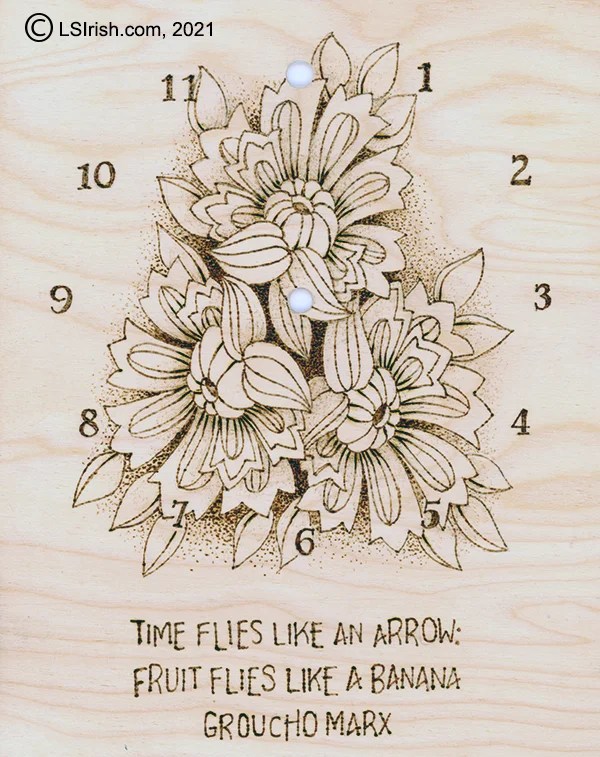
2  After my shading was worked I added my fine line doodle detailing using my ball-tip pen at a medium-hot setting.  Part of that detailing step included creating some solid black areas in the design.  Again, to the right is the gray scale image, showing only the black tonal values.  All tonal values to this point have been specifically created with the tool tip and burner temperature setting in my pyrography.


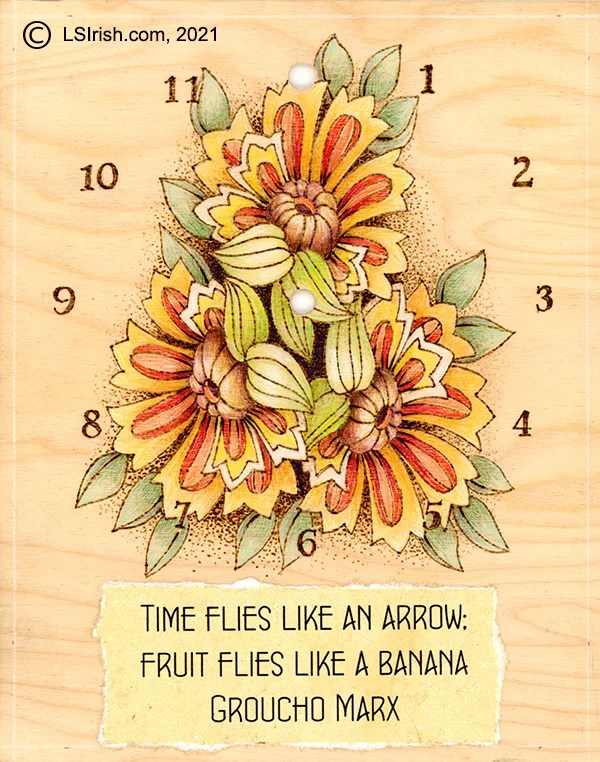
3  But what happens to that pyrography tonal value work when colored pencils are added to give individual coloring to the design.  In this photo you can see the added color pencil work, using artist quality pencils which contain little or no chalk base. Inexpensive colored pencils, or school quality sets often contain chalk as the base filler which adds a white, gray, or black toning to the color hue.  Artist quality pencils use either a wax base which makes the blending of the colors easy without changing the color tones or if you are using watercolor pencils no base at all.

I am working with pure hues – red, yellow, and blue or secondary and tertiary mixes of those hues.  I have used some white as shown in the small left-side tear drop accents and I have worked a graphite pencil shading in the background area directly to the birch plywood.

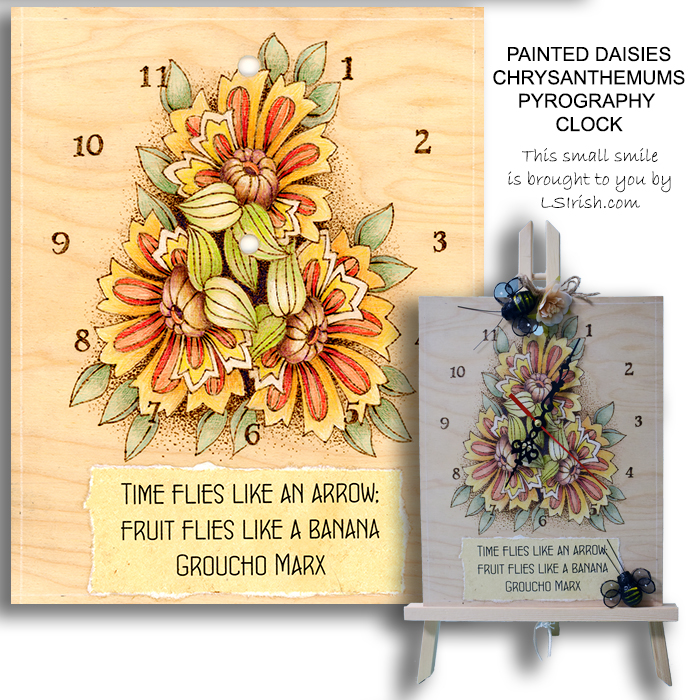
4  Now let’s compare these three stages of work.  Stage one is the simple pyro shading, stage two is the pyro detailing, and stage three is the addition of pure color hues using colored pencils.  Now compare the gray scale photo of stage two to stage three and you will see that the colors have added very little to almost no tonal value to the work.

This means that all of my pyrography tonal value shading remains unchanged and therefore totally in my control even when I am laying colored pencil over the work !!!!

OK … I’m off to work on your new e-projects but will get back to you if I come across another ‘quick tip’ idea.

Thanks you ~ Lora Irish


Working with Pure Color Hues Read More »

Free Pyrography Clock Pattern

This pyrography project uses a 1/8″ x 8″ x 10″ basswood plywood plaque as the base media for my newest kitchen clock work.  It has been a fun project that’s included wood burning, colored pencil art, and collage applique, plus a little bit of bling with twine, silk flowers, and two black bumble bee accents.

free pyrography clock pattern

Even though the 1/8″thick plywood can warp with high-heat burning or high-humidity conditions, it is so light weight that the small quartz battery clock hanger fully supports the project – you can hang this anywhere.

My finished painted daisies pyrography clock is show displayed on a small wood easel and, while meant to go into my kitchen is still sitting on my computer desk.

Your free Lora S. Irish pattern is just below the supply list.


Supply list: Amazon.com links

Walnut Hollow Creative Woodburner Wire Tip Wood Burning Tool
(Note – this Amazon link shows the Creative tool on sale at 42% off as on Feb. 11, 2021)

8″ x 10″ x 1/8″ basswood plywood
(This link offers a 15 sheet pack of 12″ x 12″ x 1/8″ sheets)

Saral 12″ x12′ Graphite Transfer Paper

Quartz Clock Movements with Black Hands

Handmade Antique Deckle Edge Blank Paper – A4 Size Package of 50

Scotch Quick Drying Tacky Glue

Zenacolor, 120 Watercolor Pencils, Numbered, with Brush and Case

2 – black bumble bee picks (I found mine at Michaels.)

Easel Tabletop Painting Easel with Canvas Sets(4 Packs) Wooden Art Table Easel Stand


The featured quote: 

Time flies like an arrow: fruit flies like a banana. ~ Groucho Marx


Free for Personal Use Pattern:

free pyrography clock pattern

For more floral clock ideas please visit ArtDesignsStudio.com, my pattern website.
Henna Tattoo Patterns 1

Henna Tattoo Patterns 2

Floral Clocks

Step 1:  Prepare your wood plaque by lightly sanding the wood with 220- to 320-grit sandpaper, working the sanding strokes with the grain of the wood.  Remove all sanding dust.  Using graphite paper, trace your pattern.  Using the ball-tip pen and my Walnut Hollow Creative tool, I burned the general outlines of the daisy pattern, numbers, and quote onto my wood plaque.  I used a medium-hot setting of 6 – 8.

When the outline is completed, erase any graphite lines or pencil lines that remain from the pattern tracing step.

free pyrography clock patternStep 1


Step 2:  I was not happy with my lettering burn, but very pleased with my outline work.  My solution was to create a collage paper piece to add to the plywood that would carry my quote while covering up my wood burned letters.  I chose a heavy, yet flexible antique paper that easily went through my home computer printer.  You can see that collage piece temporarily placed over the burned letter.

free pyrography clock patternStep 2


Step 3:  Still using the ball-tip pen and a medium heat setting of 4 – 6, I have added shading to the background area of the pattern.  Lowering the temperature a bit more to the 3 – 4 heat level, I then worked light shading into the flowers and leaves.

free pyrography clock patternStep 3


Step 4: When your burning is done its time to get out your favorite artist-quality colored pencil set.  Do a quick google image search under ‘painted daisy chrysanthemums’ for coloring ideas.

I used tones of yellow through bright red for the petals, yellow greens for the inner flower leaves, and green teals for the background leaves.  Tones of sienna, golden brown, and chocolate make up the flower centers.

Both white colored pencil and white chalk pastel pencil was used to brighten the highlights of the work.

Lay several thin lines of quick-dry tacky glue to the back of your collage paper.  Use a stiff piece of card stock to evenly spread the glue.  Position your quote to your plaque and press lightly into place.  Place a heavy book on top of the quote to press the paper evenly to the wood and let dry.

Several light coats of matte spray sealer.  The sealer protects your raw wood, colored pencil work, and collage paper.


free pyrography clock patternStep 4


Step 5:  Here’s my finished clock with the quartz clock movement inserted, bees in place, and just one fun silk flower.

free pyrography clock pattern

Hope you have fun creating your own pyrography clock!  Thanks for stopping by my blob ~ Lora

Free Pyrography Clock Pattern Read More »

Limited Color Palette for Wood Crafts

A limited color palette allows you total control over which elements in your painting become dominant; which become secondary; and which fall into the foreground, mid-ground, or background.  So whether you do fine art paintings, wood carvings, or pyrography, understanding how  limited palette can work for your craft makes the painting steps so much easier.

You probably are already using a limited color palette but may not realize that the way you chose your colors has a name and purpose. So let’s do a little art color theory exploration.

What captures your attention first?
   1. The barn scene.
   2. The path and background mountains.
   3. The Christmas tree and fence lights.

It is the Christmas tree and fence lights that catch my eye. The barn scene becomes a secondary element which simply tells the story of where that Christmas tree is located.  The reason the tree is dominate is because I have used a limited color palette.


PLANNING YOUR PALETTE
Limiting your color palette does not necessary mean using just a minimal number of colors, although that is one method of creating a limited palette painting.

This painting used fifteen different colors but specifically limits where each color can be used.
For this sample it means that I have carefully planned in advance where I would use my colors and what type of color – neutral, pure, or tonal value – I would use for each element.

I began by categorizing each element in the painting as a neutral area, natural area, man made area, tree lights area, and the main feature of the design. This gives me five types of elements in the pattern.

ASSIGNING TONAL VALUE PALETTES
Neutrals are my blending and shading tones for my natural and man made elements. These are simple white, black, and mid-tone brown.

Naturals are my snow, sky, mountains, and trees. For this palette I chose mid-tone gray-scaled colors of medium blue-gray, medium purple-gray, and medium green-gray. All three have the same muted mid-range gray tone which unities them on the tonal value scale.

Man made elements include the barns, the silos, and the fence posts. To make these areas slightly different from the natural tones I have added a medium red-gray to my colors. This color is only used in those man made objects.

Tree light elements use a total new palette of only primary and secondary pure colors that contain no white, gray, or black toning.

Highlights of pink and pale bright green are used only in the primary element of the main Christmas tree to make it the dominant feature of the entire design.


GRAY SCALE V. PURE COLOR
Gray-scaled tonal value colors are used throughout this scene, with the exception of the tree light color palette.
The greatest contrast of those tones are found in the barn roof overhangs where the pure white of the snow meets the darkest black tone of the barn wall shadows. The strength of this black-white contrast is most often found in the front elements of your mid-ground area.

As you come forward in a scene, into the foreground, more colors can be distinguished and therefore there are less black-toned elements. A foreground tree trunk has shades of brown and gray where a mid-ground tree trunk tends to lose that coloring therefore going into the black-tones.

Background scene elements tend to be in the white-toned area of your colors. Distant trees, mountains, and the sky area of worked in the pale white-gray tones.


PURE COLOR TONAL VALUES
Pure colors as primary and secondary hues have no added white, gray, or black tone and therefore no real tonal value.

Those bright pure colors become mid-toned with only as much visual impact to the design as the background mountains.
In the gray scaled painting what has become dominant are the areas of greatest tonal value contrast – those areas where the blackest tones lies directly against the brightest white tone.

Home Sweet Home- Jewel-Toned Dark Value Palette
This Home Sweet Home hen uses a limited palette of only dark-toned valued colors – dark red-brown, dark green-blue, dark yellow, and dark brown. The dark toned colors are often called jewel tones.
As a folk art design the elements in the pattern are simple and a very limited color palette emphasizes that simplicity.
Pattern available in Hens, Roosters, and Chickens


Snow Day
My final example of limited palette coloring for your wood crafts uses only primary
and secondary colors. No tertiary hues are used.  Since this is a wood burning this small wall heart
was painted using watercolors which allow all of the sepia burning to show underneath the hue.
The full tutorial and pattern are found here …


WHAT DOES THAT MEAN FOR OUR PAINTING?
It means that color dominates tonal value, that dramatic changes in tonal value dominate over mid-toned values, and that by choosing to limit our color palette we, the artist, decide which elements we want to have the strongest impact in the final design.

I can push an area forward by using pure color hues or I can set the element firmly in the mid-ground range by using dramatic tonal contrasts, or I can push the area into the far background by using closely related mid-toned values.

Ceremonial Mask – Transparent Wash-Tone Palette
Only very water-thinned, pure color make the limited palette for this Ceremonial Mask relief carving.
By only using transparent coloring and coloring without a gray-tone addition,
the wood grain and antiquing remain dominant.
Pattern available in Ceremonial Masks


HOW DO I GIVE EXTRA IMPACT?
Our original limited palette contains only two pastel tones – pink which is red plus white, and pale Caribbean green which is green plus white. Neither of these colors contain gray or black.

Those two pastels, used only in the main Christmas tree are enough color change to separate this tree from the other lit pine tree and the fence line lights.

Click on the image below for a free, full-sized, printable pattern.


Limited Color Palette for Wood Crafts Read More »

Scroll to Top