I had a question from WoodWorkingChat.com on the Wood Spirit Carving Project that is being posted right now, that I thought I would share with you. The question was “How do you pick the right sized bench knife?”
Please remember you can click on any image for a full-sized photo.
Quality of the Steel
There are three important considerations in which bench knife you purchase. First is the quality of steel in the blade, which determines whether you can bring the knife to a very sharp, fine point with a sharp edge. While your hand will adjust to a knife handle that is not an absolute perfect in fit, there is nothing you can do to improve a poor quality steel blade or force it into holding an edge.
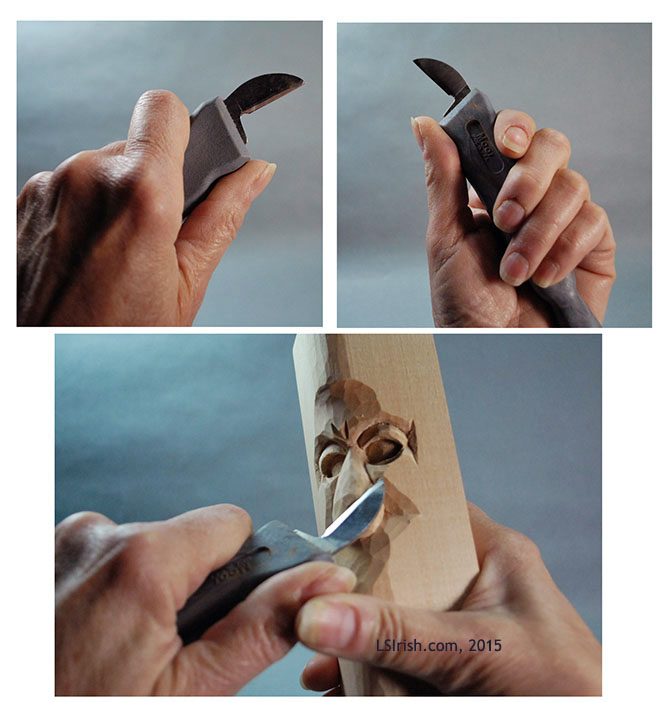
This top photo shows an ergonomic handled chip carving knife. I use this one for my general craft needs as cutting paper, cutting chipboard, or cutting leather. The handle is slightly too wide for a comfortable grip in my hand, and the extension of the knife point beyond the hand grip is a touch too long. Yet, this knife would be a perfect grip for a carver with a larger hand size than mine (woman’s small). The steel of this blade is very high quality.
Length of the Blade
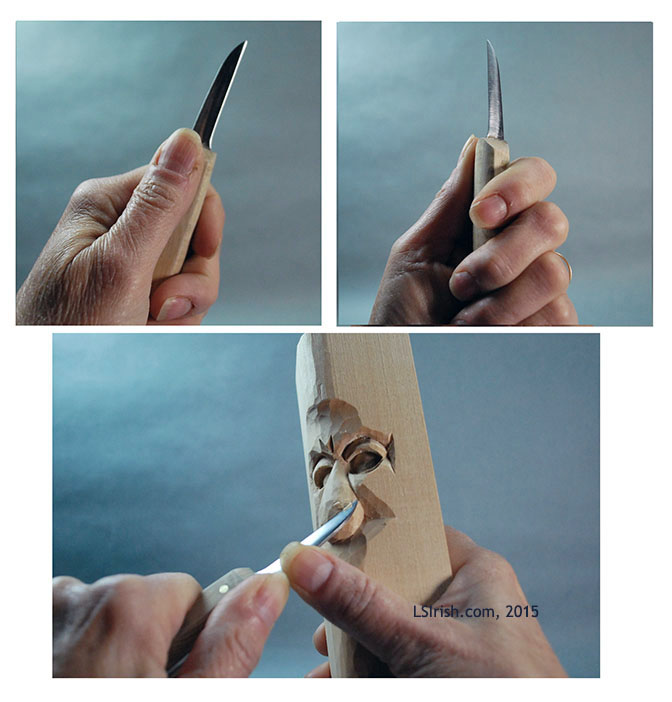
Second is the length of the cutting blade. A long bladed bench knife is perfect for de-barking walking sticks, for long whittling cuts, and for general shaping.
This second photo shows a long bladed bench knife. This is the classic bench knife that is often shown for beginning carvers, yet its primary use is for long whittling strokes as de-barking walking sticks or rounding over the corners of a practice block. The handle of this knife fits my hand perfectly, but the long blade pushes my fingers away from the wood. I use this one for rough-out work, but never detail or shaving work.
Fit of the Handle
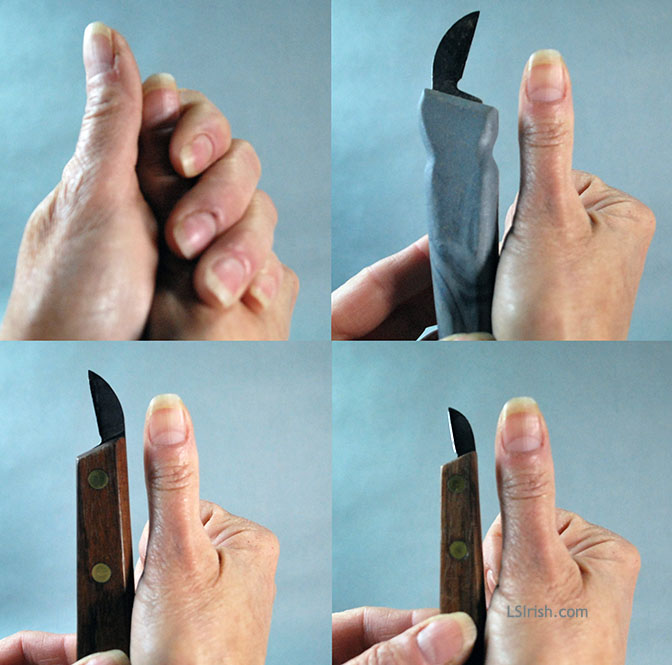
Finally, the third consideration is how the blade handle fits in the palm of your cutting hand. I use ‘the rule of thumb’ to size my bench knives. For a moment extend the thumb of your non-dominate hand in the ‘thumbs up’ position. Wrap your dominate hand around that extended thumb with the extended thumb tip resting at the mid-joint of the first finger. Use a light, semi-open grip. For me, the size and length of that extended thumb is the perfect size for my bench knife and tool handles. (See bottom photo)
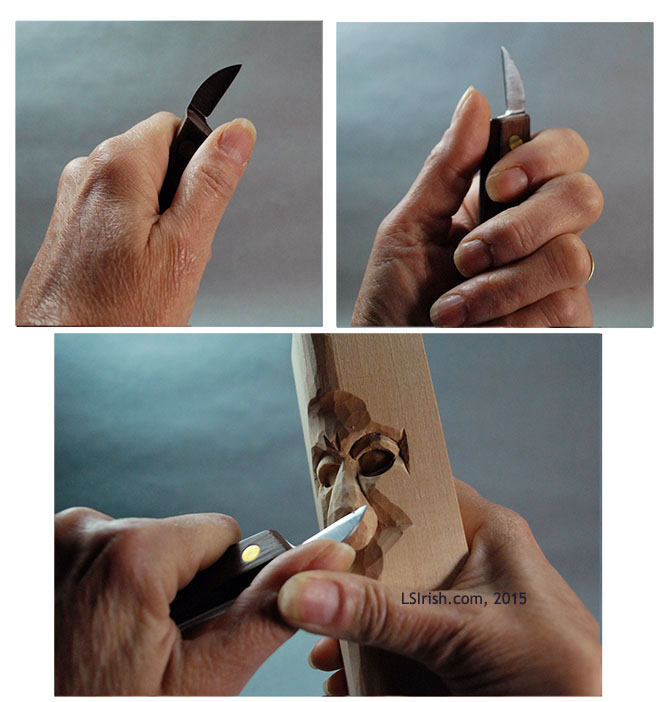
The third photo shows my favorite bench knife, a rose wood handled large chip carving blade. The handle is exactly the size of my extended thumb, and the blade point is never more than one inch away from the wood.
I have a second chip carving knife that I use regularly that is classified as a small chip knife. The knife has a very short, narrow handle and a 3/4″ or less blade. A short blade, as a large chip knife, brings your hand right onto the carving wood, which gives you more control over the movement of the cutting tip. Very small, short blades, as a small chip knife, are perfect for getting into those tight corners or creating undercuts.
Rule of Thumb Sizing
If I am sizing a palm handled tool, I slide my non-dominate hand further up into my dominate hand so that the first joint of the extended thumb rests against the mid-joint of my first finger. This places the pad or base of my extended thumb into the center of my carving hand palm. The size of my thumb pad is about the size that I want for my palm tools.
Which bench knife or carving tools work best for you is determined by what style of wood carving you are working, the size of your hand, and your hobby budget. Of note is that many wood carvers own and use more than one bench knife or set of gouges, so that we will have on hand the right tool for the right job. As your hobby grows so will your tool hoard … 🙂
If you are just starting your hobby of wood carving you may wish to check out our article on the Wood Carving Tool Kit.
Not sure what tools, knives, or carving sets will get you started in the craft of wood carving, chip carving, and whittling? Are you wondering what general woodworking and craft supplies you might need for your first carving project? Have fun browsing through Lora Irish’s carving kit which includes wood carving beginner sets, sharpening stones and honing boards, rasps, rifflers, sanding and tracing paper, compasses, rulers and t-squares, and so much more!
A basic relief carving or whittling tool set contains far more than just your carving tools and knives. Let’s take an in-depth look at some of the common supplies you may use in your carving craft. All photos in this article are large-sized and labeled, just click on any image to show the full-sized photo.
Plus there are lots of links to Amazon.com, so that you can do a little window shopping as you prepare and plan your own wood carving supply kit.
We have spent the last week looking at the wood carving art of chip carving in this free, online seminar by Lora Irish, which includes free chip carving patterns. Today I thought we might take a few minutes and look at some of the common mistakes that can happen in your wood carving.
Let’s look at a few of the common problems and errors that can happen in chip carving. Please note that if you are working a practice board you may find that the basswood is not the high quality that you might find in a prepared basswood wood carving blank. Small chip outs are more common when working practice board quality basswood.
1. Ragged walls can be caused by poor quality wood or because of an improperly sharpened knife edge. A poorly sharpened knife, or an incorrect bevel to the knife edge are the primary causes for cutting problems in chip carving.
The craft basswood boards available at your local hardware store often show some ragged wall cuts. A dull knife tears through the wood instead of cutting the wood. When working on a high quality piece of basswood, check your knife edge as soon as you discover a ragged wall.
2. Each chip should have a sharp, clean point at the center of the chip well. Correct this problem by re-cutting along one side of the center point piece.
3. This chip’s wall was cut using several, staggered strokes. Re-cut the wall using one full stroke that covers the entire wall side.
4. In this sample the knife effect began the wall cut slightly away from the intersecting joint line between the two chips. You can re-cut one of the chip walls to thin the intersection.
5. Every chip carver discovers a very wobbly edge chip walls. I find this problem most often occurs when I am cutting through a spray adhesive paper pattern. Use the blade’s edge to shave just the curved area of the line, avoiding the two end points.
6. Chip outs happen and are caused by several reasons. If you are working on a heavy grained wood as sugar pine, the change in the grain pattern can cause a thin point to break free.
On soft carving woods as basswood the point can chip because the stroke is pulled into the point. The pulling action tears the point away from the plaque. Try cutting your finest points with a push stroke instead of a pull cut. With a push stroke you literally lay the edge of the blade along the line and push the blade down into the grain.
Over cutting one side of the point, reaching the blade point too deeply into the wood, can cause a point chip to break away when the second cut meets the first. Try scoring the point lines first by using a light pressure in the blade and cutting an extremely shallow cut.
Chip outs can be repaired by using wood glue and a tooth pick. Place a small drop of glue on the board at the break out spot. Place the broken chip back into position. Allow the glue to dry thoroughly, about one half hour then re-cut the chip.
7. If your knife feels as though it is cutting through grainy wood – a sandpaper feeling – check your knife’s edge for sharpness. It bares repeating that the biggest problem in chip carving is either too steep a blade bevel or an edge that has lost its hone.
Please stop by Art Designs Studio, Lora Irish’s wood carving, pyrography, and chip carving pattern website.
Chip Carving Basics E-Project, Everything from this Chip Carving Seminar and more! Learn how to create a wide variety of chip carving designs using different styles of easy-to-cut chip motifs, by Lora S. Irish. 37 page, PDF file format, easy to print e-project and the full cp015 Chip Carving Pattern package with 110 ready to print chip carving patterns.
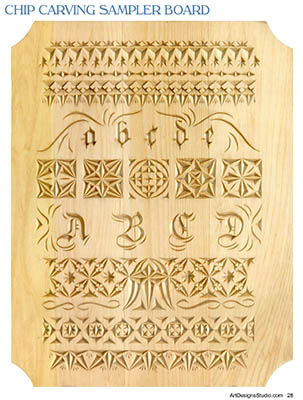
For our final session in this in-depth, step by step seminar on Chip Carving, we will look at a classic carving layout for a needle-arts styled Sampler layout. This layout can easily be adapted to use any border, line, or motif chip carving pattern.
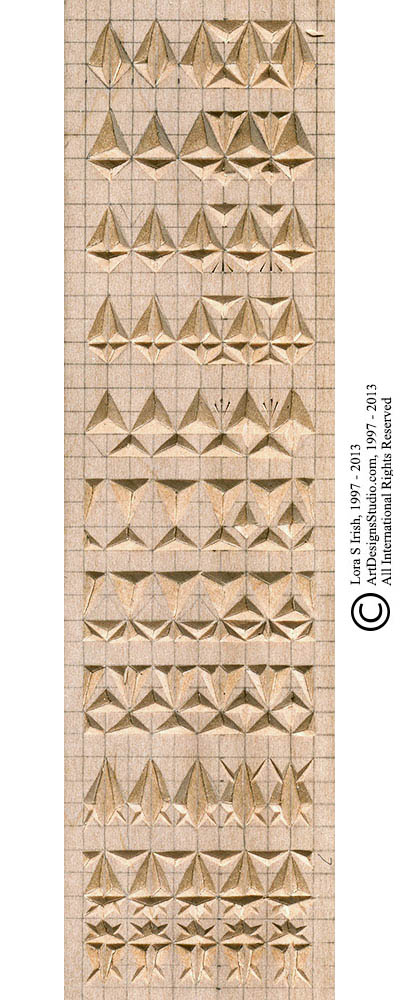
There are several ways to learn and practice your chip carving. The first is through the use of practice boards. We have discussed this idea several times during this seminar, but it is worthy of one more look. In the sample board to the right I have worked a series of progressions using the simple 3×2 grid diamond motif that has been shown throughout these pages.
The grid pattern was penciled directly to the basswood practice board using 1/4″ squares. Each 3×2 grid motif was marked using a darker pencil line. As I worked each row of the practice board I treated that basic 3×2 diamond differently in how many times I divided the diamond into triangles, the style of cut, in the positive and negative space, and in the addition of accents.
As you look at the photo sample you will see that the first two diamonds in each row show just the cuts used to create the diamond. The last two diamonds show the accent chips and cuts that can be used. This creates 9 variations of the 3×2 diamond and 9 possible borders.
Our Chip Carving Pattern Package contains four patterns which show 36 variations of just the 3×2 diamond motif that can be used to change, alter, and vary any of the larger pattern layouts using both triangle, and straight-wall cuts, as well as negative space.
Classic Needle-Arts Sampler Layout
The sample shown right is a finished carving from our Chip Carving Pattern package, available at Art Designs Studio. It is also available in our Chip Carving E-Project, a 37-page PDF file e-book and 110 chip carving chip variations and patterns.
Beginning in the 15th century needlework samplers became a way in which young women could show their skills with a needle and thread. Small patterns, motifs, and borders decorated the linen cloth as a record for future use. In essence, a needlework or needle-arts sample is similar to the practice boards we create for our wood burning, wood carving, and in this lesson our chip carving.
The layout pattern is very simple and perfect to practice and experiment with small chip carving patterns. The top rows will be small border patterns. The central area of the sample is used for larger, individual designs or rows of similar sized motifs. The bottom rows return to the border patterns. This places the largest visual units at the center of the layout and the small designs at the top and bottom areas finished work.
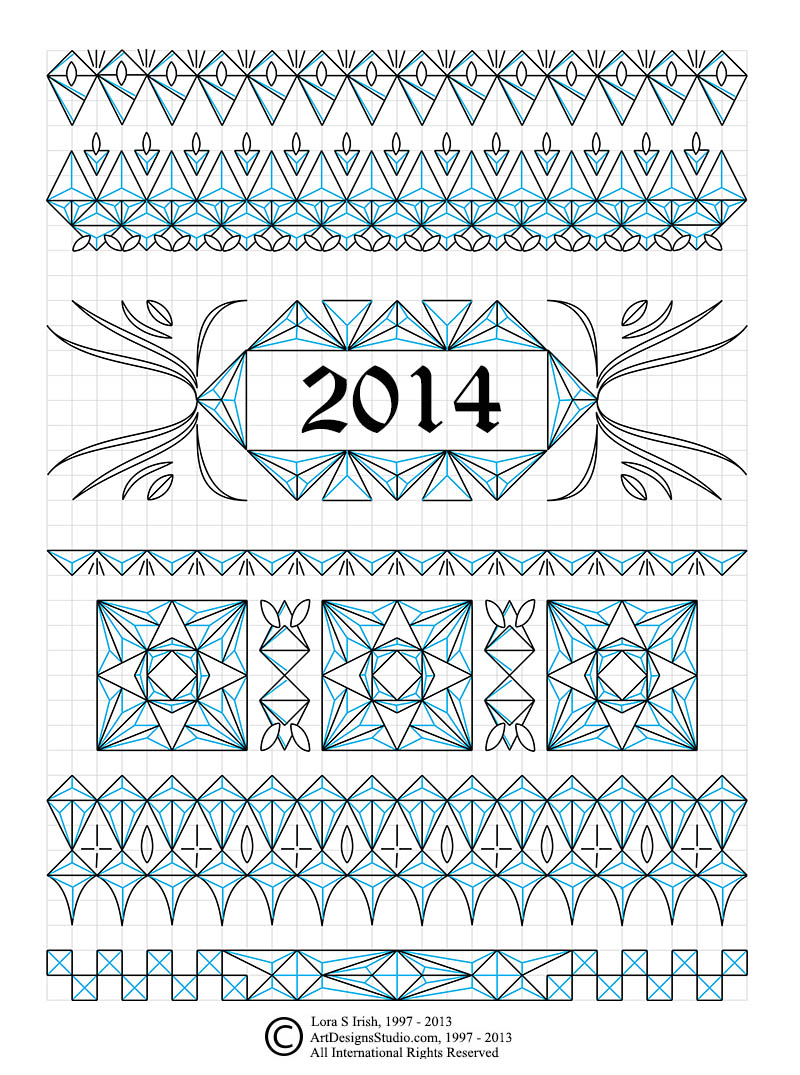
Sampler Layout Chip Carving Pattern
The Sampler Chip Carving Pattern, shown right, uses the needle-arts layout. Please click on the image for a full-sized, printable pattern.
The third row shows the first large motif area and uses both free-from long line work as well as large triangle chip cuts. The central rectangle area can be used for a name, date, special event, or for a small free-from pattern.
A thin, small border line of triangle chips with stab knife accents fills row four.
A 6×6 square motif is used in row five and separated with a small mirror-image 3×2 straight-wall chip cut.
Row six uses curve-edged chips along the bottom edge of the border pattern. It also makes use of negative space, captured between the 3×2 motifs as well as both cut oval and stab knife accents
The last row, number seven, combines a simple alternating square chips border with a triangle chips motif. It shows on the two sides of the triangle motif how easy it is to adjust the triangle chip sizes to fit into a specific space.
I hope that you have enjoyed this free, online Chip Carving Seminar. Please feel free to drop me an email note if you have any questions.
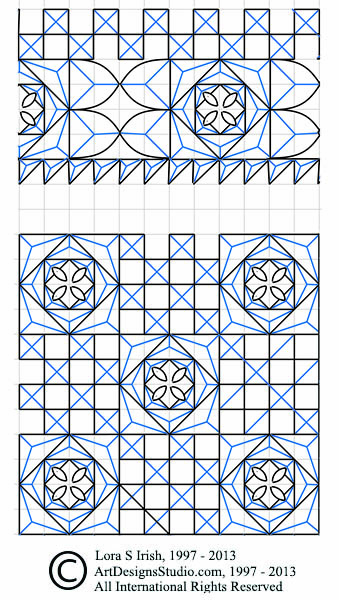
Today we are going to put it all together as we work through a Chess Board – Game Board Chip Carving layout. We will use triangle, square, curve-edge, and free form chips to cut this 13″ square board. I will be working a small practice board using 1/4″ basswood. This small sample allows you to learn and experiment with each chip style used to create the larger board.
The finished sample, right, is a composite image made from my smaller practice board to show how your finished large board will look.
4″ x 8″ x 1/4″ basswood practice board printed copy of the practice pattern removable spray adhesive large chip carving knife 320-grit sandpaper13″ x 13″ x 1/2″ to 3/4″ basswood plaque is needed for a full-sized board.
Practice Board Pattern
Click on the practice board pattern to the right for a full-sized, printable pattern.
Step 1
Lightly sand your practice board with 320-grit sandpaper. Work the sanding with the direction of your wood grain to avoid fine cross-grain scratches. Remove any dust with a clean, dry cloth.
Step 2
Make a printed copy of the practice pattern. Following the directions on the label, spray the back of the pattern paper with an even coating of spray adhesive. Place the paper pattern onto the board, aligning the edge of the pattern with the edge of the board. Rub the paper gently to insecure that it is in full contact with the wood. Allow the spray adhesive to dry thoroughly, about one half hour.
Step 3
Begin your practice session by checking the sharpness of your chip carving knife. Work your knife over your sharpening stones as needed to create a low bevel to the cutting edge. As you work through steps 4 to 6, try to keep the angle of the chip knife the same for each side of the triangles. This will keep the depth of the chip wells consistent throughout the motif.
We will work the border motif square from the center out towards the curve-edge chips.
Full-sized Chess Board Chip Carving Pattern
This pattern shows one quarter of a full-sized chess board layout. Please click on the pattern for a full-sized printable pattern.
Step 4
The first area that we will work is the square motif created with triangular chips. This motif is made up of three rows of alternating triangles around a diamond shaped negative central area. Following the directions for cutting Triangle Chips, working one triangle chip at a time, cut the three sides of each inner row triangle.
Step 5
Work the next row of triangle chips in the square motif. Cut the side of the new triangle that shares the side of the inner triangle first, then cut the remaining two sides. By cutting along the side of a triangle that has already been worked in a previous chip you reduce the minimize the chances of that side breaking or chipping out.
Step 6
Work the remaining, outer row of triangles in the square motif. Again, work the side of the new triangle that shares a pre-cut side with the previously worked triangle first. Then cut the remaining two sides.
Step 7
Next we will cut the small square chip rows that create the side border of the pattern. These small squares are worked holding the chip knife at the same angle to the wood as you did for the larger square motif triangles. For this design the small squares are alternated with small squares of negative space.
Step 8
The curved edge chips on the sides of the large square motif are worked next and treated at three individual chips to make to complete chip pattern. There are two three-piece curved edge chips on each side of the large square motif. Begin by cutting the straight sided triangle that joins the large square motif. Cut the side of this triangle that touches the cut area of the large square motif first, then cut the remaining two sides.
Step 9
Work one curve-edge triangle at a time. For the first curve-edge triangle cut along the straight side that touches the triangles cut in step 7 first.
Next, gently roll or curve the direction of the knife blade to match the curve of the pattern line for the next side of the curve-edge triangle chip. Cut the remaining curve-edge side of this triangle.
Step 10
The inner row of this border pattern is created using small triangles and is cut in the same method as the large triangles in the design. So far we have cut each triangle as an independent chip, working through all of the sides of one complete chip before moving to the next.
You can gang cut chip shapes instead of working them one by one. In gang cutting you cut all of the matching sides of the triangles in an area or group at one time. Example, you can cut all of the small triangle accents along the side that touches the large motif first. Then, rotating the board you cut all of the sides of the row that are at 90 degrees to the main border pattern. The last cutting session works all of the diagonal line cuts for each of the small triangles.
Gang cutting reduces the time need to cut each triangles individually, and reduces the time needed to rotate the board for each and every cut.
Step 11
The inner negative space diamond in the large square motif is worked next by making a small two-cut chip that cuts the inner leg of the inner row triangles.
Lay your blade, at the 45 degree angle, onto the wood at the center point of this inner triangle leg. Push the knife down to cut a small line that goes through the chip wall and into the un-carved diamond area. Turn the knife blade over in your hand and angle the blade away form the first cut at the 45 degree angle. Cut along the same line. This releases a small triangle of wood from the diamond.
Step 12
Repeat steps 3 through 11 to cut the game board squares. Work the large square motifs first, followed by working the alternating squares areas.
Step 13
When all of the chips have been worked remove the paper pattern from the wood.
Check your work for any small problems and correct as necessary. I will note here that in my experience no two chips will ever be exactly alike. In any chip carving there always seems to be a few chips that are not exactly on the pattern line, or perhaps have a little deeper or shallower well.
Unless you are placing your chip carving into a contest or carving show, you are the only person that will ever inspect each and every chip that you carved in a full design.
Make what adjustments that you need to but do not become over obsessed with re-working each and every chip that you have carved.
Consistency comes with practice. So for the new chip carvers I suggest that instead of spending a great deal of time re-working one practice project that you move onto your next. In time most of the small problems or errors will resolve by repeated chip carving.
Step 14
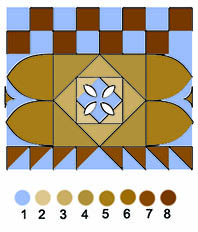
I finished my practice board by applying two coats of linseed oil mixed 1 to 1 with turpentine. The oil finishes deepens the wood and sharpens the shadows in the chip wells. Allow the oil to dry overnight. Work the wood with two to three coats of paste wax, allowing each coat to dry
Chip Carving Workshop by Lora Irish takes you through all of the essential chip carving techniques, from tool sharpening and preparation to hand positions, chip cutting, and finishing. You’ll discover how to use both geometric shapes and free form designs to create wonderfully detailed patterns. Practice projects will have you decorating household items and creating artistic pieces in a variety of original designs. Hope chests, wooden spoons, jewelry chests, clocks, candle plates, serving trivets and decorative plaques are just a few ideas for your new chip carving skills.
Tomorrow, our last day for this Free Online Chip Carving Seminar by Lora Irish, we will look at a basic needle art style Sampler Layout using the free chip carving patterns that are posted to this thread. Thanks for reading today!