beginners project

wood carving wood spirit patterns

Choosing Your Wood Carving Bench Knife

I had a question from WoodWorkingChat.com on the Wood Spirit Carving Project that is being posted right now, that I thought I would share with you.  The question was “How do you pick the right sized bench knife?”

Please remember you can click on any image for a full-sized photo.

Quality of the Steel

wood carving the wood spirit patternThere are three important considerations in which bench knife you purchase.  First is the quality of steel in the blade, which determines whether you can bring the knife to a very sharp, fine point with a sharp edge.  While your hand will adjust to a knife handle that is not an absolute perfect in fit, there is nothing you can do to improve a poor quality steel blade or force it into holding an edge.

This top photo shows an ergonomic handled chip carving knife.  I use this one for my general craft needs as cutting paper, cutting chipboard, or cutting leather.  The handle is slightly too wide for a comfortable grip in my hand, and the extension of the knife point beyond the hand grip is a touch too long.  Yet, this knife would be a perfect grip for a carver with a larger hand size than mine (woman’s small).  The steel of this blade is very high quality.

Length of the Blade

wood carving the wood spirit patternSecond is the length of the cutting blade.  A long bladed bench knife is perfect for de-barking walking sticks, for long whittling cuts, and for general shaping.

This second photo shows a long bladed bench knife.  This is the classic bench knife that is often shown for beginning carvers, yet its primary use is for long whittling strokes as de-barking walking sticks or rounding over the corners of a practice block.  The handle of this knife fits my hand perfectly, but the long blade pushes my fingers away from the wood.  I use this one for rough-out work, but never detail or shaving work.

Fit of the Handle

wood carving the wood spirit patternFinally, the third consideration is how the blade handle fits in the palm of your cutting hand.  I use ‘the rule of thumb’ to size my bench knives.  For a moment extend the thumb of your non-dominate hand in the ‘thumbs up’ position.  Wrap your dominate hand around that extended thumb with the extended thumb tip resting at the mid-joint of the first finger.  Use a light, semi-open grip.  For me, the size and length of that extended thumb is the perfect size for my bench knife and tool handles. (See bottom photo)

The third photo shows my favorite bench knife, a rose wood handled large chip carving blade.  The handle is exactly the size of my extended thumb, and the blade point is never more than one inch away from the wood.

wood carving the wood spirit patternI have a second chip carving knife that I use regularly that is classified as a small chip knife.  The knife has a very short, narrow handle and a 3/4″ or less blade.  A short blade, as a large chip knife, brings your hand right onto the carving wood, which gives you more control over the movement of the cutting tip.  Very small, short blades, as a small chip knife, are perfect for getting into those tight corners or creating undercuts.


 Rule of Thumb Sizing

wood carving the wood spirit patternIf I am sizing a palm handled tool, I slide my non-dominate hand further up into my dominate hand so that the first joint of the extended thumb rests against the mid-joint of my first finger.  This places the pad or base of my extended thumb into the center of my carving hand palm.  The size of my thumb pad is about the size that I want for my palm tools.

Which bench knife or carving tools work best for you is determined by what style of wood carving you are working, the size of your hand, and your hobby budget.  Of note is that many wood carvers own and use more than one bench knife or set of gouges, so that we will have on hand the right tool for the right job.  As your hobby grows so will your tool hoard … 🙂

If you are just starting your hobby of wood carving you may wish to check out our article on the Wood Carving Tool Kit.


Choosing Your Wood Carving Bench Knife Read More »

wood spirit carving with Lora Irish

Free Wood Spirit Carving Project

Cutting the slope of a wood spirits mustacheToday we will work through establishing the depth of the nose bridge, the slope of the nose, the division between the nose and the mustache, and freeing the nose from the cheeks.

So, click on the link below and let’s get carving!

Wood Spirit Carving, Establishing the Slope of the Nose

If you are just joining this free, online wood carving project, by Lora Irish, please check out the links below for your supply list and an over view of the planes of the human face.


cutting the nose bridge of a wood spirit wood carvingCarving the Wood Spirit Face, Supply List
Wood Spirit Carving, Planes of the Human Face


 Other happenings around the Studio

Carving gloves and thumb guards used in wood carvingIf you are a new carver you may wish to check out Lora’s tool kit article for ideas on what tools, knives , and supplies make us a wood carving kit.

Beginner’s Whittling, Chip, and Wood Carving Supply Kit


Free Wood Spirit Carving Project Read More »

beginner's carving tool set

Lora’s Wood Carving Tool Kit

Sharpening stones and leather strops used in wood carving and whittlingNot sure what tools, knives, or carving sets will get you started in the craft of wood carving, chip carving, and whittling?  Are you wondering what general woodworking and craft supplies you might need for your first carving project? Have fun browsing through Lora Irish’s carving kit which includes wood carving beginner sets, sharpening stones and honing boards, rasps, rifflers, sanding and tracing paper, compasses, rulers and t-squares, and so much more!

A basic relief carving or whittling tool set contains far more than just your carving tools and knives.  Let’s take an in-depth look at some of the common supplies you may use in your carving craft.  All photos in this article are large-sized and labeled, just click on any image to show the full-sized photo.

Plus there are lots of links to Amazon.com, so that you can do a little window shopping as you prepare and plan your own wood carving supply kit.

Beginner’s Whittling and Relief Carving Tool Kit – An in-depth look at wood carving supplies

Join us on FacebookJoin us on Facebook!

Get the latest updates, discover the newest posts, find our most recent freebies!  “Like” us today!

Lora’s Wood Carving Tool Kit Read More »

shadow and light in pyrography photographs

Color, Shadow and Light in Pyrography 3, by Lora S Irish

Over the last two days we have been exploring how light, shadows, color, and tonal value are created in a photograph and how they affect the sepia pyrography wood burning.   Today we will look at repeated tonal values, black and white contrast, and adjacent mid-tone in our gray-scale photos.  Next we will take a look at how your eye and brain sees and interrupts images.

Shadow and Light in Pyrography Photos – Day 1
Shadow and Light in Pyrography Photos – Day 2
Shadow and Light in Pyrography Photos – Day 3
Shadow and Light in Pyrography Photos – Day 4

Lora S. Irish books

repeated tonal values in a pyrography wood burningRepeated Tonal Values

A shade of tonal value will be repeated several times throughout any image or photograph. In the tomato drawing three areas that been marked that all share the same tonal value. Each of these areas would receive the same pyrography burning to keep the tones equal.

You will find similar or equal tonal values throughout your gray or sepia toned image even though those same areas show different hues in the color photo.  A medium green, medium red, and medium blue may share the same medium sepia tonal value.

black and white contrast in a pyrography wood burningBlack and White Contrast

Placing one or two areas of the extreme tonal values next to each other gives the eye a place to compare the darkest and palest tones.  The brightest highlight on this tomato lies in the upper left and is adjacent to the blackest tone of the drawing, found in the background area. These two tonal value areas set the whitest and darkest tones of your tonal value scale.

Working an area of high contrast – white against black – creates a visual boundary for your tonal value scale.  All mid-tones must fall between these two extremes.  The boundary tones do not need to be pure white or pure black; a gray-scale can be created starting with a pale gray and ending with a dark gray.

adjacent mid-tone values in a pyrography wood burningAdjacent Mid-Tone Values

In any gray scaled photo you will discover adjacent areas in two different elements that have the same tonal value. In these areas the defining line between the two elements seems to disappear. In our sample there are three areas where the body of the tomato and either the table surface or background share the same tonal value.

When two areas share one tonal value you can adjust one or both of the mid-tone values in a burning to create some contrast. Even a very small change in one area, either going a bit lighter or darker, is enough to redefine your boundary lines.

facebook coupon


How the Brain Interrupts an Image

landscape scene for pyrography wood burningNotice that I did not say how the eye sees an image. The eye receives information about an image or photo in two distinct manners, it is only when those two pieces of information are combined by the brain do we see an image. So where the eye gathers information it is the brain that interrupts that information into one image.

Inside of the eye are two receptors – the cones and rods. The cones of the eye gather information about color, it determines if an objects is red, yellow, or blue. The rods, the second eye receptor, evaluates the amount of light each area is receiving; the rods create the gray-scale tonal values that we use in pyrography. Our sample photo for this section is a wooden hill just after sunrise.


landscape pyrography wood burning Color Receptors – Cones

The sample photo has been altered to remove as much shading as possible while emphasizing the color hue of each area. The gray-green leaves of the forest are now broken into areas of yellow, yellow-green, deep green, and blue. The tree trunks show greens, reds, and yellows.

You can see the colors contained in light when you view a rainbow created through a prism, called a spectrum. Each color in the spectrum has its own specific wave length. When light strikes an object most of those color waves are absorbed by the object. Those that are not absorbed bounce off the object to be received by our eye.

So the color of any object and therefore the color that our eye cones receive are the light wave lengths that the object rejects. We don’t see green leaves, we see the green light waves that have bounced off of the leaves.

gray scale landscape for pyrography wood burningSepia or Gray Scale Receptors – Rods

What the tonal value receptors, the rods, see is equivalent to a sepia or black and white photo. Rods record the amount of light an area is receiving – whether it is in pure highlight or the darkest shadows.


landscape pyrography wood burningCombining the Cones and Rods Images

The brain combines the information sent by the cones and rods to create one image that has color hues and tonal values.

In the photo sample, left, the color image has been superimposed over the sepia tonal value image, exactly as the brain compiles the information it receives. The resulting photo is an excellent copy of the original camera photograph.


Lora Irish on Facebook


Color, Shadow and Light in Pyrography 3, by Lora S Irish Read More »

Toxicity in Pyrography

Toxicity of Wood Burning and Wood Carving Media

Sara emailed me yesterday with a great question about wood and finish toxicity in pyrography.  So I am postponing the next posting for Shadows and Light until tomorrow as I think her question needs to be answered for all of us.

Before we begin please know that I am not a chemist, nor an expert in toxicity of any particular product.  What I can offer is general, common sense ideas that will help you avoid some of the possible health hazards that are possible in our crafts.

If you are having problems breathing, have developed a rash, or have a burning sensation on your skin or around your nose, mouth, or eyes – call your doctor immediately!

Our two favorite crafts – wood carving and wood burning – bring with them some safety and toxicity concerns.  Every aspect of our crafts also can have hazards that can affect our hands, eyes, and lungs.  Below is a listing of links that will get you specific information about wood species, finishes, and chemicals, plus the link to two Poison Control centers.  Please take time to browse through these links and bookmark them in your browser for future reference.

Which surfaces are safer than other surfaces to burn is just the first consideration of many when it comes to health hazards with any hobby.  Let’s look a few safety precautions that you can take to reduce or avoid the problems of toxicity and irritants that can come with wood burning.  Safety falls into four general categories – media, ventilation, handling, and chemical finishes.

Birch, Basswood, and Poplar Pyrography Surfaces

The three most common woods for pyrography are basswood, birch, and poplar.  All three have low toxicity levels but can cause some hand or eye irritation when handled.  Birch and poplar plywood are also common burning surfaces. These three woods are tight grained and carry minimal sap content, and so create a minor amounts of fumes during the pyrography.  Pine is a common pyrography wood, but is a high sap content wood.  As you work pine you will notice that it does create a large amount of fumes.

Extremely hot, intense burnings can burn through the veneer layer of the plywood into the glue layer below, releasing the fumes from glue.  All three of our favorite woods do require some sanding before you begin your project, and therefore release dust into your work area and can cause some lung irritation.

1.  Chose clean, dry known species woods for your wood burning projects.

2.  Check the wood species toxicity lists shown in the links below before you begin your project.

3.  Even low toxicity woods can cause health issues for some people.  Watch for runny or stuffy noses, a burning sensation around the nose or mouth, extra dry or scratchy hands, and any problems breathing. If you develop any of these symptoms while working with any wood burning surface stop immediately and contact your doctor.

Unknown, Reclaimed, or Found Wood Pyrography Surfaces

As you browse through the links below you will discover that many woods, fresh and clean from the sawmill, have medium to high toxicity levels.  If you do not know the exact species of the wood you want to burn you have no way to check in advance whether you will be working a low-level or high level wood.  Unknown woods carry with them unknown hazards.

Reclaimed wood carries other hazards beyond the known toxicity levels of the wood, often carrying fungus, molds, and accumulated dust that develops from long-term or outdoor storage.  Further, wood taken from unknown sources as old barn siding or from older furniture can have chemical coatings or paint left from it original form.  Insect infestations is also common with reclaimed wood.

Pallet wood has become popular as a reclaimed wood for woodworking projects – unknown species, mold and fungus, and the possibility of chemical content.  Pallets are created from subprime quality wood scraps or from ‘trash’ wood that is not high enough quality to become building or furniture lumber.  In the US pallets are marked or stamped to note any chemical treatment or processes – please see the link below before you begin any pallet wood project.

1.  Avoid burning any wood that you can not positively identify.

2. Avoid burning any wood that may have had chemical, oil, or paint finishes.  When you burn something that once had a layer of varnish on the surface you will be releasing fumes from the accumulated dust and dirt, the varnish, and the wood.

3.  Avoid burning any wood that has been water damaged, or has developed mold, fungus, or dust accumulation.

3.  Save those wonderful free reclaimed pallets for your woodworking projects, and even then be sure to follow basic safety precautions.

Gourds as a Pyrography Surface

Gourds are just stunning surfaces for our wood burning and create minimal fumes during the pyrography process.  But preparing the gourds for work does carry health hazards.  If you purchase uncleaned, dried gourds they will have an outer layer of dried skin that is often covered with mold and fungus that must be removed.  Cleaned, dried gourds have this outer layer removed, revealing the wood-like surface of the gourd.

The inside of the gourd also has mold, mildew, fungus, and heavy concentrations of dust for the dried fibers that can cause lung, eye, and hand irritation.

1.  Wear a dust mask during the preparation steps when working with gourds – cleaning, cutting, and sanding steps.

2. Wash the outside of your gourd in hot water and dish washing soap before you begin any project steps to remove all dust or potential mold and fungus spores.

3. Do any cutting and sanding outside if possible or in a well ventilated area.  Wear your dust mask, and you make wish to wear latex gloves.

4.  Once the gourd is cut you can fill the inside of the gourd with a solution of water and Clorox before you begin cleaning out the seeds and fibers.  The clorox will kill any spores from the mold or fungus as well as wet the fibers to reduce the dust potential.  Let the Clorox solution sit inside the gourd for about ten minutes, drain, rinse, then begin your cleaning steps.  You can re-wet the inside of the gourd as needed.

5. Wash your hands often while preparing your gourd to remove any dust from your fingers.

Leather, Watercolor Paper, and Paper Mache Surfaces for Pyrography

All three of the above medias are chemically treated.  Leather can be chemically tanned, dyed, or waterproofed.  Use vegetable-tanned, undyed leather only for wood burning.  Purchase your vegetable-tanned leather from a craft or leather working source.  Avoid using reclaimed leather products as old purses, coats, or overnight bags.  There are many new materials used in hand bag and coat manufacturing that look exactly like leather but are synthetic plastics that should not be burned.

Watercolor paper and paper mache have chemical binders that hold the wood pulp in a sheet or in a shape.  These seldom cause health problems or skin irritation, but know that they are there in case you have a reaction.

Common Sense Safety in the Pyrography Art Studio and the Wood Carving Shop

1. Work in a well ventilated area.  Crack a window at least a few inches to allow air movement.

2.  Place a small work area fan behind you on a stool or small table.  Set the fan on low and point the fan to move from behind you into your work area to move the fumes away from your face.

3.  Work in an upright posture.  Avoid leaning over the pyrography project where you will directly inhale fumes.

4.  Wash your hands often to avoid dust or dirt build-up from your pyro project.

5.  Wear a dust mask when sanding any surface.  You can also wear latex gloves while sanding.

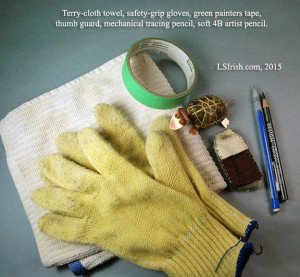
6.  Place an old terry-cloth towel on your work surface while sanding.  The dust will collect in the fibers of the towel.  When you are finished sanding, roll the towel up and throw it in the washing machine to remove that dust from your work area.

7.  Don’t dust with a brush.  Wipe with a lightly damp cloth.  Dusting with a brush only move the dust from your burning surface into the air where you will breathe it into your lungs.

8.  Don’t burn anything – no matter how wonderful a shape or surface it is – that may have been chemically treated, painted, varnished, or paint remover striped.  Those chemicals are still there in the wood grain and will become toxic fumes as you burn.

9.  Don’t burn any unknown, reclaimed, or long stored woods that may have chemicals, paints, or dust accumulation.

10.  Avoid extreme hot temperature burnings on any surface that may contain binders, glue, or chemicals as paper mache or plywood.

11. If you think you might be having a toxic reaction at any point in your work – Stop! Call your doctor!

12.  Read the directions and safety precautions that are listed on your finishes, sealers, polyurethane, paints, and any other chemicals that your may be using.

Follow these simple, common sense precautions in your shop and you will enjoy years and years of safe, fun pyrography!

American Association of Poison Control Centers
U.S. Department of Health and Human Resources

Wood Species Toxicity Links:

The Wood Database
Toxic Woods – HSC Information Sheet
American Wood Turner posting by Bruce Taylor

Chemically Treated Wood Toxicity:

Wood Preservatives and Treated Wood – Hazards and Alternatives
How to determine if a wood pallet is safe for use
How to Know If A Pallet Is Safe to Use

Common Toxic Chemicals and Finishes:

Environmentally Sound Finishes
Wood Toxicity and How to Protect Yourself
Paint, lacquer, and varnish remover poisoning
Choose Environmentally Safe Varnish: Consider an Oil-Based Varnish

Toxicity in Craft Gourds:

Gourd Safety

Toxicity of Wood Burning and Wood Carving Media Read More »

Scroll to Top