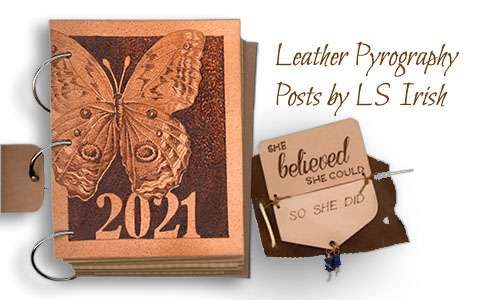
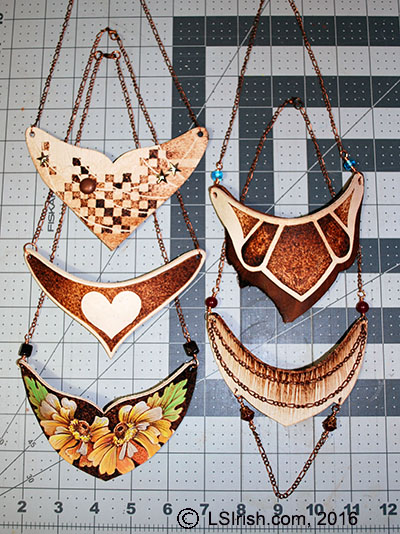
In this leather pyrography series, you will find the steps for creating the copper, wire-bent jewelry. Plus, how to create 10 quick necklaces out of one pyrography burning that is perfect if you are a craft seller or need a group of Holiday presents this years.
An easy way to get started with leather pyrography art journals is to purchase several scrap bag assortments of leather. This gives you a variety of leather to begin exploring leather burning.
Journaling is a hot hobby today, giving pyrographers a wonderful leather surface for our sepia designs. Creating faux deckle edged paper adds to the unique quality of our wood burning journals. Let’s discover how very easy it is to make your own deckle edged leaves and writing sheets.
I prefer to either use a graphite tracing paper or graphite pencil lead rubbed over the back of my pattern my paper as my tracing media. Graphite leaves a pale to medium gray line on our working surface that has no oil or wax, and therefore is not a permanent marking.
When I began my work with pyrography on leather, my practice board got a touch out of hand. I began my text project with a 10 lb. scrap bag of vegetable-dyed leather from Springfield Leather Co. which contained a variety of weights, textures, and species of leather pieces.
The journal is bound with a very simple lacing pattern that can be opened to remove and refill the journal cover for long-term use. The paper pages, printed using my home computer printer, are laced to the back cover only, which allows the front cover to be fully opened and even rolled over to the back of the journal during use.
Learn in this free, online pyrography project how easy it is to add pyrography burnings to small leather boot belts, leather belts, and leather wrist bands. Step-by-step instruction and free wood burning patterns.
This step by step leather journal project assumes that this is your first wood burning, includes how to trace pattern, basic pyrography techniques, and the instruction for the Griffin Journal.
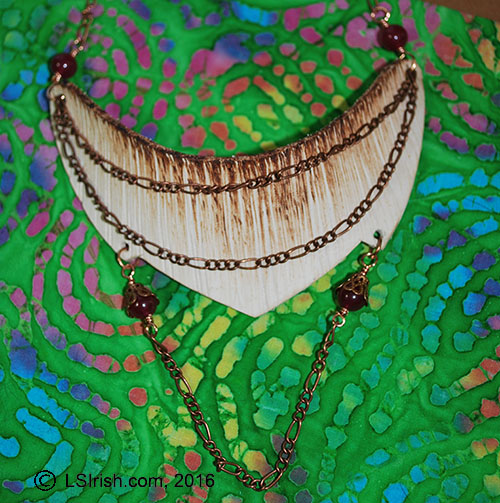
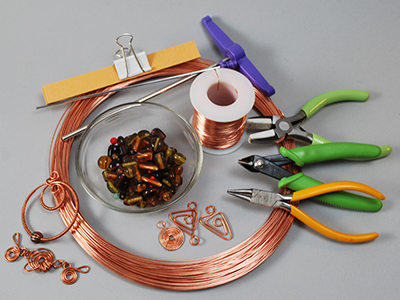
SUPPLIES 5” X 3” (14 cm x 7.5 cm) vegetable-tanned leather 2 – 6” lengths of copper chain for necklace 1 – 5” length of copper chain for top hanging chain 1 – 7” length of copper chain for middle hanging chain 1 – 4” length of copper chain for beaded chain 4 – 6 mm round adventurite beads 2 – 6 mm split rings 1 – lobster claw latch 18” – 20-gauge or 18-gauge copper wire
Using your loop-tip, or ball-tip, burn thin, straight lines onto the leather shape. Begin the lines at the top edge of the leather and pull the lines to the center area of the leather. Work several layers of burned lines, beginning on a medium heat setting and working towards a hot temperature setting. Use a v-gouge to cut vertical lines in the leather, creating white lines through the burned areas.
Navajo Nation
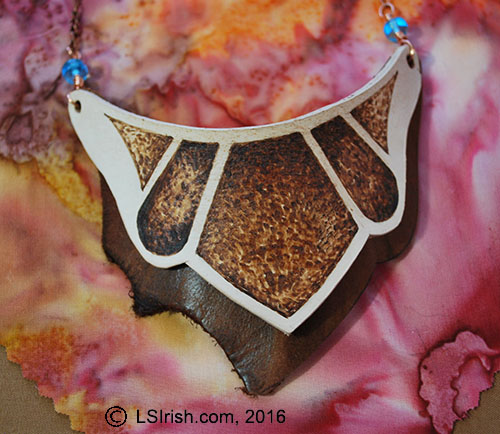
SUPPLIES 1 – 5 1/2” x 3 1/2” (14 cm x 9 cm) medium weight, vegetable-tanned leather 1 – 5 1/2” x 4” (14 cm x 10.25 cm) medium weight, dark brown scrap leather 2 – 7 1/2” (19 cm) lengths of copper chain 18” length of 20- or 18-gauge copper wire 2 – 8 mm turquoise glass crow roller beads 2 – 6 mm split rings1 – lobster claw latch
Trace the pattern to your vegetable-dyed leather. Using a loop-tip or ball-tip burning pen, fill in each area with a medium temperature burn. Increase the temperature setting slightly and burn a second layer of strokes to the top half of each area. Increase the temperature again to a hot setting and following the photo burn in the black-toned areas of the design. The round end loop of the turquoise glass bead link is worked through both layers of leather.
Forever Yours
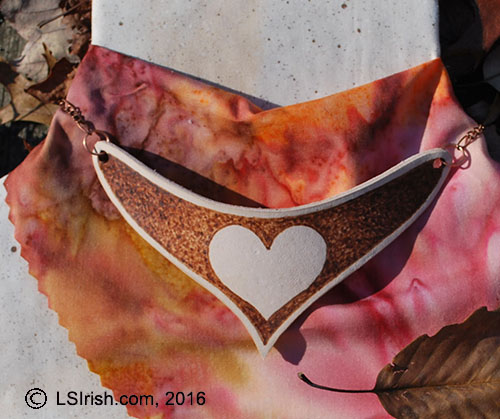
SUPPLIES 1 – 5 1/2” x 3” (14 cm x 7.5 cm) medium weight, vegetable-tanned leather 2 – 10 mm copper jump rings 2 – 6 mm copper split rings 2 – 7” (17.75 mm) lengths of copper chain 1 – lobster claw latch
Trace your pattern to the vegetable-tanned leather. With your pyrography unit set on a medium temperature setting, using a ball-tip or shader-tip pen, begin filling the areas of the pattern outside of the heart design with a medium-light tonal value. Use any fill or texture pattern that you like. Work a second layer of burning on a slightly hotter temperature setting at the center point of the leather necklace and in the outer half of each side. A third burning at a still slightly hotter setting is worked in the outer one-third of each side of the necklace.
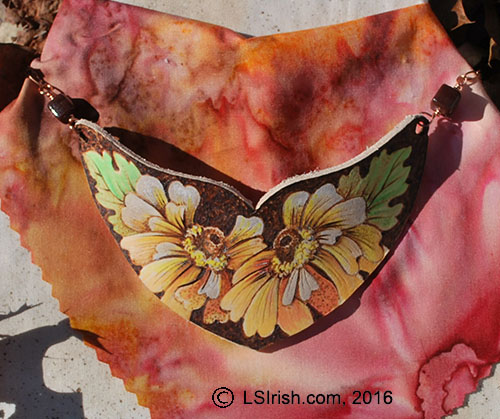
Summer Dreams
SUPPLIES 5 1/2” x 3 1/2” (14 cm x 9 cm ) medium weight vegetable-tanned leather 2 – 8 mm square glass beads 2 – 7” ( 18 cm ) long copper chain 2 – 6 mm split rings1 – lobster claw latch 18” – 20-gauge or 18-gauge copper wire
You can add color to your leather burned jewelry by using artist quality colored pencils. Begin this project by tracing your pattern to the cut leather. With your finest line pen, outline the entire pattern to a dark tonal value. Add shading in the petals and leaves using your shader-tip on a medium hot setting. Work the background in a solid dark tone. When the burning is complete begin adding your color in thin, light layers of pencil work. Use one color over another to create new hues. When the burning is complete begin adding your color in thin, light layers of pencil work. Use one color over another to create new hues. When the coloring is complete give your necklace one to two coats of brush-on acrylic finish.
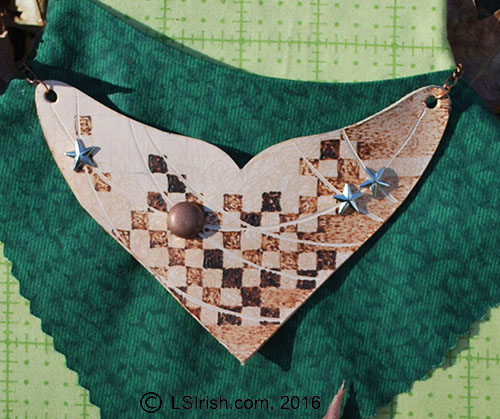
Steamed
SUPPLIES 5 1/2” x 4” (14 cm x 10.25 cm) medium weight vegetable-tanned leather 2 – 7” ( 18 cm ) long copper chain 2 – 6 mm split rings 1 – lobster claw latch 18” – 20-gauge or 18-gauge copper wire Assorted leather brads and decorative rivets
With a pencil, create a 1/4” grid on the face of your leather necklace. Fill the grid squares in a checkerboard pattern, varying the tonal values. Fill the right side of the necklace squares with this medium setting tonal value to make the larger block areas. With a low temperature fill the un-worked squares in the central area with a fill texture. Place a small ceramic plate face-down onto your leather and mark a pencil line. With a craft knife cut along the line, on both sides, to open a groove. Add your decorative brads and rivets.
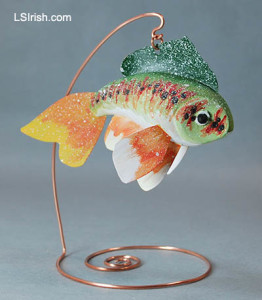
Wire-bent and wire-wrapped jewelry is an art that is currently in high favor among crafters. Jewelry supplies are readily available at most large box craft stores and through online shopping.
For my leather burnt necklaces I chose copper wire and findings, but there is a wide variety of wire types that you can use as silver, silver-coated, black, and colored aluminum. Personally, I prefer copper as it is a soft, easy to bend metal that can be tempered through gently hammering into strong, secure links and chains.
Glass beads and lamp work beads are also a favorite for me in jewelry work, but you will find a wonderful selection of gemstones, cut crystal beads, resin beads, and even bone or shell beads that you can use.
Completing your necklace
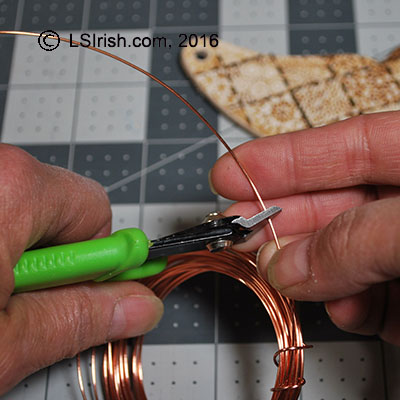
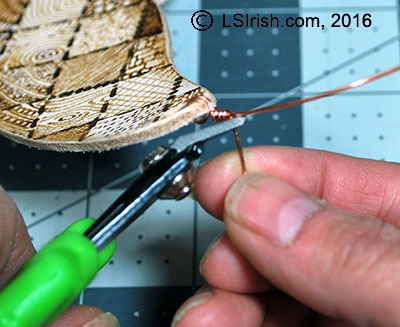
1 Cut an 8” length of 18-gauge copper wire with your flush cutters.
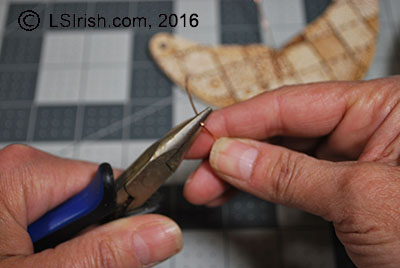
2 Grip the wire about 3” from one end in your straight pliers. Bend the wire to a 90 degree angle. Move the wire to your round-nose pliers, gripping the wire at the 90 degree angle. Roll the 3” end around the round-nose pliers to create a small loop.
3 Slide the short end of the wire through one of the holes in your leather burnt necklace. Move the wire to center the leather inside of the small loop.
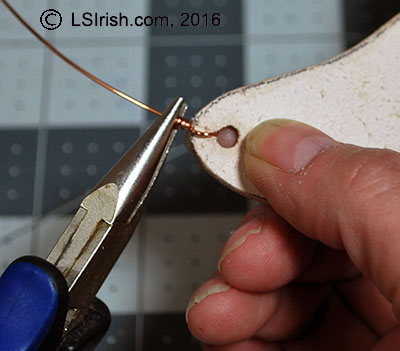
Secure the loop
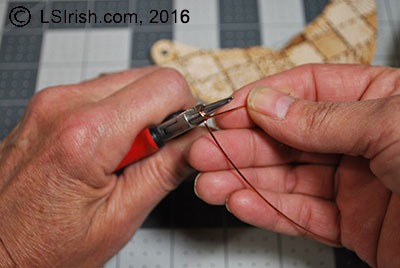
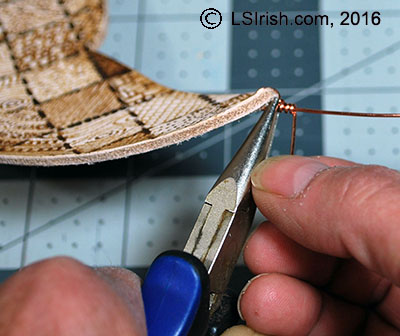
4 Grip the top of the loop, where it overlaps the long working end of the wire in your straight pliers. Roll the short end of the wire around the long working wire two to three times.
5 Clip the excess short wire with your flush cutters.
6 With your straight pliers crimp the cut end tightly against the long working wire.
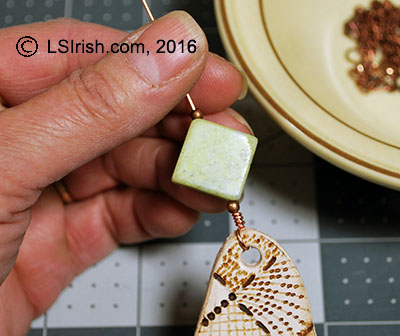
Adding beads
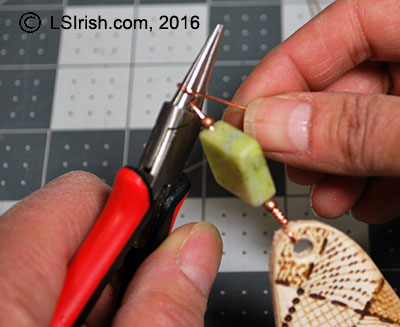
7 Slide your chosen beads onto the long working wire. In my necklace I used one 2-mm copper bead, one 16-mm square yellow jade bead, and one 2-mm copper bead.
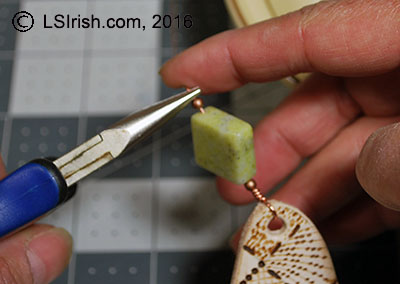
8 Grip the working wire in your straight pliers, with the tip of the pliers against the last bead. Bend the working wire into a 90 degree angle.
9 Place the 90 degree angle into your round-nose pliers and roll the working wire into a small loop.
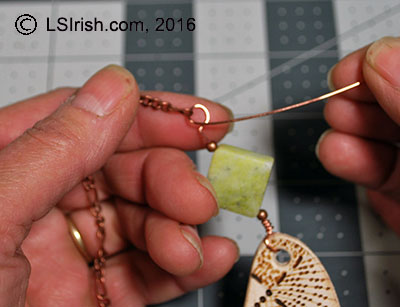
Adding the chain
10 The second small loop should be created by holding the wire in the same spot or area of the round-nose pliers as you did the first loop. This keeps the two end loops of the bead dangle the same size.
11 Cut two sections of 2- to 3-mm copper chain 7” long each. Slide the last open link of the chain onto the short end of the loop wire. Move the chain link to the center of the loop.
12 Complete your wire wrapped bead dangles by gripping the small loop in your straight pliers and wrapping the short end wire around the base of the loop two to three times.
Shaping the leather
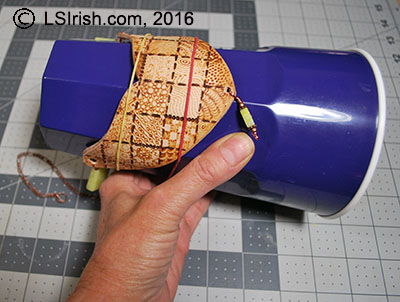
17 Your leather burned necklace can easily be shaped by simply placing your finished necklace under your kitchen faucet for a few moments, allowing the leather to become wet. Pat the leather necklace dry on a clean cloth. While the necklace is still damp and pliable, lay the necklace on a large, plastic soda glass and with loose (oversized) rubber bands lightly secure into place. Let the necklace dry overnight.
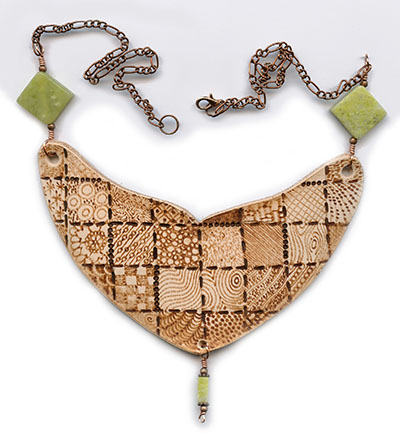
Completed necklace
In the next post I will be sharing five more ideas for this leather burned necklace project, with the free patterns. But here is a preview …
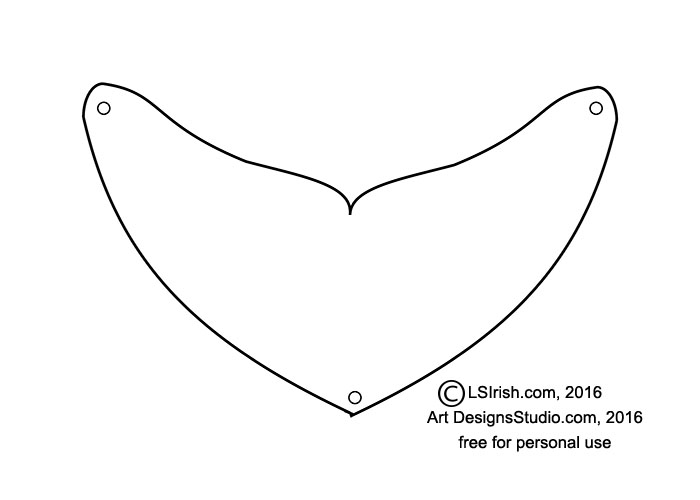
I love combining my crafts and hobbies, and in this project we will be working on a quick, fun design that uses leather working, jewelry making, and, of course, pyrography. Today we will get together the supplies, cut out our leather necklace shape, and do the pyrography steps.
In the next post you will find the steps for creating the copper, wire-bent jewelry. Then on day three of this mini-project I will show you how to create 10 quick necklaces out of one pyrography burning that is perfect if you are a craft seller or need a group of Holiday presents this years.
So … let’s get started!
Quilted Jade Necklace Supplies: 5 1/2” x 3 1/2” (14 cm x 9 cm ) medium weight vegetable-tanned leather bench knife or craft knife leather hole punch cotton swab applicators gum tragacanth edge finish wooden edge slicker #4 – #8 soft pencil for tracing pyrography pen tips – ball, loop, or micro writing tip white artist eraser 2 – 16 mm square yellow jade beads 1 – 5 mm x 8 mm yellow jade rectangle bead 6 – 3 mm antique copper round beads 2 – 4 mm copper rosettes 2 – 7” ( 18 cm ) long copper chain 2 – 6 mm split rings 1 – lobster claw latch 18” – 20-gauge or 18-gauge copper wire satin brush-on leather finish
Tracing the pattern
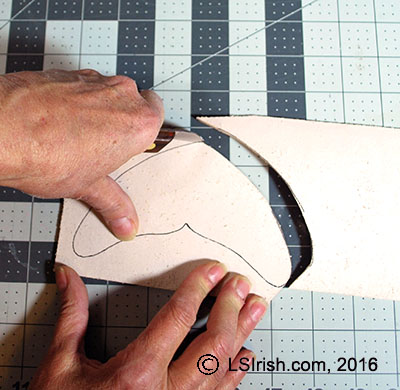
1 Make a printed copy of the pattern for the Quilted Jade Necklace. Cut the pattern out using scissors. Lay the paper pattern on the raw-hide side of the leather scrap. Using a soft, #4 – #8 pencil, trace around the outside edge of the paper pattern.
Working the leather
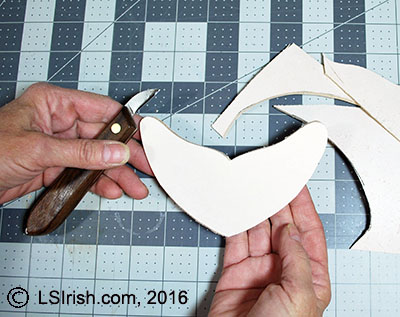
2 Place the leather on a cutting mat with the raw-hide side up. Using a craft knife or bench knife, cut the necklace free from the scrap leather. Save the extra scraps from the cut leather block for smaller bracelet shapes and earrings.
3 With a white artist eraser, remove any remaining pencil guidelines from the raw-hide side of the leather necklace.
Creating the grid lines
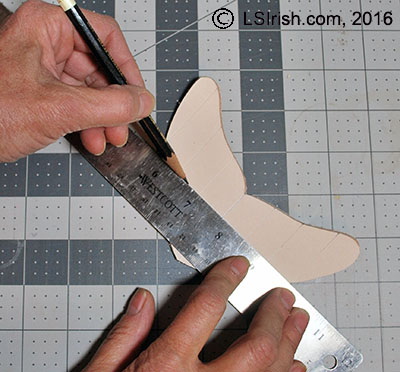
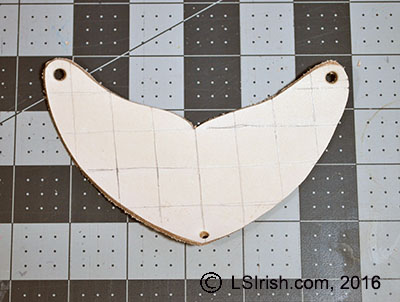
4 Using the cutting mat ruler marks as your guidelines, create a diagonal 1” square grid on the tanned side of the leather with a soft, #4 – #8 pencil.
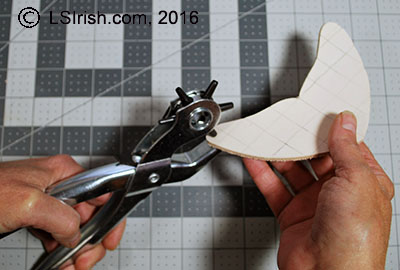
5 – 6 With a leather hole punch, cut a 3/16” or 1/4” hole in each side of the necklace to receive the jewelry chain and beads. Create one hole at the center point of the bottom edge of the leather necklace to receive a bead dangle.
Finishing the raw edges
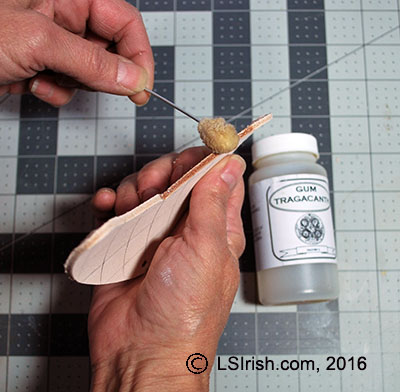
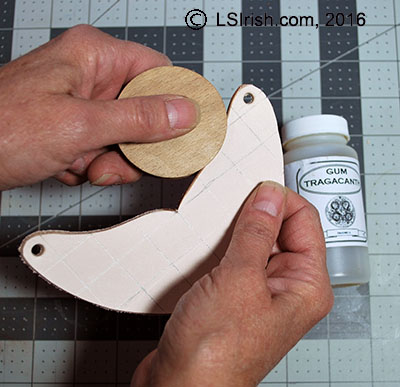
7 With a cotton or wool swab applicator, apply one coat of gum tragacanth along one edge of the leather necklace.
8 Briskly rub the damp edge with a wooden edge slicker. The handle of a large wooden spoon works well in place of a slicker. The gum tragacanth and slicker will polish and round the raw cut edge of your necklace.
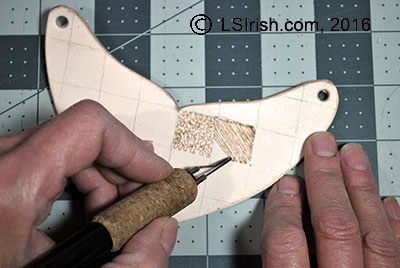
Burning the fill textures
9 The pyrography burning for this project is worked as a texture and fill practice board, where each 1” square is filled with a different, small pattern. Have fun creating your own fill patterns or refer to the Fill Pattern Chart with our Mushroom Doodle Pyrography Project.
10 As you work each 1” square, vary the temperature setting of your pyrography pen to create some squares with pale tonal values, some with medium values, and some with dark toned values.
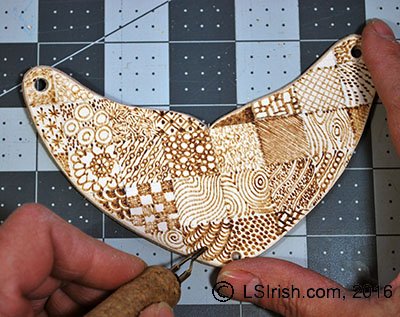
Adding borders
11 With a ball-tip or loop-tip pen, on a hot temperature setting, work along some of the pencil grid lines with a series of evenly spaced, small dots. With the straight edge of a shading pen tip, work the remaining grid lines with evenly spaced, short dash lines.
Shading the lower edge
12 You can add a little touch of shading along the bottom edge of your leather necklace using a shader-tip and a medium temperature setting. Work this layer of shading right over the fill and texture patterns that you have already burned. Rub a white artist’s eraser over your burned surface to remove any dirt, oil, or remaining pencil lines from the leather. Dust with a dry cloth.
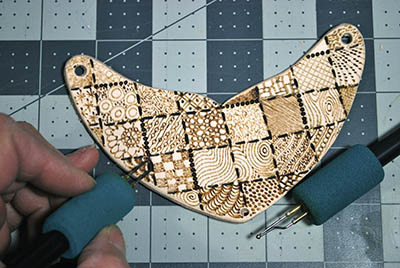
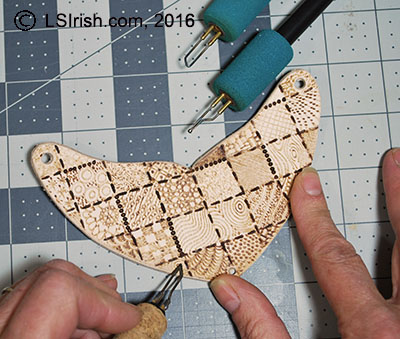
Pyrography close-up
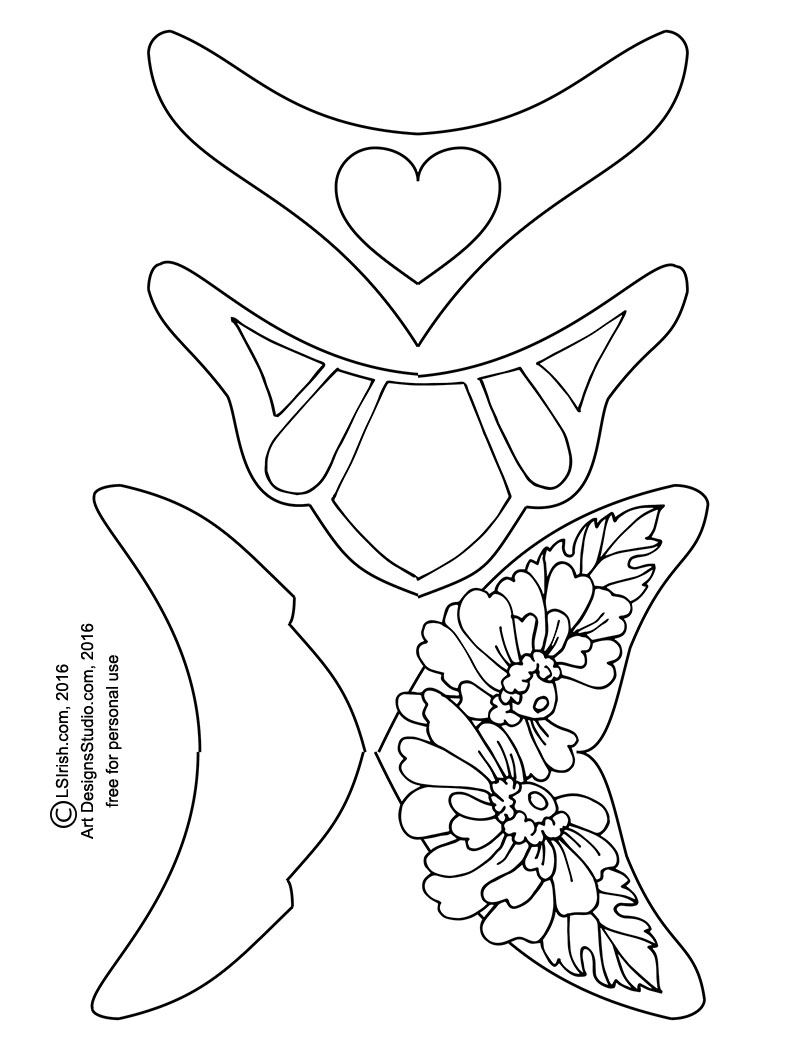
Click on the leather cutting patterns below for a full-sized pattern.
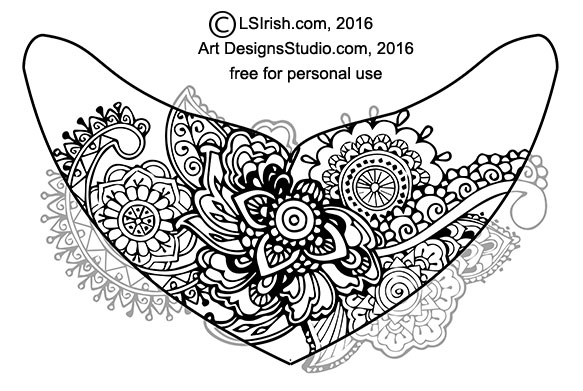
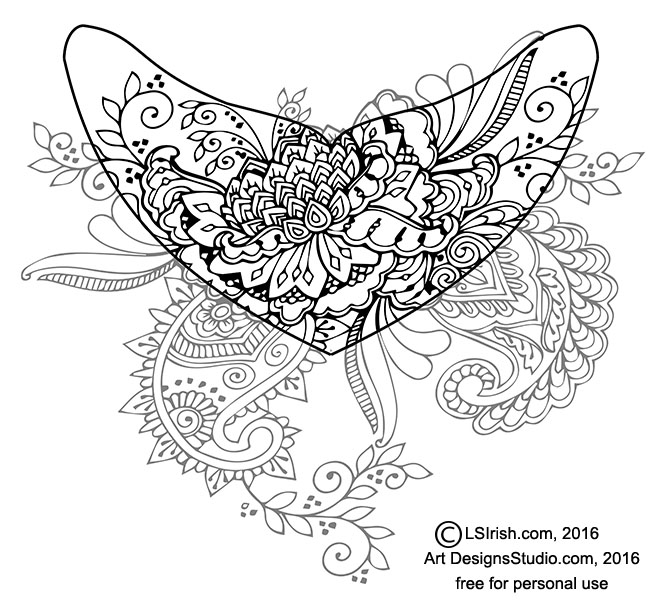
Here are two more ideas for your leather burned jewelry necklace, worked with patterns from our Henna Tattoo Pattern Pack.
And, this one!
In the next post I will be showing you how to add your jewelry chain, bead dangles, and copper findings. So, check back soon!
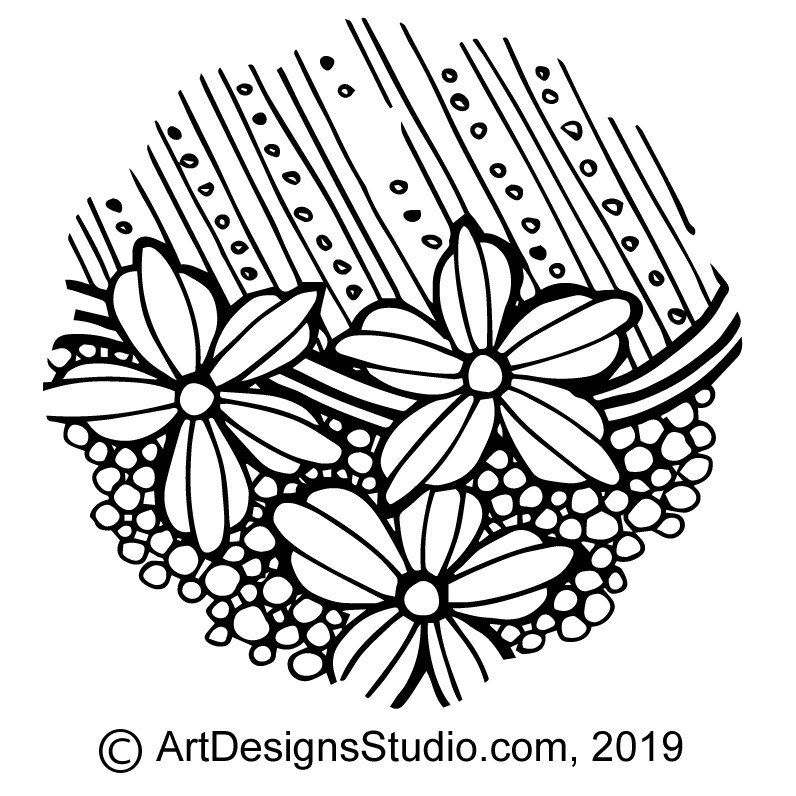
With a long, three-day weekend coming up in the US, you will have lots of time to fill with fun, new projects. Below are just a few of the ideas you will find here at LSIrish.com or at my carving-pyrography pattern website, ArtDesignsStudio.com.
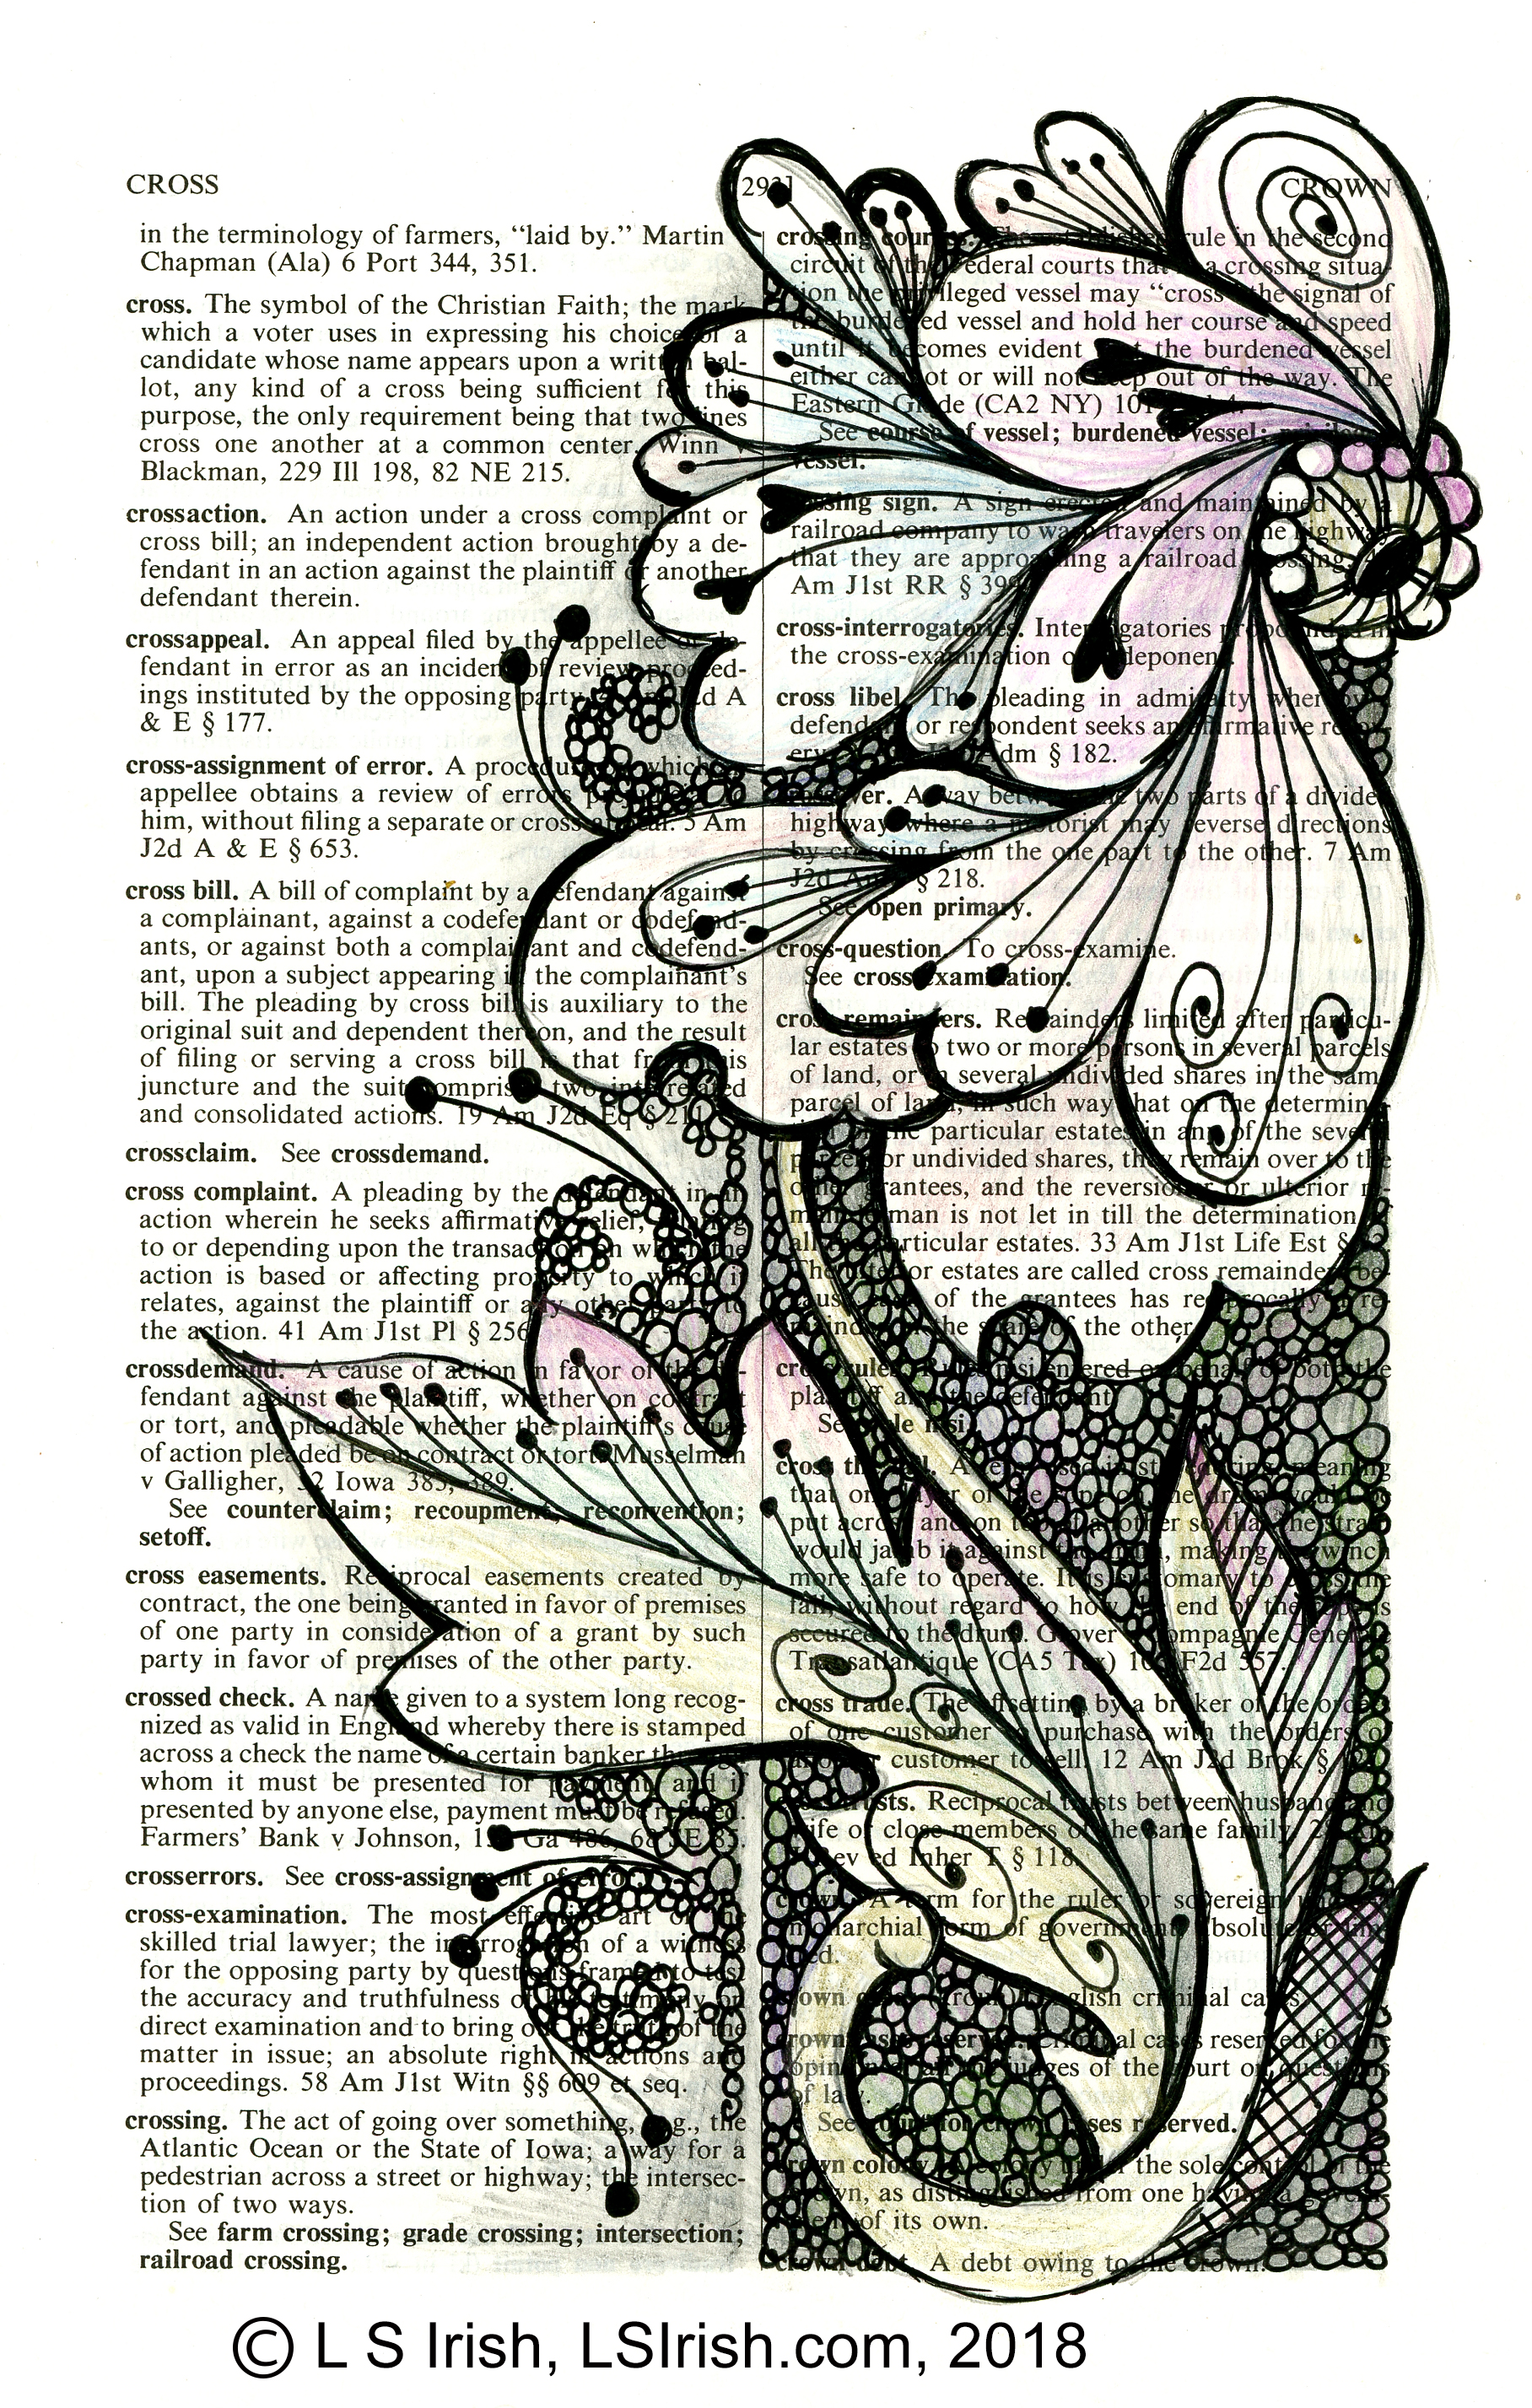
Altered Art is the fun of taking an item as an old book and re-purposing it as the base for your craft arts. The sample to the right is a pen and ink, pencil, and colored pencil drawing worked on the page of an old law dictionary.
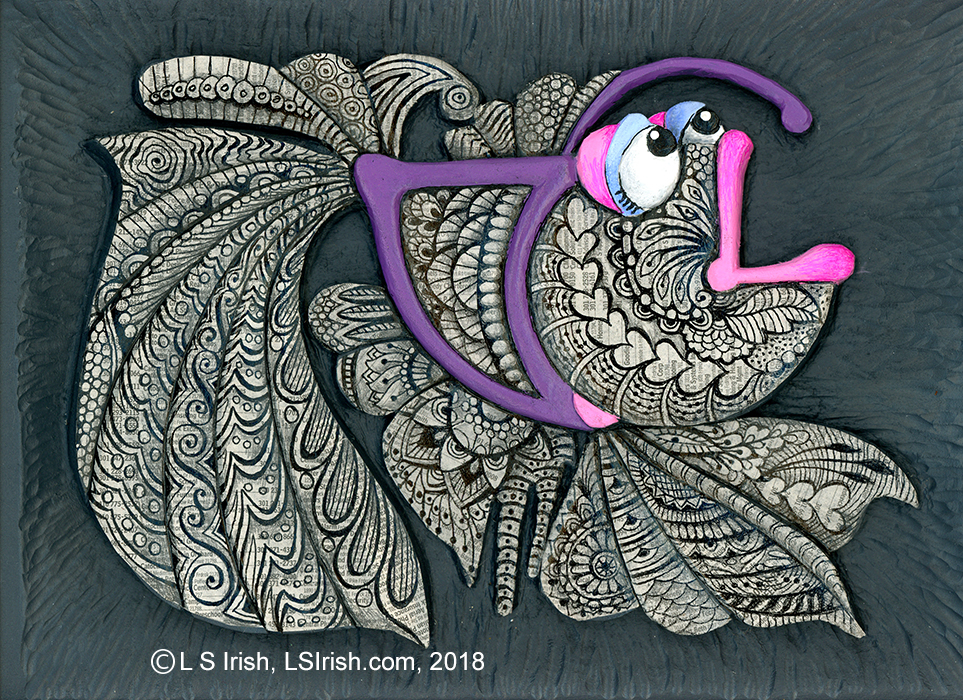
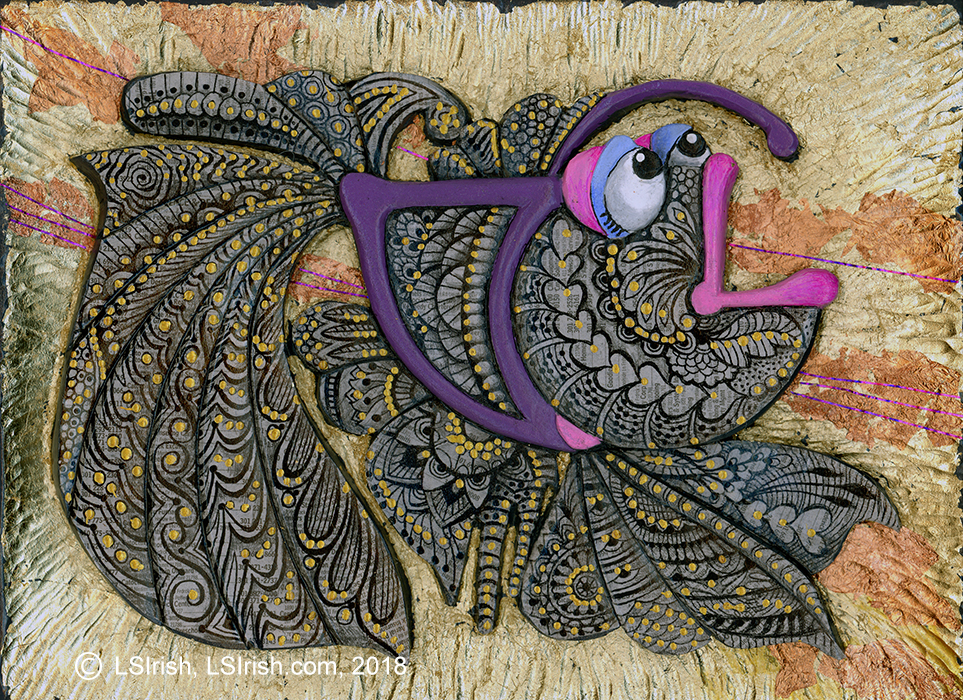
A second interruption of altered art is when we cross-craft by combining multiple crafting skills to create a unique work. In this sample a relief carving becomes the base for decoupage, pen and ink designs, and even gold and copper gilding.
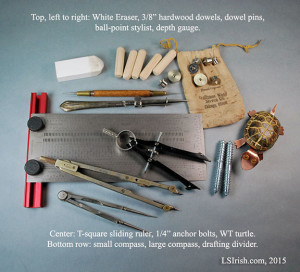
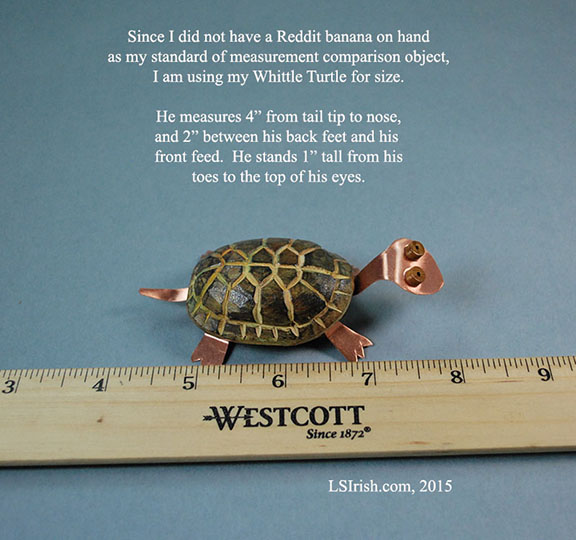
A basic relief carving or whittling tool set contains far more than just your carving tools and knives. Let’s take an in-depth look at some of the common supplies you may use in your carving craft. All photos in this article are large-sized and labeled. Please click on any image to show the full-sized photo.
As you browse through this series of wood carving knives, tools, and supply photos you will see our Whittle Turtle, used for size comparison. Our turtle measures about 4″ long from tail tip to nose, and 2″ between his toes.
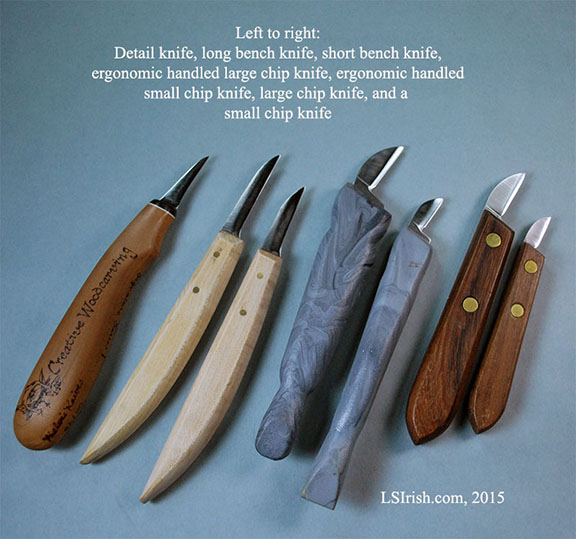
Bench Knives
Bench knives come in a variety of sizes and profiles, with each made to do a particular style of cuts. Bench knives made a straight-walled cut called the stop cut in relief wood carving.
Left to right:
Detail bench knife has a fine, narrow blade that ends in a sharp angle point. It is used for fine detail lines, and shallow cuts.
Long bench knife has a blade approximately 2″ to 2 1/4″ long. The cutting edge is flat and leads to a wide-angle point. This is an excellent whittling knife and often used to strip the bark from walking sticks.
The short bench knife has a blade of 2″ or less. It is used exactly as the long bench knife but places your hand closer to the wood as you work.
The next two knives are chip carving knives with ergonomic-grip handles. The short blade places your hand in very close contact to the wood, giving you total control over any cut. Ergonomic handles do not fit all hands. Check the width and length of any ergonomic handle before your make your purchase.
The last two chip knives, far right, have the same short blade as the ergonomic handled tools but use a short, narrow wood handle. Chip carving knives can be used as bench knives in relief carving, chip carving, and for whittling.
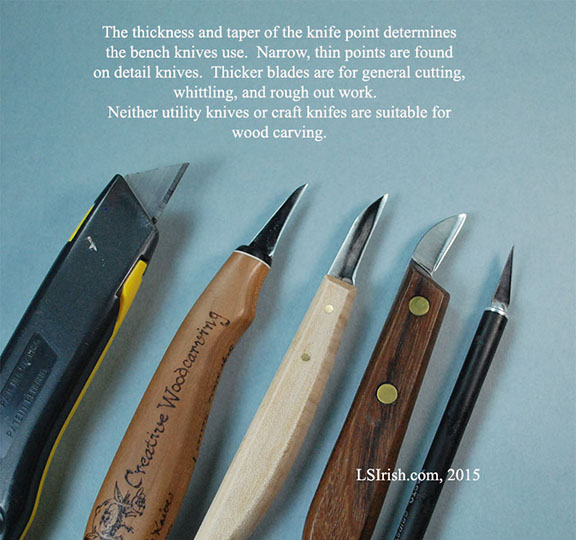
Utility and craft knives are not made to withstand the stress and pressure of wood carving. This tools are made with low quality steel and made to be disposable. In comparing the these knives to the standard carving bench knives you can see that the tip will be prone to breaking, a safety hazard during caring.
They are excellent for cutting your pattern paper, sharpening your soft pencils that you use in tracing, slicing masking tape, and for other preparation steps.
Not all knives are made with quality steel blades. Quality steel bladed bench knife can be purchased, starting around $25 to $40 USD. This is a lifetime of carving investment and well worth the price.
In the photo you can see an inexpensive bench knife – rosewood handle – that was obtained at a large craft box-store and cost less than $10. While the knife looks beautiful the steel is low quality. It rusts easily and will not hold a sharpened edge. The plain wood handled bench knife, while visually not as attractive, is high quality steel and has seen about two decades of hard use.
I strongly suggest that you purchase any carving tools from carving supply houses, not from the large box-stores. Take time to check the customer reviews to discover how other carvers values the tool.
Sharpening Stones and Leather Strop
The sharpening stones that you use for your garden tools are not suitable for your fine steel carving knives. They are far too coarse and will leave deep scratches along the cutting edges.
Shown in the photo is a beige Japanese water stone (top left), and a set of profiled fine-grit, red Arkansas stones (top right). In the center of the photo are one rough-grit and one fine-grit ceramic sharpening stones.
The green stone (center) is a made-made honing board and to your right center is a wood honing board. Honing boards have pre-cut profiles that fit your v-gouges and round gouges.
Our Whittle Turtle is standing on three sheets of emery paper, extremely fine grit sandpaper made for metal polishing. Emery paper comes in grit sizes from 1500- to 400-grit and is an inexpensive substitute for sharpening stones. The long white ceramic stick is used for sharpening the inside edge of your round gouges.
At the bottom of the photo is a leather strop and two honing compounds. The strop removes the burr edge left of the knife after stone sharpening. The compounds are used of the raw leather side of the strop and come in a variety of fine grits, with each grit a different color.
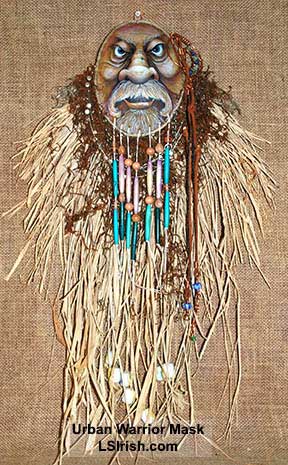
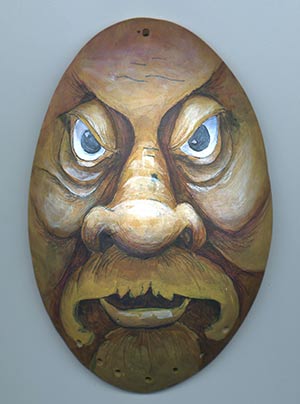
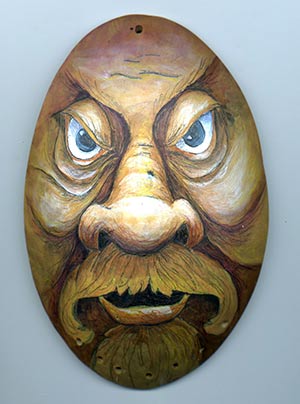
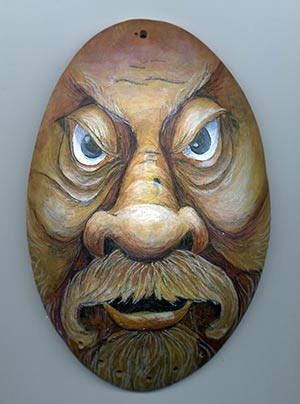
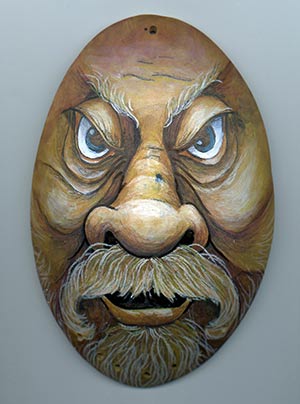
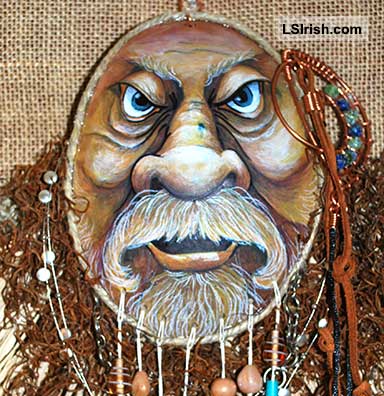
Learn how to turn the cut sections from your craft gourds into Urban Warrior Masks. This Lora S. Irish free step-by-step instruction project will guide you through the painting, colored pencil, and permanent marker work needed to create a detailed wood spirit pattern on your next gourd project.
Wood spirits are a favorite wood carving theme and their amazing, emotional, wild faces are also perfect patterns for your gourd art. Let’s look at a simple coloring technique that uses an undercoating of acrylic paints for colored pencil detail work to create your own Urban Warrior Mask. Finished mask measures 31″ long by 24″ wide.
Overview
The outer surface of a gourd is slick – it acts as a polished, sealed surface on which your paints and colored pencils can slide. To make the surface more acceptable to color application we will begin with a light fine-grit sanding. This opens the wood-like surface of the gourd and allows your acrylic paints to soak into the gourd fibers.
A base painting for shading and highlighting is done first using acrylic craft paints that have been thinned slightly with water. After the craft paints are well dried the entire face is detailed in a free flowing manner to add more color, fine lines, and enhance the depth using colored pencils. To add a few final bold, strong strokes of black a fine point permanent marking pen is used.
Painting supplies:
Cut gourd section, 7″ high x 5 1/2″ wide 1/8″ drill bit fine grit fingernail files acrylic craft paint burnt umber, navy blue, ocher yellow, titanium white, carbon black flat 1/4″ sable shader brush #2 or #1 sable liner brush artist quality colored pencils black permanent fine point marker re-workable spray matte sealer graphite paper transparent tape
Mask construction supplies: hot glue and glue sticks raffia florist moss twisted sea grass assorted large hole jewelry beads 24- and 16- gauge copper wire 1/4″ wide x 1 yard leather cord 2mm black rattail cord assorted vintage jewelry
Preparing the gourd
1. This mask is created from the cut-out section from another gourd project. It measures 7″ high by 5 1/2″ wide. Clean the inside of the gourd section, be sure to use a dust mask whenever you clean, sand, or trim any gourd.
2. Using an 1/8″ drill bit and power drill create a hanging hole in the top of your gourd section. One-half inch from the bottom edge drill 7 evenly spaced 1/8″ holes to use for corded jewelry.
3. Using foam-core fine-grit fingernail files lightly sand the outer surface of the gourd section. This very light sanding allows the acrylic paints, colored pencils, and permanent markers adhere to the surface.
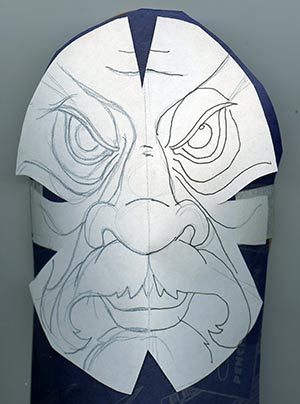
4. Trace your wood spirit face pattern to the outer surface of the gourd. You cam cut lemon wedge slices in the sides of the pattern paper to allow the paper to fit the curve of the gourd. Slide a piece of graphite paper under your pattern paper, tape both onto your gourd with one or two pieces of transparent tape. Trace along the pattern lines with a colored ink pen.
Try our Fun Wood Spirits pattern package at ArtDesignsStudio.com for your wood spirit craft pattern. This pattern package by Lora Irish contains 14 wood spirit patterns, each accompanied by a detailed shaded drawing to guide you through the shading of the face.
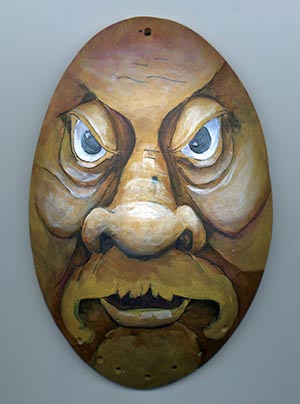
Creating an underpainting
5. On a clean palette place a small amount of burnt umber, navy blue, ocher yellow, and titanium white acrylic craft paint.
6. Thin each color slightly with water. Using a 1/4″ flat sable shader and a #2 or #1 liner begin with your burnt umber to shade the darkest areas of the face. As you work you can smooth the edges of your shading by following each brush stroke with a slightly damp brush. Run the damp brush along the edge of the brush stroke to lighten the color application.
The darkest areas of the face are in the space between the eyes and nose bridge, in the cheek folds along the sides of the nose and nostrils, and under the mustache. The inside of the nostrils and mouth are painted solid burnt umber.
The medium dark areas are just below the lower eye lids, at the outer corners of the eyes, the top of the chin which is in shadow from the mustache, and along the bottom rolled edge of the nose.
Highlight with titanium white at the center of the upper eye lids, along the center ridge of the nose, along the tops of the nostrils, and at the top of the lower lip. Add a small white highlight at the center top of any cheek wrinkle.
Use ocher yellow on the bottom edge of the mustache. Titanium white fills the eye area. Add a small amount of navy blue to the white and shadow the eye ball along the upper eye lid. Use carbon black to create the eye pupil. Allow to dry, do not use a spray sealer at this stage on your gourd.
Colored pencil detailing
7. After the acrylic paint has dried it creates a finely textured surface that is perfect for grabbing colored pencil work. As you add the colored pencil details keep each pencil very well sharpened.
Use a wide variety of colors in your colored pencil work. For my Urban Warrior I used cherry red, indigo blue, forest green, and royal purple, along with the tones of umber brown and black. Use fine lines to accent the acrylic painting.
8. Using tones of ocher yellow, orange, rust, and maroon red colored pencils add your skin tone coloring. The brightest area of skin color on a face falls along the ridge of the nose, high areas of the cheeks, the upper eye lids, and the lower lip.
9. A final colored pencil toning is done using beige and titanium white to add highlights to the top of the nose, the highlights in the cheeks, and along the center of the upper eye lid.
Sharpen your titanium white pencil and create individual hairs in the eyebrows, mustache, and beard.
10. To add strong, bold lines in the face use a fine-point or medium-point permanent marking pen. My solid black line work falls along the upper eye lid, the cheek wrinkles near the nose, along the lower half of the side of the nose, and along the outside lines of the lower lip. Add a second layer of titanium white colored pencil to strengthen the hair in the eyebrows and beard.
Lightly spray your gourd painting with two coats of re-workable matte spray sealer.
For more great wood spirit patterns at ArtDesignsStudio.com please visit Leaf Eatters, 14 line art craft patterns based on the classic Gothic leaf eatter and Green Man Cathedral patterns.
Decorating your Urban Warrior
In this close-up photo the brightly colored pencil work stands out because it lies upon a darker, shaded acrylic paint base. To add to the brightness of the finished mask let’s add the raffia, seagrass, and vintage jewelry work.
Decorate your Urban Warrior Mask with any type of craft products – raffia, yarn, string, scrapbook paper, ribbons, jewelry beads, and even vintage necklaces or earrings.
1. Using a hot glue gun secure a strand of twisted seagrass, a basket weaving product, around the cut edge of the gourd section. My gourd was thick enough that it took three complete turn of seagrass to completely cover the edge. You could also use bailing twine or sisal, thick knitting yarn, or basket weaving round reed.
2. The long turquoise bead strands were worked from a vintage necklace. Cut the necklace apart, saving all beads. Cut a 1 yard length of crochet cotton or any other heavy thread. Fold the thread in half, feed the loop through one of the drilled holes at the bottom of the gourd section. Thread the ends of the crochet cotton through the loop and gently pull into place to create a half-hitch knot.
The ends of the thread can now be threaded through your vintage jewelry beads. Tie a simple overhand knot in the string to secure each bead at different levels along the thread.
3. Create the beard using raffia. Do not dampen or per-moisten the raffia, work with it dry. Pull three to four long strands from the hank. Fold them in half and tie a simple overhand knot about 1″ from the fold. Hot glue the knot to the inside area of the gourd along the lower edge. I added raffia beard hair to the mid-point of the mask. After all of the beard is in place that the glue set, trim the raffia to create a long oval-shape to the beard.
Beards can also be created using yarn, string, crochet cotton, sisal, and even ribbons. For finer thread material you can sew the folded center of each strand to a length of bias sewing tape, then hot glue the tape – not the individual strands – to the back of the gourd.
4. Lay the jewelry crochet strings over the face. Along the top of the raffia beard hot glue brown floral moss to the outer edge of the gourd.
5. Using large holed beads, thread several lengths of raffia through a bead and tie a knot near the end of the raffia to hold the bead into place. I added about seven large ceramic beads.
6. As you are looking through your vintage jewelry look for any out dated bracelets or damaged necklaces that can be hot glued to the outer edge of the gourd. As my finishing accent I glued a large, bold copper hooped earring to the side of his face and added a few leather and rattail strands.
7. Use 16-gauge copper wire to create a hanging loop through the top drilled hole. Your Urban Warrior is ready to display.
For more great craft pattern ideas, please visit ArtDesignsStudio.com where we will spark your imagination!