Woodcarving

Wood burning the Wood Spirit face

Wood Burning the Wood Spirit Face

Wood Burning the Wood Spirit Face
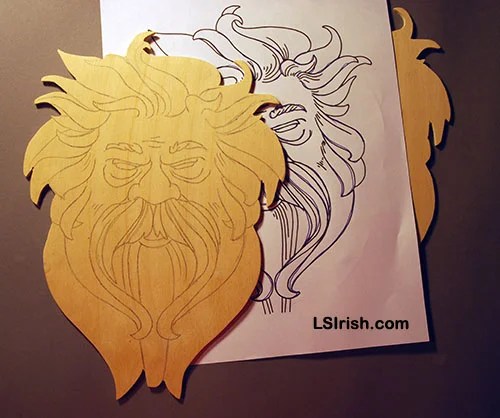
During this Cross-Crafting Seminar we have looked, in-depth, at how you can use a scroll saw to add new dimensions your wood carving and wood burning projects.  In today’s post we will be wood burning the Wood Spirit face that we scroll saw cut in the last session.

If you are new to pyrography, please visit our links page Pyrography, found in the header nav bar.  This will give you lots of links to the tutorials, teaching sessions, and techniques posted here at LSIrish.com about wood burning.

As we work through these next two session to this seminar you will see that I am using pyrography to set my shadows and hair lines in the wood spirit face.  We will then use colored pencils to add the coloration.

Note: If you are new to pyrography, in our right hand nav bar you will see a free PDF on which pen tips to use, and what burn strokes each create.  Please download it now.

Cross-Crafting Seminar Introduction
Cross-Crafting Seminar Supply List
Cross-Crafting Seminar Free Patterns
Cross-Crafting Seminar, Scroll Saw Basics
Cross-Crafting Seminar, Setting Up Your Scroll Saw
Cross-Crafting Seminar, Scroll Sawing the Wood Spirit Face
Cross-Crafting Seminar, Wood Burning the Wood Spirit Face
Cross-Crafting Seminar, Colored Pencils for the Wood Spirit Face

Introduction and Supplies:

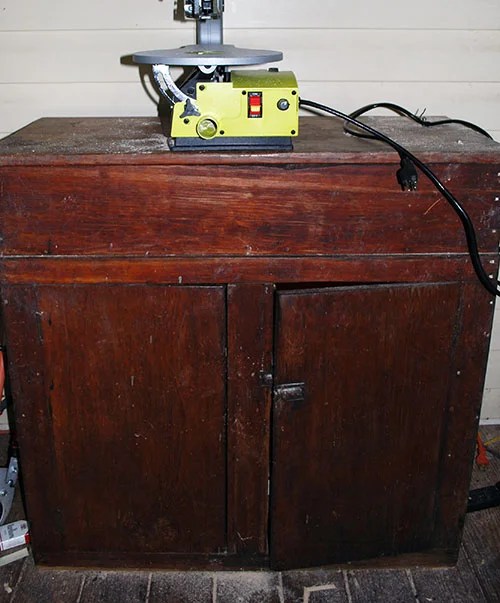
Wood burning tool – for this project I used my Optima
Spear-point, or flat shader pen tip
Ball- or looped-tip pen
Heavy-gauge wire triangle hair tip
#6 to #8 soft graphite pencil
green painter’s tape
white artist eraser
large scrap of brown paper bag
leather strop and honing compound

My recommended wood burning tool favorites include the Walnut Hallow Versa-Tool for first time pyrographers.  If you are ready to up-grade to a high-end, variable-temperature tool then I suggest either the Colwood or the Optima.

Below each pyrography tool listed is a link to an in-depth seminar that will not only give you a free, step-by-step project you can start today, but also allow you to see each of the three pyrography tools in use to help you decide which unit is the best for you.

These three in-depth tutorials are hosted on a wood carving forum.  Unfortunately I am banned/blocked from posting to this forum now because of technical difficulties on this forum.  So, if you have questions or comments about these three projects please email me here, through my blog.  Do not post to these threads as I can not read, see, or answer your questions there!

Walnut Hallow Versa-Tool

Walnut Hollow Versa-Tool Toucan Project  –  Looking for that first wood burning tool, then take a few moments and read through this tutorial for an in-depth review of the Walnut Hollow Versa-Tool used to wood burn a Toucan Family.

Colwood

Colwood Winter Birdhouse Wood Burning Tutorial – This in-depth, step-by-step project focuses on a winter bird house wood burning scene.  The project takes you from the initial tracing of the design to the final coloring steps.

Optima

Irish Optima Pyrography Seminar  – This in-depth pyrography project shows over 250 detailed, close-up photos, step-by-step instructions, and in-depth explanations of texturing, shadings, and fine line work used to create the Advertising Barn landscape.

Note: Click on any image for a full-sized photograph.  Now, my apologizes!  I know that some of these photos are dark.  I accidentally got such a sharp polish on my wood during the crumpled paper stage in Step 1 that the wood had too high a reflective quality for the photography lights … AH!

Tracing a Pyrography Pattern
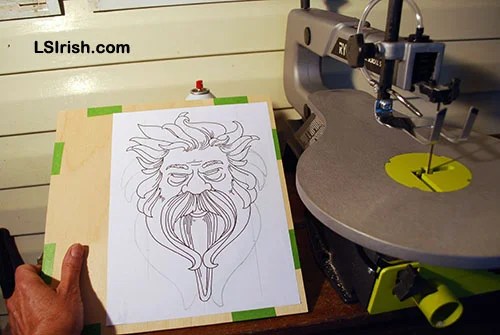
Step 1 Transferring a Pyrography Pattern

Before your trace your pattern, take a few moments to lightly sand your wood using a crumpled brown paper bag.  Paper is an extremely fine-grit sanding media and will remove any remaining fine wood fiber, polishing the wood surface.

There are several ways to trace your wood burning pattern to your burn surface, and those are explored in the link above.  For this project I chose to rub the back of my pattern with a soft, #6 to #8 graphite pencil.  Tape the pattern to the scroll saw cut wood with the pattern showing and the graphite surface against the wood.  Use an ink pen to trace over all of the lines.

The graphite from the pencil rubbing will leave a medium-toned grey line on your wood.  It can easily be burned over as you work your pyrography and then removed using a white artists eraser when the pyrography is completed.  Carbon paper, graphite paper, and newspaper tracing can leave permanent – non-removable – lines on your work … a pencil rubbing is the cleanest media for tracing.

Wood burning the wood spirit face
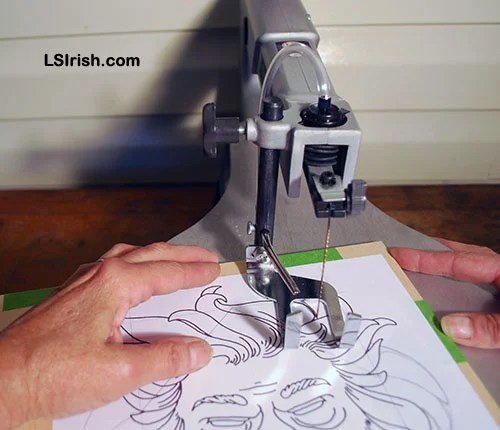
Step 2 Basic Woodburning Strokes and Textures

Using a flat, or spear-shaped shader, set your wood burning unit to a medium temperature.  For my Optima that is a setting between 4 and 5.  Lay the shader with the flat bottom of the shader on the wood, along the cheek at the side of the nose.  Using a smooth, even pull shade along the nose edge.

The inner corner of the eyes at the nose bridge is the deepest shadow point in the face.  The second deepest is the bottom corner of the cheek at the edge of the nostrils.

Note: Every wood burner unit manufacture has their own name for their own pen tips.  As example a looped tip can also be called a standard writing tip by a second manufacture or if it is from a third manufacture it can go by just an SKU number.  So the names for each tip can change according to what unit you are using.  Please check the photos for what shaped pen tip I am using and then use the closest tip you have for your unit.

Shading the wood spirit face in pyrography
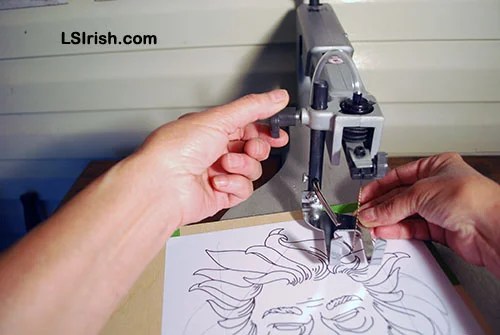
Step 3 The dark shading continues, using the flat or spear-shaped shader along the bottom edge of the nose.  An extra dark c-shaded stroke is used to create the black of the nostrils.

At the bottom of the cheeks, next to the nose is a wrinkle area that is triangular.  This area is deeply shaded towards the black-brown tonal value.

The eye lids and eye wrinkles are shaded along the bottom edge of the pattern line, with the darkest shading near the nose and allowing the stroke to pale as you pull it towards the outer edge of the face.

With a light touch, shade the sides of nose.  Allow a very thin line of white – un-burned – area at the outer nose pattern line.

wood burning the wood spirit faceStep 4 Turn your wood burning unit down to a cool-medium tone.  For my Optima that is a setting just below 4.  Using the flat or spear-shaped shader shade along the outer cheeks, sides of the face and the forehead area of your wood spirit.  Allow some of this shading to move into the hair areas of the face.

Darken the inside of the mouth and the small space below the nose that separates the sides of the mustache with a medium- or hot- temperature and the flat shader.


wood burning the wood spirit faceStep 5 Begin shading the top or inner areas and sides of the hair strands using the flat or spear-shaped shader and a medium temperature setting.  The heaviest shaded hair sections are top of the mustache and the beard that is trapped inside of the sides of the mustache.  Use long, flowing lines to imply individual hair strands.


wood burning the wood spirit faceScan to this stage of the work: Click for a larger image.


wood burning the wood spirit
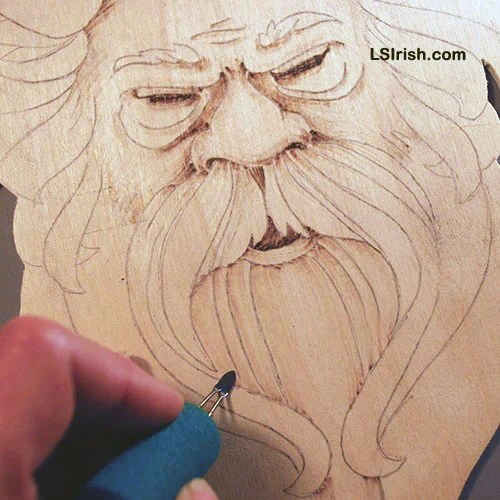
Step 6 I have changed to my ball-tip writing pen and set my temperature to a high setting.  For my Optima that is between 6 and 7.  With the ball-tip, outline all of your pattern lines for both the face and the hair strands.


wood burning the wood spirit faceStep 7 Take a moment and with a white artist’s eraser remove any remaining tracing lines that are visible.  Use a dry, clean cloth to remove the eraser particles.

Colored erasers, like the bubble gum pink school erasers, can leave streaks of dye color on your wood surface that can only be removed by sanding that area back to the un-burned, raw wood.  White erasers have no dye and will not mar your burning.


wood burning the wood spirit faceScan to this stage of the work: Click for a larger image.


wood burning the wood spirit faceStep 8 On the high temperature setting, using a heavy-gauged wire hair tip begin adding the individual strands of hair.  Each strands is worked from its closest point near the face out towards the outer edges of the hair strand.

Since we will be adding colored pencils to this project not every strand of hair needs detailing.  For my wood spirit I chose those hair strands that were in the background of the design for his head hair, and at the top of the mustache and beard.

But hair is just plain fun to work, so add as much detailing as you like!

If you do not have a heavy-gauge wire hair tip you can use the side or edge of your shading tip to burn wonderful hair lines.

wood burning the wood spirit face
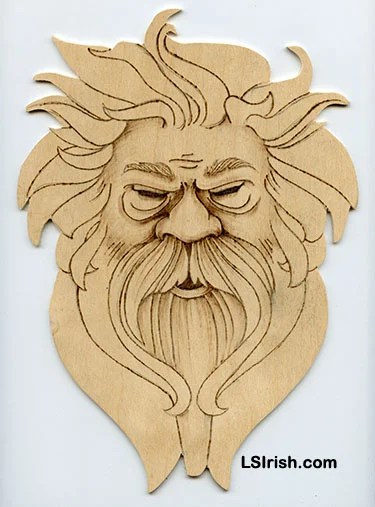
Step 9 The finished wood spirit can be left in just its pyrography stage or you can follow me in the next posting where we will use colored pencils to add his skin tones.


Wood Burning the Wood Spirit Face Read More »

Setting up your new scroll saw

Setting Up Your Scroll Saw

Setting Up Your New Scroll SawWhere and how you set up your scroll saw is extremely important to the quality of cutting your can do in your new craft.  We will take a qick look at several options to placing your saw into the most comfortable, accurate cutting position as possible.

Cross-Crafting Seminar Introduction
Cross-Crafting Seminar Supply List
Cross-Crafting Seminar Free Patterns
Cross-Crafting Seminar, Scroll Saw Basics
Cross-Crafting Seminar, Setting Up Your Scroll Saw
Cross-Crafting Seminar, Scroll Sawing the Wood Spirit Face
Cross-Crafting Seminar, Wood Burning the Wood Spirit Face
Cross-Crafting Seminar, Colored Pencils for the Wood Spirit Face


I am lucky enough to have both a full-dedicated woodworking shop and a craft studio.  My shop holds my table saw, drill press, band saw, as well as an extra-large work table where I can clamp, glue, and sand.  The craft shop is where I work on my smaller projects as my wood carving and wood burning.

But, for right now, I am setting up my scroll saw on my back porch!  Since the Ryobi 16″ Variable Speed Scroll Saw is quite portable I can store the tool in its shipping box in the studio when I am not using it, and then move it to the porch for those quick cuts or full-length projects.

Setting Up Your New Scroll SawThe reason I am working off the back porch is because I have an old, hard-used dry sink that measures 38″ from the floor to the table top – a perfect height for me for scroll saw cutting.  The base of the dry sink holds two shelves where I store several furniture clamps, my vise, and some of the woodworking tools that I need around the studio.

For me, a standing position is the most comfortable for accurate cutting.  The height of this dry sink lets me look into the saw blade area of the scroll saw at a 45 degree angle – perfect to see exactly where the blade is in the wood and to clearly see the cutting line on the pattern.  Note position #2 in the photo.

A standard table is only 30″ tall at the top of the table.  If you are in a standing position this puts your focus point directly on the wood.  While you can see the pattern line clearly, this high angle obscures your view of the saw blades working edge. Note position #3 in the photo.

If you chose a sitting position using a kitchen chair, at a standard table your visual view is at a very low angle to the saw.  You now see the full length of the saw blade but can barely see your wood or pattern line. Note position #1 in the photo.

There are several easy, inexpensive options for your new scroll saw table.

  1.  You can purchase scroll saw stands that are heavy-weight metal made specifically to hold smaller-sized power tools.  These are great if you have a full-dedicated workshop.  The stands often are made to have a plywood table top which bolts to the stand.  You can then bolt your scroll saw to the table top to reduce vibration.
  2. Check you have a local Habitat for Humanity ReStores your tall kitchen cabinets or bathroom cabinets at extremely reasonable prices.  Again, you will need to create a table top, out of 5/8″ plywood which you bolt to the cabinet.  If your kitchen cabinets are a bit short you can create a plywood box for the table top that brings your saw up to the perfect height for you.
  3. If you are using a regular table, studio table or kitchen table, which are only 30″ high, you may want to purchase a tall bar stool for just a few dollars at your local GoodWill.  Since you can’t safely raise the height of your saw you can easily raise yourself to get that 45 degree view of the saw.

A few more considerations.

I find that I do need a wide foot print around my scroll saw as I work.  I tend to move my body, re-position my stance left or right, as I move through the curves.  So I work in an area where I have about 2′ to 3′ feet of clear space on either side of the scroll saw table.

Because of the amount of dust created by the saw I find that a good, heavily-textured floor mat gives me a firm stance on the floor.  Saw dust can be quite slippery!  A 4′ x 5′ bound-edged rug works well, but you can also purchase heavy rubber floor mats meant for shop use.

Be sure that your working table is firmly set on the floor.  Shim the table legs or base if necessary to insecure you have a secure working space.

If your scroll saw is light-weight, does not have a heavy iron base, you will want to secure the saw directly to the table top.  You can either bolt the scroll to the table as most scroll saws have holes pre-drilled in the base to permanently set the saw to its stand or table.  You can also use furniture clamps to secure the saw base to the table.

Never set your scroll saw on an unclamped or unsecure surface to raise the level of the blade to a better visual view … don’t set it on a stack of scrap plywood, stack of books, or a cardboard box.  Any of these ‘solutions’ can slide out from under the saw or simply colapse while the saw is running.  Instead, if you need to raise the level of the saw, do so by raising the entire table or cabinet using a 2″ x 4″ frame bolted directly to the bottom of the table.

To reduce any excess vibration try setting your scroll saw on a non-skip kitchen matt before you clamp it to the table.  These matts are very inexpensive security!


Setting Up Your Scroll Saw Read More »

Scroll Sawing the Wood Spirit Face

Scroll Sawing the Wood Spirit Face

Scroll Sawing the Wood Spirit Face

Cross-Crafting Seminar Introduction
Cross-Crafting Seminar Supply List
Cross-Crafting Seminar Free Patterns
Cross-Crafting Seminar, Scroll Saw Basics
Cross-Crafting Seminar, Setting Up Your Scroll Saw
Cross-Crafting Seminar, Scroll Sawing the Wood Spirit Face
Cross-Crafting Seminar, Wood Burning the Wood Spirit Face
Cross-Crafting Seminar, Colored Pencils for the Wood Spirit Face

Our next step in our Cross-Crafting Seminar, which takes a look at using scroll sawing, wood carving, pyrography, and colored pencil work in one project, is to do a test cut.  Let’s use a classic Wood Spirit face for this practice session.  This face comes from my book, Wood Spirits and Greenmen, and the pattern is linked below.

Click on the pattern image to open a new window with the full-sized pattern.  Save a copy of the pattern to your desktop, where it will be easy to find later.

Scroll Sawing the Wood Spirit FaceSupplies

Ryobi 16″ Variable Speed Scroll Saw
Ryobi 15 TPI Regular Tooth Saw Blade for general scroll saw work
Temporary Adhesive Spray
2 – 12″ x 12″ x 1/8″ sheets of birch plywood
220-grit sandpaper
Sheet of heavy brown paper bag
Green painter’s tape
2 printed copies of the Wood Spirit pattern

Note:  I buy my birch plywood and basswood off of Ebay.com because I can see the actual pieces of wood that I am purchasing.  Birch plywood is often available at your local hardware store or large box craft store.

Preparing for Cutting

Scroll Sawing the Wood Spirit FaceStep 1 For this step-by-step I am going to cut two plywood wood spirit faces at the same time. This is called gang cutting.

Lightly sand both sheets of birch plywood on both sides using 220-grit sandpaper.  Work the paper in the direction of the grain lines of the birch wood to avoid creating small, cross-grain scratches.  Wipe the plywood with a clean, dry tact cloth.  Crumble a large sheet of heavy brown paper bag into a loose ball.  Use the crumbled paper to sand over the surface of both sheets of plywood.  Brown paper bags are wonderful, extremely fine sanding papers.

Step 2  Print two copies of the pattern. One will be used to cut the Wood Spirit face shape from the wood.  The second will be used to trace the Wood Spirit detail lines to the cut-out, scroll sawed shape.

Scroll Sawing the Wood Spirit FaceStep 3  Stack the two sheets of plywood with the best sides facing each other, these will be on the inside of the stack with the rougher sides facing outward.  Use several strips of green painter’s tape along the edge of the stack to secure the two pieces together.

Step 4  Read the directions on the side of your temporary adhesive spray, and follow those directions to spray the back – reverse – on your cutting pattern.  Place the pattern, face up with the spray adhesive against the wood.  Lightly rub the paper pattern from the center out  towards the corners to flatten the paper and insure that it is completely adhered to the wood.  Let the paper dry for a few minutes before you beginning your scroll saw work.

Step 5 If this is your first scroll saw session, please read all of the instructions and safety procedures that came with your model of scroll saw.  Insert a 15 TPI regular/general cutting blade in the saw.  Remember, the teeth of the saw blade point down.

Note:  When I am cutting out a general shape, as with the Wood Spirit, I am not as concerned about exactly following the pattern line as cutting a smooth line!  You will see that in some areas I may have cut inside or outside the pattern line.  Since no one but me and you will ever see the original pattern whatever I cut will become the final items.  So relax, have fun, and know that it is so OK to wander off the line.  This is meant as a practice piece, a piece on which you can learn, experiment, and make mistakes.

Scroll Sawing the Wood Spirit FaceStep 6 Loosen the Drop Foot Knob on the left of the scroll saw arm.  Allow the Drop Foot to lower onto the plywood.  Tighten the Drop Foot knob.  This foot keeps the wood held tightly against the work table, stopping the wood from vibrating as the blade moves through the cuts.

Do not add any pressure to the Drop Foot. By just setting it on the board you are cutting it will have the correct pressure when you tighten the knob.


Scroll Sawing the Wood Spirit FaceStep 7 Begin your first cut at the top of the board, cutting towards the head, following one of the hair strands.  Start the saw before your blade touches the wood, then glide the wood into the working saw blade.  Move slowly, allow the blade to do the work for you.  Stop the cut when saw blade’s motion when you reach the inside angle or v-shape point of the hair strand.


Scroll Sawing the Wood Spirit FaceStep 8 Turn off the saw, lift the Drop Foot by releasing the Drop Foot knob, and back the blade out of the cut and out of the board.


Scroll Sawing the Wood Spirit FaceStep 9 Make the second cut, starting at the top of the board, cutting towards the head, on the second side of the same hair strand.  Stop the cut when you meet the end of the first cut.


Scroll Sawing the Wood Spirit Face Read More »

scroll saws for wood carving and pyrography

Cross-Crafting Scroll Saw Basics

Basics to Scroll Saws

During this session we will take a quick look at the features of a basic scroll saw, and walk through the steps to changing your scroll saw blade.  The scroll saw shown is a Ryobi 16″ variable speed.

Cross-Crafting Seminar Introduction
Cross-Crafting Seminar Supply List
Cross-Crafting Seminar Free Patterns
Cross-Crafting Seminar, Scroll Saw Basics
Cross-Crafting Seminar, Setting Up Your Scroll Saw
Cross-Crafting Seminar, Scroll Sawing the Wood Spirit Face
Cross-Crafting Seminar, Wood Burning the Wood Spirit Face
Cross-Crafting Seminar, Colored Pencils for the Wood Spirit Face

Ryobi Scroll SawClick on any image for a full-sized picture of that step.

Read Your Manual

Begin by reading the information and instruction manual that came with your particular scroll saw, especially the safety steps.

  1. Wear safety glasses.
  2. Use the correct blades made for your specific scroll saw.
  3. Check the condition of your saw blade before you begin any working session.
  4. Always know where your fingers are in relationship to the saw blade.
  5. Unplug the saw and remove the Child’s Safety Plug when not in use.
  6. Watch for physical and visual fatigue – take frequent breaks.

Scroll Saw Features

The Ryobi features a Tension Knob for quick and easy blade tension adjustments on the top back of the machine.  The Sawdust Blower keeps the wood clean of sawdust in front of the saw blade.  The Drop Foot holds the wood securely to the work table to reduce vibration and the Throat Plate gives you access to the bottom of the saw blade.

Ryobi Scroll SawThe On/Off Switch is on the lower front of the motor and also contains a Child’s Safety Plug that can be removed to prevent the machine from turning on.

The three pronged knob on the left front controls the tilt angle of the table, called the Bevel Scale.  On the right side of the front is your variable speed control.  For the Ryobi the speed range is from 550 r/min. to 1,650 r/min.


Scroll Saw Blades

scroll saw bladesScroll saws use two styles of blades – pinned and unpinned.  Pinned blades have a small metal cross bar at the top and bottom of the blade that slides and locks into the blade holders.  This gives a strong, secure anchor for the blades.

Unpinned blades do not have the cross blades, and are simply straight at the top and bottom.


fretwork scroll sawingThe unpinned blades are used in fretwork where you will be cutting holes into the design.  Begin by drilling a small hole, just slightly larger than the width of your saw blade, inside of the shape that you will be cutting.  Release the Tension Knob on the top of the machine.  Release the top Blade Holder Knob.  Remove the top of the blade from the scroll saw.  Slide the wood over the top of the blade, threading it through the drilled hole.  Secure the top of the blade by tightening the Blade Knob and Tension Knob.

Saw blades are sorted by the number of teeth per inch, TPI.  The Ryobi Specialty Scroll Saw Blade Set gives you three sizes – 7 TPI Hook Tooth for thick widths of wood, 15 TPI Regular Tooth for general cutting, and 18.5 TPI Skip Tooth for fine and tight turned cutting.  For our projects in this seminar I used the 15 TPI regular tooth, pinned blades.

Cross-Crafting Scroll Saw Basics Read More »

Cross-Crafting Seminar Free Patterns

Cross Crafting Wood Carving. Pyrography, and Scroll Saw Free ProjectThe free patterns for this Cross-Crafting Seminar are posted here.

Cross-Crafting Seminar Introduction
Cross-Crafting Seminar Supply List
Cross-Crafting Seminar Free Patterns
Cross-Crafting Seminar, Scroll Saw Basics
Cross-Crafting Seminar, Setting Up Your Scroll Saw
Cross-Crafting Seminar, Scroll Sawing the Wood Spirit Face
Cross-Crafting Seminar, Wood Burning the Wood Spirit Face
Cross-Crafting Seminar, Colored Pencils for the Wood Spirit Face

Please click on the pattern, which will open a full-sized image in a new window.  Right-hand click on the image and select ‘Save Image As’.  As your pattern to your desktop, where it will be easy to find later.  The patterns are pre-sized to print on an 8 1/2″ x 11″ sheet of computer printing paper.

We will be working on the scroll saw cutting, wood carving shaping, and pyrography decoration in this step-by-step project.  During our seminar there will be at least three more free patterns – a wood spirit design used in the scroll saw instructions, and two hand combs.  So, please check back to snatch a free copy of these when they are posted.

free Lora Irish carving patternSpoon Carving Pyrography Tracing Pattern

free Lora Irish pyrography patternFork Carving Pyrography Tracing Pattern

free Lora Irish craft patternStrainer Carving Pyrography Tracing Pattern


Cross-Crafting Seminar Free Patterns Read More »

Scroll to Top