Woodcarving

Twistie Stick Snake Carving by Lora Irish

Twistie Stick Snake Carving Free Project

Free Lora IRish Cane Carving ProjectHi Gang!

I thought I would share a walking stick carving.

Day 1 Twistie Stick Snake Cane Carving
Day 2 Twistie Stick Snake Cane Carving
Day 3 Twistie Stick Snake Cane Carving
Day 4 Twistie Stick Snake Cane Carving
Day 5 Twistie Stick Snake Cane Carving

Walking Stick Joinery
Walking Stick Wood Species – Harvesting Your Sticks
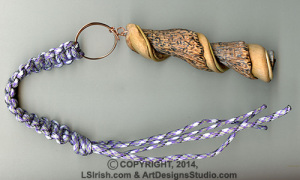
Walking Stick – Adding Extras
Walking Stick – How to Clamp Your Handle

Free Mountain Man Cane Carving Pattern


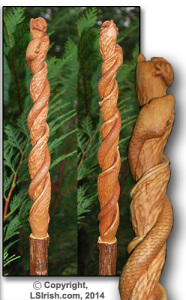
Walking stick carving is often one of the first carving projects a new woodcarver tries.  This particular design – a snake wrapped around a Sassafras twistie stick – is a beginner’s level project, but I think that even the advanced carvers here may discover a few fun tricks and tips.

We will work, step by step, through creating the round, establishing the snake, marking and cutting the twist, texture the snake and bark, adding a frog on the top of the stick, and how to add a real honeysuckle vine into the twist.  The cane will be lightly coated with a finished with a linseed oil and turpentine mixture and then dry mounted to your walking staff.

Supplies:

These are the tools that I used, but you do not need these exact tools or exact sizes.  Use what you have.  If you are new, a bench knife, or large chip carving knife, and a basic Japanese set will get you started.  Because we will be creating the pattern directly to the basswood you can make this stick in any length!
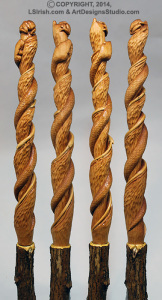
Sassafra Twistie Cane and Snake by Lora Irish1 1/2″ x 1 1/2″ x 12″ basswood blank
bench knife or large chip carving knife
v-gouge
3/8″ round gouge
1/8″ round gouge
u-gouge, also called a veining tool
several sizes of fine rasps or rifflers
220-grit sandpaper
1″ wide painter’s tape or masking tape
pencil, for marking the cane
old toothbrush for cleaning
carving gloves
thick terry-cloth towel
sharpening tools
cardboard center from a roll of toilet paper
linseed oil
turpentine
all thread pipe
epoxy glue

walking stick staff – approx. 4′ to 5′ tall, x 1 1/4″ diameter

Sassafra Twistie Cane and Snake by Lora Irish

We will begin tomorrow by rounding-over the basswood stick, establishing the path of the snake, and rough carving the Sassafras twistie area low to reveal the snake’s body.So, go get your knives and carving tools, check them for sharpness, find a basswood cane blank, and join me tomorrow as we begin this fun project.  I’m off to start cropping photos for you.

I will also be posting  this Twistie Stick Snake Cane each day on my favorite carving forums.  Stop by, join up, so that you can post your questions and photos!!!!  Carving forums are like potato chips … just one is never enough … Grin!

FamilyWoodworking.org at Twistie Stick Snake Cane Thread

WoodworkingChat.com at Twistie Stick Snake Cane Thread

And while you wait to get started, visit Roy’s relief Carving Class thread – See our widgets in the right hand nav bar and on both forums!!!!

Lora Irish carving patternswood carving bench knivesI had a question from one of the forums, and thought I would post the answer here too!

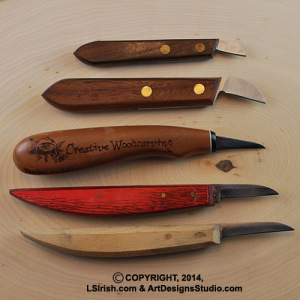
In the photo you can see five different bench knife styles – top to bottom – small chip carving knife, large chip carving knife, detailer, short-blade bench knife, and a long-blade bench knife.

I prefer a large chip carving knife as my main cutting knife whether for relief or for 3-d cane carving. My hand is small, much smaller than my husbands. Where the longer handles of the bench knives fit his hand, they are too cumbersome for me. Also, the short blade of the chip knife puts me hand right against the wood during the cut, a bench knife leaves my hand 1″ to 1 1/2″ away from the wood. The third advantage is that the chip knife serves two purposes – one for my regular carving and, of course, for chip carving.
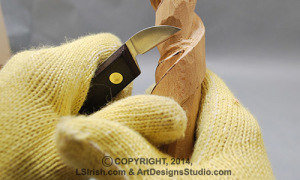
chip carving knifeIf you haven’t gotten a bench knife yet, consider a large chip carving knife. While you are making your purchases also get some of the new self-adhering bandage wraps. You can cut a short – 5″ length – and wrap the handle of your knife to give added grip strength. Cut a longer piece – 12″ – and wrap your tool handles if you have arthritis. It will make the handles thicker for easier gripping as well as pad the handle to minimize the stress on your joints.
Twistie Stick Snake Carving Free Project Read More »

free walking stick wood carving project

Wood Carving Walking Sticks

wood Carving Cane Toppers by Lora IrishWalking Sticks and canes are a favorite wood carving project for both beginning carvers to the most advanced woodworker.  This free, online project by Lora Irish will take you through the basic techniques used in choosing your wood staffs and sticks, wood carving cane toppers, cane construction, and finishing used for walking sticks.  Learn how to use wood burning in your cane carving to clean the joint lines of your carving and add fine details.  Explore the different steps you can use to add bright, bold painted coloring.

This free Irish project will be posted over the next several weeks, and will include how to carve the planes of the wood spirit face.  So please check back often to see what new techniques, patterns, and ideas Lora has posted.

Harvesting Walking Sticks – Learn how to harvest, store, and dry your tree saplings and branches for cane carving.

Common Tree Species – Take a look around your own backyard to discover which tree species you can use for walking stick and cane carving.

Adding Extras – Make your walking stick stand out by adding a small ‘What If’ bag to your staff.

Our next lessons will focus on Cane Construction Techniques!

Wood Carving Walking Sticks Read More »

Free Wood Carving Santa Ornament Pattern

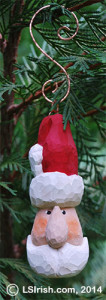
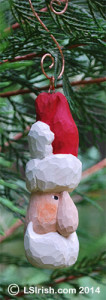
free wood carving santa patternI know that August has just begun and that it is still a month before the kids go back to school, but this is the perfect time to start collecting the patterns and projects that you will want to work this fall.

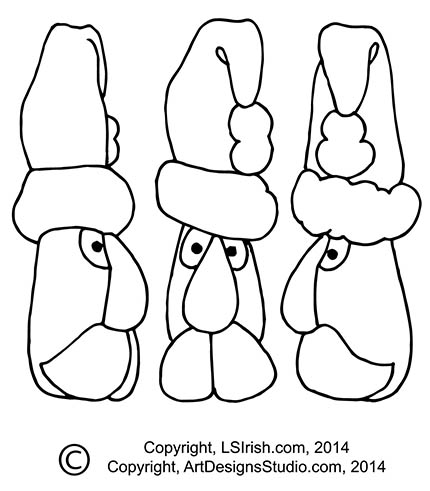
This “Oh So Easy Santa Ornament” is a great beginner’s project and a real quick carve for any advanced carver.  He takes only two carving knifes – a bench knife and a v-gouge.  Make a dozen or more, place them in a basket of straw with a few extra Christmas balls and have them ready and at hand to give away as instant Holiday gifts!


Estimated Carving Time: less than 2 hours

Estimated Painting Time: 1/2 hour

free wood carving santa patternSupplies:

bench knife or large chip carving knife
v-gouge
sharpening tools
1″ x 1″ x 4″ basswood block
320-grit sandpaper
Acrylic craft paints
titanium white
burnt sienna
cadmium orange
deep cadmium red
Acrylic or polyurethane spray sealer
20-gauge copper wire
16-gauge copper wire

free Lora Irish wood carving pattern

Please, check in often as Lora is doing her yearly pattern closet cleaning!  Lots of free wood carving and pyrography patterns are headed your way.

Free Wood Carving Santa Ornament Pattern Read More »

Welsh Love Spoon Carving

Welsh Love Spoons

free Welsh Love Spoon patternWelsh Love Spoons have long been a favorite carving theme for wood carvers.  Tradition says that this original art style for wood carving came from the seamen of the British Isles that brought small pieces of wood and a carving knife with them on their ocean voyages to fill the long hours.  Many of the designs and patterns were symbolic of the sailor’s love of home and family, but they also used some of our favorite whittling trick carvings as the ball and chain or ball in the cage.
Today any relief carving pattern can become the design for the handle of your Welsh Love Spoon.  For my sample I chose a simple grape design with a double stem that wraps around the spoon handle.  With another upcoming stormy weekend it seems like a perfect time to share my carving and pattern for you to enjoy.

For your Free Welsh Love Spoon Pattern Pack by Lora Irish, please visit our wood carving,  & pyrography patterns website,
Art Designs Studio.

To learn more about Welsh Love Spoon carving, please visit Lora S. Irish’s free online tutorials.

Welsh Love Spoons Tutorial:
Welsh Love Spoons Introduction
Basic Cutting Techniques
Open Linked Chain
Ball and Cage

Welsh Love Spoons Read More »

Chip Carving Common Mistakes

We have spent the last week looking at the wood carving art of chip carving in this free, online seminar by Lora Irish, which includes free chip carving patterns.  Today I thought we might  take a few minutes and look at some of the common mistakes that can happen in your wood carving.


Chip Carving Seminar by Lora Irish
Chip Carving Seminar
Chip Carving Supplies
Chip Carving Graphed Patterns
Chip Carving Hand Positions and Grips
Chip Carving – Triangles and Square Chips
Chip Carving – Straight-Wall Chips
Chip Caved Game and Chess Board
Chip Carving Sampler Pattern Layout
Chip Carving Common Mistakes
Chip Carved Shortbread Cookies


Let’s look at a few of the common problems and errors that can happen in chip carving.  Please note that if you are working a practice board you may find that the basswood is not the high quality that you might find in a prepared basswood wood carving blank.  Small chip outs are more common when working practice board quality basswood.

common mistakes in chip carving

1.  Ragged walls can be caused by poor quality wood or because of an improperly sharpened knife edge.  A poorly sharpened knife, or an incorrect bevel to the knife edge are the primary causes for cutting problems in chip carving.

The craft basswood boards available at your local hardware store often show some ragged wall cuts.  A dull knife tears through the wood instead of cutting the wood.  When working on a high quality piece of basswood, check your knife edge as soon as you discover a ragged wall.

2.  Each chip should have a sharp, clean point at the center of the chip well.  Correct this problem by re-cutting along one side of the center point piece.

3.  This chip’s wall was cut using several, staggered strokes.  Re-cut the wall using one full stroke that covers the entire wall side.

4. In this sample the knife effect began the wall cut slightly away from the intersecting joint line between the two chips.  You can re-cut one of the chip walls to thin the intersection.

5.  Every chip carver discovers a very wobbly edge chip walls.  I find this problem most often occurs when I am cutting through a spray adhesive paper pattern.  Use the blade’s edge to shave just the curved area of the line, avoiding the two end points.

6. Chip outs happen and are caused by several reasons.  If you are working on a heavy grained wood as sugar pine, the change in the grain pattern can cause a thin point to break free.

On soft carving woods as basswood the point can chip because the stroke is pulled into the point.  The pulling action tears the point away from the plaque. Try cutting your finest points with a push stroke instead of a pull cut.  With a push stroke you literally lay the edge of the blade along the line and push the blade down into the grain.

Over cutting one side of the point, reaching the blade point too deeply into the wood, can cause a point chip to break away when the second cut meets the first.  Try scoring the point lines first by using a light pressure in the blade and cutting an extremely shallow cut.

Chip outs can be repaired by using wood glue and a tooth pick.  Place a small drop of glue on the board at the break out spot.  Place the broken chip back into position.  Allow the glue to dry thoroughly, about one half hour then re-cut the chip.

7.  If your knife feels as though it is cutting through grainy wood – a sandpaper feeling – check your knife’s edge for sharpness.  It bares repeating that the biggest problem in chip carving is either too steep a blade bevel or an edge that has lost its hone.

Chip Carving Basics E-Project by Lora IrishPlease stop by Art Designs Studio, Lora Irish’s wood carving, pyrography, and chip carving pattern website.

Chip Carving Basics E-Project, Everything from this Chip Carving Seminar and more!  Learn how to create a wide variety of chip carving designs using different styles of easy-to-cut chip motifs, by Lora S. Irish.  37 page, PDF file format, easy to print e-project and the full cp015 Chip Carving Pattern package with 110 ready to print chip carving patterns.

Chip Carving Common Mistakes Read More »

Scroll to Top