Pyrography Basics

pyrography landscape backgrounds by L S Irish

Pyrography Landscape Backgrounds

In Pyrography landscape burnings your background determines the time of year, the time of day, and the weather conditions of your scene.  Landscapes are worked from the farthest element in the scene to the nearest, foreground elements, which allows you to overlap foreground burnings over the paler background areas.  So those first few burning steps are extremely important in setting the stage for your main element, as a barn or church.

Landscape Pyrography Scenes by L S IrishLet’s look at a few examples of how you can create both seasonal and weather conditions in your landscape pyrography burnings.

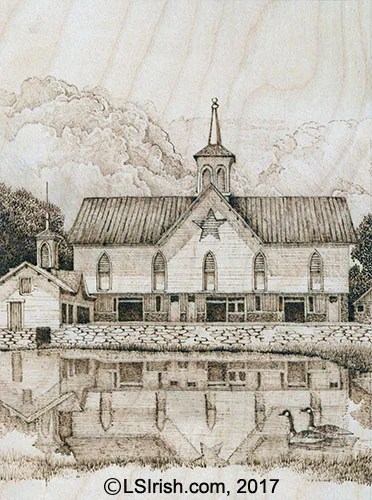
The wood burning, shown right, is from my book, Great Book of Wood Burning, and is titled The Star Barn.  Three strong elements set the time of day – the thick, low storm clouds in the farthest background point, the extremely dark trees just behind the barn on both sides of the barn, and the wide shadows of the roof overhang on the barn.

The roof barn overhang shadow is even on both sides of the face of the barn.  At the peak of the roof the there is almost as much shadow on the right side as on the left.  This places the sun in the 12 to 1 o’clock position.

All three elements tell you that this scene is mid-afternoon, high summer, and that the thunderstorms are eminent. This scene has atmosphere, weather, and tells a story about the conditions surrounding the landscape subject.

Wood burning a landscape, church, by L S IrishThe Country Church, also from the Great Book of Wood Burning, does not use clouds to suggest the time of year.  Instead the light speckling of leaves on the two deciduous trees behind the barn and the lack of fallen leaves on the ground set the time of year as early spring.

The top edge of the line of background trees has been packed with more burning strokes than the lower layer of the tree area, giving the impression that the leaves are just emerging at the tips of the branches.  The high grass – un-mowed – in the foreground shows the new spring growth.  Long shadows under the roof overhang are shown on the right side of the face of the church which places the sun in the 2 to 3 o’clock position in the sky.

With a little planning and forethought you can take either of these two landscape pyrography scenes into a different time of year, time of day, or weather conditions.  Let’s see how!

Clear, sunny day setting

landscape pyrography wood burning by L S Irish
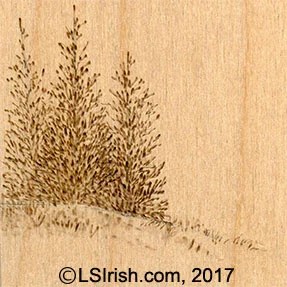
A clear, sunny day has few or no clouds in the sky.  If you chose to add clouds they hand high in the sky and display both the top and bottom edges of the cloud.  Clear days create a deeper tonal value in the background elements as well as casting very crisp shadows.

Clear, sunny sky backgrounds allow you to burn the background trees, mountains, or farm fields in varying tonal values which separates one area of the background from another.  In my sample you can see three distinct trees with the middle tree in front of the other two trees.

Misty or foggy morning

Creating pyrography wood burned landscapes by L S Irish
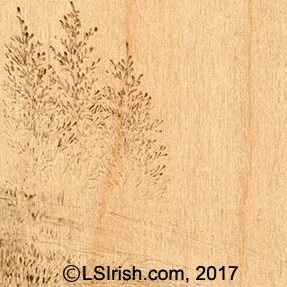
Early morning fog is simply a cloud that has settled against the earth.  That cloud is full of fine water particles that obscure your vision.  The lower to the ground the cloud lies the less you can see of your background trees or fence line.

Note in this sample burn that while the tips of the pines are burned at a pale-medium temperature setting, the lowest portions of the pines have little or no burning strokes.  The very bottom of the pines are not burned, which implies the heaviest area of fog the lies along the edge of the hill.

The slight slope of the ground is further implied by the diagonal shading strokes that is worked from the left to the right, under the pines.  As those shading strokes flow to the right they become paler, implying that the fog is becoming thicker the farther down the hill it lies.

Early evening, sunset

Creating pyrography wood burned landscapes by L S Irish
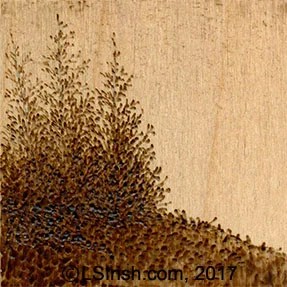
As the sun slips behind the horizon of your scene it creates a graduated variation in the sky with the brightest, or palest area along the horizon line and with the sky becoming darker as the sky nears the top of your pattern.  Note that the palest, un-burned point, in this sample is in the lower right corner, just above the grassy slope.

Because the light is coming from behind the pines and at a low angle to the pines, all of the pines on our side of the scene are in shadow.

In sunset scenes, because the tree line is in shadow, the pines are burned as if they were one tree and not three trees.  The deep shadowing obscures the individuality of the the pines.

Winter snow

Creating pyrography wood burned landscapes by L S Irish
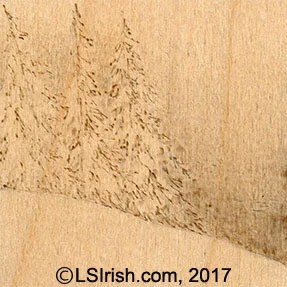
Snow scenes can seem hard to burn because of all of the pale, white areas in the scene.  So instead of burning the snow on the background trees, you burn the atmosphere around those background trees.

Snow clouds are just like fog and mist.  They hang low against the ground and are more dense the closer to the ground they lie.  This is because each small snow flake casts a small shadow – the higher the number of flakes, the more small shadows you have.

For this sample there is no burning of the grassy slope because it is fully covered with snow.  The pines have only a few strokes, at the tip of the branches, where the branches touch the ground, and at the top of the pines.  This leaves the larger areas inside of each pine un-burned, implying that the snow is sticking to the branches.

The background atmosphere – the snow cloud – is burned in a deeper tonal value and becomes paler the higher it reaches into the sky.  This cloud shading also helps to emphasize the snow on the pine branches, giving a darker tonal value to where the sky shows between the pine branches.

Work in Progress

landscape pyrography wood burning by L S Irish
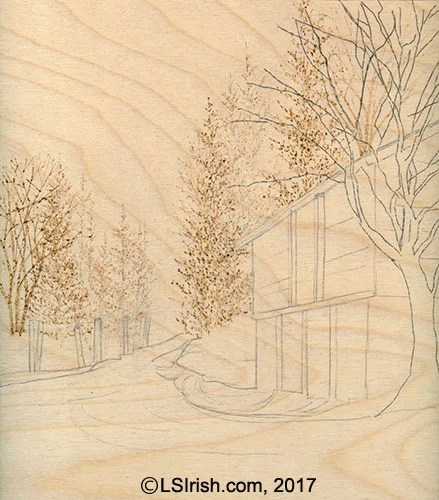
The current project on my table is a landscape scene of an old bank barn that lies right at the edge of a dirt road.

I have the first step of this project completed, which is the farthest background elements of the distant trees on the left side and the trees on the right that fall behind the barn.

Because the deciduous trees on both sides of the background only have their trunks and branches burned I can at this point in the work chose to make this either an early morning scene or a snow scene.

How I treat the land lying under both of these tree lines will determine the time of day and the weather conditions.

Here are my choices:

If I do not burn the land area, this will become a snow scene and I will leave the deciduous trees without leaves.

If I chose to lightly create a tonal value shading in the land this will become an early morning scene.  I can decide the time of year by how thickly I fill the tops of the deciduous trees with leaves – a thin layer of leaves means springtime, a thicker layer of leaves means summer, and a medium layer of leaves and the impression of fallen leaves on the ground implies an autumn setting.

If I chose to add heavy shadows, worked in a medium tonal value, under the trees I can create a specific time of day.

Check back tomorrow to see what I chose to do!

Practice pattern

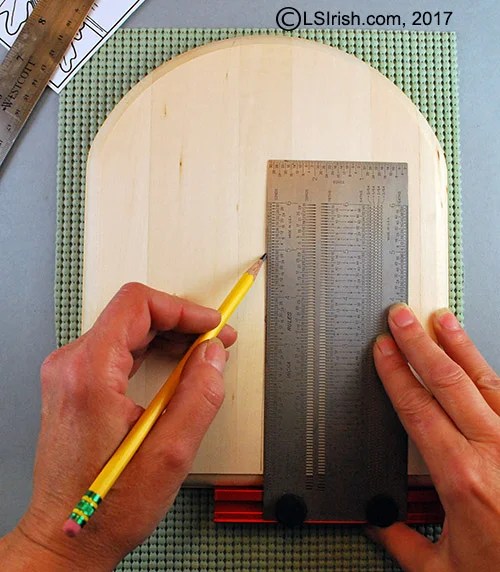
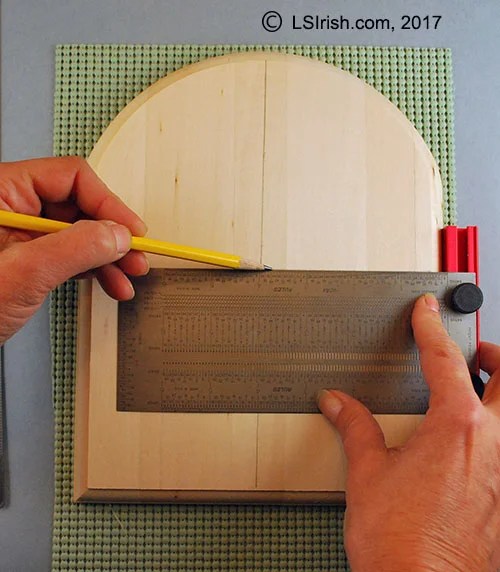
While you wait for the next posting you might enjoy doing a test sample for weather, time of day, and time of year yourself.  On a birch, poplar, or basswood board create a four square grid with each square measuring 3″ along the sides.

Wood burning a landscape scene by L S Irish
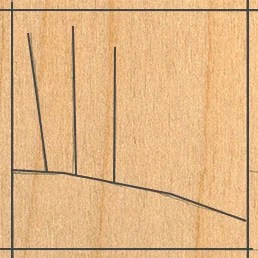
The pattern for these background trees is simply the line at the top of the grassy slope, and a line for each central trunk of each tree.  Because the trees are created using a short, quick stroke with either the loop-tip or ball-tip pen, you only need a few lines to guide you as to where you will burn your pines.


wod burning landscape scenes by L S Irish
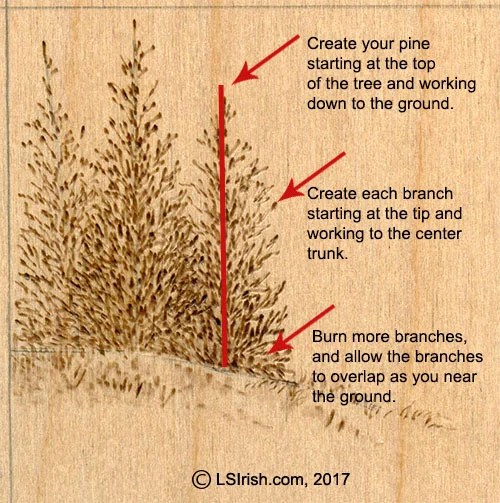
Pines are burned from the top of the tree down to the ground line and from the outer tips of each branch towards the central trunk of the tree.  Place the branches randomly along the trunk, allow open air spaces between branches.

As you near the trunk you will have branches overlapping which will create the natural deepening of the tonal value through the center of the tree.

Follow the four weather samples, above, to practice how you can determine and control the time of day, time of year, and weather conditions in any landscape.

OK … see you tomorrow with an up-date on my WIP barn landscape burning.

~ Lora


Pyrography Landscape Backgrounds Read More »

how to trace your pattern to the wood

How to Trace Your Pattern on to Wood

Preparation – Begin by cleaning, and sanding your wood to create a smooth surface on to which you can transfer your pattern.  Remove all sanding dust using a dusting brush and clean, dry cloth.

Chose Your Tracing Media – There are three primary tracing products which are graphite paper, carbon paper, newspaper, and a soft #4 to #8 artist pencil.

Please share on Facebook and Pintrest!


tracing your pattern to the wood with graphite paperGraphite Paper Graphite paper can be purchased through both office supply and craft stores.  It comes in several colors, including gray, white, and blue for easy tracing onto different colors of wood.  Graphite leaves a very fine line on the wood and can be erased with a white artist eraser after you have completed your project.


how to trace your pattern to the woodCarbon Paper Carbon paper comes in 8 1/2″ x 11″ sheets and has a very dark, heavy layer of tracing media on the back surface.  It is available in deep blue and black colors.  Carbon paper lines do not erase easily and should be carved or scraped away as your work your project.  Use this media on projects that will receive excessive handling or for long-term projects as it holds up very well.  Because carbon paper was primarily used with typewriter to create multiple copies, you may need to do a little searching to find it.


how to trace your pattern to the woodPencil Rubbing – My favorite way to trace my pattern to the wood is to rub the back of the pattern paper with a #4 to #8 artist pencil. This creates a layer of graphite that will easily transfer to the wood surface as your copy the pattern lines with an ink pen.  Pencil rubbings work extremely well for wood, gourds, and even leather.  Woodless pencils work wonderfully for tracing.


Newspaper – Heavily printed sheets of newspaper works wonderfully as a tracing media.  As you trace along the pattern lines the printer’s ink from the newspaper will leave a dotted line on the wood.  This process is especially good for extra large projects as out door signs or long, wide mantel boards.  The ink is easily erased with a white artist’s eraser.


tracing your pattern to the wood1.  Adjust your digital pattern as necessary to fit your project piece.  Print several copies of your pattern – one for the main tracing, one for cutting and tracing small areas of the pattern, and one for a reference to the detail lines of the design.

You will need a ruler, a small t-square or right angled triangle, a pencil, painters or masking tape, scissors, and several colors of ink pen.  Of note, my ruler is cork-backed to grip the wood surface and keep the ruler from sliding.


tracing your pattern to the wood2.  With a right angle triangle or small t-square mark the center vertical line of your project’s surface.


tracing your pattern to the wood3.  Use your ruler to find and mark the center point of your vertical line.


tracing your pattern to the wood4.  With the t-square or right angle triangle, draw a horizontal line across the project surface at the center point of the vertical line.


tracing your pattern to the wood5.  Fold your printed pattern into quarters, matching the outer pattern lines on the sides of the pattern. Place the folded pattern on to the wood, aligning the paper folds to the marked lines on the wood.

If you will using a pencil rubbing for your tracing media, open the folded pattern and rub the back of the pattern to completely cover it with pencil graphite.  Refold your pattern and begin the positioning steps.


tracing your pattern to the wood6.  Unfold your pattern, continuing to match folds in the pattern paper with your guidelines.  Cut several small strips of painters tape.  Use the tape to secure two sides of the pattern paper to the wood surface.


tracing your pattern to the wood7.  Use a colored ink pen to mark any changes you want to make in the pattern, so that you will follow your changes during the tracing process.


tracing your pattern to the wood8.  Slide your tracing media – graphite paper, carbon paper, newspaper – under the printed pattern with the tracing surface against the wood.  Trace along the pattern lines with a colored ink pen.  Use a light pressure, just enough to transfer the pattern line without leaving an indented score line from the ink pen’s point.  When your tracing is complete lift the pattern paper at one of the un-taped corners.  Check your work before you remove the pattern paper and tape.


tracing your pattern to the wood9.  Trace only those lines that you really need for your initial working steps.  For my Beta Fish relief carving I needed only the outlines of each area of the fish and the outlines of the grass to work the rough out carving steps.


tracing your pattern to the wood10.  When your project work is done, remove any remaining tracing lines using a white artist’s eraser.   Avoid colored erasers that can leave dye streaks on your carving or pyrography work.


tracing your pattern to the wood11.  Click on the small image on the right for your free full-sized, printable Beta Fish pattern – a design from Relief Carving Workshop, by Lora Irish.


how to trace your pattern to the wood12.  This second example is from the Wood Spirit Carving project posted on the Wood Carving Illustrated Forum.  The pattern was transferred to the wood using typewriter carbon paper because the project would require intense handling.

Relief Carving Wood Spirit Grape Man WIP – Over 250 detailed, close-up photos with step-by-step instructions of relief carving the wood spirit, green man face. This thread has had over 69,000 views!

how to trace your pattern to the wood13.  After the levels where established in the carving I cut my paper pattern into small sections that could be easily re-traced to the project.


how to trace your pattern to the wood14.  Click on the small image to the right for a free full-sized printable pattern.


How to Trace Your Pattern on to Wood Read More »

Using colored pencils with Pyrography

Colored Pencils in Pyrography

Since this seminar is all about how to incorporate multiple hobbies into one project, during this posting we will be using colored pencils to create skin coloring for our scroll saw cut, wood burned Wood Spirit face.

You might like to visit another one of our colored pencil – pyrography project, Coloring your Wood Burning Projects.

Cross-Crafting Seminar Introduction
Cross-Crafting Seminar Supply List
Cross-Crafting Seminar Free Patterns
Cross-Crafting Seminar, Scroll Saw Basics
Cross-Crafting Seminar, Setting Up Your Scroll Saw
Cross-Crafting Seminar, Scroll Sawing the Wood Spirit Face
Cross-Crafting Seminar, Wood Burning the Wood Spirit Face
Cross-Crafting Seminar, Colored Pencils for the Wood Spirit Face

Supplies:

There are several excellent brands of colored pencils that we can use in pyrography.  I strongly suggest that you invest in an artist quality or artist grade set.  Student grade or school grade colored pencils, as those that come with the new Adult Coloring Books are often chalk-based and do not apply to wood in a smooth, easy to blend layer.  Artist quality pencils are wax-based or watercolor-based, apply easily and evenly across your wood, paper, and even fabric.

The following are a few of my favorites, available at Amazon.com and I do mix and match manufacture brands in any project!

Prismacolors are my favorite for watercolor paper, vellum, and chip board colored pencil work. These have a soft wax core, blend easily, and will leave a nice, rich coloring with light strokes.

Prismacolor Premier Colored Pencils, Soft Core, 48 Pack

Prismacolor Watercolor Pencils

I use my Derwents for adding coloring to wood burnings on wood.  Derwents have a harder core than Prismacolor and are perfect for getting into the tight wood grain and deeply scored pyrography detailing that some of our wood burnings have.

Derwent Colorsoft Pencils, 4mm Core, Metal Tin, 24 Count

Derwent Drawing Pencils, Inktense, Watercolor, 24 Per Pack

Lyra is a must-have for anyone who does a lot of skin tone work.  This pack has twelve extra-large pencils in the most common skin colors.  No mix, no mess, just chose the shade for your shadows, highlights, and general skin tones.

Click on any image for a large photograph.

Lyra Color Giants Skin Tone Colored Pencils

colored pencils in pyrographyStep 1 Since my wood spirit will become the end caps to a small, outdoor bird feeder I have chosen basic, strong colors for my project’s skin tones.  As we work through these steps you will be able see how working one color of pencil over another creates new color hues in your project.

You do not need a large set of pencils.  A set between 12 to 24 is enough colors to create a wide range of hues by working one color over another.

Note: Colored pencils apply best when laid down in light-pressure, thin layers, not heavy-pressure one-step coloring.  Thin layers allow the wood burning shading to clearly show through the hues and can be developed with additional layers to create deep, rich color tones.

Keep your pencil points sharp so that the point can easily reach into the fine crevices of the burned strokes and wood grain.

New colors can be created by working thin layers of one color over another color.  For best results apply the darker toned color first then lay the paler color tone on top.

colored pencils in pyrographyStep 2 We may refer to skin colors as white, yellow, red, brown, or black, but all skin colors are simply shades of orange.  All humans have orange colored skin!  Some of us may have pale white-orange skin, and others a red-orange tone, and some such a deep coloring of orange that it appears almost black … but everyone of us is orange!

To learn how to get that perfect skin color every time. please read Adding Skin Colors to Wood Burnings.  It is an in-depth look at the mixing color hues to get just the right shade of orange for your portrait.

The base shadow color for my wood spirit is black cherry – a rich, deep red-purple. Work several light layers of black cherry over the areas of shading in the face that you created with your wood burning steps.

Since all skin tones are shades of orange, we are using a purple-toned colored pencil for a our base shading step.  Purple is the compliment to orange and when the orange pencil is worked over this purple shading the finished coloring will be a rich shade of brown.

Let your pencil lines show, let them go in random directions, and keep the pressure on the pencil tip light.  The random lines add to the wild look of the wood spirit.

colored pencils and pyrographyStep 3 Since I want my wood spirit wild and woolly I am adding more shading over my base of black cherry using a deep ultramarien blue colored pencil.  Work several light layers of ultramarine blue in the same general areas as the pyrography shading on the face, but do not cover up all of your black cherry work.

Skin is transparent, while it does have pigment you can see through the skin to the vein and bones in the body.  Blood veins often have a bluish cast under the skin, so in our wood spirit we can use the ultramarine blue to pick up that effect.

Just as we allowed the wood burning shading of the face to move into the hair strand area, take some of this colored pencil shading into those same areas.

colored pencils in pyrographyStep 4 A couple of light layers of forest green shading blends the shadow areas of the face.  Note in the photo that no area of the shading now has one individual strong coloring, but instead has a speckled, blended effect.  Green works just as tones of blue in portrait coloring, implying the under-structure of bone and veins.


colored pencils and pyrographyStep 5 Now that you have the shadows well established in the face it is time to overlay the general skin tone.  I used a medium rust-brown pencil for this general overlay.  Apply several light layers of coloring to the face.  Allow some areas of the original wood uncolored to create your highlights – the center of the forehead, the outer corners of the upper eye lids, the center of the eye wrinkles below the eyes, the center line of the nose, the center of the cheeks, and the center of the mouth.

As with all of the other colors, work these layers of skin tone directly over your previous colors, and expand your coloring area towards the areas that you will leave as highlights.

Two light coats of this general skin tone is also applied to the mustache and beard area of the face to give it just a touch of color toning.

colored pencils and pyrographyStep 6 Several light coats of orange is applied to the entire face – over the shaded areas and the highlights.  This orange is what gives the skin its warmth, makes it feel alive.


Step 7 colored pencils and pyrographyI decided that I wanted my wood spirit to have a darker base coloring to his skin tone.  So I have added a few layers of a darker brown skin colored pencil.


colored pencils and pyrographyStep 8 My highlights in the face as of Step 7 are in bright orange.  To add those bright reflective spots on the high areas of the face I use Titanium white.  Again, use freely moving strokes and let your pencil lines show.

In this photo you can note that my pencil is two-toned.  When a colored pencil becomes to short to place in the pencil sharpener or too short to hold comfortably, simply super glue the blunt end to the end of another pencil!


colored pencils and pyrographyStep 9 I want my wood spirit to have grey-white hair, so I will be using the coloring of the birch wood as my base color for all of his hair and beard.

To create individual strands of hair I used the Titanium white pencil, and worked long, curving lines of white from his face towards the outer edge of the hair area.

This white is worked in those hair strands that are closest to you, on top of other strands.  Click on the image for a close-up.

colored pencils and pyrographyStep 10 Using a medium grey or french grey colored pencil I have added more hair lines into the mid-ground and background hair strands.  Again, let your pencil lines show.


colored pencils and pyrographyStep 11 My last step is to intensify the white throughout the wood spirit’s face and hair.  As this is the last layer of colored pencil work I can add extra pressure to the pencil to create thicker line work.

Once the coloring is completed I give my wood burned colored pencil projects a light coating or Reworkable Spray Fixative.  This is a matte toned finish that protects the work you have already accomplished but that also allows you to add more colored pencil work over your piece.

This protects the work I have done while I decide what final finish I may want for the project.  Since this scroll saw wood spirit and its matched gang-cut piece will become the end pieces for my small bird feeder, it will eventually be finished with polyurethane after it is attached to the feeder.

Thanks for reading ….. tomorrow we will be working on scroll saw cutting our wooden spoon and the wood carving steps for that project.  See ya’ there!


Colored Pencils in Pyrography Read More »

Free Pyrography Wood Burning Project by Lora Irish

Walnut Hollow Woodburner Detailer – 6

Let’s finish up the step by step instructions for this Henna Moon Pyrography Project and the test drive review of Walnut Hollow’s Woodburner Detailer.

Please click on any image in this post for a full-sized photo.

Henna Tattoo Pyrography ProjectFinishing the Main Design
Step 14:  I have complete the detailing by working the bottom floral scrolls.

If you are just coming into this project, please see the previous post pages for the free pyrography pattern, the free guide pattern, and the early steps to this Henna Moon Pyrography design.

Henna Moon Pyrography Project
Walnut Hollow Woodburner Detailer – Introduction
Walnut Hollow Woodburner Detailer 2 – History of Henna Tattoos
Walnut Hollow Woodburner Detailer 3 – Tracing the Pattern
Walnut Hollow Woodburner Detailer 4 – Outlining the Design
Walnut Hollow Woodburner Detailer 5 – Detailing the Moon and Sun

Guidelines for the Border Pattern
Step 15:  Border and trim patterns for Henna Tattoo designs can be either organic or geometric.  I chose a small triangle pattern with an arched bottom line for my plaque.

Using a pencil and ruler mark a line 1/4″ from the outer edge of the plaque. This area will become the outer, un-burned margin along the plaques edge.  Measure and mark a second line 1/2″ from the first margin line.  This will be the burned border area.  Measure and mark this area into 1/4″ segments.

In the first border segment pencil a line from the upper right corner to the lower left corner, cutting the segment along the diagonal.  In the next segment make the diagonal line from the upper left corner to the lower right corner.  This creates two of the three sides of your first triangle shape.  Continue working across the border area until all of the triangle shapes are established.

Lay a small coin or bottle cap at the inner base of your triangle shape.  Adjust the coin until it touches both legs of the triangle, then trace along the coin with your pencil.  This creates quick, easy, and accurate arcs.  Pencil mark a small circle on the inner border guideline, centered in the arc.

Henna Tattoo Pyrography ProjectHenna Tattoo Pyrography Project


Henna Tattoo Pyrography ProjectBurning the Border
Step 16:  I worked the upper triangle shapes with a lattice-work pattern.  Begin by burning a fine line about 1/16″ from one side of the penciled guideline.  Stop the line 1/16″ from the guideline at the bottom intersection point of the triangles.  Repeat until you have worked four thin lines in the inner triangle.

Next, repeat the above step working from the opposite side of the inner triangle.  This creates a crossed-line lattice. Use a touch-and-lift dot stroke at the intersection of each line in your lattice-work.

The outer or lower triangle has been shaded from a medium to pale tonal value, starting at the outer point of the triangle using a tightly packed scrubbie stroke.  Outline the three sides of the triangle.

Using a touch-and-lift dot pattern make a medium-sized dot at the intersection of each triangle along the inner edge.  Burn the circle that lies on the guideline to a medium tonal value.  Touch-and-lift a small dot evenly spaced between these two dots.

Close-up of the Border Work
Step 17: Here are the close-up photos for the border pencil lines and the burned triangle border work.

Henna Tattoo Pyrography ProjectHenna Tattoo Pyrography Project

Finishing Step
Step 18:  Using a white artist eraser, work the eraser across the entire surface of your finished burning to remove any remaining tracing lines, pencil guides, and the normal dirt and oil accumulation that occurs during the burning process.  A white eraser contains no dye that can permanently mark and mar your pyrography.  Remove the eraser dust using a soft, clean cloth.

Pyrography can and does raise small wood fibers from the surface of your plaque as you work.  Using a crumbled paper bag lightly sand over your plaque to remove these little fibers.

Sign and date your work.  As a habit I sign my projects of the back of the plaque.  Your work is ready for the finishing spray, sealer, or oil finish of your choice.

Walnut Hollow Woodburner Detailer Review

I started this project to answer the question “Why would I want a Walnut Hollow Detailer that has less power, reaches a lower temperature, and that is not temperature adjustable when I already have a Versa-Tool and several higher-end burning units?”

Many of us discovered pyrography when the only electric burning tool was a soldering iron.  That one temperature tool had a permanently installed wedge shaped pen tip and when plugged into the wall socket reached a very high temperature just below 1000 degrees.  The only control we had over our tonal values and burn lines was determined by how lightly we touched the tip to the wood, and how long we allowed the tip to stay in contact with the wood.  For very pale tonal values you had to unplug the soldering iron, let it totally cool down, then you plugged it back into the electric strip and did your pale tones before the tip reached full temperature.  Scorching and halos were simply part of any burn.

The Versa-Tool is a fantastic wood burner which I highly recommend.  The inline rheostat allows you to control the temperature of your tool tip and gives you so much more control over your tonal values.  It is a perfect entry-level wood burner at an extremely reasonable price that you will use throughout your pyrography hobby.

But, yes there is a but, the Versa-Tool is temperature set for multiple hobbies which include soldering, stencil cutting, hot-knife cutting. Because it is a cross-craft tool it has a high temperature range, near the 1000 degree mark, and you can experience both scorching and haloing even with careful attention to the rheostat setting.

My high-end burners – RazorTip, Colwood, and Optima – are also cross-craft temperature set with even a hotter capacity than the Versa-Tool.  This type of burner uses a great deal of electric power, and I have watched as my high-end units tend to drop in temperature when the air conditioner or electric heat kicks on.  My Optima has such a high range that I don’t think I have ever had mine set above a ‘6’ on a ’10’ dial.  All of the above cross-craft styled tools can need a recovery time after you burn a long line or work to fill an area with a texture pattern.

When Walnut Hollow created the Detailer they had only one craftsman in mind – the pyrographer!  This tool was made for us, and us alone!  That 750 degree permanent temperature setting is just high enough to create clean, crisp black tones without scorching our wood, gourds, leather, or paper burnings.

It quickly hits its set temperature and holds that temperature throughout long burning sessions. Because of the lower temperature setting, I never had to pause to let the ball tip recover from a long line stroke or from fill stroke work.  In fact, I never noticed any variation in the tip heat or in the tonal value of a burned line throughout this 6 hour pyro session.

Since Walnut Hollow really thought ahead, all of the interchangeable tips that you have for your Versa-Tool or even an older Walnut Hollow one-temperature soldering iron tool will fit and work wonderfully with your Detailer.  So they are giving us the full range of burning pen tips that we love and use all the time.

“So why would I want a Walnut Hollow Detailer that has less power, reaches a lower temperature, and that is not temperature adjustable when I already have a Versa-Tool and several higher-end burning units?” Because it lives up to its advertising – “A perfect temperature for precision and detail” pyrography burnings.

Treat yourself today to a tool made to fit anyone’s budget and created with you, the pyrographer, in mind by visiting  WalnutHollow.com.  Oh, and while you are there get yourself a Versa-Tool! The Walnut Hollow Detailer and Versa-Tool are so reasonably price you can easily afford both.

Thanks for joining me in this Henna Moon Pyrography Project.

Disclaimer:  I am not associated nor work for Walnut Hollow and have received no financial compensation for this review.  All opinion expressed here are mine and based on my experience using this tool.

Walnut Hollow Woodburner Detailer – 6 Read More »

Henna Moon Pyrography Project by Lora Irish

Walnut Hollow Woodburner Detailer – 5

We are continuing the step by step instructions for this Henna Moon Pyrography Project and the test drive review of Walnut Hollow’s Woodburner Detailer.

Please click on any image in this post for a full-sized photo.

Henna Moon Pyrography Project
Walnut Hollow Woodburner Detailer – Introduction
Walnut Hollow Woodburner Detailer 2 – History of Henna Tattoos
Walnut Hollow Woodburner Detailer 3 – Tracing the Pattern
Walnut Hollow Woodburner Detailer 4 – Outlining the Design

Our tracing pattern is the line art for just the outlines of each element in this Henna Moon design.  During these steps we will work to fill each element and areas inside each element with Henna-styled details and patterns.  You can re-burn the same line art outline time and time again, and create new projects by changing which pattern elements you fill with shading and which fill patterns or textures you use in each element.

Simple pyrography shadingSimple Shading in the Henna Flowers

Step 9: Henna tattoos often feature stylized flowers, detailed leaves, and repeat patterns of circles, arcs, or triangles.  After the outline for each element is complete that element – flower, leaf, scroll – is detailed with small repeat patterns as spiral curls, wavy lines, lattice lines, and stems with bud dots.

I began the inner detailing of my henna tattoo elements by working the four large flowers that surround the Sun and Moon faces.  Using a light pressure touch with the pen tip of my Walnut Hollow Detailer and a tightly packed scrubbie stroke I created a pale tonal value shading in the flower petals.  That shading is placed at the bottom of each petal where it tucks under another petal.  The outer edge area of each petal was left unshaded – unburned.  This gives a white area to the upper petal and a dark area to the lower petal.

Note:  Even when using simple shading I still want some areas left un-burned to become my white tonal value, some pale sepia tones, some medium tones, and some dark tonal values.  In Henna Tattoos that pale and medium tones come from light pressure, fine line strokes.  Deep mid-tones and blacks come from touch-and-lift dot stokes.  The blackest tones are tightly packed touch-and-lift dots.


Henna Tattoos for PyrographyLine Detailing in the Sun Rays

Step 10: The outer ring of sun rays was worked in a simple long wavy line that followed the outline shape of one side of the ray.  The sun rays that lie behind the upper curve of the moon are accented with small dots, worked along a diagonal line.  This is just a touch-and-lift stroke with the ball tip of the Detailer.

Note:  You can use just about any geometric pattern, line pattern, or texture fill stroke to create the detailing inside of your flowers, leaves, and scrolls in Henna Tattoos.   So for each flower chose or create a new fill pattern, and use that pattern for each of the petals in the fill.  Leaves, paisley-shapes, and scrolls can be either pattern filled or area where you wood burn a small flower and leaf motif.


Henna Tattoos for PyrographyDetailing the Sun Circles

Step 11:  A stem-and-bud dot pattern was used in the inner row of Sun rays and a triangular pattern fills the circle that encompasses the Sun face.

Note: As I worked the Sun rays from the outside towards the inner ring near the face I packed my strokes tighter.  I have not changed my temperature setting or how much pressure I am using on the pen.  Adding more lines into an area darkens the tonal value appearance of that area. 


Henna Tattoos for PyrographyCreating the Leaf Details

Step 12:  The leaves of a Henna Tattoo are just as decorative as the flower petals or scrolls.  One set of leaves uses a line stroke with a circular spot in the center.  Another group of leaves has an inner outline with the outer border worked in parallel lines and the inner area in a small flower pattern.


Working the Lower Scroll Element

Step 13:  I have added the shading and detailing to the lower scroll element by using a leaf and scallop design inside of the scroll.

Detailer Review:  At this point in the burning I have worked for about three hours.  The Detailer, throughout this entire time, has never skipped a beat.  It has held a consist, constant, even temperature with each and every stroke.  As you look at the close-up, below, you can see I still have no hot spots where one line intersects or turns and angle, I have no scorch marks, and my line work is the exact same tonal value throughout the stroke’s pull.

c-up 002


I will be posting the final steps to this project tomorrow, Friday, Oct. 30th.  We will work the bottom accent elements, then create the pencil guidelines and burn the border trim.  Plus tomorrow I will give you my final decision on how the Walnut Hollow Woodburner Detailer has preformed … but, I expect you already know I am totally delighted with its performance throughout this project.

PS – At this point, three hours in, I still have no carbon build-up on the ball tip of the Detailer and not one gray-black carbon smudge because of a dirty tip … big grin!!!!

Walnut Hollow Woodburner Detailer – 5 Read More »

Scroll to Top