General Crafts

free applique quilt pattern

Doodle Applique Quilting

We have been working with doodle patterns in our wood burning and pyrography projects this last week.  Today, let’s see what happens when you bring those doodle designs to your favorite applique quilt project.

free applique quilt pattern

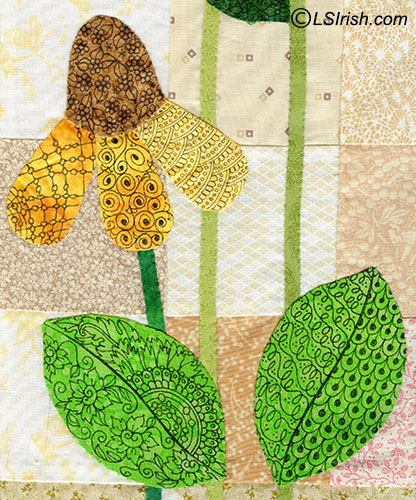
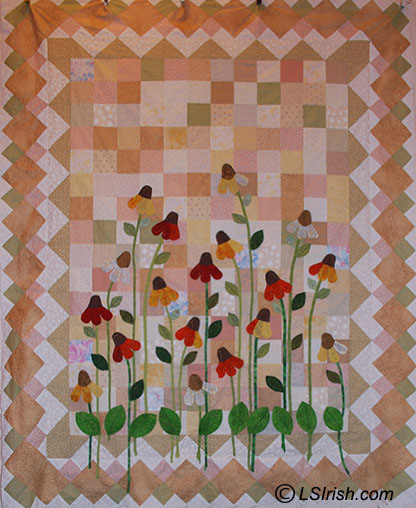
While I have stitched quite a few small applique quilting projects, I have finally started my first full-sized quilt work.  I wanted something fun, something easy, but something extra special since I know I will be working on the quilt top for some time.  I chose a classic, simple wildflower daisy pattern with long stems and lots of leaves over a four patch neutral toned block pattern.

free applique quilt pattern

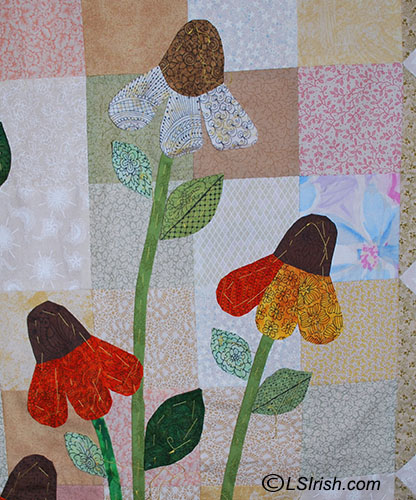
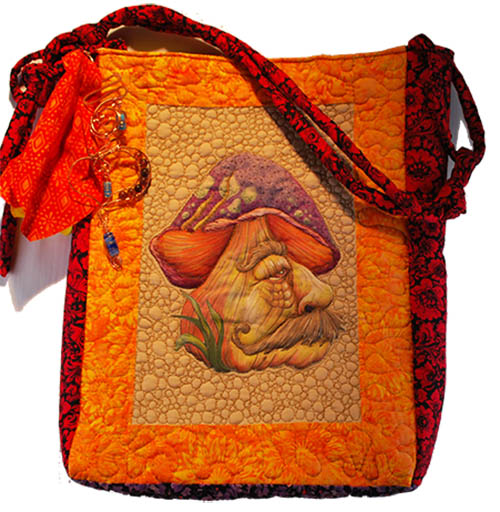
To add that extra, I chose to get out my fine point permanent marking pen, a variety of tone-on-tone bright cotton fabrics, and the doodle patterns we have been using for our pyrography.  This is a great idea for the quilt top that has been lying around the sewing room because you just didn’t feel it had enough pizzazz to finish.

doodle_quilt_large

Wash and iron your fabric.  Click and save a copy of the free applique quilt pattern.  Trace a copy of each pattern piece onto the back of a piece of 220-grit sandpaper.  Pin or tack the fabric to a piece of foamboard.  Lay the sandpaper pattern pieces on the fabric and trace around the outer edge with a water-soluble pen, allow space between each pattern piece for seam allowances.

free applique quilt pattern
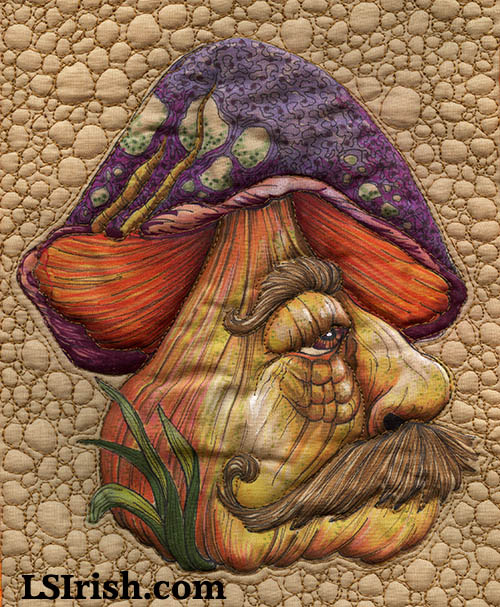
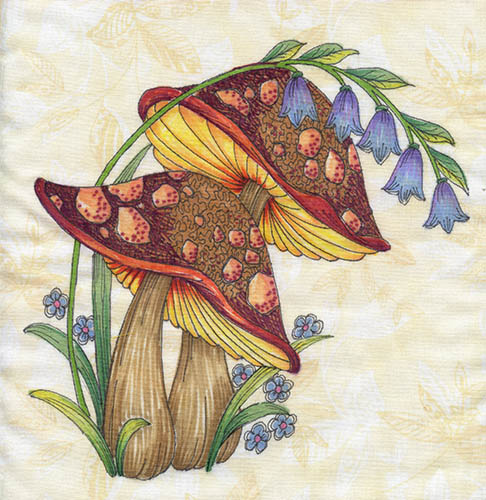
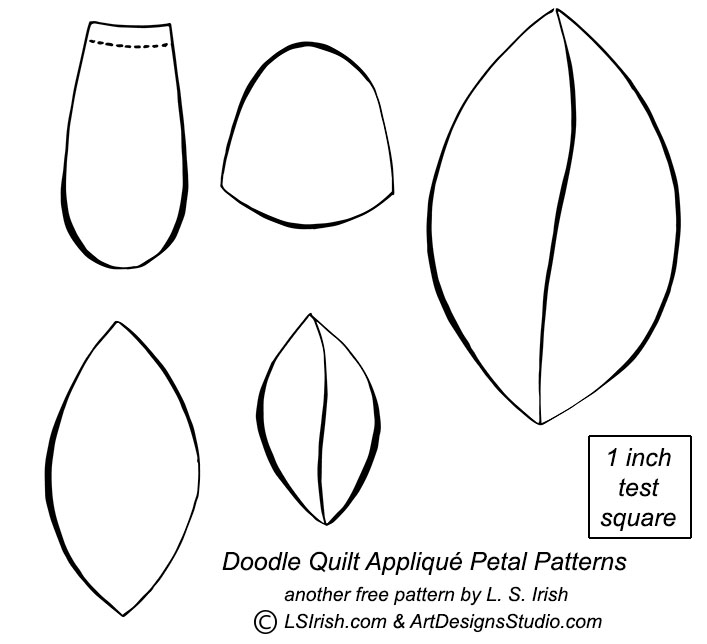
Click and save the full-sized pattern above – another free pattern by Lora S. Irish.

Now, using your permanent marking pen, have fun doodling patterns to the fabric.  I chose black for my designs, but also consider using multiple colors for pale toned or neutral fabrics.  When the doodling is done, remove the fabric from the foamboard and iron.  You are ready to move on to your favorite applique technique.  Fun, easy, creative, and a one of a kind show stopper.

For more doodle designs and doodle fill patterns, please see our New Pattern Package – Pyrography Doodles at Art Designs Studio.

Pyrography Doodles Pattern Pack by Lora Irish

Doodle Applique Quilting Read More »

Wood Spirit Gourd Masks

webimage-urbanlargeLet our patterns spark your imagination today!

It’s gourd and pumpkin carving season around the studio.  While cleaning up from one of my current gourd art projects, Basket Weaving, Braided Raffia Gourd Rims, I came across the leftover, cut-out section of gourd.  As a wood carver and pyrographer I often create and use practice boards in my teaching.  This small section of gourd seemed perfect for just that purpose.

Soon I had an acrylic under-painting with colored pencil wood spirit face worked up … but what to do with it.  The face painting came out so very well that I didn’t want to just ‘take a photo then throw it in a box for storage’.

Some hot glue, copper foil, electric wires, vintage and damaged jewelry pieces, some thick cotton yarn, and a pair of old glasses quickly turned a practice gourd scrap into an Urban Warrior Gourd Art Mask.

To learn how to make your own Urban Warrior Steampunk Mask please visit our newest free, online project, Wood Spirit Gourd Mask.

Both the Urban Steampunk Warrior Mask, shown, and the Wood Spirit Gourd Mask free project are worked from our Fun Wood Spirits pattern package ,available at ArtDesignsStudio.com.   While you are visiting our line art craft patterns website please note that our Halloween pattern packages have just been posted.

Halloween Scroll Saw 1 – 21 scroll saw ghouls, pumpkins, zombies, and more.
Halloween Scroll Saw 2 – 21 scroll saw cats, bats, rats, witches, ghosts and more.
Pumpkin and Fun Halloween Pattern Package – 71 fun designs for the very young Trick or Treaters.

When you get your’s done, please drop me an image through our Contact Me page.  I would love to start an Urban Warrior Mask gallery to share ideas.

Wood Spirit Gourd Masks Read More »

Marker Quilt Squares

A nice selection of permanent colored marking pens are a great media to express your creativity on your next quilt, pillow, or tote project.

mushroom quilt patternSupplies:

100% cotton fabric
Assorted color selection of permanent marking pens
Fine point black permanent marking pen
1″ wide masking tape
clip board
printed pattern – Mushroom Wood Spirits

Do a test square on the fabric you will be using before you begin painting your quilt square.  Some brands of colored permanent marking pens can make other brands bleed.

1.  Begin by choosing a pale color fabric.  You can use a solid, tone on tone, and even a pale  colored print.  Cut your fabric to the size of your quilt pattern instructions plus 2″ on the wide and 2″ on the length.

2. Tape your printed pattern to the center of your clip board.  Center the fabric square over the pattern, fold the excess fabric to the back of the clip board and using masking tape secure the sides. You will see the printed pattern lines through the fabric.

3.  Permanent markers not only come in a nice, wide range of colors they are also available is several sizes of pen tip widths.  For my mushroom tote and quilt square owl I used medium sized tip points for the main coloring and a fine point black marker for my outlining and detailing.

mushroom_04Since the marking pen colors are translucent some of the color of the fabric will effect the final color of each area of your painting.  If you are working on a pale green fabric with a bright yellow marker the area will become a bright yellow-green color.  You can use a scrap of your fabric as a test square for each color that you want to use.

4.  Begin each area with your palest color, then add layers of gradually darker colors to create realistic shading and gradual changes in color.  You can work several layers of marker color over one area, allowing each area to dry for a few moments to intensify the final color tone.

5.  Complete all of the color work then let your fabric dry thoroughly.  Now use the black fine point marking pen to add your details, outlines, and to sign your artwork.

6.  Set your colored art using a dry, cotton setting on your iron.  That’s all you need to do to turn any pattern into an original painted quilt square.

When you get your’s done I would love to see it!!!!!

My sample is worked on a finished block size of 8″ x 11″ with 2 1/2″ orange boarders.  The Sides of the tote were cut at 3 1/2″.

mushroom patterns by Lora S Irishowl_02

These two samples are ready to become quick, fun throw pillows.
Retro Owls

Marker Quilt Squares Read More »

Basics to Painting

Susan posted an in-depth look at the basics techniques used in painting wood carvings, wood burnings, gourds, and general wood crafts here on our blog.

This in depth, step by step, how to paint your craft project includes working with oil paints and acrylics as antiquing colors, dry brushing, china painting with acrylics, marbling, and simple painting techniques.

So please stop by Basics to Painting and all of its step-by-step projects.

.

LSIrish-OP-001

Basics to Painting Read More »

Scroll to Top