Working with skin and hair
Supplies:
8 ½”x 12” x ¼” birch plywood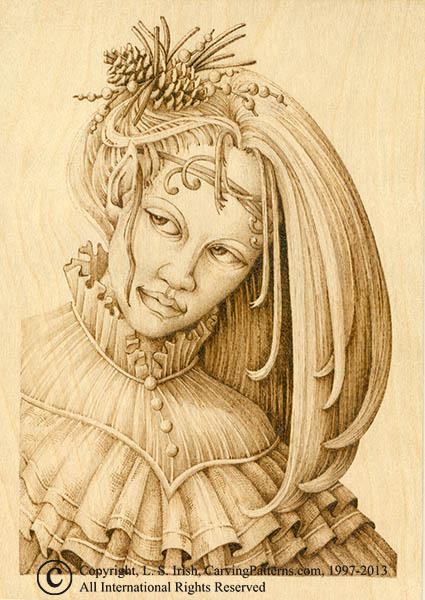
Variable temperature wood burning unit
Standard writing tip
Graphite paper
White artist eraser
#2 soft pencil
This Pixie Queen burning will allow you to practice creating the human face before you begin wood burning portraits from family and friend photos. Because our Pixie is a mythical creature you can learn to burn soft skin tones, shaping the facial features and creating crisp eyes without worrying about being totally true to a particular person’s facial features.
The focus of the project is contrast in tonal values that lie side by side. The pale tones of the face are framed by the black tones of the background trapped hair on the right side of her face. The ruffles of the almost white clothing capture black tone shadows. The deep toned pine cones rest on pale blonde hair. Throughout the burning I will be placing very dark tones in direct contact with extremely pale areas.
Begin your project by lightly sanding your board with 220-grit sand paper. Remove any sanding dust with a clean tack cloth. Trace the pattern to the board using graphite paper or by rubbing the back of the pattern paper with a soft #2 pencil. As you trace along the pattern lines the pencil rubbing will leave a fine gray line that can be erased after burning.
Step 1: Darkest points in the face

This entire project was worked on low-medium and medium temperature settings using the standard writing tip. A tight flowing random doodle stroke was used for the face shading, long line strokes for the hair and cross hatching for the dress areas. Low temperatures with multiple layers of burning will bring the darkest areas up to their tonal values.
I want the skin tones as even and smooth as possible so throughout this project I am working at as low a temperature as I can so the color develops very slowly. The constant motion of the random doodle avoids the small hot spots that can happen with line strokes as cross hatching. This particular burning stroke can be worked with wide turn back loops that allow a large amount of un-burned area between the bends or, as I will be using on this project, with tight turns that cover the entire working area. Within several layers of burning the shading will blend into gradual shading through the face.
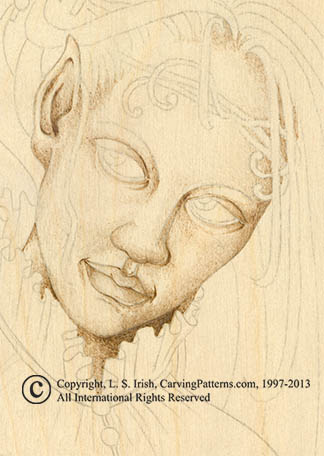
I have started the mapping of the face to find my shadow areas. The darkest points in her face are the corners of the mouth, the inner corners of the eyes, the nostrils, and inside of her ears. My light source is coming from the upper left hand corner so the left side of her face will be lighter in tonal value than the right with the darkest skin tones along the right cheek and jaw line.
Step 2: Mapping the highlights
When I map an area I am looking for my darkest tonal values in the element that I am working. By burning these dark areas first at a low temperature I can easily add and expand the shading to include the mid-tone and pale values that I will need to create the dimension of the object. All of my shading is worked off this first mapping of the dark tones. At the same time I want to make note of where my brightest, unburned highlights will fall in the object. Since these areas will not be worked on the project I often will make pencil notes on my paper pattern for reference as I work.
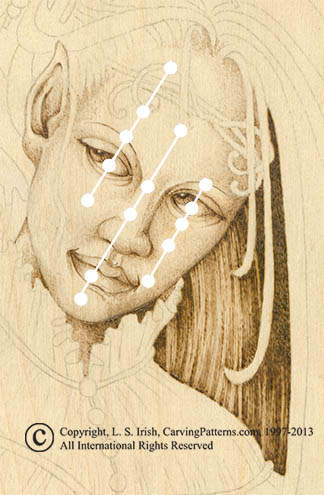
This photo comes several steps from now but it is a good example of the finished shading on the face. As I work the first shading steps on the skin I also want to map where my highlights will fall. These highlight area are unburned so that they remain the tonal value of the raw wood.
The highest point in the face is the nose with the forehead, eye brow ridges, cheeks and chin falling below this point. The nose bridge, eye lids, corner of the nose and chin sit deeply into the face. The eyes are the deepest point.
For our Pixie there are three vertical lines that run from her jaw line to her hair line. The brightest highlights fall directly on these lines. Because her head is tilted to the right the first highlight lines begins high on the forehead and runs to the top of her cheek before the jaw line rolls away from the light source. Where this line hits the high areas of the face there will be a bright highlight.
The second vertical begins a little left of the center of her forehead and runs through her nose to the top of her chin. This line does not run directly down the center of her nose but towards the left of center because of her head tilt. The final vertical line starts low of the forehead and stops at the top edge of the corner of her mouth. The forehead area above this line rolls away from the light source and the area below the mouth to the bottom edge of the chin also drops away from the light.
With the light coming from the upper left to the face that highlights in the first, left, line will be larger than those in the center vertical line with the highlights in the right line being small and compact.
Step 3: Deepening the tonal values and shading the neck
I’ve added a second layer of shading to the face which has darkened the first mapped areas and added a medium tone shading along her jaw line, ears and eye lid areas. The neck area has been worked. Because her collar folds behind her neck a medium tonal value is needed to distinguish these two areas. The shading under the left side of the neck accents the highlight areas that will fall on the edge of the left jaw line and the left side of the chin.
Step 4: Adding the eye pupils, inner ear shadow and the corners of the mouth
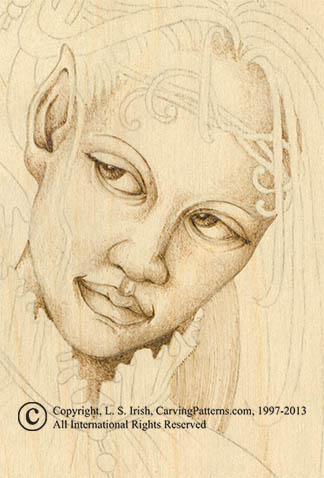
The mouth has been detailed; notice how dark the corners of the mouth have become. The ear also has its detailing so that the inside ear will be as dark as the eye pupils. The nostrils are made with just a line because of the tilt of her head very little of the nostrils show.
The eyes are worked by first lightly shading the entire eye ball area. The eye is an actual ball shape that is set behind the eye brow ridge and the cheek bone area. The eye is the deepest area of the face so the eye needs to be shaded. Once the shading was done the iris and pupil were added. A hint of eyelashes and one fine line for the eyebrow complete the eyes. Very fine lines add a feeling of eye lashes along the upper eye lids.
I have started to add the section of hair that falls behind her shoulder with low temperature long line strokes.