
In this section of the Ceremonial Mask Pyrography project we will complete the mapping steps to shading the face. Using a ball tip pen and the scrubbie stroke we will explore how to make any shading into an even, smooth graduated shading. The black tone solid-fill areas to the face will be added to create areas of dramatic contrast with the unburned white highlights in the cheek, nose, eye lids, and mouth.
Ceremonial Mask Pyrography Project 1
Ceremonial Mask Pyrography Project 2
Ceremonial Mask Pyrography Project 3
Ceremonial Mask Pyrography Project 4
Ceremonial Mask Pyrography Project 5
5. Continuing the Left-Side Shading
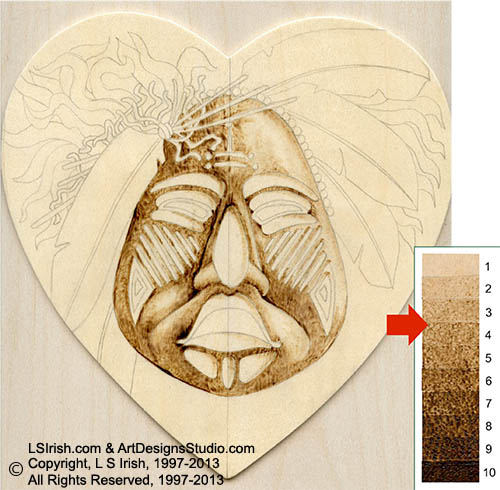
Begin this step at a tonal value setting of #3 medium-pale. Work the long pull strokes using the spear shader along both sides of the outer nose ridge.
Shape the lower area of the right-side cheek and the cheek areas adjacent to the outer nose ridge. Establish the shading surrounding the raised elements for the eyes, eyebrows, and chin area.
Raise your temperature setting to a #4 dark-pale and still using the spear shader in long pull strokes, strengthen these shaded areas to create dark areas at the corner of the eye elements, along the left-side cheek at the outer nose ridge, and at the left-side mouth corner.
6. Overlay the Mapping
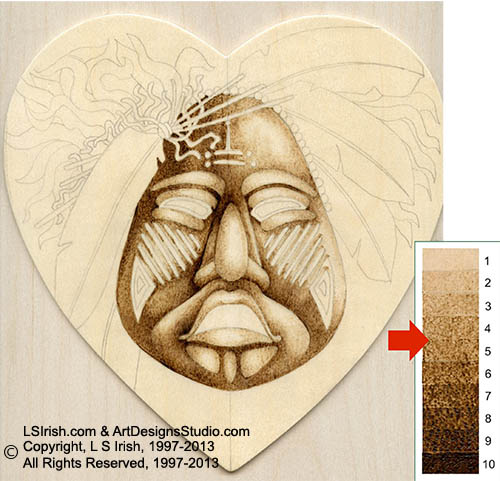
In the last three steps we have mapped the main areas of shading in the face. Because poplar takes a burn stroke quickly and because a spear shader stroke begins dark and fades to a pale tone through the pull, the facial shading at this point is uneven, and patchy.
To smooth the shading to a gradually changing tonal value shading move to your ball tip or looped tip pen.
Beginning on a tonal value temperature setting for a #3 medium-pale use either the tight scrubbie stroke or a tight curl pattern to work over your shaded areas.
Continue with the ball tip pen, and the tight scrubbie stroke, slowly increasing your temperature setting up to a #5 light-medium to blend in the darker tonal values as shown in the photo.
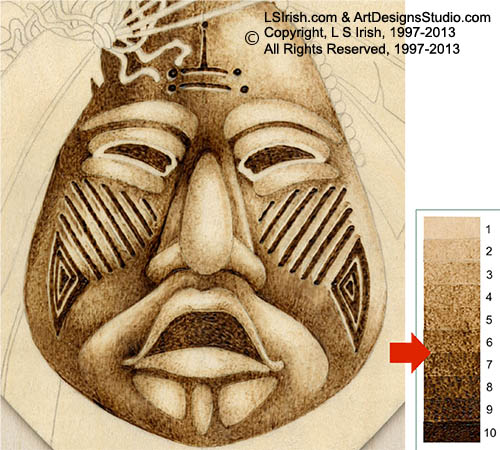
7. Black-Fill the Eyes and Mouth

Ceremonial masks are most often carved from wood and include areas of geometric decorations that are cut into the facial areas. In our pattern that includes the decoration on the forehead and the cheek diagonal line work.
As the sunlight reaches across an indented line it will leave a very dark shadow inside the trough of the cut and a highlight on one of the edges of the cut.
As you work this step leave a thin unburned line of #1 tonal value on the high side of the decorative cut lines. Follow the photo for the placement of these highlight areas.
Using the ball tip or looped tip pen, the solid fill dot pattern, and a #5 light-medium to #7 dark-medium tonal value, fill the forehead pattern, eyes, cheek decorations, mouth.
8. Make Minor Adjustments
After the mapping steps and blending steps are completed it is a good time to set your project somewhere on your work table and take time to look at the face as a whole instead of as small shaded areas.
Approximately one-fourth of your face should be in the unburned to dark-pale tones for highlights. The next half of your design should fall in the mid-tone range from light brown to deep medium brown.
The last fourth of your pattern should be in the dark to solid-fill black tones.
Check List:
1. Do you have smooth, even, gradual shading?
2. Have you established dark shadows at the corners of the eyes, eyebrows, and left-side of the mouth?
3. Have you created a wide range of tonal values?
Thank you for joining me today, more tomorrow.
Pingback: Ceremonial Mask Pyrography Project | LSIrish.com