November 2013

Wood Carving Celtic Dragon 3

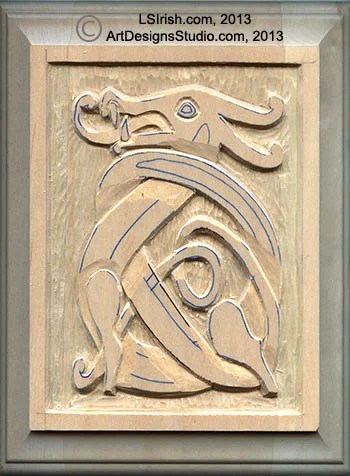
Over the last two days we have worked on a relief wood carving project featuring a Celtic knot dragon pattern.  Today we will walk through the simple and easy painting steps to give this basswood carving the look of stone.

Wood Carving Celtic Dragon 1
Wood Carving Celtic Dragon 2
Wood Carving Celtic Dragon 3

Celtic Dragon Wood Carving by Lora IrishPreparing the carving for painting

14.  Basswood is an easy to carve wood that has a very clear, white coloring.  Because basswood is very porous it is does not take oil based stains well without the use of a pretreatment sealer as polyurethane or spray sealer.  For our project I used acrylic craft paints to create the stone effect.

Supplies:

Acrylic craft paints in:
Titanium White
Carbon Black
Payne’s Gray
Burnt Umber
Burnt Sienna
Driftwood oil stain
Water bowl
Glass tile, palette paper, or tin foil
Paper towels
Clean, soft cloth
Assorted soft-bristle paintbrushes
Splatter brush or old toothbrush
Masking tape or painter’s tape
220-grit sandpaper
Polyurethane spray sealer

More information on painting your wood carvings.

using a primer coat when painting a wood carvingPrimer coat for relief wood carving

15.  Begin by using painter’s tape along the uncut 1/4″ margin surrounding the carving.  Cut long pieces, place into position, and press firmly.  The painter’s tape will protect these areas from coloring.

Place a small amount of titanium white, Payne’s gray, and burnt umber on a glass tile. Thin each color with an equal amount of clean water.

Brush two wash coats of titanium white on the carved area of the plaque. Because you mixed equal parts paint and water, this coat will not give full, solid coverage.

While the titanium white coats are still damp, pick up a small amount of Payne’s gray and mix it with the titanium white on your tile. Working along the diagonal of the plaque,  brush a few random strokes of the gray/white mix over the white background. Pick up a little more Payne’s gray, mix it with the titanium white on your tile, and apply it to the carving.

Next, add a small touch of burnt umber to the gray/white mix and repeat. Add a small amount of burnt sienna to the mix and repeat. Your background should now contain many  shades of white, gray, and brown. Allow these coatings to dry for about half an hour .

splatter painting a relief wood carvingSplatter the carving with fine paint dots

16.  Clean your glass tile, and then place a small amount of each paint color on the tile. Do not thin these colors with water. Working one color at a time, use an old stiff toothbrush or splatter brush to splatter a coat of each color on the carving.  Do this by picking up a small amount of color on the end of the splatter brush. Hold the brush a few inches from the surface of the carving, and pull your thumb across the top of the brush. This action will spray a fine mist of paint drops over the carving. Thin the paint with a few drops of water if you wish to create a fine spray with small droplets.

Painting the routed border

17.  Remove the tape from the edges of the carving. Brush two thinned wash coats of titanium white on the routed border edges of the plaque. Streak this area with a mix of titanium white and Payne’s gray, just as you did with the center of the carving. Allow the carving to dry overnight.

Creating a vintage look to your painted carving

18.  After you have completed the painting steps and allowed the paint to dry , sand the carved areas, background, and routed edges of the plaque using 220-grit sandpaper to remove some paint from the high areas of the carving. Sand lightly in some areas to remove one or two layers of color; in other areas, sand the carving back to the raw wood. Clean the dust from the board using a soft, dry cloth.

Seal the work with two coats of polyurethane spray sealer. Allow the sealer to dry thoroughly. Following the manufacturer’s instructions to apply an oil-based stain to the carving . Wipe away the excess oil stain with a soft, clean cloth. Allow the stain to dry overnight. Seal the work with one to two light coats of polyurethane spray sealer. Remember to sign and date the back of the plaque when finished.

I hope you have enjoyed this in-depth step-by-step free relief wood carving project and will take the time to browse through the other free online relief carving projects by Lora Irish that we have posted on our blog.

Thank you for visiting – Lora Irish!

Lora Irish celtic knot pattern129_150x150Celtic knot patterns by Lora S Irish
Celtic CrossesCeltic Dragon KnotCeltic Knots 2

Celtic Knot Carving Patterns by Lora S Irish, ArtDesignsStudio.com

Wood Carving Celtic Dragon 3 Read More »

Celtic Dragon Wood Carving by Lora Irish

Wood Carving Celtic Dragon 2

We are working on a beginner level relief wood carving project with a free Celtic knot dragon pattern by Lora S. Irish.  Yesterday’s post worked through the basic tool kit, preparing your basswood board, tracing your pattern, and rough cutting the background area using a bench knife stop cut and the round gouge.

Today we will work on the general shaping steps, how to smoothly contour the dragon body, and using the bench knife to cut detail lines into the relief wood carving.

Wood Carving Celtic Dragon 1
Wood Carving Celtic Dragon 2
Wood Carving Celtic Dragon 3

general shaping of a reliefwood carvingGeneral shaping of the dragon body

5.  Any celtic knot pattern is created with a line that is knotted in an up-then-down pattern.  The line crosses over itself multiple times.  In our Celtic Knot Dragon pattern, by Lora Irish, the body of the dragon goes from the head under the tail, behind the front leg, under the tail again, behind the back leg, under the tail a third time, then it becomes the tail section that crosses over the body at the neck.

6.  On your pattern, with a pencil, mark each of the cross-over areas of the dragon body.

7.  Using either the bench knife or v-gouge cut a v-trough in the area of the dragon along the cross-over lines, in the background or under-tucked area of the body.  Example, where the tail crosses over the neck, the neck area is cut with the v-trough.

using a straight chisel to shape a relief wood carvingGeneral contouring with a straight chisel

8.  With a straight chisel or skew chisel, cut along the outer edge of each body area of the dragon.  You are carving away the sharp edge of the wall to begin giving your dragon body a curved contour.

Work with the grain of your wood as you shape the outer edges of each area.  Begin the cutting stroke so that the tool runs parallel with the grain and cuts away from the open ends of the grain line.  Turn your board as necessary.  More about Working with the grain of your wood.

Work the eyes, tongue, and teeth in the same manner.

using a v-gouge in relief wood carvingusing a straight chisel to round over a relief wood carvingshaping a relief wood carving with a straight chisel
A v-gouge is used to cut a v-shaped trough along the pattern line that separates one area of the relief carving from another.Hold the straight chisel at an angle along the straight wall edges of each element.  Cut a thin slice.  Work with the grain of the wood to create the cleanest cuts.Lay the chisel with the angle of the cutting edge against the wood for thin slices.  For deep, thick slices use this tool with the angle of the edge up.


Irish_celtic06Smooth the dragon body into a clean, even curve.

9.  To smooth the dragon’s body use your straight chisel or skew chisel held at a very low angle to the wood.  Dropping the chisel as close to the wood as possible allows you to shave extremely thin slices of wood.  Work this step until all of the wood in the dragon has been shaved, do not leave any area uncut or at the original wood plaque surface.

The original wood surface has a different texture and feel than those areas that we have cut.  This difference will visually show after the work is complete and can create a problem during the painting and staining steps as each area will accept coloring in a different way.  Make it a habit to cut the entire wood surface during the smoothing steps.

10.  Basswood has several outstanding qualities that make it a great beginner carving wood.  It is a tight, even grained wood that has a clear, white coloring.  Although it is classified as a hardwood it is easy to cut and take the finest detailing well.  This means that you, as a beginner, have the opportunity to learn how to use your tools, how to make your relief carving strokes, and how to work through the level changes of a relief carving.

Because basswood is an easy cutting wood it often leaves small fiber of loose wood grain after the cut is complete.  I call them Fuzz Bunnies!  To remove these left-over wood fibers re-cut where necessary with your bench knife or chip carving knife.

11.  Using 320-grit sandpaper lightly sand your carving to give a final, smoothing to the work.  You can also use rifflers, small profile-shaped files that fit into the deep edges, sharp angles, and undercuts of a relief wood carving.  Wipe any dust from the carving with a clean, dry cloth.

As your hobby grows you will advance into other woods as maple, walnut, and mahogany.  Because these woods are harder surfaced they seldom need intense sanding, the shaving steps give a clean finish to the work.

v-gouge detailing in a relief wood carvingAdding the detail lines to the dragon

12.  With a pencil mark the areas from the pattern onto your dragon carving for the inner detailing.  You can cut your pattern into small pieces.  Tape those pieces into position on your carving and slide a small piece of graphite paper underneath to make the tracing.

13.  Using either the stop cut made with a bench knife or the v-gouge, cut along the traced inner detailing lines.  If you chose the v-gouge cut the v-trough detail line in several light, shallow passes.  This slowly lowers the line and avoids the corners of the cross hatched areas to chip out.

14. Chip outs happen.  If your tool lifts a corner of wood or complete pops the corner off the board, reset that chip by licking up a small amount of yellow wood glue on the end of a toothpick.  Place the glue dot onto the wood where the chip came off, and place the chip into position.  With a water damp brush clean up any glue that seeps from underneath the chip.  Allow the glue to dry for about 15 minutes.  You are ready to continue carving.

straight chisel shaving in wood carvingrelief wood carved flower patterncarving detail lines using a round gouge
Shaving can be done using a straight chisel or round gouge.  Hold the tool low to the wood to cut very thin slices of wood.Check your carving for any loose wood fibers, rough cut corners, and harsh contours.  Use 320-grit sandpaper to lightly smooth the finished carving.A v-gouge is used to cut thin, detailing lines into your carving.  Use light pressure and recut the v-gouge lines as necessary to slowly drop the depth of the lines.


Irish_wood_flowerThe woodcarving steps for this Celtic Knot Dragon pattern by Lora Irish are complete.  You can leave your carving in the wood finish coloring or join me tomorrow as we work though the painting technique to create a stone-look to this relief carving.  Thank you for joining me today, Lora Irish.

While you wait for tomorrow’s post, here is the practice flower pattern that you can use in your free relief wood carving project.

Wood Carving Celtic Dragon 2 Read More »

Celtic Dragon Wood Carving by Lora Irish

Wood Carving Celtic Dragon 1

Beginner Level Wood Carving Project

This quick, easy, and fun Celtic Dragon pattern is perfect for your first endeavor into relief wood carving.  It uses a very basic set of carving tools, a bench knife, and a pre-routed basswood plaque.  Your dragon carving can be completed in just one weekend.

Over the next several days I will be posting all of the step you need to create your own Celtic knot relief carving project.  Please bookmark our blog so that you don’t miss any of the fun.  I hope that you will share this link on your favorite wood carving forum or message board.

Please take a moment and download our free PDF e-book, Your First Carving.  This is an in-depth look at the woods, tools, terminology, and techniques used in relief wood carving, written and shared by Lora S Irish.

Wood Carving Celtic Dragon 1
Wood Carving Celtic Dragon 2
Wood Carving Celtic Dragon 3

Celtic Dragon Wood Carving by Lora IrishSupply List:

8” x 10” x 3/4” (203 x 254 x 19mm) router-edged basswood plaque
Bench knife
Large and small round gouges
Wide sweep round gouge
V-gouge
Straight chisel
U-gouge
Sharpening tools and strop
220-grit sandpaper
Graphite tracing paper
Painter’s tape
Pencil
Ruler and/or compass
Soft, clean cloth
Stiff toothbrush or brass wire brush
Thick terry cloth towel or non-slip mat
Depth Gauge

free celtic dragon knot by Lora IrishPreparation of the carving board

1.  Most of the supplies used in this project can be obtained online at your favorite wood carving supply house, through Amazon.com, or at your local large craft store.  The sandpaper, painter’s tape, ruler, compass, and brass wire brush are available through most hardware stores.

2.  Using 220-grit sandpaper lightly sand your plaque, working the sandpaper with the grain of the wood.  Avoid sanding against the grain or in circular swirl strokes.  This will leave fine scratches that can appear during the painting and staining steps.

3.  Sand again using 320-grit sandpaper.  Remove all of the sanding dust using a dry, clean cloth.

free wood carving celtic knot dragon pattern by Lora IrishTransferring your Pattern

Click on the pattern images to the right and save a copy to your Desktop.  Print one copy of each pattern – the outline tracing pattern and the shaded contour pattern.

Center the pattern to the board, secure one side using painter’s tape.  Slide a sheet of graphite paper under the pattern paper with the graphite side against the wood.  Using an ink pen and light hand pressure trace along the outer boundary lines of each element of the dragon.  Remove the pattern and graphite papers.

Learn more about how to work with your patterns and tracing.


wood carving tool setGather your wood carving supplies

For this carving I am using a nice quality Japanese carving tools set which includes a large round gouge, small round gouge, straight chisel, skew chisel, and v-gouge.  Carving tool sets can cost between $25 per set up to several hundred dollars.  I strongly advise any beginner to start with an inexpensive tool set while you discover which style of wood carving will be your favorite.

Learn more about creating a basic wood carving tool kit.

Suggested tool list at Amazon.com :

Ramelson 6 Piece Palm Set Tools, 1/8″ to 1/4″ Profile
Raemlson 6 Piece Long Handle Beginners Carving Tools
Flexcut 3 Knife Starter Set
FLEXCUT Carving Kit – 5 Piece
FLEXCUT Carving Kit – 11 Piece
Flexcut Slipstrop
Power Grip Carving Tools, Seven Piece Set
Walnut Hollow 8-Inch by 10-Inch Basswood Rectangle Plaque
Walnut Hollow 8″ by 10″ Basswood French Corner Wide Edge Plaque

stop cut in relief wood carvingCutting the background area

1.  Mark a 1/4″ margin using a pencil and ruler along the outer raised carving area of your plaque.  This 1/4″ area will remain uncarved, at the original level of the wood. During the next two steps treat this margin line as if it were a boundary line to your pattern.

2.  This project begins with dropping the background area of the plaque to free the dragon pattern for carving.  With a bench knife or large chip carving knife, cut along the outer boundary lines of the dragon pattern.  Hold the knife vertical to the wood and slowly pull along the tracing line.  Stop cuts are made in several shallow cuts instead on one deep lunge of t he knife tip.

3.  Using the small or large round gouge, rougehout the background.  Lay the center of the gouge about 1/2″ to 1″ from the stop cut tracing line.  Glide the gouge into the stop cut.  This will release a small chip of wood.


stop cut using a bench knifestop cut using a chip carving kniferoughing out the background with a round gouge
1.  The background rough-out step begins with a stop cut made with a bench knife or chip carving knife.2.  Hold the knife vertical to the wood and make several shallow cuts along the tracing lines.3.  Use a round gouge to carve from the background area into the stop cut line at the pattern edge.


rough out cuttingthe background of a relief wood carving4.  The rough-out stage may take several layers of round gouge cutting.  As you deepen your background re-cut the stop cut along the outer pattern line to slowly drop the straight-edged wall along the dragon.  My final layer of round gouge cuts was worked with the grain (vertical to the plaque) to set all of the carving strokes in one direction. More about Background treatments for your relief wood carving.

Determining the depth of your relief carving

The depth of your carved background and carved design is determined by how thick your carving board is.  As a general rule the carving is cut to approximately 1/2 the depth or thickness of the wood at the deepest point.  For a 3/4″ board this makes the background drop about 3/8″ deep.  More about Determining the depth of a carving.

Please join me tomorrow, November 16, 2013, as we work through the shaping and contour steps for this Celtic Dragon Knot pattern.  Thank you, Lora Irish

Wood Carving Celtic Dragon 1 Read More »

Pyrography Feather Border 2

pyrography feather border by Lora IrishIn Pyrography Feather Border 1 we worked the steps for preparing your wood board, tracing the pattern, shaping the feathers, and adding drop shadows to this free, online wood burning project with a free pattern.  Today we will go through the steps for detailing the feathers, adding a drop shadow to the fur clusters, using painter’s tape as a masking agent, and working the geometric border using a dot-fill pattern.

This is a long posting, but I wanted to share this project over just two days.  Please, bookmark our blog so that you can return at any time to work through and complete this free pyrography project.

Wood Burning Step 5 – Detailing the feather

Click on any image in this posting for a large image that you can save to your computer.

creating a detailed wood burned feather

The curved shader has a slightly rounded edge along its thin metal tip.  This edge cuts a very fine line into your wood.  On low temperature settings, that line may have a very pale tonal value but you will be able to see the shadow along the cut edge of the stroke.  On higher settings the curved shader will burn slightly wider, darker lines.

Feathers are made up of many long, thin sections – mini-feather lines.  To create those lines set your temperature setting to a mid-medium tonal value and using the belly edge of the curved shader pull long detailing lines from the center shaft towards the outer edge of each feather.  As you pull these lines the starting point of the line will naturally burn darker and gradually pale in tonal value as you move through the stroke.

Work a second layer of curved shader lines in the feathers, starting from the outer edge and pulling towards the center.  Match the curve shape of these two layers of lines.

Wood Burning Step 6 – Adding a drop shadow to the fur

Adding drop shadows to your wood burning patterns

With the basic shape, shading, and detailing done in the feathers it is time to move into the fur clusters.  Using the ball tip or looped tip pen, a heat setting of dark-pale tonal value, and the dark-fill or scrubbie stroke, create a drop shadow in the left background for the fur clusters.  Since fur is made of many fine hair lines this shadow is not as dark as the more solid feather element.


Wood Burning Step 7 – Painter’s tape masking agent

working a geometric border in pyrography

Painter’s tape, a thick version of masking tape, can be used as a masking agent to block or protect your wood when you are working at temperature below the very dark tonal value heat settings.  This project has a straight line border which is perfect for painter’s tape masking.

With scissor cut small pointed triangles from your strip of painter’s tape.  Place the point in the point of the area you want to protect, laying the long, straight side of the tape along the pattern line. Press into position.  Fill all of the areas that you want to protect for this burning step with tape.  Use long, straight pieces of tape to protect the unburned border line above the geometric triangle line.   Please follow the image above for placement.

On a dark-pale to mid-medium tonal value setting, the ball tip or looped tip pen, burn tightly packed dots into the exposed triangles in the border.  More dots are added at the point of the triangle to give a solid fill effect.  As you work up towards the top of the triangle allow more open space between the dots.

Wood Burning Step 8 – Removing the painter’s tape mask

using tape to protect an area in wood burning

Because the painter’s tape protects any wood on which it lies you can bring your burning tip up to and even over the tape as you work your stroke patterns.  When you carefully lift the tape any burning strokes that passed over the tape are also removed, leaving a clean, unburned area.  You can see in the photo that the triangles between those that we just burned have very straight edges from the tape.

Transparent tape is not recommended as a masking agent.  This type of tape tends to be too thin to withstand the burned strokes.  It also can have too much adhesive grab, causing some of the wood fibers to pull off the board when you remove the tape.  Masking tape can be used as a masking agent for mid-range temperature setting.

Wood burning Step 9 – Working the second set of border triangles.

LSIrish_feather-009

Repeat Step 7 – 9 for the remaining triangles in your border.  Use painter’s tape to mask off the pattern so that only the remaining triangles are exposed.  Use a dark-pale tonal value temperature setting, the ball tip or looped tip pen, and the packed dot fill stroke to burn these areas.  The heaviest dot fill is at the bottom edge of these triangles, with a less dense fill at the point.  Painter’s tape can easily be used over areas that have already been burned to protect that area from the work that you are about to do.  In this feather border the dark triangles are masked so that the pale triangles can be filled.

Wood Burning Step 10 – Adding the final detailing

detailing and outlining a pyrography wood burning

The final step to this wood burned feather and geometric line border is to add the feather decoration pattern, to accent line the leather strings, and to add fine hair lines into the hair clusters.

Using the ball tip or looped tip pen, a heat setting for a mid-dark tonal value, and a long line stroke, fill in the bar pattern on the left sides of the feather.  This mid-range temperature stroke will allow your previous shaping, shading, and detailing to show.

Using the ball tip or looped tip pen, a mid-dark tonal value setting, and the touch-and-lift dot pattern add the speckling pattern to the right side of the feathers.

Where needed, added fine mid-dark thin lines to accent your design along the leather string and feather shafts above the hair clusters.  Do not completely outline these areas.  If you have a tonal value burned area along the leather string you do not need the accent line.  If the leather string has an area of unburned wood or extremely pale burn, then add a thin line to define the edge.

With the curved shader and a mid-dark tonal value setting, burn this hair lines into the hair clusters.  Allow the hair lines to extend beyond its cluster, into the next cluster.  Sign and date your work.

Wood Burning Step 11 – Add color

using colored pencils with your wood burnings

Let’s complete this Indian Feather and Geometric Line Border pattern by adding coloring with artist quality colored pencils.  You can see the colored pencil chart in the image above.

There are several types of colored pencils, which you chose determines how clear, and clean your coloring is over your wood burning.

Student quality colored pencils are available at most craft stores, office supply stores, and even at your local drug store.  These are low quality pencils and use either a clay or chalk base to the pigments.  The clay body of this type of pencil leaves a cloudy, opaque look to the coloring and can block out your pyrography work.

Artist quality wax-based pencils are available through your local large craft store or online through an art supply house.  I use both PrismaColor and Derwent.  PrismaColor pencils have more wax to the pencil core and applies in a smooth, even finish.  Derwent tend to have a harder core and are excellent for extremely fine line work.  This style of colored pencil can be used in thin layers, one color over another, to blend the coloring and create new color hues.

PrismaColor also manufactures a watercolor pencil.  They are applied in the exact same manner as wax-based pencils.  After you have colored the area you can brush a light coat of clean water to the area, turning them into liquid watercolor for easy blending and shading.

Use a very sharp point to your pencil.  Add your color in thin, light coatings.  Three to five light coats of colored pencils gives a more even, smooth coloring.  Use one color over another to create new hues.  When you coloring is complete finish your Indian Feather and Geometric Line Border with several light coats of polyurethane or acrylic spray sealer.

Thank you for joining me in this free, online pyrography project – Lora Irish.

Pyrography Feather Border 2 Read More »

Pyrography Feather Border 1

We have spent the wpyrography feather border by Lora Irisheek working on an in-depth wood burning for the Ceremonial Mask Pyrography project.  Today let’s look at a small portion of that project and how you can easily create a feathered border design to decorate a box lid. This Feather Border project will take you through the steps of tracing your pattern, shading the feathers, creating a drop shadow that lifts your pattern off the background, the detailing steps to the feathers and fur, and how to add coloring with colored pencils.

This is a long posting, but I wanted to share this project over just two days.  Please, bookmark our blog so that you can return at any time to work through and complete this free pyrography project by Lora Irish.

Pyrography Feathered Border 1

Pyrography Feathered Border 2


Supply List:

9″ x 10″ birch plywood board
220- or 320- grit sandpaper
graphite paper
pencil and ruler
variable temperature wood burning unit
ball tip pen
spear shader pen
curved shader pen
masking or painter’s tape
brown paper bag
artist quality colored pencils
gloss or semi-gloss spray sealer

Prepare your wood blank

Lightly sand your wood project using 220- or 320- grit sandpaper to remove any loose wood fibers and imperfections.  Sand with the grain of the wood to avoid creating fine swirl scratches that sandpaper can leave.  Wipe the wood surface with a dry, clean cloth to remove any dust.

On a scrap piece of the same wood, leather, or gourd media that you will be burning create a sepia practice board scale that is divided into ten units.  We will be using that scale throughout this project for the tonal values and temperature settings.

Trace the pattern

feather board pattern by Lora Irish

Click and save a copy of this free pyrography pattern by Lora Irish to your computer.  Print a copy to use in this tracing step.

Measure the geometric line design on the pattern. Use a ruler and pencil to mark the geometric pattern to your board.  This geometric board is a simple 3/8″ thick line, a 1/8″ unburned margin, and a 7/8″ wide line of triangles.  A seven triangle repeat measures at 6 3/8″ on the inside edge of the board.

Center the paper pattern to your board and secure one edge with masking or painter’s tape.  Slide a sheet of graphite tracing paper under the pattern and trace along the outlines using an ink pen.   Check that you have all lines transferred and remove the pattern paper and graphite paper.

Wood Burning Step 1 – Shaping the feathers

Click on any of the project images for a large image that you can save to your computer.

Pyrography shading for a feather

The first step for our feather border is to create the basic shape or curve of the feather.  This step uses a spear shader, the long pull stroke, and a tonal value setting for medium-pale.  Each side of the feathers is an upside-down cup.  From the center feather shaft the feather side curves up to the center line of that part of the feather and then drops down to the outer edge.

Begin your spear shader strokes at the feather shaft and pull towards the central area of the feather in a long, curving line.  The stroke will naturally be darkest where you begin your stroke and fade into a very pale tone as it nears the mid-portion of the feather side.

Use the spear shader and the long pull stroke to work long lines into the fur clusters at the top of the feathers.  This shading is worked where one cluster of fur tucks under another and is pulled from the tucked point of the cluster towards the outer edge of that cluster.  Again, allow your stroke lines to curve.

The beads are shaded along the sides, working towards the center of the bead using the long pull stroke and spear shader.

Wood Burning Step 2 – Shading the edge of the wood burned feathers

shading the edge of a wood burned feather

To curve and shape the outer edges of the feathers use the spear shader on a slightly hotter temperature setting for a pale-medium tonal value.  Place the side of the spear shader against the outer edge pattern line and burn long pull strokes that curve towards the center area of the feather side.  Match the curve of this series of strokes to the curve of the strokes made in the previous step.  Each feather side should now go from dark along the outer edge, gradually fading to a pale or unburned wood tone at the center of the feather side, and then gradually darken as it nears the feather shaft.

Wood Burning Step 3 – Shading the leather strings

wood burning a feather border pattern

Using the spear shader and the long pull stroke, shade the leather strings at the top where they wrap around the two feather shafts, and below the feathers in the beaded area of the leather.  The shading is worked from where the leather tucks under either the feather or into the bead, then pulled towards the center point of that section of string.  Use a pale-medium to mid-medium temperature setting for this step.

Shade the feather shafts using the long pull stroke.  The darkest shadow on the shafts falls on the left side of the feather.

Wood Burning Step 4 – Creating a drop shadow

Creating a drop shadow in your pyrography projects

A drop shadow is worked in the background area of the design and pushes your elements visually off the wood.  This step creates those drop shadows on the left side of the feathers and leather strings.  They are created with the ball tip or looped tip pen, a pale-medium tonal value, and either a solid-fill stroke texture or a tightly packed scrubbie stroke.

Drop shadows are never darker than the tonal value of the area that is creating them.  As we develop the feather in the next few steps you will see that the outer edge of the feather will have a tonal value about two steps deeper than the shadow we are now creating.  Please refer to the finished pyrography project at the top of this post.

The wider the drop shadow, the farther  from the background your element hangs.  Narrow shadows place your element close to the background.  Note in the image the point on the far left feather shadow and the point on the actual feather.  The space between these two points defines the distance that the actual feather is from the background wood.  This space is a visual measurement or reference.

The amount of air space between the shadow and the element defines the distance of the element from the board.  The leather strings hang free – do not touch – the background.  We know that because  the shadow does not touch the leather string.  The beads do touch, lie against, the background.  We know this because the shadow touches the bead and is only a partial circle, not a full shaped  shadow.  In the feathers, returning to the left feather point, we know that this feather does not touch the background because the two points – feather and shadow – are so far apart.

Tomorrow we will begin the fine detailing in the feathers and creating the fur clusters.

Thanks for reading – Lora Irish

Pyrography Feather Border 1 Read More »

Scroll to Top