Russian Birch Bark Carving
Pattern Layout Work for Birch Bark Carving
With this particular project I decided that I wanted to add birch coat pegs to the basswood oval. This way the carving becomes not only fun to create and decorative but also useful. It will eventually be hung in the hall to hold the family car keys and the dog’s leash.
Once the design has been traced to the face of the oval the markings for the pegs are established using a compass. In the close-up of this sample look to the bottom section of the design. You will see three small circles that will eventually become the peg holes. That is what we will be working to create.
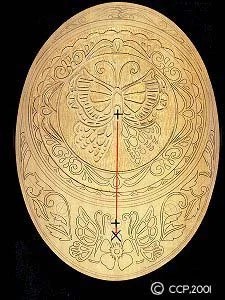
1. Note that on the pattern is a small cross (+) in the center of the butterfly’s body. This is the central point for all of the circular lines. In the sample to the right I have carved a small diamond shape to note this point.
2. Tracing a circle or drawing it by hand is never as accurate as using a compass. Once the pattern has been traced place the compass point at the cross (+) mark on the butterfly. Open the compass to match the width of each circular line. Now redraw the pattern line with the compass.
To create an even line along the edges of the pattern, the outside border line, open the compass so that the point of the compass sets against the outside edge of the oval and the pencil rests on the border line. The point arm of the compass should drop over the edge … Now holding that arm against the edge pull the compass along the sides of the piece. The point arm will guide the compass while the pencil point will make an evenly spaced border line.
To establish the placement of the birch coat pegs I have added a circular line in the bottom portion of the pattern. Looking at this section of the design there seems to be space between the two butterfly’s antennas for the center peg so this is the width that I have set the compass. This width places the other two side pegs around the area of the leaf stem curl on the left and right of the design.
Using the center cross in the main butterfly as the compass point, open the compass to the distance from that point to the space between the bottom butterflies. Pull a circular line.
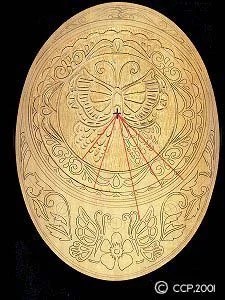
3. To find the center point of this peg placement line you will want to find the point where this line intersects the edge of the board. Make a mark or cross to note this point on both sides of the oval. Using this point for the point of your compass open the compass so that it’s opening is larger than the distance from this point to the space between the butterflies. This is a random width for the compass … it just needs to go past the space.
Put the point of the compass at the intersection cross on the side lines and mark an arc wherever the pencil point falls. Using the same compass width repeat this for the second side. You should now have a spot where the two arcs intersect, creating a small x on the oval.

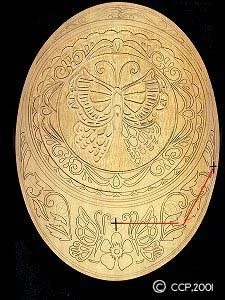
4. Place a ruler so that it touches both the center circle point on the main butterfly and the intersection point of the two arcs you just made. Pull a pencil line along the ruler. Wherever this line crosses the peg placement circle line is the exact center of that line!
5. Now that you have divided the peg placement line in half you will want to divide each half section into half again to establish the second and third peg holes.
For this division use the new point you just made that marks the center of the peg placement line and the side intersection points for the compass. See the sample to the right. Place the point of the compass at this center cross, open the compass to a random width that seems greater than the half way distance and pull an arc. Using the same compass width pull a second arc using the side intersection point for the point of the compass.
Repeat this for the other side.
6. Again lay a ruler along the oval so that is touches both the center point cross in the main butterfly and the new arc intersection cross. Pull a pencil line. Repeat this for the other side. These pencil lines will divide the peg intersection into equal lengthened quarters.
To learn more about using your compass to divide a circle please see Lettering Layouts (free Bald Eagle pattern) and Dividing a Circle.
