Adding Skin Colors to Your Pyrography and Wood Burning Portraits

For the steps to complete the coloring for your Wood Burned Fireman please see:
Working With Watercolors

(Left to Right)
Cadmium Yellow
Cadmium Red Medium
Raw Sienna
Verdi Green
Ultramarine Blue
Lamp Black
Titanium White (Acrylic)
Work the color from a glass tile or dinner plate for easy clean up.
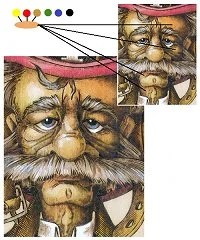
Creating a realistic coloring for the skin tones on either a wood carving or wood burning project can sometimes seem a challenge. This project will work you step-by-step through both the color mixes that you will use and their appropriate shading areas.
For this project I am using watercolors over a wood burning. The watercolors are extremely translucent so the burning does not become cloudy or thick from the color application.
Practice this technique of a scrap board before you go to your finished project. For each step, the watercolors that you mix need to be thinned heavily with water. Since you are working on basswood or pine the wood will absorb the color quickly. By using extremely thin coats you can easily add more toning by applying extra layer.
Some notes on the skin structure of a human:
What we call skin is made up of multiple layers of thin tissue. Each layer of tissue carries a small amount of pigmentation making them translucent. There is some coloring but the layers are not opaque, you can see through the skin to the bone and blood vessel structures below. Remember that kid’s trick of putting a flashlight under you hand so that the light showed through and you could see some of the bones, tendons, and veins!
So now we know that you can see through the skin. Bones which are a whitish-blue tone, blood vessels which have a dark blue tone, and muscles which are a medium red-brown now affect the coloring that you see on the skin’s surface, because they show through the skin.
The tighter the skin lays over the bone the whiter that area will be, the center ridge of the nose; the top edge of the chin, the forehead area. Areas of skin that cover muscles will take on a red-brown tone; the jaw area, under the chin and the neck. Skin that goes over large blood veins will pick up the blue coloring, the veins in the temple region, the inner corner of the eye where it meets the nose ridge. Those areas that have a large supply of fine blood capillaries will have a red coloring, the tip of the nose, the tip of the ears, and the cheek areas, any area where you blush.
Basic Coat Skin Coloring
For a moment make your hand into a very tight fist … hold that position for a few seconds … now open your hand and note the coloring of your finger tips. If you have pale skin (European) you will see that the color of your finger tips is a pale yellowish color. If you have a medium skin (Asian, Mid-Eastern, Native American) coloring your finger tips will be a yellowish-orange. Dark skin (African) will show up as a pale orange-red tone. This is the true color of pigment in the layers of your skin. The tight fist forces the blood away from the fingers letting you see just the skin color.
All skin colors fall within the yellow-orange to orange-red range. The variations of wonderful colors that the human species comes in will be created from this mix. There are no true “pink”, “red”, “yellow”, “brown”, or “black” coloring. We all have skin that falls into the orange range and the variations depend on the amount of yellow or red added to that orange hue.
Basic Skin Coloring Over The Body Structures
So we start with a yellow or yellowish-orange skin, as in this project’s example, and lay that color over each body structure:
- Skin (yellow) over Bone (Whitish Blue) = pale yellow-gray tone
- Skin (Yellow) over Muscle (Red-brown) = pale orange-brown tone
- Skin (yellow) over Blood Veins (Dark Blue) = medium green-brown tone
- Skin (Yellow) over Capillary Areas (Red) = medium orange tone
For other skin tones simply substitute the appropriate skin base color then add each tone for the body structure:
- Medium skin (yellowish-orange) over Bone (Whitish-blue) = med. orange-gray
- Dark skin (orange-red) over Bone (Whitish-blue) = med. red-gray tone
Step 1: The basic skin color coating
For a Pale skin tone, as in the sample, mix 2 parts Cadmium Yellow, 1 part Cadmium Red Medium, and 1 part Raw Sienna. (more yellow)
For Medium skin tones make the base coat 2 parts Cadmium Yellow, 2 parts Cadmium Red, and 1 part Raw Sienna. (equal yellow and red)
For Dark skin tones make the base coat 1 part Cadmium Yellow, 2 parts Cadmium Red, and 1 part Raw Sienna. (more red)
Thin the color mix with water until you can barely see the coloring. Apply one coating to the entire skin area.

Step 2: Define the shadow side of the face
Note which side of your face is to be highlighted and which will be shadowed. In this sample the side to your right is the shadow side, on your left is the highlight side. Apply a second coat of the basic skin color to the shadow areas of the face.
The lower lip is done is this coloring. Lips are neither pink nor red unless your subject is wearing lipstick!

Step 3: Create shadow areas
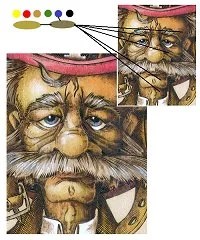
To your basic skin color add 1 part of Verdi Green, this is a medium green hue. Your mixed color should now be a greenish-brown tone. Use this to establish specific shadows in the face as under the wrinkle lines, along the edge of the nose, in the corners of the eye areas, and along the lower mouth where the chin touches.
Although it does not show in this sample project the upper lip is done in this coloring since it is shadowed beneath the nose.
Step 4: Tone the darkest face shadows

To the mix you created above add a 1/2 part of ultramarine blue. Now you should have a dark brownish-blue tone. Use this for the very dark shadows on the face as the shadow side of the nose, the inner corner of the shadow eye, the far side of the shadow cheek, under the chin in the neck area.

Step 5: Creating highlights
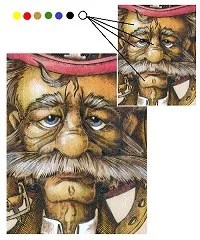
Since there is no true white in watercolors I am changing for this step to acrylics. Thin a small amount of Titanium White Acrylic with water, just as you have done with your watercolors. Thinly wash this white to the highlight areas of the face, the forehead, other ridge side of the nose, the top of the nostril, the cheek puffs, and the top of the chin.
Step 6: Blushing the cheeks
Since it did not seem appropriate to this pattern, I have not blushed the fireman’s cheeks. However if you are working on a pattern where blush is applicable this is done with a mix of yellow and red to create a pure orange hue. Very lightly brush this over the top edges of the cheek area starting at the center of the eye and working toward the ear. It is the outer section of the cheek that blushes not the entire cheek area.
Step 7: Adding extra character to the face
If your face is angry you may add a little of this blush tone to the eye lid area just below the eye brow … this gives the eye an intense look. Use some extra white highlights around the edges of the mouth to give a drawn look. For those that have stayed at the local saloon a “little too long” add some blush to the ball of the nose and the tips of the ears!
Step 8: Sealing the watercolors
After all of the color has been applied finish your carving or wood burning with several light coats of spray polyurethane to seal the colors.
