
Beginner’s Carving Tool Sets

https://lsirish.com/tutorials/woodcarving-tutorials/woodcarving-fundamentals-techniques/tools-and-tool-kits/basic-carving-tools/
Beginner’s Carving Tool Sets Read More »
https://lsirish.com/tutorials/woodcarving-tutorials/woodcarving-fundamentals-techniques/tools-and-tool-kits/basic-carving-tools/
Beginner’s Carving Tool Sets Read More »

Fall is for harvesting. cutting, and storing your tree saplings for cane carving, waling sticks, and wizard wands.
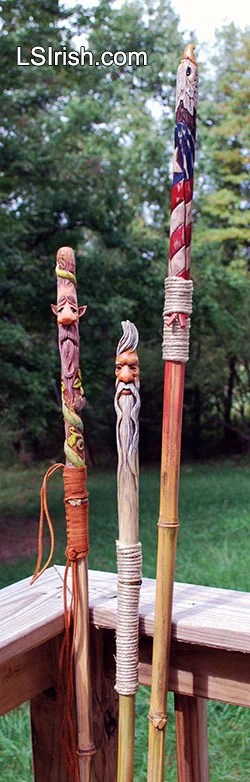 From early fall to late winter is the time for trimming your fruit trees and cleaning the saplings along your fence line. Those wonderful cuttings are perfect for walking sticks and canes. Because of the season the branches and trunks have a lower sap content than you find during the growth months.
With this winter’s storms there is a large supply of downed tree branches waiting to be harvested by the weekend wood carver. It is easy to strip the bark from a green wood stick.
Begin by trimming any small branches from the main stick as close as possible. With a bench knife make several small cuts in the bark at one end of the branch. The knife blade can be teased under the nicked area and then used to pull thin strips of bark off the walking stick branch.
If you are not going to carve your stick directly after harvest paint, the ends with any latex paint to seal the wood. Hang the sticks using bailing twine in a cool dark space and allow to dry until next year.
Green wood can be carved if you keep the exposed end grain liberally soaked with a mixture of linseed oil and turpentine – a half and half mix that is thin enough to soak deeply into the fibers. After each carving session, soak the end grain with oil and loosely cover the stick with a plastic bags to control the moisture content.
When the carving is complete, keep it in a loose plastic bag and store the carving in an area where the stick will be out of direct sunlight and that has a consistent temperature, to avoid dramatic changes that will cause rapid drying. Allow your carving to dry completely before adding any finishing products – approximately one year for each inch of wood.
Even with these precautions checks, and splitting can occur. This is just a natural part of green wood carving and can add drama to your carving as it emphasizes the delicate, living nature of the wood. If the checking is sever you can use butterfly splints or a hardwood dowel to secure the two sides of the split.
With any green wood or winter storm harvested wood, please be aware that your branches can bring unexpected visitors into the house. Insect eggs can hatch if the wood is stored in a warm area.
LEARN MORE:
https://lsirish.com/tutorials/woodcarving-tutorials/woodcarving-projects/wood-carving-walking-sticks-adding-extras/
https://lsirish.com/tutorials/woodcarving-tutorials/woodcarving-projects/wood-carving-walking-sticks-common-tree-species/
https://lsirish.com/tutorials/woodcarving-tutorials/woodcarving-projects/wood-carving-walking-sticks-harvesting/
Harvesting Saplings for Cane Carving Read More »

 What tools do you need to start carving?
This common question is very hard to answer because the tools and knives you may be using one year from now could well be very different than those that I suggest for a newbie carver.
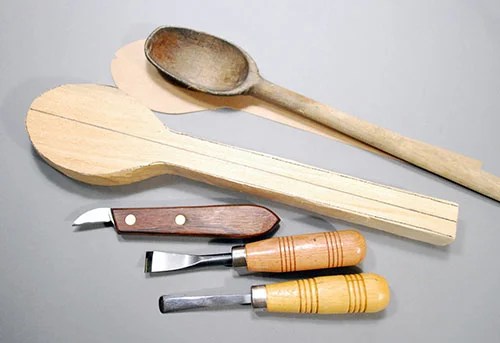
Shown right is a set of spoon carving tools that include several sizes and profiles of round gouges.
Relief Carving Workshop: Techniques, Projects &
Patterns for the Beginner (Fox Chapel Publishing)
Comprehensive Guidebook from Lora S. Irish with Easy-to-Learn Step-by-Step Instructions & Exercises
Paperback – Illustrated, March 1, 2013

 Your First Carving Tools
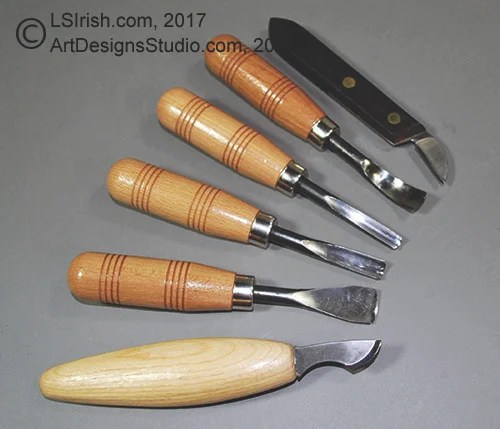
If you are just starting wood carving I strongly suggest a simple set of carving tools. Sets are available in 6 to 12 tools, and often come with a storage box or cloth roll. Select a medium-sized tool profile set of 1/2″ wide or less that includes at least a straight chisel, skew chisel, large round gouge, small round gouge, and a v-gouge.
A mid-quality beginner’s tool set of five to six tools will cost between $40 to $75.
To this set add the best bench knife or large chip knife that you can afford. Your bench knife is your primary tool in carving and the better quality steel makes all the difference in how easy your carving flows through the cuts. A high-quality bench knife often runs around $35 to $60.
Interchangeable blade sets are also excellent for the new carve. As an example I use the FlexCut 11 piece Interchangeable set all the time for whittling, relief, and cane carving. This set has every tool profile that a new carver needs while keeps your initial costs low. I also have used the same Ramelson Beginner’s Set for nearly twenty years with great success.
You will also need a sharpening set to keep the edge of your new tools crisp. Sharpening tools can include ceramic stones, a leather strop, honing compound, and a slipstrop. Estimate another $50 to $75 for your sharpening set.
All of these tools are explored in Beginner’s Whittling and Relief Carving Tool Kit.
What I do not recommend for the beginning carver!
1. I don’t use any sets that are available from the large arts and crafts box stores. These sets are very inexpensive because they are not manufactured from high quality steel. Often they come un-sharpened or only partially sharpened, which means that you must conquer sharpening techniques before you ever put a knife into the wood.
2. I don’t recommend high-end, extra-high quality tools for a beginner. I know, those sets are just beyond beautiful and the very best you can buy. And I know that I just told you to buy the best bench knife you can afford … But … neither you nor I know whether you will love wood carving with the intensity that I do at this point in your new hobby. We also can not predict what style of carving you will finally chose.
These tools can be purchases after you discover that you are addicted to carving! You can purchase high-end tools individually which means you can add to you beginner’s set one tool at a time.
So, at this time, save that money to purchase wood.
3. While I do list utility knives as a possible starting tool kit I do not recommend them. Utility knives are made to be disposable and do not have the steel strength that true wood carving tools do. Utility knife blades can crack, split, and pop at any moment, and create a danger of injury.
 Carving Styles
There are many different styles of wood carving and each has its own set of specialty tools. In the next year, as a new carver, I strongly recommend that you give all of these carving styles a try. Most long-time carvers work several different styles on a regular bases.
Whittling is often done with one medium-length bench knife or pocket knife. A few extra tools may be in your whittling kit and could include a small v-gouge, a small u-gouge, and perhaps a medium or large round gouge.
Chip Carving uses a set of three short blade knives, often set on a slight angle from the handle. I personally use a large chip carving knife as my primary bench knife.

Hardwood Old World style carving uses heavy handled, large bladed tools that are moved through the wood using a leather or wood mallet. The straight chisel, skew chisel, round gouge, and v-gouge are the main tools used.
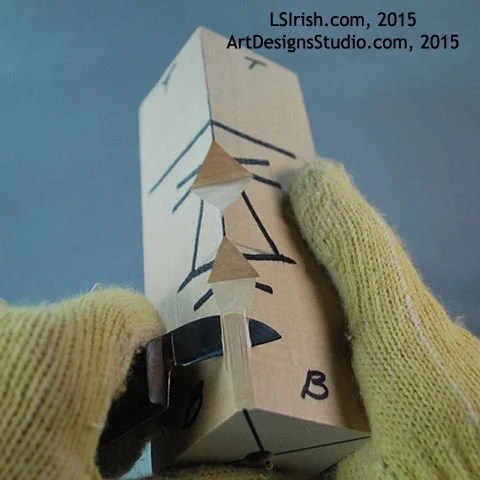
3-D Carving uses a basic set of tools that include chisels, round gouges, v-gouges, and a pocket knife, bench knife, or utility knife.
Relief Carving uses a very similar set of tools to 3-D carving with the addition of bent-back gouges, dog-leg gouges, and the bull nose chisel.
Cane Carving, as relief and 3-D, uses a basic tool set with the inclusion of a draw knife, dowel sets, and clamps.
Cane Topper Woodcarving: Projects, Patterns, and Essential Techniques for
Custom Canes and Walking Sticks (Fox Chapel Publishing)
Step-by-Step Instructions and Expert Advice from Lora S. Irish Paperback – December 10, 2018

Power Carving is a style that uses rotary tools with diamond, steel, or ruby bits to do the basic work. A basic 3-D or Relief Carving set of tools is then used to dress out the carving.
 Beginner’s Whittling and Relief Carving Tool Kit
This in-depth tutorial explores all the tools, knives, and carving aids that I have accumulated over twenty years of wood carving.
Some were inherited from my father, who was a gun stock carver. Some are sets that I have purchased and used over the years. Of course, some are just fun specialty tools that I have added to my kit.
While you may need to purchase your bench knife, chip knife, and carving tool set to begin your new hobby, many of the tools listed in this tutorial you may already own in your woodworking or craft supplies.
Browse through the tutorial, consider what you already have on hand, and then make your selection.
A selection of mix-and-match patterns offer suggestions for creating dozens of
unique designs for spoons and other implements — forks, ladles, dippers, spatulas,
knives, pie servers, and scoops. In addition to clear, detailed directions accompanied by
helpful drawings, inspiring photographs illustrate decorative ideas for using the carved spoons
in kitchen wreaths, centerpieces, and other ornaments


My Dad, an avid wood worker and gun stock carver, always insisted that nails and screws were only little clamps to hold the wood together until the glue dried! Words of wood wisdom.
Glue is the agent that gives any joint its strongest bond. But for the best joint the wood pieces need to be clamped tightly until that glue is thoroughly dried – for many wood glues that is at least 24 hours.
But what do you do when your wood, or gourd shape does not fit any of your regular wood clamps and you don’t want to use nails or screws?
Let’s look at a few quick clamps that can be made out of common household items and that can be adjusted to fit any size or shape.

This is a set of 3 pound molds for handmade soap
that I was ‘quickly’ throwing together – too big for my
small wood clamps, but perfect for this Today’s Carving Tip!
1 Low tack masking tape makes a great, disposable clamp. Available in many widths, up to 4″, the tape can be wrapped multiple times around your project to make a tight tension on the joint. Because it is low tack it does not leave glue residue to the project surface, which is wonderful when working gourd art.
2 Large rubber bands can be purchased from most office supply stores, usually by the pound box. They come in a variety of lengths and can be used over and over again. Look for extra wide bands when you go shopping, 1/2″ to 1″ wide bands are available and provide greater strength.
3 Bungee cords can be ganged to become a flexible clamp for your work. I use smaller bungee cords, and simply lock one to another until I have a nice tightness. Spacer blocks, as the 1 1/4″ basswood carving block shown here, can now be slid beneath the bungee cords to give you the tightest pressure.
4 Zip ties have become an every day item around the house and they use as wood clamps is invaluable. Gang zip them, tighten them a little at a time so each tie is even, and simple cut them off when you are done.
5 Butcher’s string is thick, cotton, two to three ply twist cord which is perfect for really odd shapes, such as a gourd art project. Wrap the string around your project and tie as tightly as possible. Repeat, so that your clamp has several independent strings tied around the joint. Working one string at a time, slide a popsicle stick, tongue depressor, or 1/4″ or wider dowel rod under the string. Gently twist the stick to wrap the string around the stick’s center. When you have the string as tight as you can twist secure the stick with a small clamp or with several clothes pins.
Next time you are cleaning those kitchen drawers or odd boxes, make up a quick clamp kit to keep in your wood, gourd, or pyrography studio – on hand and ready to go.
Quick Wood Carving & Pyrography Clamps Read More »

Wood Carving Walking Sticks, Introduction
 Wood Carving Walking Sticks – Adding Extras
Wood Carving Walking Sticks – Common Tree Species
Wood Carving Walking Sticks – Harvesting
Wood Carving Walking Sticks, Gluing Your Joint
Wood Carving Walking Sticks, How to Clamp Your Cane Handle
Wood Carving Walking Sticks, How to Join Your Cane Handle
Wood Carving Walking Sticks, Working with Bamboo
Free Mountain Man Cane Carving Pattern
![]()

Twistie Stick Snake Cane Carving, Day 5
Twistie Stick Snake Cane Carving, Day 4
Twistie Stick Snake Cane Carving, Day 3
Twistie Stick Snake Cane Carving, Day 2
Twistie Stick Snake Carving Free Project
Walking Stick and Cane Handle Joinery
Wood Carving Walking Sticks
![]()

Introduction to Cane Carving
 The Basic Construction Used In Cane Carving
The Basic Joinery Used In Cane Carving
Adding a Leather String Grip to your Cane Carving
![]()

 Four Methods to Cutting a Wooden Spoon Blank
Spoon, Fork, and Ladle Styles for Wood Carving
The Art of Spoon Carving by Lora S. Irish
Wood Carving a Basic Wooden Spoon
Styles of Wood Carved Spoons
Welsh Love Spoons
Welsh Love Spoons Introduction
Basic Cutting Techniques
Carving A Chain and Ball
Ball and Cage Carving
![]()

Wood Carving Fish Decoys
Sun Fish Decoy
Ice Fishing Decoy Gallery Two
Ice Fishing Fish Decoy Gallery
![]()

 Mule Deer Relief Carving Free Project by Lora Irish
Working in Levels – Mule Deer Relief Wood Carving Project
Shaping the Mule Deer – Mule Deer Relief Wood Carving Project
Wood Burning the Mule Deer Details
Dry Brush Painting – Mule Deer Relief Wood Carving Project
![]()

Relief Wood Carving Canada Goose Project
 Relief Wood Carving Canada Goose Project, Part One
Relief Wood Carving Canada Goose Project, Part Two
Relief Wood Carving Canada Goose Project Part Three
Relief Wood Carving Canada Goose Project Part Four
![]()


Tiki Chess Set, Beginner’s Carving Project
![]()
![]()

![]()


Wood Carving Celtic Dragon 3
Wood Carving Celtic Dragon 2
Wood Carving Celtic Dragon 1
![]()
 Chip Carving
Free Chip Carving Wood Carving Pattern
Free Chip Carving Projects by L S Irish
Back to the Basics of Wood Carving
Chip Carving Common Mistakes
Chip Carving – Sampler Layout Pattern
Chip Carved Chess and Game Board
Chip Carving – Straight-Wall, Curve-Wall, Free Form
Chip Carving – Cutting Triangle and Square Chips
Chip Carving Hand Positions and Grips
Chip Carving Graphed Patterns
Chip Carving Supplies
Chip Carving Seminar
Free Chip Carving Pattern
Sharpening Your Chip Knives
Positive and Negative Space in Chip Carving
Chip Carving Shortbread Cookies
Sharpening Your Chip Knives
![]()

Carving the Relief Wood Spirit
Wood Grain with Acrylics and Oil Stain
Dry Brush and Rouging the Wood Spirit Face
![]() More Technique and General Instructions
More Technique and General Instructions
 Wood Carving A Simple Flower
Wood Carving Free Projects, Lora Irish Books Read More »

 Russian Birch Bark Carving
 Altered Art Wood Carving
 Working with Your Patterns
