Woodcarving

Chip Carving Graphed Patterns

In today’s Chip Carving Free Online Seminar by Lora Irish we will discuss how to prepare your wood board, how to transfer your pattern, and how to set up a chip carving practice board.

Chip Carving Seminar by Lora Irish

Chip Carving Seminar
Chip Carving Supplies
Chip Carving Graphed Patterns
Chip Carving Hand Positions and Grips
Chip Carving – Triangles and Square Chips
Chip Carving – Straight-Wall Chips
Chip Caved Game and Chess Board
Chip Carving Sampler Pattern Layout
Chip Carving Common Mistakes
Chip Carved Shortbread Cookies


Wood Preparation

sanding basswood plaqueAny wood surface will require a light sanding using 320-grit sandpaper.  Rough surfaces can cause your chip knife to grab or hesitate as you make the cutting stroke.
Sand in the direction of the wood grain to avoid adding fine scratch lines from the paper.  Wipe the board well with a lint-free dry cloth to remove the sanding dust.


Pattern tracing using graphite paper

how to trace a pattern to woodIf the pattern is small and you have a printed copy of the design you can use graphite paper to trace the image to the wood.  Center the printed pattern to the wood and tape it into place along one edge.  Slide the graphite paper under the pattern.  Using a ruler, compass, or straight edge and a hard pencil, mark along each line.  After the cutting is complete the tracing lines can be erased.

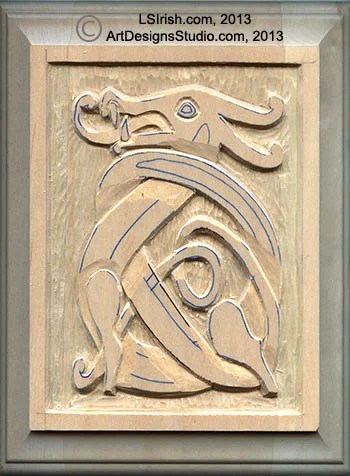
Advantages – Tracing has the advantage when you are transferring your pattern to curved surface or when you want your chips in one oddly shaped area on the wood.  In the photo sample the carving board is oval and the pattern has that same oval.  Tracing with graphite paper made it easy to cut the pattern along the oval shape and align it properly with the board.

Disadvantages – Hand tracing, even when you use a ruler and compass, does not always give you perfectly matched chip sizes or perfectly straight cutting lines.  Take time to double-check your line accuracy before you begin cutting.  After the chip carving is complete you will need to remove any remaining tracing lines using a white eraser.  For stubborn lines a light sanding with 320-grit sandpaper may be necessary.

Graphing directly to the wood

free chip carving wood patternBecause most chip carving patterns are geometric they can easily be graphed direct onto the board.

Using a small t-square, a ruler, and hard pencil mark the grid to your board.    The size of each unit determines the final size of the chip motif – a 1/3” space will create larger chip motifs than a 1/4” spacing.  With a soft pencil, to mark darker lines, pencil in your motif using the grid guidelines.

Advantages – Creating the pencil graph directly to the wood means that your knife is cutting directly into each chip wall.  There is no graphite paper that might slide as you create the chip lines and there is no pattern paper between you and the wood as you work.

Disadvantages – Your final chip carving will only be as accurate as your pencil grid.  Use a small t-square to mark all of your grid lines, sliding the square across one edge of the board.  After the chip carving is complete use a white eraser to remove the pencil grid.  A light sanding using 320-grit sandpaper will remove any stubborn lines.

Applying a graphed pattern with removable spray adhesive

free chip carving wood patternSpray adhesives allow you to temporarily glue the printed pattern directly to your wood board.  You can cut your chips following the printed paper lines.  After the chip carving is complete the remaining pattern paper can be lifted from the wood, leaving a clean, unblemished background.

Read and follow the directions of the label for the best results when using spray adhesives.  After the pattern has been affixed to the wood allow the paper to dry completely before you begin your cutting steps.

Advantages – By using a printed, adhered pattern you know that each chip cutting line is absolutely accurate.  The bright white of the paper and the black chip outlines makes it easy to know where you have cut and where you still need to work.  When the pattern is removed the background wood is clean, there will be no tracing or pencil lines to remove.

Disadvantages – Spray adhesives can become permanently affixed to your wood.  Do a test sample on a practice board before you use this method on your larger project.  Be sure to clean the nozzle of your spray adhesive can before you coat your pattern paper, a clogged nozzle can cause your spray to become uneven in coverage and it can leave small clumps of adhesive that are hard to cut.  Spray adhesive patterns can come loose during the cutting steps.

This often happens where one chip lies against another.  The loose side of paper can both block your view of your next cut as well as get in the way of the knife blade.  If this happens lightly score the pattern paper along the outer lines of the chip you are cutting.  This releases just the paper chip so that you can remove it.  Now cut along the score lines.

Simplifying the Pattern

free chip carving wood pattern
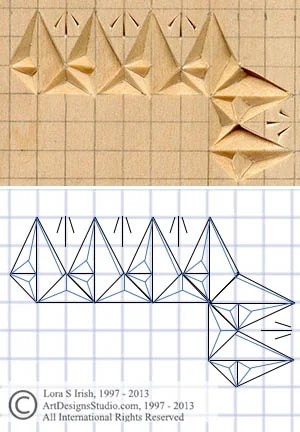
As you view the free chip carving patterns that are being offered with this seminar you will note that the outer lines of each chip is marked with a black line.  The inner cuts that make the well of the chip are marked with blue lines.  If you are tracing or graphing your pattern the inner lines do not need to be transferred to your board.  Instead, after the outer lines have been graphed with a #4 soft pencil or a fine point marker, place one small dot inside the chip to note where the center point of the chip well will be.  One dot, centered in the chip well will note a three or four-sided chip cut.  One dot placed in one corner of the chip well will note a straight-wall cut where the third chip wall slopes into the corner.

Chip Carving Graph Paper

The two square girds below are 100 dpi for accuracy.  Please click on each image to view the full-sized pattern.  Save to your computer.  You can Click and Print as many copies as you need.  As we work through the practice board grids over the next few days I will be using a blank grid and pencil marking the chip motifs.

free 1/4" graph paperfree 1/3" graph paper
1/4″ chip grid1/3″ chip grid


Today’s Free Chip Carving Pattern

free chip carving wood patternNext we will look at hand positions for cutting your chips, common problems, and positive and negative space in chip carving.  We are getting very close to cutting a few chips.  Thank you for reading!


Chip Carving Graphed Patterns Read More »

Chip Carving Supplies

In this free online Chip Carving Seminar session, by Lora S. Irish, we will first take a look at the basic supplies that you will need.

Chip Carving Seminar by Lora Irish

Chip Carving Seminar
Chip Carving Supplies
Chip Carving Graphed Patterns
Chip Carving Hand Positions and Grips
Chip Carving – Triangles and Square Chips
Chip Carving – Straight-Wall Chips
Chip Caved Game and Chess Board
Chip Carving Sampler Pattern Layout
Chip Carving Common Mistakes
Chip Carved Shortbread Cookies


For more about Chip Carving please visit Chip Carving.

chip carving tools and suppliesbasswood practice boards – 3″ to 4″ wide x 18″ long, 1/4″
basswood is available at most hardware stores
11″ x 14″ basswood plaque – needlepoint sampler pattern
14″ x 14″ basswood plaque – chess game board pattern
large chip carving knife
stab chip carving knife
detail wood carving bench knife
sharpening stones and leather strop
graph paper
removable spray adhesive
pencil
320-grit sandpaper
white artist eraser
linseed oil
turpentine
paste wax finish

Chip Knives

For more about wood carving tools, please visit Basic Wood Carving Tool Kit.

For this seminar you will need a chip knife, stab knife, and detail bench knife.

large chip carving knifeChip Carving Knives

The chip carving knife is your primary cutting tool.  It has a short blade as compared to wood carving bench and detail knives, or whittling pocket knives, which places your carving hand closer to the actual cuts in the wood.  The blade is angled slightly from the handle, placing the point and cutting edge in the correct position for the push cut used to angle the inner walls of the chip.

Chip knives are available in large and small sizes, with wooden or ergonomic resin handles.  My personal preference is the large, wood handled knife which can also be used as a bench knife in my relief carving.

chip carving stab knifeStab Chip Carving Knife

The stab knife also comes in two varieties.  This is a straight-edged blade made to be pushed into the wood that makes thin, straight line accent cuts in the negative space of the chip pattern.  If the tip of the stab knife is sharpened along with the straight edge of the blade and at the point, this knife can be used to cut the walls of your chips.

wood carving detail bench knifeDetail Bench Knife

Detail bench knives, used in wood carving, are excellent for your chip carving.  The long, narrow blade can be used to cut the walls of the chip and can reach deeply into the sloped floor of a straight-wall chip.  For chip carving you want a detail bench knife with a short blade to keep your cutting hand close to the wood.

 Utility, Craft, and Pocket Knives

Although utility and craft knives are readily available and very inexpensive but I do not recommend them for either wood carving or chip carving.  The steel in the blades are very thin and not the high quality found in specific wood carving knives.  The tips of these blades can snap easily, creating the potential for you to end up cut.  Please also avoid using straight-edged razor blades for the same reasons.

There are some excellent quality steel pocket knives available today that are perfect for whittling wood carving projects.  I do not, however, recommend them for chip carving.  The thickness of a pocket knife blade can cause problems when you are cutting small-sized chips.  Thick blades tend to push against the wood as it cuts, compressing the wood outside the chip.  That compressed area then causes cutting problems as you cut an adjacent chip.

Sharpening Tools

For more about sharpening, please visit Sharpening Your Wood Carving Tools, and Sharpening Your Chip Knives.

For this seminar you will need a coarse sharpening stone, a fine sharpening stone, a leather strop and rouging compound, emery cloth 1500-grit sandpaper, and several sheets of newspaper.  My personal preference, especially for new carvers, are ceramic stones.  These are reasonably prices, small enough to keep right in my carving kit, do not require either water or oil, and last a life time.

Coarse 1000-grit Sharpening Stones

The coarse sharpening stone creates the angle of the knife blade bevel.  If you are wood carving hardwoods and using a mallet you want a wide bevel on the edge of your cutting tool, up to 25 degrees.  If you are relief carving you want to drop the bevel angle, bringing the bevel down to around 20 degrees.  For chip carving you want a very narrow bevel, below the 20 degrees.

A sharpening jig that allows you to set the exact degree of the bevel takes the guess-work out of knife sharpening.  If like most carvers you sharpen by eye, place the blade of your knife flat against the coarse stone.  Raise the back – blunt – edge of the blade slightly, just high enough to slide 3 to 4 sheets of paper under the back edge.  This sets the knife blade at a very shallow angle to the stone, perfect for chip carving.

Pull your knife across the stone to create the cutting edge bevel.  Work both sides of your knife.

fine sharpening stone for chip carving knivesFine 6000-grit Sharpening Stones

Fine stones have a high grit number, ranging from 6000- to 8000-grits.  This stone sharpens the cutting edge.  Place your knife onto the stone as the same bevel angle or ever so slightly higher.  Pull the knife blade across the stone until you have developed a bright edge.

The fine stone work will create a very thin strip of steel along the cutting edge of the blade.  You can not see this strip, but if you run your finger from the back of the knife towards the edge you will be able to feel a thin, rough tin edge.

Emery Cloth Sandpaper

There is a wonderful version of sandpaper, called emery cloth, that is specifically made use with metal.  Emery cloth comes in many grades, I use 500-, 1000-, and 15oo-grit.  I use my finest grit emery cloth before I move to my strop to insecure that I have established and then released the tin edge.  Many carvers use emery cloth exclusively for sharpening.
In relief carving you can wrap emery cloth around a dowel for sharpening the inside cutting edges of your round gouges.

Leather Strop and Rouge

Stropping, pulling a carving knife across a leather strop, removes the tin edge developed on the fine sharpening stone and brightens the cutting edge. The leather strop has two sides – one raw leather and one tanned leather.  A rouging compound or sharpening compound is rubbed over the raw leather side of your strop.  Place the blade, at the same bevel angle that you have been working, against the strop and pull the knife in long strokes across the compound.  Work both sides of your knife.

There are several stropping or rouging compounds available, and each wood carver seems to have their favorite.  I use red oxide in a stick form and aluminum oxide power.

sharpening chip carving knivesNewspaper

Select several sheets of newspaper that are heavily printed.  You can also print a sheet of condensed text using your computer printer for this step.  Paper has a very fine grit and the printing ink acts as a rouging compound.  Fold the paper into quarters and place it at the edge of your work table.  Lay you knife blade flat against the paper and pull the knife across the paper several times.

This final paper stropping will polish the cutting edge.

Measuring Tools

graphing a chip carving patternChip carving patterns can be printed and then glued to your wood using removable spray adhesive, which for this seminar I will refer to as gluing, or they can be graphed directly to the wood.  Printing and gluing the pattern insures that you are working from a pattern that has perfectly straight cutting lines, but unless you have a graphic image editing program you are constrained to working the pattern at the size of the printed paper.

You can, using a small t-square, compass, and straight edge, create a pencil graph directly onto the wood.  I use a #2 soft pencil to create the grid and use light pressure on the pencil to avoid leaving thin, indented lines in the basswood.  You can also use a pale brown colored watercolor pencil for this step.  When the chip carving is finished, using a white artist eraser the pencil graph and chip outlines can be removed.  With watercolor pencil the board is wiped with a slightly damp cloth.

Basswood Practice and Project Boards

For this seminar I would strongly suggest that you begin with basswood practice boards.  Chip carving needs precise, strong cuts to create the wonderfully intricate geometric chips.  Precision comes with practice!

You can find 3″ to 4″ wide by 1/4″ thick by 18″ to 24″ long basswood craft boards at most local hardware stores which are perfect for your practice work.  Check each board carefully to insecure that it has even, straight grain, and a clear unblemished coloring.  These basswood boards are not the high quality found in the finished project plaques that are available through Walnut Hollow and other companies, but quite fine enough to use for learning, experimenting, and practice motifs.

Tomorrow we will look at how to prepare the wood for your chip carving.  Thank you for reading!

free chip carving pattern by Lora Irish

Chip Carving Supplies Read More »

Chip Carving Seminar

Its that time of year, time to start our Free Online In-depth wood carving Winter 2014 Seminar, taught by Lora Irish, wood carving and pyrography book author and line art pattern maker.

Chip Carving Seminar by Lora Irish

Chip Carving Seminar
Chip Carving Supplies
Chip Carving Graphed Patterns
Chip Carving Hand Positions and Grips
Chip Carving – Triangles and Square Chips
Chip Carving – Straight-Wall Chips
Chip Caved Game and Chess Board
Chip Carving Sampler Pattern Layout
Chip Carving Common Mistakes
Chip Carved Shortbread Cookies

Free Chip Carving ProjectFor this year’s seminar I have chosen Chip Carving, also called Spoon Carving!  This wonderful style of wood carving uses geometric and free form cut chips to create intricate designs.  This free seminar is only being offered here on my blog, so please lets your friends and fellow carvers on your favorite message boards know!  Post a link today.

I am delighted to say that we have a new Chip Carving Pattern Package and a new Chip Carving Basics E-Project on our pattern site, ArtDesignsStudio.com, created just for this seminar.

Over the next week or so we will take an in-depth look at this wood carving technique, create several chip carving practice boards, and take a close look at a classic needlepoint sampler layout, shown above, that you can use to carve multiple chip carved projects.  The pattern and photo sampler for this  Needlepoint Layout is available in both our new Chip Carving Pattern Package and in the Chip Carving E-Project.

We will explore:

free Irish chip carving patternSupplies needed for chip carving
Creating basswood chip carving practice boards
Wood preparations
Knife sharpening
Transferring a chip pattern to your board
Knife angle
Common problems
Positive and negative space
How to cut the different styles of chips
Learn triangles, square, straight-wall, curve-edge, free form, and accent chips
Using chip styles in your patterns
Work a set of chip progressions
How to turn a corner


free Irish chip carving patternTo get ready for this seminar you will need the following supplies:

basswood practice boards – 3″ to 4″ wide x 18″ long, 1/4″ basswood is available at most hardware stores

11″ x 14″ basswood plaque – needlepoint sampler pattern

14″ x 14″ basswood plaque – chess game board pattern

large chip carving knife

stab chip carving knife

detail wood carving bench knife

sharpening stones and leather strop

graph paper

removable spray adhesive

pencil

320-grit sandpaper

white artist eraser

boiled linseed oil

turpentine

paste wax finish

Class begins Wednesday, January 15th!  I’ve saved a chair at the teaching table just for you!


Chip Carving Seminar Read More »

Wood Carving Celtic Dragon 3

Over the last two days we have worked on a relief wood carving project featuring a Celtic knot dragon pattern.  Today we will walk through the simple and easy painting steps to give this basswood carving the look of stone.

Wood Carving Celtic Dragon 1
Wood Carving Celtic Dragon 2
Wood Carving Celtic Dragon 3

Celtic Dragon Wood Carving by Lora IrishPreparing the carving for painting

14.  Basswood is an easy to carve wood that has a very clear, white coloring.  Because basswood is very porous it is does not take oil based stains well without the use of a pretreatment sealer as polyurethane or spray sealer.  For our project I used acrylic craft paints to create the stone effect.

Supplies:

Acrylic craft paints in:
Titanium White
Carbon Black
Payne’s Gray
Burnt Umber
Burnt Sienna
Driftwood oil stain
Water bowl
Glass tile, palette paper, or tin foil
Paper towels
Clean, soft cloth
Assorted soft-bristle paintbrushes
Splatter brush or old toothbrush
Masking tape or painter’s tape
220-grit sandpaper
Polyurethane spray sealer

More information on painting your wood carvings.

using a primer coat when painting a wood carvingPrimer coat for relief wood carving

15.  Begin by using painter’s tape along the uncut 1/4″ margin surrounding the carving.  Cut long pieces, place into position, and press firmly.  The painter’s tape will protect these areas from coloring.

Place a small amount of titanium white, Payne’s gray, and burnt umber on a glass tile. Thin each color with an equal amount of clean water.

Brush two wash coats of titanium white on the carved area of the plaque. Because you mixed equal parts paint and water, this coat will not give full, solid coverage.

While the titanium white coats are still damp, pick up a small amount of Payne’s gray and mix it with the titanium white on your tile. Working along the diagonal of the plaque,  brush a few random strokes of the gray/white mix over the white background. Pick up a little more Payne’s gray, mix it with the titanium white on your tile, and apply it to the carving.

Next, add a small touch of burnt umber to the gray/white mix and repeat. Add a small amount of burnt sienna to the mix and repeat. Your background should now contain many  shades of white, gray, and brown. Allow these coatings to dry for about half an hour .

splatter painting a relief wood carvingSplatter the carving with fine paint dots

16.  Clean your glass tile, and then place a small amount of each paint color on the tile. Do not thin these colors with water. Working one color at a time, use an old stiff toothbrush or splatter brush to splatter a coat of each color on the carving.  Do this by picking up a small amount of color on the end of the splatter brush. Hold the brush a few inches from the surface of the carving, and pull your thumb across the top of the brush. This action will spray a fine mist of paint drops over the carving. Thin the paint with a few drops of water if you wish to create a fine spray with small droplets.

Painting the routed border

17.  Remove the tape from the edges of the carving. Brush two thinned wash coats of titanium white on the routed border edges of the plaque. Streak this area with a mix of titanium white and Payne’s gray, just as you did with the center of the carving. Allow the carving to dry overnight.

Creating a vintage look to your painted carving

18.  After you have completed the painting steps and allowed the paint to dry , sand the carved areas, background, and routed edges of the plaque using 220-grit sandpaper to remove some paint from the high areas of the carving. Sand lightly in some areas to remove one or two layers of color; in other areas, sand the carving back to the raw wood. Clean the dust from the board using a soft, dry cloth.

Seal the work with two coats of polyurethane spray sealer. Allow the sealer to dry thoroughly. Following the manufacturer’s instructions to apply an oil-based stain to the carving . Wipe away the excess oil stain with a soft, clean cloth. Allow the stain to dry overnight. Seal the work with one to two light coats of polyurethane spray sealer. Remember to sign and date the back of the plaque when finished.

I hope you have enjoyed this in-depth step-by-step free relief wood carving project and will take the time to browse through the other free online relief carving projects by Lora Irish that we have posted on our blog.

Thank you for visiting – Lora Irish!

Lora Irish celtic knot pattern129_150x150Celtic knot patterns by Lora S Irish
Celtic CrossesCeltic Dragon KnotCeltic Knots 2

Celtic Knot Carving Patterns by Lora S Irish, ArtDesignsStudio.com

Wood Carving Celtic Dragon 3 Read More »

Celtic Dragon Wood Carving by Lora Irish

Wood Carving Celtic Dragon 2

We are working on a beginner level relief wood carving project with a free Celtic knot dragon pattern by Lora S. Irish.  Yesterday’s post worked through the basic tool kit, preparing your basswood board, tracing your pattern, and rough cutting the background area using a bench knife stop cut and the round gouge.

Today we will work on the general shaping steps, how to smoothly contour the dragon body, and using the bench knife to cut detail lines into the relief wood carving.

Wood Carving Celtic Dragon 1
Wood Carving Celtic Dragon 2
Wood Carving Celtic Dragon 3

general shaping of a reliefwood carvingGeneral shaping of the dragon body

5.  Any celtic knot pattern is created with a line that is knotted in an up-then-down pattern.  The line crosses over itself multiple times.  In our Celtic Knot Dragon pattern, by Lora Irish, the body of the dragon goes from the head under the tail, behind the front leg, under the tail again, behind the back leg, under the tail a third time, then it becomes the tail section that crosses over the body at the neck.

6.  On your pattern, with a pencil, mark each of the cross-over areas of the dragon body.

7.  Using either the bench knife or v-gouge cut a v-trough in the area of the dragon along the cross-over lines, in the background or under-tucked area of the body.  Example, where the tail crosses over the neck, the neck area is cut with the v-trough.

using a straight chisel to shape a relief wood carvingGeneral contouring with a straight chisel

8.  With a straight chisel or skew chisel, cut along the outer edge of each body area of the dragon.  You are carving away the sharp edge of the wall to begin giving your dragon body a curved contour.

Work with the grain of your wood as you shape the outer edges of each area.  Begin the cutting stroke so that the tool runs parallel with the grain and cuts away from the open ends of the grain line.  Turn your board as necessary.  More about Working with the grain of your wood.

Work the eyes, tongue, and teeth in the same manner.

using a v-gouge in relief wood carvingusing a straight chisel to round over a relief wood carvingshaping a relief wood carving with a straight chisel
A v-gouge is used to cut a v-shaped trough along the pattern line that separates one area of the relief carving from another.Hold the straight chisel at an angle along the straight wall edges of each element.  Cut a thin slice.  Work with the grain of the wood to create the cleanest cuts.Lay the chisel with the angle of the cutting edge against the wood for thin slices.  For deep, thick slices use this tool with the angle of the edge up.


Irish_celtic06Smooth the dragon body into a clean, even curve.

9.  To smooth the dragon’s body use your straight chisel or skew chisel held at a very low angle to the wood.  Dropping the chisel as close to the wood as possible allows you to shave extremely thin slices of wood.  Work this step until all of the wood in the dragon has been shaved, do not leave any area uncut or at the original wood plaque surface.

The original wood surface has a different texture and feel than those areas that we have cut.  This difference will visually show after the work is complete and can create a problem during the painting and staining steps as each area will accept coloring in a different way.  Make it a habit to cut the entire wood surface during the smoothing steps.

10.  Basswood has several outstanding qualities that make it a great beginner carving wood.  It is a tight, even grained wood that has a clear, white coloring.  Although it is classified as a hardwood it is easy to cut and take the finest detailing well.  This means that you, as a beginner, have the opportunity to learn how to use your tools, how to make your relief carving strokes, and how to work through the level changes of a relief carving.

Because basswood is an easy cutting wood it often leaves small fiber of loose wood grain after the cut is complete.  I call them Fuzz Bunnies!  To remove these left-over wood fibers re-cut where necessary with your bench knife or chip carving knife.

11.  Using 320-grit sandpaper lightly sand your carving to give a final, smoothing to the work.  You can also use rifflers, small profile-shaped files that fit into the deep edges, sharp angles, and undercuts of a relief wood carving.  Wipe any dust from the carving with a clean, dry cloth.

As your hobby grows you will advance into other woods as maple, walnut, and mahogany.  Because these woods are harder surfaced they seldom need intense sanding, the shaving steps give a clean finish to the work.

v-gouge detailing in a relief wood carvingAdding the detail lines to the dragon

12.  With a pencil mark the areas from the pattern onto your dragon carving for the inner detailing.  You can cut your pattern into small pieces.  Tape those pieces into position on your carving and slide a small piece of graphite paper underneath to make the tracing.

13.  Using either the stop cut made with a bench knife or the v-gouge, cut along the traced inner detailing lines.  If you chose the v-gouge cut the v-trough detail line in several light, shallow passes.  This slowly lowers the line and avoids the corners of the cross hatched areas to chip out.

14. Chip outs happen.  If your tool lifts a corner of wood or complete pops the corner off the board, reset that chip by licking up a small amount of yellow wood glue on the end of a toothpick.  Place the glue dot onto the wood where the chip came off, and place the chip into position.  With a water damp brush clean up any glue that seeps from underneath the chip.  Allow the glue to dry for about 15 minutes.  You are ready to continue carving.

straight chisel shaving in wood carvingrelief wood carved flower patterncarving detail lines using a round gouge
Shaving can be done using a straight chisel or round gouge.  Hold the tool low to the wood to cut very thin slices of wood.Check your carving for any loose wood fibers, rough cut corners, and harsh contours.  Use 320-grit sandpaper to lightly smooth the finished carving.A v-gouge is used to cut thin, detailing lines into your carving.  Use light pressure and recut the v-gouge lines as necessary to slowly drop the depth of the lines.


Irish_wood_flowerThe woodcarving steps for this Celtic Knot Dragon pattern by Lora Irish are complete.  You can leave your carving in the wood finish coloring or join me tomorrow as we work though the painting technique to create a stone-look to this relief carving.  Thank you for joining me today, Lora Irish.

While you wait for tomorrow’s post, here is the practice flower pattern that you can use in your free relief wood carving project.

Wood Carving Celtic Dragon 2 Read More »

Scroll to Top