How to create a circular Celtic pattern
Any circular design begins by dividing your circle into a predetermined number of units or pie shaped sections. Let’s explore how easy it is to create a circular layout that fits your particular project.

This is a five part series that will be expanding over the next few days.
Part 1, How to create and divide your circle grid
Part 2, Sample Circular and Square Grids, ready to print and use in your pattern work
Part 3, How to convert a linear pattern into a circular design
Part 4, Four free circular Celtic Patterns
Part 5, Sample single Celtic pattern motifs to trace
 Free Celtic Circle Pattern
1. Fig. 1 Begin by measuring your projects surface area. Use your measurements to create a square.
Mark a diagonal line from one top corner of the square to the opposite lower corner. Mark the second diagonal, working the remaining two corners.
This establishes the center point of your square area, which will become the center point of your circle.
Measure along the top edge of the square to find the center point of this line. Repeat along the bottom square line. Connect the two points with a pencil line. Repeat for the two sides of the square.
Your square is now divided into eight equal sections.
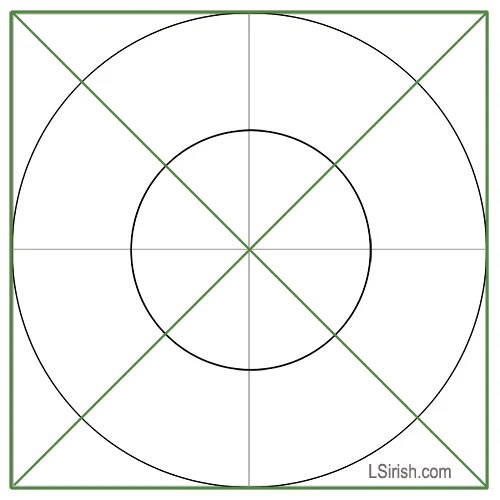 Fig. 1
2. Fig. 2 Place the point of your compass at the center point created in step 1. Open the pencil arm of the compass to touch the center point of the top line of the square. This is the radius of your circle.
Rotate the compass to create your outer circle for your design grid.
Keep the compass point at the center point of the square. Shorten the length of the open compass arm to one half the length of one diagonal line from the edge of the circle to the center point to make a small circle inside the large outer circle.

Fig. 2
3. Fig. 3 Your circle grid now has four pie shaped areas. Now begin to divide each of these areas into smaller sections.
Each pie shaped section is currently divided into two pieces by the placement of the inner, smaller circle.
Mark a diagonal line into the top area of one pie shaped section by placing your ruler on one top corner point “A” to the opposite lower corner point “D”. Repeat for the remaining two corners, “C” to “B”.
Where these two diagonal lines cross is the center point, “E”, of the top pie shaped section of your grid.

Fig. 3
4. Fig. 4 Place your ruler on the center point of the full circle and the center point of the pie shaped section that you just created. Draw a pencil line. This divides that pie shaped section into two equal sized portions.
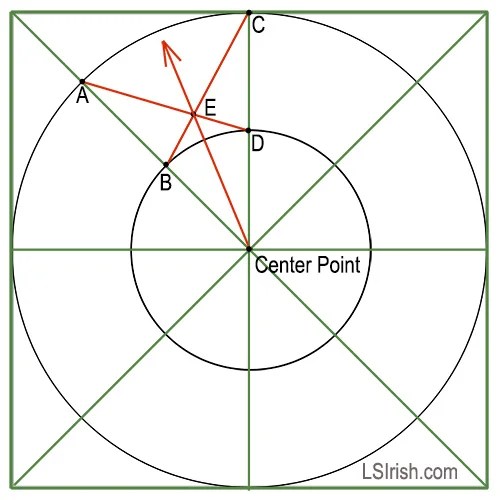
Fig. 4
5. Each new section can be re-divided by using the same method as shown in steps 3 and 4.
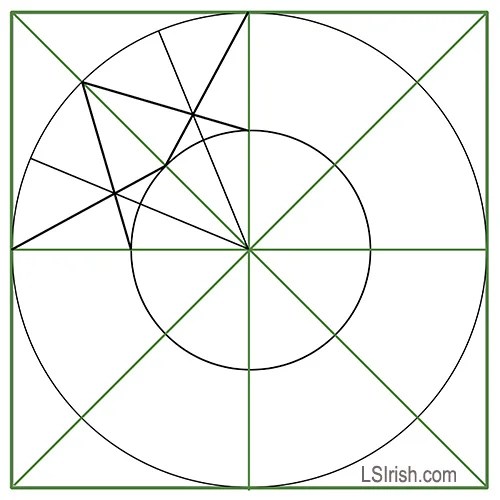 Fig. 5 creates an eight section circle grid.
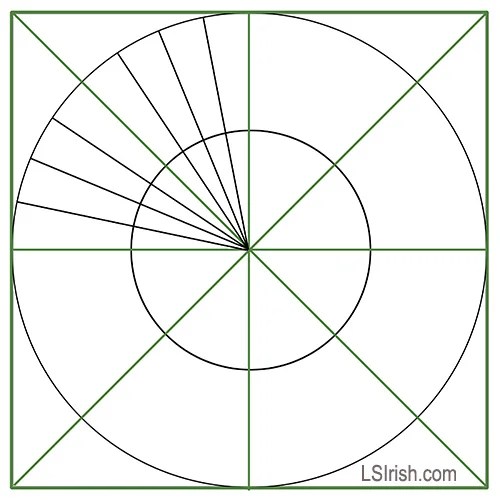 Fig. 6 will establish a 32 section circle grid.
6. Fig. 7 You can use a protractor to establish the circle grid sections for project designs that do not easily fit into a square motif format.
Working counter-clockwise:
90 degrees = 4 sections
72 degrees = 5 sections
45 degrees = 8 sections
30 degrees = 12 sections
22.5 degrees = 16 sections
11.25 degrees = 32 sections
 Fig. 7 Protractor Chart
Five complete pattern packs, over 100 designs and motifs, for the low price of only $22.95


