Do you make these common mistakes in your chip carving?
Too often a chip carved triangle is just not perfect. So let’s look at why these small errors happen and how to correct them to create the very best chip carving project you can!
Ragged walls can be caused by either poor quality wood or an improperly sharpened knife. Basswood is a common chip carving wood that has finely packed, dense grain lines, and is considered an easy wood to work. But not all basswood is adaptable to chip carving. Avoid end grain plaques as you are cutting across the open end of the vascular bundles, which are similar to small soda straws that draw moisture up through the tree. Also avoid ‘hardware store’ thin basswood sheets. The 1/4″ and 1/8″ thick sheets are not the high wood quality of a 3/4″ plaque.
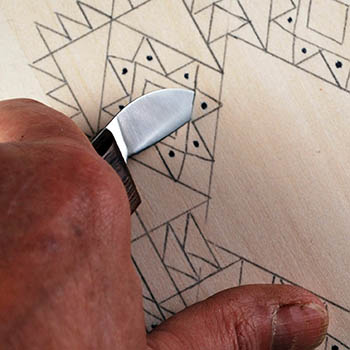
A dull knife tears through the wood grain instead of cutting it. Learn how to properly sharpen your chip carving knife. When you are concerned that your chips are repeatedly coming out rough, stop and take time to resharpen and hone your knife edge.
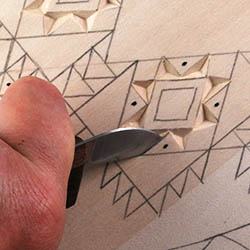
Each chip should have a sharp, clean point at the center of the chip well. This is caused because the angle of one of the side cuts did not fully reach the deep center point of the chip, where the three walls intersect. Correct this by re-cutting that wall, taking your knife point slightly deeper.
Free form lines and straight wall cuts also can get misaligned at the center of the well. Double check that you are using the correct hand grip on your knife and that your depth is even throughout the cutting stroke.
This chip’s wall was cut with several staggered strokes. During the cutting step either you changed the angle of your knife, or paused during the cut which misaligned the knife’s edge through the remaining stroke. Re-cut that wall with one, smooth, clean stroke.
Your knife angle is just as important at the top of the triangle cut as it is on the wall and well. It is easy to end up with a top edge that is not razor sharp, the preferred finish for any chip carver. A simple wobble as you make the stroke can cause the knife to miss the fine edge of the neighboring chip.
Try turning the wood to recut the chip. A new view of that top edge may help steady the stroke.
Every chip carver discovers wobbly edged chip walls. I find this problem often occurs when I am cutting through a spray adhesive paper pattern. Both the glue and the paper can cause the knife edge to be pushed away from the pattern line. Correct this by re-cutting the chip wall by thinly shaving just the bulge, not the points of the chip.
Chip outs happen and can be caused by several reasons. If you are working on a heavy grain wood as sugar pine, the change in the grain can cause a small thin point to break free.
On soft woods, as basswood, the edge of the point can be lost because the knife was pulled out instead of lifted out of the cut. To lift out the knife simply stop the stroke. Gently pull the knife back along the stroke just a small bit, then lift the knife free from the cut. Pulling on the tip of the blade at the end of the cut can add excess pressure that lifts a grain line.
Over cutting one side of the point, reaching the blade too deeply into the wood, can cause a point to chip out. Try scoring the pattern line first by lightly cutting along the line with just the tip of your chip knife. This pre-cuts and therefore pre-releases the wood grain at the point of the chip before you make the actual chip stroke.
Chip outs can be repaired by using wood glue and a tooth pick. Place a small drop of glue on he board at the break out spot. Use the toothpick to insure that the glue is deeply pressed into the chip area, not trapping any air space below the glue. Replace the chip out and press firmly. After about one-half hour of drying you can re-cut and sand this area.
NOTE – SANDPAPER FEELING TO THE CUTTING STROKE
Since I was rambling on yesterday about tonal values / shadows and light, I thought…
Tonal Values in all crafts - wood carving, wood burning, colored pencils, and painting If…
Simple Guide to Wood Crafting Finishes The when, why, and how each sealer product is…
I have two Freebie Alerts for you today. Our Bird House Sign has two full…
Beginner Wood Carving Project - 'No Vacancy' Birdhouse Let's have a little fun!!!! I am…
Is it too early to be talking about the Fourth of July?!? https://lsirish.com/woodcarving-tutorials/woodcarving-projects/beginner-projects/wood-carving-fish-decoys/4/ https://lsirish.com/woodcarving-tutorials/woodcarving-projects/beginner-projects/ice-fishing-fish-decoy-gallery/…