2017

pyrography landscape backgrounds by L S Irish

Pyrography Landscape Backgrounds

In Pyrography landscape burnings your background determines the time of year, the time of day, and the weather conditions of your scene.  Landscapes are worked from the farthest element in the scene to the nearest, foreground elements, which allows you to overlap foreground burnings over the paler background areas.  So those first few burning steps are extremely important in setting the stage for your main element, as a barn or church.

Landscape Pyrography Scenes by L S IrishLet’s look at a few examples of how you can create both seasonal and weather conditions in your landscape pyrography burnings.

The wood burning, shown right, is from my book, Great Book of Wood Burning, and is titled The Star Barn.  Three strong elements set the time of day – the thick, low storm clouds in the farthest background point, the extremely dark trees just behind the barn on both sides of the barn, and the wide shadows of the roof overhang on the barn.

The roof barn overhang shadow is even on both sides of the face of the barn.  At the peak of the roof the there is almost as much shadow on the right side as on the left.  This places the sun in the 12 to 1 o’clock position.

All three elements tell you that this scene is mid-afternoon, high summer, and that the thunderstorms are eminent. This scene has atmosphere, weather, and tells a story about the conditions surrounding the landscape subject.

Wood burning a landscape, church, by L S IrishThe Country Church, also from the Great Book of Wood Burning, does not use clouds to suggest the time of year.  Instead the light speckling of leaves on the two deciduous trees behind the barn and the lack of fallen leaves on the ground set the time of year as early spring.

The top edge of the line of background trees has been packed with more burning strokes than the lower layer of the tree area, giving the impression that the leaves are just emerging at the tips of the branches.  The high grass – un-mowed – in the foreground shows the new spring growth.  Long shadows under the roof overhang are shown on the right side of the face of the church which places the sun in the 2 to 3 o’clock position in the sky.

With a little planning and forethought you can take either of these two landscape pyrography scenes into a different time of year, time of day, or weather conditions.  Let’s see how!

Clear, sunny day setting

landscape pyrography wood burning by L S IrishA clear, sunny day has few or no clouds in the sky.  If you chose to add clouds they hand high in the sky and display both the top and bottom edges of the cloud.  Clear days create a deeper tonal value in the background elements as well as casting very crisp shadows.

Clear, sunny sky backgrounds allow you to burn the background trees, mountains, or farm fields in varying tonal values which separates one area of the background from another.  In my sample you can see three distinct trees with the middle tree in front of the other two trees.

Misty or foggy morning

Creating pyrography wood burned landscapes by L S IrishEarly morning fog is simply a cloud that has settled against the earth.  That cloud is full of fine water particles that obscure your vision.  The lower to the ground the cloud lies the less you can see of your background trees or fence line.

Note in this sample burn that while the tips of the pines are burned at a pale-medium temperature setting, the lowest portions of the pines have little or no burning strokes.  The very bottom of the pines are not burned, which implies the heaviest area of fog the lies along the edge of the hill.

The slight slope of the ground is further implied by the diagonal shading strokes that is worked from the left to the right, under the pines.  As those shading strokes flow to the right they become paler, implying that the fog is becoming thicker the farther down the hill it lies.

Early evening, sunset

Creating pyrography wood burned landscapes by L S IrishAs the sun slips behind the horizon of your scene it creates a graduated variation in the sky with the brightest, or palest area along the horizon line and with the sky becoming darker as the sky nears the top of your pattern.  Note that the palest, un-burned point, in this sample is in the lower right corner, just above the grassy slope.

Because the light is coming from behind the pines and at a low angle to the pines, all of the pines on our side of the scene are in shadow.

In sunset scenes, because the tree line is in shadow, the pines are burned as if they were one tree and not three trees.  The deep shadowing obscures the individuality of the the pines.

Winter snow

Creating pyrography wood burned landscapes by L S IrishSnow scenes can seem hard to burn because of all of the pale, white areas in the scene.  So instead of burning the snow on the background trees, you burn the atmosphere around those background trees.

Snow clouds are just like fog and mist.  They hang low against the ground and are more dense the closer to the ground they lie.  This is because each small snow flake casts a small shadow – the higher the number of flakes, the more small shadows you have.

For this sample there is no burning of the grassy slope because it is fully covered with snow.  The pines have only a few strokes, at the tip of the branches, where the branches touch the ground, and at the top of the pines.  This leaves the larger areas inside of each pine un-burned, implying that the snow is sticking to the branches.

The background atmosphere – the snow cloud – is burned in a deeper tonal value and becomes paler the higher it reaches into the sky.  This cloud shading also helps to emphasize the snow on the pine branches, giving a darker tonal value to where the sky shows between the pine branches.

Work in Progress

landscape pyrography wood burning by L S IrishThe current project on my table is a landscape scene of an old bank barn that lies right at the edge of a dirt road.

I have the first step of this project completed, which is the farthest background elements of the distant trees on the left side and the trees on the right that fall behind the barn.

Because the deciduous trees on both sides of the background only have their trunks and branches burned I can at this point in the work chose to make this either an early morning scene or a snow scene.

How I treat the land lying under both of these tree lines will determine the time of day and the weather conditions.

Here are my choices:

If I do not burn the land area, this will become a snow scene and I will leave the deciduous trees without leaves.

If I chose to lightly create a tonal value shading in the land this will become an early morning scene.  I can decide the time of year by how thickly I fill the tops of the deciduous trees with leaves – a thin layer of leaves means springtime, a thicker layer of leaves means summer, and a medium layer of leaves and the impression of fallen leaves on the ground implies an autumn setting.

If I chose to add heavy shadows, worked in a medium tonal value, under the trees I can create a specific time of day.

Check back tomorrow to see what I chose to do!

Practice pattern

While you wait for the next posting you might enjoy doing a test sample for weather, time of day, and time of year yourself.  On a birch, poplar, or basswood board create a four square grid with each square measuring 3″ along the sides.

Wood burning a landscape scene by L S IrishThe pattern for these background trees is simply the line at the top of the grassy slope, and a line for each central trunk of each tree.  Because the trees are created using a short, quick stroke with either the loop-tip or ball-tip pen, you only need a few lines to guide you as to where you will burn your pines.


wod burning landscape scenes by L S IrishPines are burned from the top of the tree down to the ground line and from the outer tips of each branch towards the central trunk of the tree.  Place the branches randomly along the trunk, allow open air spaces between branches.

As you near the trunk you will have branches overlapping which will create the natural deepening of the tonal value through the center of the tree.

Follow the four weather samples, above, to practice how you can determine and control the time of day, time of year, and weather conditions in any landscape.

OK … see you tomorrow with an up-date on my WIP barn landscape burning.

~ Lora


Pyrography Landscape Backgrounds Read More »

Pyrography Greenman Leather Bullet Journal Cover

Greenman Pyrography Leather Bullet Journal Project

The newest project on my table is a step-by-step pyrography leather Greenman, inspired by the fun hobby of bullet journaling.

Please share this project with your FaceBook friends!

Pyrography Greenman Leather Bullet Journal CoverOur Greenman Leather Pyrography Bullet Journal Cover is worked on 7 to 8 ounce vegetable dyed leather and laced using waxed linen thread and two bamboo skewers.  The completed journal opens at the bottom, with the lacing for the bullet journal pages on the back of the journal.  You can open the cover and completely roll the cover to the back to have easy, full access to your pages.

28 large-sized, step-by-step photos spread over 7 pages, with complete instructions, a free Greenman pattern, and printable bullet journal pages.


pyrography burned leather purseThis project is a great compliment to me recent Greenman Leather Slop Bag Project.  Check it out as the free pattern for this project would create a wonderful design when you are ready to burn your second bullet journal cover.


Colored Pencil Portraits, Adult ColoringFor more ideas to use with this Bullet Journal Cover project you may wish to check out ArtDesignsStudio.com’s newest E-Project, Colored Pencil Portraits.

146 pages of instructions, patterns, and ideas including 6 in-depth step-by-step portrait projects and 62 patterns for wood spirits, greenmen, shamans, wizards, vampires, dragons, and assorted designs.

On SALE through June 4th, only $9.50
regular price $14.95

Check out our other E-Book on sale in the right-hand nav bar.


Colored Pencil Portraits Pattern PackageOr try our Adult Coloring, Pyrography, Carving Patterns Pack which has just the patterns and designs, ready for your next project.

62 line art patterns and designs featuring Wood Spirits, Greenmen, Shamans, Wizards, Pixies, and even Vampires.  Also included is an assortment of fun designs featuring Henna Flowers, Dragons, Winged LIzards, and more. As an added bonus this package includes 12 fully colored or pencil shaded designs to guide you in your craft work.

Ready for you to download to your computer and print from your home printer, available at ArtDesignsStudio.com, Lora S. Irish’s pattern store.

Greenman Pyrography Leather Bullet Journal Project Read More »

Adult Coloring - Colored Pencil Application

Adult Coloring – Working with Colored Pencils

Adult Coloring, Colored PencilsTake a few moments today and browse through our Adult Coloring, and Pyrography Colored Pencil articles.

Adult Coloring – Working with Colored Pencils     New!!!

Adult Coloring – Colored Pencil Application     New with Free Pattern !!!

Working in Layers, Colored Pencils

Coloring your Wood Burnings with Colored Pencils

Wood Spirit Gourd Pencil Jar, Mixed Media

Cross-Crafting Seminar, Colored Pencils and Pyrography


adult coloring portraitsNew Patterns and E-Project
Available at ArtDesignsStudio.com

Adult Coloring, Pyrography, Carving Portraits
Exclusive Downloaded Digital Patterns by Lora S. Irish
62 Patterns in 100 DPI, JPG format

Adult Coloring Portraits E-Project
Exclusive Downloaded E-Book by Lora S. Irish
146 Page, 62 Patterns E-Project (.pdf Format)

Adult Coloring – Working with Colored Pencils Read More »

adult coloring portraits

Adult Coloring Portraits

Break the Boundaries !!!

There is no question that adult coloring is such a success … it’s fun, it’s fast, and it’s easy.

But aren’t you ready for something more?  Aren’t you losing interest in filling in little tiny areas of nonsense doodle designs? Have you had enough of coloring in one repeated pattern a hundred times across a sheet of paper?

You know you can do so much more than just fill-in-the-blank!

Let’s break out of the boundaries, let’s color outside the box, and let’s take on a new challenge … Adult Coloring Portraits.

adult coloring portraits

Our new 149 page PDF E-Book, by Lora S Irish, Adult Coloring Portraits is now ready for download to your computer.  It includes 6 step-by-step projects for creating brilliant, vibrant skin tones; 62 patterns for wood spirits, greenmen, pixies, elves, vampires, feathered shamans, dragons, and a small assortment of fun designs.

Let’s look at a sample portrait from our new E-Book.

We think of skin tones as shades of white, black, brown, red, and yellow … but all skin coloring is simply a shade of orange.  From very pale orange to deep, rich red-black, every human skin color can be created using the same set of colored pencils – a pale yellow-orange, medium golden orange, medium cadmium orange, red-orange, deep rust-orange, and burnt umber orange.

 And we often think of skin shadow colors as shades of deep brown or black.   Yet in colored pencils  using a plain medium or dark brown dulls and dirties the face color.

So let’s start by exploring what other colored pencil shades you may have in your kit that will create those vibrant shadows in your portrait work.

Here are five pages, directly from the E-Book, that show a few of the different shading colors you can used for your face – burnt umber, 70% gray, black cherry red, deep violet, and indigo blue – and how these colors interact with your overall skin color.

Click on the images, below, for a full-sized, 8 1/2″ x 11″, printable copy directly from our new E-Book, Adult Coloring Portraits.

Adult Coloring Portrait Pages

Adult Coloring Portrait Pages

Adult Coloring Portrait Pages

Adult Coloring Portrait Pages

Adult Coloring Portrait Pages

Adult Coloring Portraits Read More »

how to trace your pattern to the wood

How to Trace Your Pattern on to Wood

Preparation – Begin by cleaning, and sanding your wood to create a smooth surface on to which you can transfer your pattern.  Remove all sanding dust using a dusting brush and clean, dry cloth.

Chose Your Tracing Media – There are three primary tracing products which are graphite paper, carbon paper, newspaper, and a soft #4 to #8 artist pencil.

Please share on Facebook and Pintrest!


tracing your pattern to the wood with graphite paperGraphite Paper Graphite paper can be purchased through both office supply and craft stores.  It comes in several colors, including gray, white, and blue for easy tracing onto different colors of wood.  Graphite leaves a very fine line on the wood and can be erased with a white artist eraser after you have completed your project.
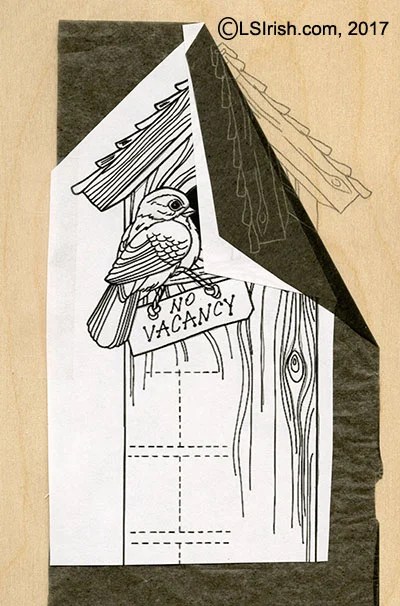
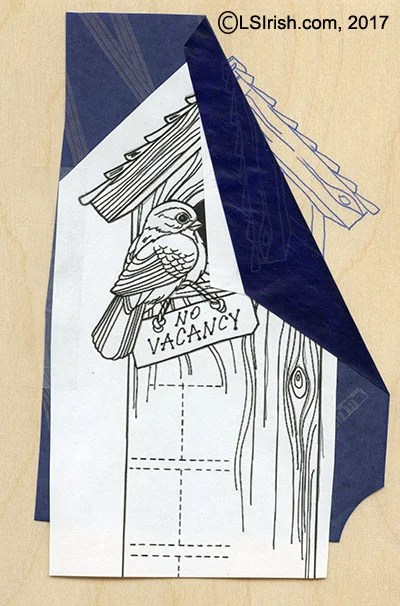


how to trace your pattern to the woodCarbon Paper Carbon paper comes in 8 1/2″ x 11″ sheets and has a very dark, heavy layer of tracing media on the back surface.  It is available in deep blue and black colors.  Carbon paper lines do not erase easily and should be carved or scraped away as your work your project.  Use this media on projects that will receive excessive handling or for long-term projects as it holds up very well.  Because carbon paper was primarily used with typewriter to create multiple copies, you may need to do a little searching to find it.


how to trace your pattern to the wood
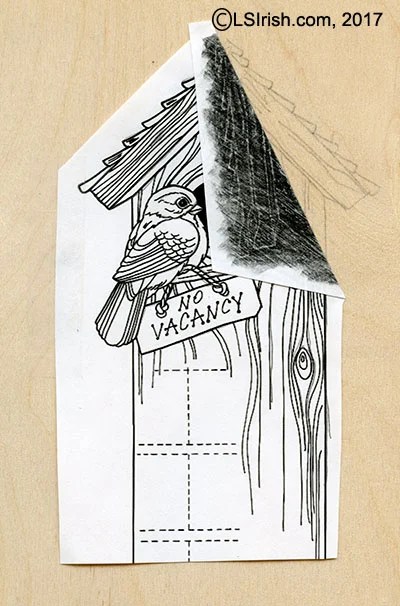
Pencil Rubbing – My favorite way to trace my pattern to the wood is to rub the back of the pattern paper with a #4 to #8 artist pencil. This creates a layer of graphite that will easily transfer to the wood surface as your copy the pattern lines with an ink pen.  Pencil rubbings work extremely well for wood, gourds, and even leather.  Woodless pencils work wonderfully for tracing.


Newspaper – Heavily printed sheets of newspaper works wonderfully as a tracing media.  As you trace along the pattern lines the printer’s ink from the newspaper will leave a dotted line on the wood.  This process is especially good for extra large projects as out door signs or long, wide mantel boards.  The ink is easily erased with a white artist’s eraser.


tracing your pattern to the wood1.  Adjust your digital pattern as necessary to fit your project piece.  Print several copies of your pattern – one for the main tracing, one for cutting and tracing small areas of the pattern, and one for a reference to the detail lines of the design.

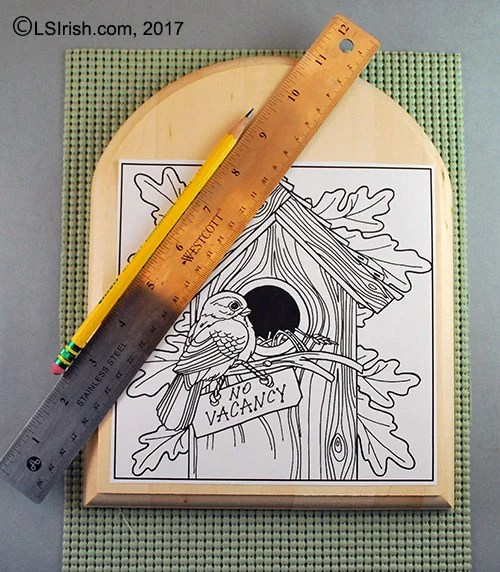
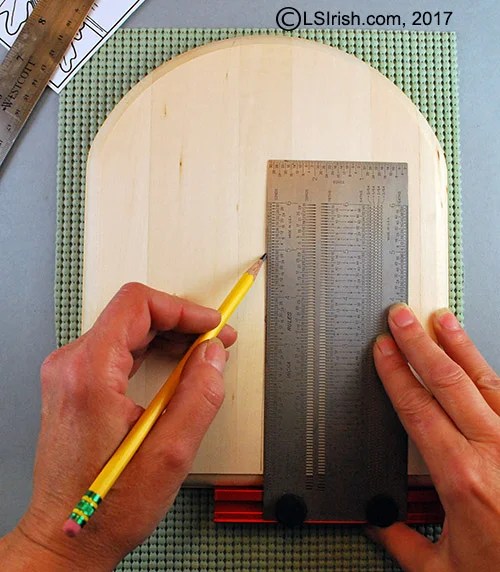
You will need a ruler, a small t-square or right angled triangle, a pencil, painters or masking tape, scissors, and several colors of ink pen.  Of note, my ruler is cork-backed to grip the wood surface and keep the ruler from sliding.


tracing your pattern to the wood2.  With a right angle triangle or small t-square mark the center vertical line of your project’s surface.


tracing your pattern to the wood3.  Use your ruler to find and mark the center point of your vertical line.


tracing your pattern to the wood
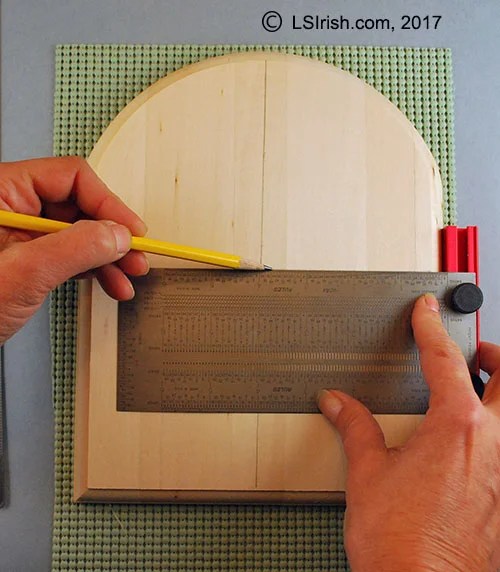
4.  With the t-square or right angle triangle, draw a horizontal line across the project surface at the center point of the vertical line.


tracing your pattern to the wood
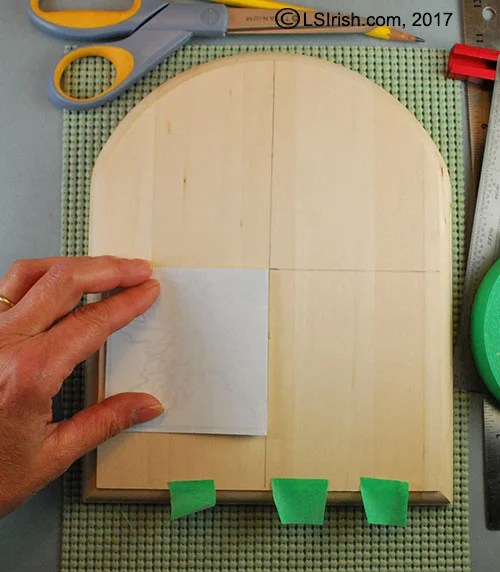
5.  Fold your printed pattern into quarters, matching the outer pattern lines on the sides of the pattern. Place the folded pattern on to the wood, aligning the paper folds to the marked lines on the wood.

If you will using a pencil rubbing for your tracing media, open the folded pattern and rub the back of the pattern to completely cover it with pencil graphite.  Refold your pattern and begin the positioning steps.


tracing your pattern to the wood6.  Unfold your pattern, continuing to match folds in the pattern paper with your guidelines.  Cut several small strips of painters tape.  Use the tape to secure two sides of the pattern paper to the wood surface.


tracing your pattern to the wood
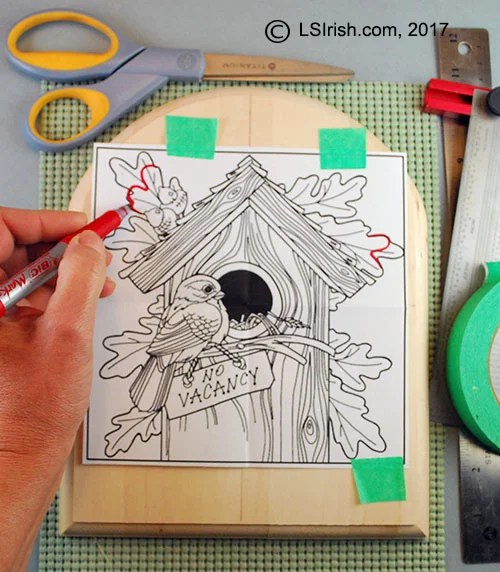
7.  Use a colored ink pen to mark any changes you want to make in the pattern, so that you will follow your changes during the tracing process.


tracing your pattern to the wood
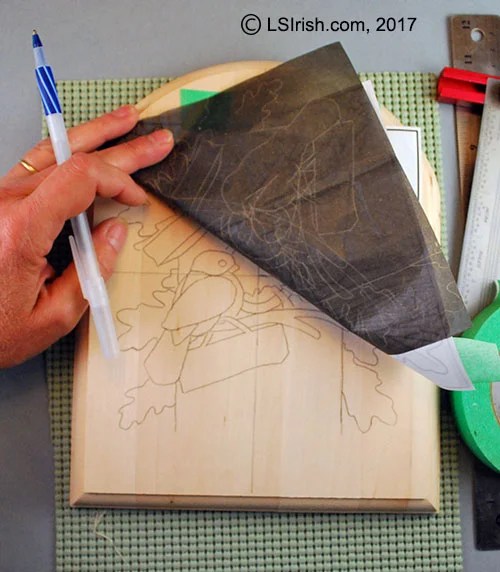
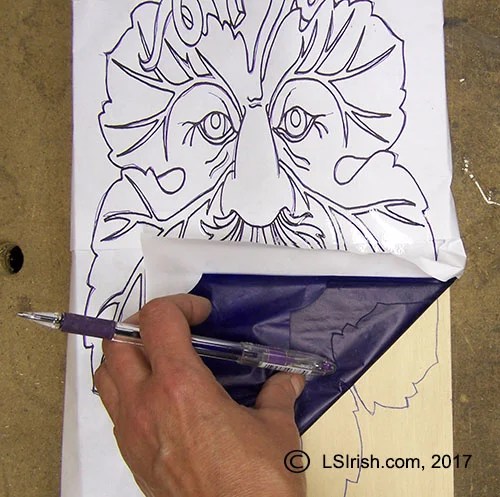
8.  Slide your tracing media – graphite paper, carbon paper, newspaper – under the printed pattern with the tracing surface against the wood.  Trace along the pattern lines with a colored ink pen.  Use a light pressure, just enough to transfer the pattern line without leaving an indented score line from the ink pen’s point.  When your tracing is complete lift the pattern paper at one of the un-taped corners.  Check your work before you remove the pattern paper and tape.


tracing your pattern to the wood
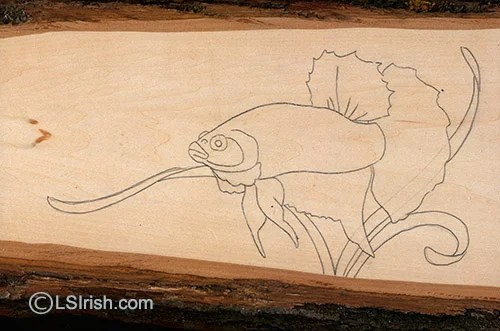
9.  Trace only those lines that you really need for your initial working steps.  For my Beta Fish relief carving I needed only the outlines of each area of the fish and the outlines of the grass to work the rough out carving steps.


tracing your pattern to the wood10.  When your project work is done, remove any remaining tracing lines using a white artist’s eraser.   Avoid colored erasers that can leave dye streaks on your carving or pyrography work.


tracing your pattern to the wood
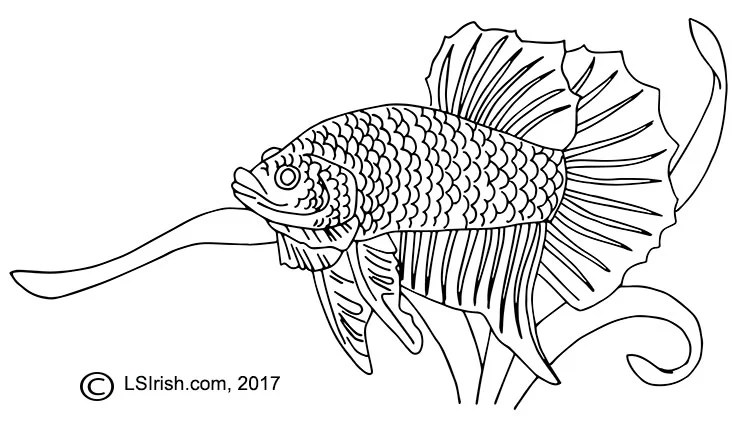
11.  Click on the small image on the right for your free full-sized, printable Beta Fish pattern – a design from Relief Carving Workshop, by Lora Irish.


how to trace your pattern to the wood
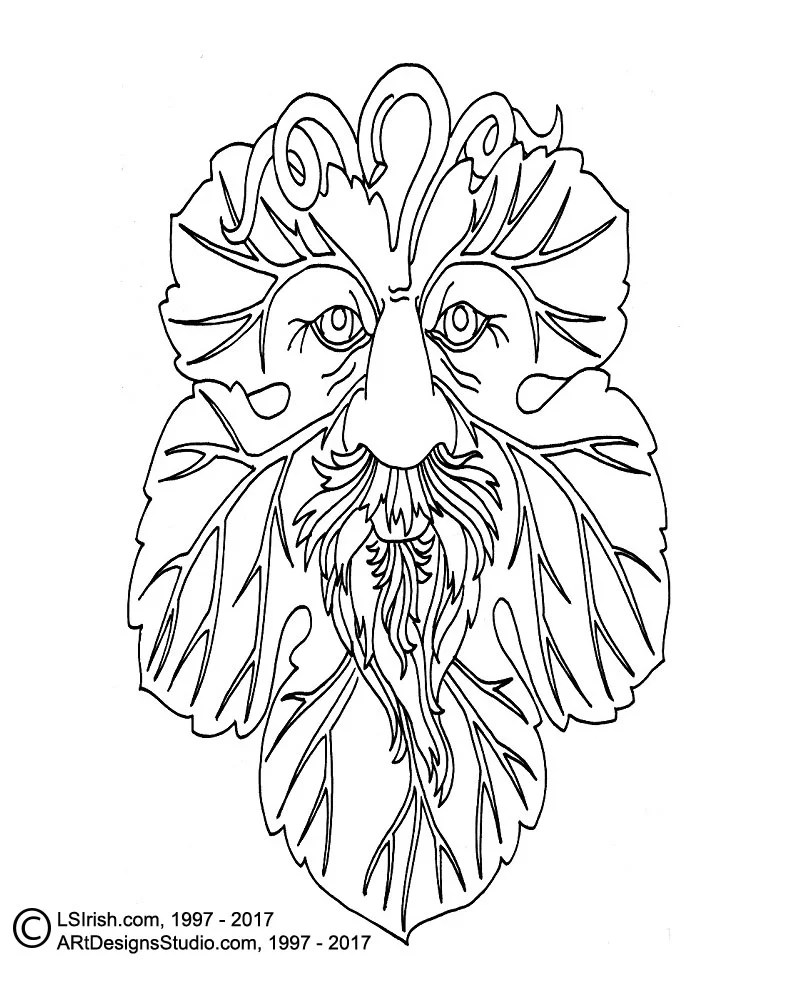
12.  This second example is from the Wood Spirit Carving project posted on the Wood Carving Illustrated Forum.  The pattern was transferred to the wood using typewriter carbon paper because the project would require intense handling.

Relief Carving Wood Spirit Grape Man WIP – Over 250 detailed, close-up photos with step-by-step instructions of relief carving the wood spirit, green man face. This thread has had over 69,000 views!

how to trace your pattern to the wood
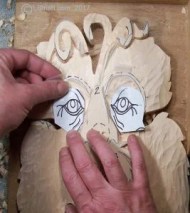
13.  After the levels where established in the carving I cut my paper pattern into small sections that could be easily re-traced to the project.


how to trace your pattern to the wood14.  Click on the small image to the right for a free full-sized printable pattern.


How to Trace Your Pattern on to Wood Read More »

Scroll to Top