December 2016

leather burning by Lora Irish

Leather Burned Jewelry

Leather Burned Jewelry Gallery of Ideas

Leather Burned Jewelry, Day One
Leather Burned Jewelry, Day Two
Leather Burned Jewelry, Day Three

pyrography on leatherRoaring Twenties

SUPPLIES
5” X 3” (14 cm x 7.5 cm) vegetable-tanned leather
2 – 6” lengths of copper chain for necklace
1 – 5” length of copper chain for top hanging chain
1 – 7” length of copper chain for middle hanging chain
1 – 4” length of copper chain for beaded chain
4 – 6 mm round adventurite beads
2 – 6 mm split rings
1 – lobster claw latch
18” – 20-gauge or 18-gauge copper wire

Using your loop-tip, or ball-tip, burn thin, straight lines onto the leather shape.
Begin the lines at the top edge of the leather and pull the lines to the center area of the leather. Work several layers of burned lines, beginning on a medium heat setting and working towards a hot temperature setting.
Use a v-gouge to cut vertical lines in the leather, creating white lines through the burned areas.


wood burning leatherNavajo Nation

SUPPLIES
1 – 5 1/2” x 3 1/2” (14 cm x 9 cm) medium weight, vegetable-tanned leather
1 – 5 1/2” x 4” (14 cm x 10.25 cm) medium weight, dark brown scrap leather
2 – 7 1/2” (19 cm) lengths of copper chain
18” length of 20- or 18-gauge copper wire
2 – 8 mm turquoise glass crow roller beads
2 – 6 mm split rings1 – lobster claw latch

Trace the pattern to your vegetable-dyed leather. Using a loop-tip or ball-tip burning pen, fill in each area with a medium temperature burn. Increase the temperature setting slightly and burn a second layer of strokes to the top half of each area. Increase the temperature again to a hot setting and following the photo burn in the black-toned areas of the design. The round end loop of the turquoise glass bead link is worked through both layers of leather.


wood burning leatherForever Yours

SUPPLIES
1 – 5 1/2” x 3” (14 cm x 7.5 cm) medium weight, vegetable-tanned leather
2 – 10 mm copper jump rings
2 – 6 mm copper split rings
2 – 7” (17.75 mm) lengths of copper chain
1 – lobster claw latch

Trace your pattern to the vegetable-tanned leather. With your pyrography unit set on a medium temperature setting, using a ball-tip or shader-tip pen, begin filling the areas of the pattern outside of the heart design with a medium-light tonal value. Use any fill or texture pattern that you like.
Work a second layer of burning on a slightly hotter temperature setting at the center point of the leather necklace and in the outer half of each side. A third burning at a still slightly hotter setting is worked in the outer one-third of each side of the necklace.


leather burned jewelrySummer Dreams

SUPPLIES
5 1/2” x 3 1/2” (14 cm x 9 cm ) medium weight vegetable-tanned leather
2 – 8 mm square glass beads
2 – 7” ( 18 cm ) long copper chain
2 – 6 mm split rings1 – lobster claw latch
18” – 20-gauge or 18-gauge copper wire

You can add color to your leather burned jewelry by using artist quality colored pencils. Begin this project by tracing your pattern to the cut leather. With your finest line pen, outline the entire pattern to a dark tonal value. Add shading in the petals and leaves using your shader-tip on a medium hot setting. Work the background in a solid dark tone.
When the burning is complete begin adding your color in thin, light layers of pencil work. Use one color over another to create new hues. When the burning is complete begin adding your color in thin, light layers of pencil work. Use one color over another to create new hues. When the coloring is complete give your necklace one to two coats of brush-on acrylic finish.

leather pyrographySteamed

SUPPLIES
5 1/2” x 4” (14 cm x 10.25 cm) medium weight vegetable-tanned leather
2 – 7” ( 18 cm ) long copper chain
2 – 6 mm split rings
1 – lobster claw latch
18” – 20-gauge or 18-gauge copper wire
Assorted leather brads and decorative rivets

With a pencil, create a 1/4” grid on the face of your leather necklace. Fill the grid squares in a checkerboard pattern, varying the tonal values. Fill the right side of the necklace squares with this medium setting tonal value to make the larger block areas. With a low temperature fill the un-worked squares in the central area with a fill texture. Place a small ceramic plate face-down onto your leather and mark a pencil line. With a craft knife cut along the line, on both sides, to open a groove. Add your decorative brads and rivets.

free Lora S Irish pattern

Leather Burned Jewelry Read More »

leather burning by Lora Irish

Leather Burned Jewelry

Step 2 – Creating the Copper Jewelry

Leather Burned Jewelry, Day One
Leather Burned Jewelry, Day Two
Leather Burned Jewelry, Day Three

wire-bent copper jewelry


Wire-bent and wire-wrapped jewelry is an art that is currently in high favor among crafters. Jewelry supplies are readily available at most large box craft stores and through online shopping.

For my leather burnt necklaces I chose copper wire and findings, but there is a wide variety of wire types that you can use as silver, silver-coated, black, and colored aluminum. Personally, I prefer copper as it is a soft, easy to bend metal that can be tempered through gently hammering into strong, secure links and chains.

Glass beads and lamp work beads are also a favorite for me in jewelry work, but you will find a wonderful selection of gemstones, cut crystal beads, resin beads, and even bone or shell beads that you can use.


Completing your necklace

1 Cut an 8” length of 18-gauge copper wire with your flush cutters.

leather burned necklace
2 Grip the wire about 3” from one end in your straight pliers. Bend the wire to a 90 degree angle. Move the wire to your round-nose pliers, gripping the wire at the 90 degree angle. Roll the 3” end around the round-nose pliers to create a small loop.

leather burned necklace
3 Slide the short end of the wire through one of the holes in your leather burnt necklace. Move the wire to center the leather inside of the small loop.

leather burned necklace

Secure the loop

4 Grip the top of the loop, where it overlaps the long working end of the wire in your straight pliers. Roll the short end of the wire around the long working wire two to three times.

pyrography leather jewelry
5 Clip the excess short wire with your flush cutters.

pyrography leather jewelry
6 With your straight pliers crimp the cut end tightly against the long working wire.

pyrography leather jewelry
Adding beads

7 Slide your chosen beads onto the long working wire. In my necklace I used one 2-mm copper bead, one 16-mm square yellow jade bead, and one 2-mm copper bead.

how to make beaded copper jewelry
8 Grip the working wire in your straight pliers, with the tip of the pliers against the last bead. Bend the working wire into a 90 degree angle.

how to make beaded copper jewelry
9 Place the 90 degree angle into your round-nose pliers and roll the working wire into a small loop.

how to make beaded copper jewelry

Adding the chain

10 The second small loop should be created by holding the wire in the same spot or area of the round-nose pliers as you did the first loop. This keeps the two end loops of the bead dangle the same size.

11 Cut two sections of 2- to 3-mm copper chain 7” long each. Slide the last open link of the chain onto the short end of the loop wire. Move the chain link to the center of the loop.

how to make copper jewelry
12 Complete your wire wrapped bead dangles by gripping the small loop in your straight pliers and wrapping the short end wire around the base of the loop two to three times.

how to make copper jewelry

Shaping the leather

17 Your leather burned necklace can easily be shaped by simply placing your finished necklace under your kitchen faucet for a few moments, allowing the leather to become wet. Pat the leather necklace dry on a clean cloth. While the necklace is still damp and pliable, lay the necklace on a large, plastic soda glass and with loose (oversized) rubber bands lightly secure into place. Let the necklace dry overnight.

shaping leather jewelry

Completed necklace

wood burned leather jewelryIn the next post I will be sharing five more ideas for this leather burned necklace project, with the free patterns.  But here is a preview …

leather burned jewelry by Lora Irish

Leather Burned Jewelry Read More »

leather burning by Lora Irish

Leather Burned Jewelry

Art of Leather Burned Jewelry

Leather Burned Jewelry, Day One
Leather Burned Jewelry, Day Two
Leather Burned Jewelry, Day Three

I love combining my crafts and hobbies, and in this project we will be working on a quick, fun design that uses leather working, jewelry making, and, of course, pyrography.  Today we will get together the supplies, cut out our leather necklace shape, and do the pyrography steps.

In the next post you will find the steps for creating the copper, wire-bent jewelry.  Then on day three of this mini-project I will show you how to create 10 quick necklaces out of one pyrography burning that is perfect if you are a craft seller or need a group of Holiday presents this years.

So … let’s get started!

leather burning and pyrography by Lora IrishQuilted Jade Necklace Supplies:
5 1/2” x 3 1/2” (14 cm x 9 cm ) medium weight vegetable-tanned leather
bench knife or craft knife
leather hole punch
cotton swab applicators
gum tragacanth edge finish
wooden edge slicker
#4 – #8 soft pencil for tracing
pyrography pen tips – ball, loop, or micro writing tip
white artist eraser
2 – 16 mm square yellow jade beads
1 – 5 mm x 8 mm yellow jade rectangle bead
6 – 3 mm antique copper round beads
2 – 4 mm copper rosettes
2 – 7” ( 18 cm ) long copper chain
2 – 6 mm split rings
1 – lobster claw latch
18” – 20-gauge or 18-gauge copper wire
satin brush-on leather finish

Tracing the pattern

1 Make a printed copy of the pattern for the Quilted Jade Necklace. Cut the pattern out using scissors.
Lay the paper pattern on the raw-hide side of the leather scrap. Using a soft, #4 – #8 pencil, trace around the outside edge of the paper pattern.

leather burning by Lora Irish

Working the leather

2 Place the leather on a cutting mat with the raw-hide side up. Using a craft knife or bench knife, cut the necklace free from the scrap leather. Save the extra scraps from the cut leather block for smaller bracelet shapes and earrings.

leather pyrography by Lora Irish

3 With a white artist eraser, remove any remaining pencil guidelines from the raw-hide side of the leather necklace.

leather pyrography by Lora Irish

Creating the grid lines

4 Using the cutting mat ruler marks as your guidelines, create a diagonal 1” square grid on the tanned side of the leather with a soft, #4 – #8 pencil.

leather working and pyrography

5 – 6 With a leather hole punch, cut a 3/16” or 1/4” hole in each side of the necklace to receive the jewelry chain and beads. Create one hole at the center point of the bottom edge of the leather necklace to receive a bead dangle.

leather jewelry DYI

leather jewelry DYI

Finishing the raw edges

7 With a cotton or wool swab applicator, apply one coat of gum tragacanth along one edge of the leather necklace.

pyrography on leather
8 Briskly rub the damp edge with a wooden edge slicker. The handle of a large wooden spoon works well in place of a slicker. The gum tragacanth and slicker will polish and round the raw cut edge of your necklace.

pyrography on leather

Burning the fill textures

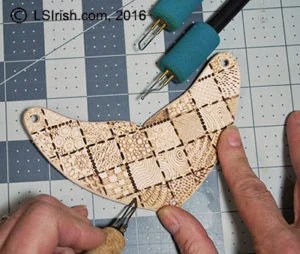
9 The pyrography burning for this project is worked as a texture and fill practice board, where each 1” square is filled with a different, small pattern. Have fun creating your own fill patterns or refer to the Fill Pattern Chart with our Mushroom Doodle Pyrography Project.

pyrography zen doodles
10 As you work each 1” square, vary the temperature setting of your pyrography pen to create some squares with pale tonal values, some with medium values, and some with dark toned values.

pyrography zen doodles

Adding borders

11 With a ball-tip or loop-tip pen, on a hot temperature setting, work along some of the pencil grid lines with a series of evenly spaced, small dots. With the straight edge of a shading pen tip, work the remaining grid lines with evenly spaced, short dash lines.

wood burning on leather
Shading the lower edge

12 You can add a little touch of shading along the bottom edge of your leather necklace using a shader-tip and a medium temperature setting. Work this layer of shading right over the fill and texture patterns that you have already burned. Rub a white artist’s eraser over your burned surface to remove any dirt, oil, or remaining pencil lines from the leather. Dust with a dry cloth.

leather burning by Lora Irish

Pyrography close-up

wood burned leather jewelryClick on the leather cutting patterns below for a full-sized pattern.

leather cutting pattern for jewelryHere are two more ideas for your leather burned jewelry necklace, worked with patterns from our Henna Tattoo Pattern Pack.

leather burned necklace


And, this one!

leather burned necklace
In the next post I will be showing you how to add your jewelry chain, bead dangles, and copper findings.  So, check back soon!

Leather Burned Jewelry Read More »

Marking Pen Quilts

Marking Pen Quilts

I have a great email question hit my inbox this morning and thought I would share my answer here.

“What brand of assorted color selection of permanent marking pens & fine point black permanent marking pens did you use.  I need pens that do not bleed on quilting cotton, specifically a black pen.  I am want to do a Dalmatian Puppy Quilt and need to permanently colour the black spots on to a white quilting cotton.”

Memory Quilt Project

A Memory Quilt is a fantastic way to record special events, special dates, and special loves that are important to you. They are easy, and quick to create using permanent marking pens!

Memory Quilts can become a project for your entire family or friends by holding a Quilting Party.  Make up the large white squares with the pattern and doodle fills completed.   Then put the squares out of your table with a pack of assorted fine point pens so that everyone can add their own drawings, signatures, or little sayings.  After the event, simply finish the quilt, memorializing the event.

marking pen quilt

My Memory Quilt came about because my son ask me what the name of one of our past cats was … “the one that was marmalade colored with three white paws?”  That started the ‘how many pets have we had in our 42 years of marriage’ naming contest that evening.  The list became so long that I finally had to write the names down so that we didn’t miss any of our beloved friends and didn’t start repeating names.

(While you may know me as a pyrographer and wood carver, my neighbors know me as ‘that cat lady!’   But I plead not guilty as a cat hoarder as all of our friends through all of our marriage have been spayed, neutered, and had their regular vetting and pet vaccinations!  Besides, the biggest pride I ever had at one time was 21, as we somehow ended up with three stray Mommas that wandered onto the back porch, which, of course, came pregnant!!!  And THAT wasn’t my fault.)

So, in answer to the email question, I personally use Sharpies!  They come in both fine point and wide point with a nice variety of colors.  The pens are very reasonably priced and available just about everywhere.

This marking pen quilt is a new creation for the Great Book of Floral Patterns that is in the process of being revised – and which sadly appears to be currently out of print from the publisher.

The quilt is worked on 12 1/2″ white cotton squares.  I printed my patterns, from our Wood Flowers Circle pattern pack, onto regular computer paper.

marking pen quilt

Next, I taped the printed pattern to my light box and over the pattern positioned my quilt square.  The quilt square was also taped to my light box using blue or green painter’s tape, which does not damage the seam allowance of the fabric.  When I turned on my light box, the pattern was extremely clear and visible through the fabric so that I could easily trace the outlines of the pattern with a fine point black Sharpie.

And … as I just wanted this quilt to a fun project I used some of my pyrography fill and texture patterns to fill in each area of my design with the same marking pen.  See our project, Pyrography Doodles, for fill ideas or you may want our Pyrography Doodles pattern package that has over 300 texture and fill patterns, plus 29 pattern designs.

If your white cotton fabric is thin or heavily starched you may have some slight bleeding.  Generally, that bleeding is some minimal that it is not really noticeable once the entire quilt is finished.

When I had all of the large quilt squares completed, I set the marking pen with a hot steam iron.  Next, I used my assorted color pack of fine point Sharpies to write the names of all of our furry friends over the years onto the blank areas of each square.  Since I know that we will have new friends join our family in the coming years, I have plenty of space to add their names too!

Next, I cut 2 1/2″ squares from a series of black and white fabric to become my small quilt squares.  Right now my quilt is waiting for the batting, backing, and free motion quilt stitching.

marking pen quilts

T-shirts are wonderful for marking pens too!  This is an extra-large, 100% cotton t-shirt that has been colored using fine point Sharpies.  The pattern comes from our Celtic Dragons pattern pack.

Marking Pen Quilts Read More »

Scroll to Top