October 2015

Free Pyrography Wood Burning Project by Lora Irish

Walnut Hollow Woodburner Detailer – 6

Let’s finish up the step by step instructions for this Henna Moon Pyrography Project and the test drive review of Walnut Hollow’s Woodburner Detailer.

Please click on any image in this post for a full-sized photo.

Henna Tattoo Pyrography Project
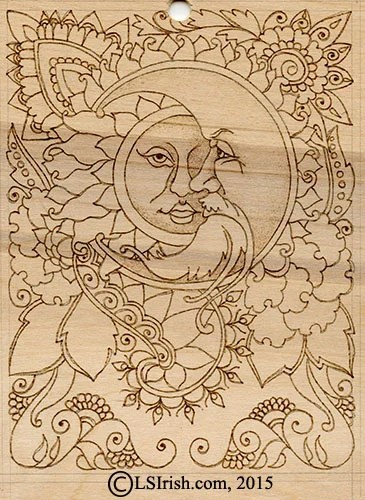
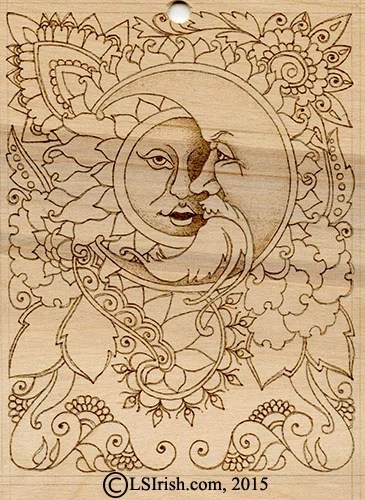
Finishing the Main Design
Step 14:  I have complete the detailing by working the bottom floral scrolls.

If you are just coming into this project, please see the previous post pages for the free pyrography pattern, the free guide pattern, and the early steps to this Henna Moon Pyrography design.

Henna Moon Pyrography Project
Walnut Hollow Woodburner Detailer – Introduction
Walnut Hollow Woodburner Detailer 2 – History of Henna Tattoos
Walnut Hollow Woodburner Detailer 3 – Tracing the Pattern
Walnut Hollow Woodburner Detailer 4 – Outlining the Design
Walnut Hollow Woodburner Detailer 5 – Detailing the Moon and Sun

Guidelines for the Border Pattern
Step 15:  Border and trim patterns for Henna Tattoo designs can be either organic or geometric.  I chose a small triangle pattern with an arched bottom line for my plaque.

Using a pencil and ruler mark a line 1/4″ from the outer edge of the plaque. This area will become the outer, un-burned margin along the plaques edge.  Measure and mark a second line 1/2″ from the first margin line.  This will be the burned border area.  Measure and mark this area into 1/4″ segments.

In the first border segment pencil a line from the upper right corner to the lower left corner, cutting the segment along the diagonal.  In the next segment make the diagonal line from the upper left corner to the lower right corner.  This creates two of the three sides of your first triangle shape.  Continue working across the border area until all of the triangle shapes are established.

Lay a small coin or bottle cap at the inner base of your triangle shape.  Adjust the coin until it touches both legs of the triangle, then trace along the coin with your pencil.  This creates quick, easy, and accurate arcs.  Pencil mark a small circle on the inner border guideline, centered in the arc.

Henna Tattoo Pyrography ProjectHenna Tattoo Pyrography Project


Henna Tattoo Pyrography ProjectBurning the Border
Step 16:  I worked the upper triangle shapes with a lattice-work pattern.  Begin by burning a fine line about 1/16″ from one side of the penciled guideline.  Stop the line 1/16″ from the guideline at the bottom intersection point of the triangles.  Repeat until you have worked four thin lines in the inner triangle.

Next, repeat the above step working from the opposite side of the inner triangle.  This creates a crossed-line lattice. Use a touch-and-lift dot stroke at the intersection of each line in your lattice-work.

The outer or lower triangle has been shaded from a medium to pale tonal value, starting at the outer point of the triangle using a tightly packed scrubbie stroke.  Outline the three sides of the triangle.

Using a touch-and-lift dot pattern make a medium-sized dot at the intersection of each triangle along the inner edge.  Burn the circle that lies on the guideline to a medium tonal value.  Touch-and-lift a small dot evenly spaced between these two dots.

Close-up of the Border Work
Step 17: Here are the close-up photos for the border pencil lines and the burned triangle border work.

Henna Tattoo Pyrography ProjectHenna Tattoo Pyrography Project

Finishing Step
Step 18:  Using a white artist eraser, work the eraser across the entire surface of your finished burning to remove any remaining tracing lines, pencil guides, and the normal dirt and oil accumulation that occurs during the burning process.  A white eraser contains no dye that can permanently mark and mar your pyrography.  Remove the eraser dust using a soft, clean cloth.

Pyrography can and does raise small wood fibers from the surface of your plaque as you work.  Using a crumbled paper bag lightly sand over your plaque to remove these little fibers.

Sign and date your work.  As a habit I sign my projects of the back of the plaque.  Your work is ready for the finishing spray, sealer, or oil finish of your choice.

Walnut Hollow Woodburner Detailer Review

I started this project to answer the question “Why would I want a Walnut Hollow Detailer that has less power, reaches a lower temperature, and that is not temperature adjustable when I already have a Versa-Tool and several higher-end burning units?”

Many of us discovered pyrography when the only electric burning tool was a soldering iron.  That one temperature tool had a permanently installed wedge shaped pen tip and when plugged into the wall socket reached a very high temperature just below 1000 degrees.  The only control we had over our tonal values and burn lines was determined by how lightly we touched the tip to the wood, and how long we allowed the tip to stay in contact with the wood.  For very pale tonal values you had to unplug the soldering iron, let it totally cool down, then you plugged it back into the electric strip and did your pale tones before the tip reached full temperature.  Scorching and halos were simply part of any burn.

The Versa-Tool is a fantastic wood burner which I highly recommend.  The inline rheostat allows you to control the temperature of your tool tip and gives you so much more control over your tonal values.  It is a perfect entry-level wood burner at an extremely reasonable price that you will use throughout your pyrography hobby.

But, yes there is a but, the Versa-Tool is temperature set for multiple hobbies which include soldering, stencil cutting, hot-knife cutting. Because it is a cross-craft tool it has a high temperature range, near the 1000 degree mark, and you can experience both scorching and haloing even with careful attention to the rheostat setting.

My high-end burners – RazorTip, Colwood, and Optima – are also cross-craft temperature set with even a hotter capacity than the Versa-Tool.  This type of burner uses a great deal of electric power, and I have watched as my high-end units tend to drop in temperature when the air conditioner or electric heat kicks on.  My Optima has such a high range that I don’t think I have ever had mine set above a ‘6’ on a ’10’ dial.  All of the above cross-craft styled tools can need a recovery time after you burn a long line or work to fill an area with a texture pattern.

When Walnut Hollow created the Detailer they had only one craftsman in mind – the pyrographer!  This tool was made for us, and us alone!  That 750 degree permanent temperature setting is just high enough to create clean, crisp black tones without scorching our wood, gourds, leather, or paper burnings.

It quickly hits its set temperature and holds that temperature throughout long burning sessions. Because of the lower temperature setting, I never had to pause to let the ball tip recover from a long line stroke or from fill stroke work.  In fact, I never noticed any variation in the tip heat or in the tonal value of a burned line throughout this 6 hour pyro session.

Since Walnut Hollow really thought ahead, all of the interchangeable tips that you have for your Versa-Tool or even an older Walnut Hollow one-temperature soldering iron tool will fit and work wonderfully with your Detailer.  So they are giving us the full range of burning pen tips that we love and use all the time.

“So why would I want a Walnut Hollow Detailer that has less power, reaches a lower temperature, and that is not temperature adjustable when I already have a Versa-Tool and several higher-end burning units?” Because it lives up to its advertising – “A perfect temperature for precision and detail” pyrography burnings.

Treat yourself today to a tool made to fit anyone’s budget and created with you, the pyrographer, in mind by visiting  WalnutHollow.com.  Oh, and while you are there get yourself a Versa-Tool! The Walnut Hollow Detailer and Versa-Tool are so reasonably price you can easily afford both.

Thanks for joining me in this Henna Moon Pyrography Project.

Disclaimer:  I am not associated nor work for Walnut Hollow and have received no financial compensation for this review.  All opinion expressed here are mine and based on my experience using this tool.

Walnut Hollow Woodburner Detailer – 6 Read More »

Henna Moon Pyrography Project by Lora Irish

Walnut Hollow Woodburner Detailer – 5

We are continuing the step by step instructions for this Henna Moon Pyrography Project and the test drive review of Walnut Hollow’s Woodburner Detailer.

Please click on any image in this post for a full-sized photo.

Henna Moon Pyrography Project
Walnut Hollow Woodburner Detailer – Introduction
Walnut Hollow Woodburner Detailer 2 – History of Henna Tattoos
Walnut Hollow Woodburner Detailer 3 – Tracing the Pattern
Walnut Hollow Woodburner Detailer 4 – Outlining the Design

Our tracing pattern is the line art for just the outlines of each element in this Henna Moon design.  During these steps we will work to fill each element and areas inside each element with Henna-styled details and patterns.  You can re-burn the same line art outline time and time again, and create new projects by changing which pattern elements you fill with shading and which fill patterns or textures you use in each element.

Simple pyrography shadingSimple Shading in the Henna Flowers

Step 9: Henna tattoos often feature stylized flowers, detailed leaves, and repeat patterns of circles, arcs, or triangles.  After the outline for each element is complete that element – flower, leaf, scroll – is detailed with small repeat patterns as spiral curls, wavy lines, lattice lines, and stems with bud dots.

I began the inner detailing of my henna tattoo elements by working the four large flowers that surround the Sun and Moon faces.  Using a light pressure touch with the pen tip of my Walnut Hollow Detailer and a tightly packed scrubbie stroke I created a pale tonal value shading in the flower petals.  That shading is placed at the bottom of each petal where it tucks under another petal.  The outer edge area of each petal was left unshaded – unburned.  This gives a white area to the upper petal and a dark area to the lower petal.

Note:  Even when using simple shading I still want some areas left un-burned to become my white tonal value, some pale sepia tones, some medium tones, and some dark tonal values.  In Henna Tattoos that pale and medium tones come from light pressure, fine line strokes.  Deep mid-tones and blacks come from touch-and-lift dot stokes.  The blackest tones are tightly packed touch-and-lift dots.


Henna Tattoos for PyrographyLine Detailing in the Sun Rays

Step 10: The outer ring of sun rays was worked in a simple long wavy line that followed the outline shape of one side of the ray.  The sun rays that lie behind the upper curve of the moon are accented with small dots, worked along a diagonal line.  This is just a touch-and-lift stroke with the ball tip of the Detailer.

Note:  You can use just about any geometric pattern, line pattern, or texture fill stroke to create the detailing inside of your flowers, leaves, and scrolls in Henna Tattoos.   So for each flower chose or create a new fill pattern, and use that pattern for each of the petals in the fill.  Leaves, paisley-shapes, and scrolls can be either pattern filled or area where you wood burn a small flower and leaf motif.


Henna Tattoos for PyrographyDetailing the Sun Circles

Step 11:  A stem-and-bud dot pattern was used in the inner row of Sun rays and a triangular pattern fills the circle that encompasses the Sun face.

Note: As I worked the Sun rays from the outside towards the inner ring near the face I packed my strokes tighter.  I have not changed my temperature setting or how much pressure I am using on the pen.  Adding more lines into an area darkens the tonal value appearance of that area. 


Henna Tattoos for PyrographyCreating the Leaf Details

Step 12:  The leaves of a Henna Tattoo are just as decorative as the flower petals or scrolls.  One set of leaves uses a line stroke with a circular spot in the center.  Another group of leaves has an inner outline with the outer border worked in parallel lines and the inner area in a small flower pattern.


Working the Lower Scroll Element

Step 13:  I have added the shading and detailing to the lower scroll element by using a leaf and scallop design inside of the scroll.

Detailer Review:  At this point in the burning I have worked for about three hours.  The Detailer, throughout this entire time, has never skipped a beat.  It has held a consist, constant, even temperature with each and every stroke.  As you look at the close-up, below, you can see I still have no hot spots where one line intersects or turns and angle, I have no scorch marks, and my line work is the exact same tonal value throughout the stroke’s pull.

c-up 002


I will be posting the final steps to this project tomorrow, Friday, Oct. 30th.  We will work the bottom accent elements, then create the pencil guidelines and burn the border trim.  Plus tomorrow I will give you my final decision on how the Walnut Hollow Woodburner Detailer has preformed … but, I expect you already know I am totally delighted with its performance throughout this project.

PS – At this point, three hours in, I still have no carbon build-up on the ball tip of the Detailer and not one gray-black carbon smudge because of a dirty tip … big grin!!!!

Walnut Hollow Woodburner Detailer – 5 Read More »

Henna Tattoo Moon Face Pyrography Project

Walnut Hollow Woodburner Detailer – 4

Walnut Hollow Woodburner DetailerWe are taking the Walnut Hollow Woodburner Detailer out for a test drive to discover it capabilities, advantages, and disadvantages for use in our wood burnings. Why would I buy another wood burning unit when I already have a high-end burning unit or the Walnut Hollow’s Versa-Tool?

Please click on any of the images and photos for a full-sized close-up.

The Versa-Tool uses 120 volts, 25 watts, and reaches 950 degrees F.  It has an in-line variable rheostat that allows you to set your temperature range from very pale tonal value settings to very black burns.  It comes with a five interchangeable burning tips, hot-knife tip, soldering tip, soldering wire, and three hot-stamp points – at a retail cost in the US of $29.99.

The Woodburner Detailer is a  one-temperature tool with a setting of 120 volt, 16.5 watt, 750 degrees F (398.89C) unit, and has an on/off inline switch.  It comes with just one small ball tip.  The Detailer sells for $14.99.  For this unit you can purchase extra tip profiles either individually for in prepackages sets of five.

Let’s find out why I would want a burner that has less power, less temperature variability, less tips, even if it is a half the price of the Versa-Tool.  As I work through the burning steps for this Henna Tattoo Moon Face pattern I will be commenting on how well I think the Detailer is preforming.  Please remember, this is just my opinion.


Henna Moon Pyrography Project
Walnut Hollow Woodburner Detailer – Introduction
Walnut Hollow Woodburner Detailer 2 – History of Henna Tattoos
Walnut Hollow Woodburner Detailer 3 – Tracing the Pattern

Walnut Hollow Woodburner Detailer

Walnut Hollow Woodburner DetailerStep 1:  The Detailer has the classic Walnut Hollow handle style that is 4 3/4″ long and 3/4″ wide at the top – a little thicker than a kindergarden writing pencil.  Top area of the handle is tightly ribbed to give you a strong, non-slip grip.  Above the grip the handle flares to protect your fingers from the heat of the tool tip and to prevent your hand from slipping onto the hot brass tip tube.  The on/off line switch is about 18″ from the base of the tool – long enough that the switch does not interfere with the pen’s movement, but close enough for easy reach.

Basic Hand Position in Wood Burning

Hand position in wood burningStep 2:  Your hand position in wood burning is extremely important.  As with all soldering-styled burners, the Detailer places your hand slightly farther away from the burning surface than high-end burning pens.  From the handle flare to the pen tip is about 2 1/2″, where the distance on my Optima pen from my finger grip to the pen tip is about 1 1/4″ to 1 1/2″.

With both pen styles – the Optima and the Walnut Hollow – I use a light pressure writing grip resting the pen between the first two fingers of my hand on one side of the pen and my thumb on the opposite side.

Because I want as much free-motion to my hand movements as possible I do not rest or support my hand directly on the wood surface.  The side or base of my palm never touches the wood.  Instead I extend my small finger until it touches the wood and use that finger’s tip as an anchor or balance point. I have exaggerated the hand position in this photo so that you can see how the small finger is the only part of my hand that comes into contact with the burning surface.

Hand position in wood burningStep 3:  In this photo I am showing my normal hand position.  You can see the two finger/thumb grip and in the shadowed area, right behind that grip you can see the tip of my small finger against the wood.

The only part of my hand or arm that is holding the pen that touches anything is that small finger.  This position and grip gives me a full range of motion as I pull the burn stroke.  Please note that I do not grip my pens as tightly as shown in this photo … that tight grip comes from holding my hand still while waiting for the camera to take the photo.  A better image of grip pressure is shown in the photo below.


detailer-5Step 4:  That extended small finger also lets me adjust the pen tip to use any part of the pen tip – from a very high off the wood position using just the point to a very low angle to the wood that allows the side of the pen tip to burn the stroke.


Outlining a Pyrography PatternOutlining a Pyrography Pattern

Step 5:  Plug your Walnut Hollow Woodburner Detailer into a surge protector electric strip for general safety.  Allow the pen tip to heat for several minutes to reach its full temperature setting.

Note:  In any burning session around the studio I have a practice board on my table as well as the project board.  A practice board is just a piece of scrap wood that is the same wood species as my project.  I can use that board to practice strokes, experiment with textures, and in this project check the burner to see if it is at full temperature.


Outlining a pyrography patternWith a light pressure grip, using the small finger as your anchor point, begin outlining your traced pattern lines.  As you pull these initial lines you want a slow, even motion to create smooth curved lines.  Remember a smooth, even burned stroke is more import than exactly following the pattern lines.  Those pattern lines will be erased at the end of the project.

Detailer Performance: With this very first step in the burning I knew I loved the Walnut Hollow Detailer!  Look closely at the moon and sun face photo.  The outlines are all of the same thickness, and all of the same tonal depth.  There are no thin, week areas in the outline and no hot spots were I paused to turn the pen tip in the curve or at an intersection line.  And not one scorched or haloed burn that can happen with a very hot tipped pen.  That outlining looks as if it could have been printed right onto the wood.   With my first go at using the Walnut Hollow Detailer I achieved what I would consider my best outlining step ever !!! I love it !!!

If this burner does nothing more than allow me to create perfect outlines every time, it has already earn its right to be on my photography table.

Simple Face Shading in PyrographySimple Face Shading in Pyrography

Step 6:  With the outlining complete, lets see how the Detailer preforms as a shading tool.

With a very light pressure on the pen tip, I have worked a tightly packed scrubbie stroke into the two faces – my moon and sun.  The shading for both falls of your right hand side of the element.  Because the sun sits behind the moon, her face shading will become the darkest tonal value in this burn.


Simple Face Shading in PyrographyStep 7: More shading has been added to the two faces by working a second light-pressure scrubbie stroke over the shadow areas.  A third layer was worked on the sun face in the right side eye area and the right side of the mouth to gradually dark her face and push it behind his un-burned nose and mustache.

The eye pupils, and the inside of her open mouth was burned to a dark tonal value using a simple touch-and-lift dot pattern.  By allowing the pen tip to rest for a moment on the wood the dot burns to an even black spot.


Simple face shading in PyrographyStep 8:  Here’s a close-up photo of the face shading.

Detailer Review:  Creating pale tonal values with the Detailer is done by simply adjusting the pressure on your pen tip!  A light, even moving touch creates smooth pale tonal values.  Adding layers of light-pressure strokes quickly brings the tonal values into the mid-range.  There is no waiting for the pen tip to cool as I would with my high-end burners. 

So at this point the Walnut Hollow Woodburner Detailer is creating perfectly even, smooth outlines, and a nice range of tonal values.  There is one more note here, which sadly I did not think to capture in a photo.  Even though I have been burning for about an hour at this point in the work and have created an area of dark and very dark tonal values there is no carbon build-up on the pen tip.  The tip is as bright and clean as when I began burning.

In the next posting we will be working the Henna Tattoo flowers and scrolls and adding to the facial shading.

While I work on the next posting, here are a few links you might enjoy:

Contrasting Tonal Values – How to use black and white to create drama in your burnings.

Mushroom Pyrography Doodles – Using textures, fill strokes, and patterns to create your shading.

Tonal Value Worksheet – Create a sepia tonal value scale using your wood burner.

Walnut Hollow Woodburner Detailer – 4 Read More »

Henna Tattoo Pyrography Project by Lora Irish

Walnut Hollow Woodburner Detailer – 3

Henna Tattoo Moon Face PlaqueThe question that we are going to explore over the next few days as we work through two step-by-step pyrography projects using the Walnut Hollow Woodburner Detailer – the Henna Moon Plaque, and the Henna Moon Leather Journal.  This post will take you through the steps for preparing your wood plaque, and tracing your pattern.  We will look at basic hand positions used in pyrography, and outlining the pattern in the next post.

Henna Moon Pyrography Project
Walnut Hollow Woodburner Detailer – Introduction
Walnut Hollow Woodburner Detailer 2 – History of Henna Tattoos


Henna Moon Pyrography Pattern

Click on each pattern for a full-sized printable image.

henna moon pyrography patternhennamoon pattern2
Henna Moon Tracing PatternHenna Moon Working Pattern


Walnut Hollow Wood Burning ToolHenna Moon Plaque Supply List:

Walnut Hollow Woodburner Detailer
8″ x 10″ Birch Plywood Plaque
Soft #4B to 7B pencil
White artist’s eraser and a Document Cleaning Pad
220-grit sandpaper
Brown kraft paper – an old grocery store paper bag
Painter’s tape or masking tape
Ruler


free pyrography patternPreparing the Wood Plaque

Step 1:  Lightly sand the working surface of your birch plywood with 220-grit sandpaper, working the sanding strokes with the grain lines of the wood.  Remove the sanding dust using a soft, clean cloth.

Step 2:  Tear a large section of brown kraft paper from a paper bag.  Crumble the paper in your hand into a loose ball.  Use the crumbled paper to lightly sand the working surface of your board.  Remove the sanding dust using a soft, clean cloth.

Note 1:  While sandpaper does remove loose fibers and reduce uneven areas in our wood plaques, it also leaves very fine scratches in the surface of the wood. By working your sandpaper in the direction of the wood grain you hide those fine scratch between the wood grain lines where they will not show after the area has been burned, stained, or colored. 

Note 2: Paper is abrasive.  In wood carving I use newspaper as the final sharpening surface for my bench knife and carving tools.  Brown kraft paper is a wonderful sanding media to remove any scratches left from the 220-grit paper and to give your wood surface a light burnished finish.  As a wood carver and pyrographer I hoard all brown paper bags that come into the house.

tracing a pyrography patternPreparing the Pattern Paper

Step 3:  Click on the Henna Moon pattern and save a copy to your desktop.  You can resize this image to exactly fit your plaque by using an image editing or photo editing program.  Print a copy of the pattern using your computer’s printer.  The pattern image that is shown here is sized to fit an 8″ x 10″ birch plaque and allows room for a border pattern.

Step 4:  Fold the pattern paper into quarters – once along the horizon line and once vertically. Creasing along the fold lines.  The intersection of the fold lines marks the center of your pattern for easy placement on the wood.

Step 5:  Turn the pattern paper to the back and rub the entire back surface with a soft #4 to #7 pencil.  This coats the back with a layer of graphite.

tracing a pyrography patternStep 6:  Using a ruler and pencil mark the center horizontal and vertical line of your wood plaque.

Step 7:  Place the folder pattern paper at the center cross lines on the wood plaque.  Carefully open the pattern, keeping the fold lines along the penciled guidelines on the wood.  Tape the top edge of the pattern paper to  the wood to hold it in place.


tracing a pyrography patternStep 8:  Using an ink pen, trace the pattern lines.  Lift a corner of your pattern paper and check that you have all of the pattern transferred.  Remove the pattern paper and tape.


how t otrace a pyrography patternNote: There are several methods to transferring a pyrography pattern to your media, and which you use depends on which media on which you will work.

For wood I usually do a #7 or #8 pencil rubbing because the graphite is dark enough to easily follow with my pen tip and can be completely removed after the burning is done using a white artist eraser.  Please be careful if you use colored erasers as you can transfer some of the eraser dye onto your project.

For watercolor paper I will use a #2 to #4 pencil.  With the white color of the paper I only need a pale graphite trace and any pencil lines left after the burning are often barely visible. 

If I am burning cotton or linen cloth I use a water soluble quilt marking pen with the cloth, laid over the pattern on my light box.  When the burning is done a light ironing with steam makes the pen marks disappear.

Leather crafters often transfer their patterns by wetting the leather surface with clean water.  The pattern paper is laid on top of the damp leather and traced using a fine point stylist or ink pen.  When completed the tracing process leaves a fine indented, unmarked line on the leather.  I don’t use this process on my leather projects because that indented line does not go away and can cause my pen to skip or wobble during a stroke.  Instead I treat the pattern transfer as if I were working on wood with a #7 or #8 soft pencil.  Any pencil lines can be removed after the burning using a Document Cleaning Pad which is a soft cloth bag filled with ground eraser bits.

If you prefer to free hand your own designs to wood, leather, or paper consider doing the line work using watercolor pencils!  Both Prismacolor and Derwent have watercolor pencils that can be purchased individually.  A Pale Sienna pencil will create a line one or two tonal values darker than basswood and birch plywood.  I use 20% French Gray for my watercolor paper burnings.  When you are finished the work you can either lift the watercolor pencil using a lightly damp cloth, or you can incorporate the pencil lines into your paint or pencil color additions.

Finished Tracing Steps

Tracing a pyrography patternStep 9:  At this point you should have your pattern transferred to your sanded and burnished plywood plaque.  We are ready to start the outlining steps in the next post.  See you there!


Walnut Hollow Woodburner Detailer – 3 Read More »

Walnut Hollow Woodburner Detailer – 2

Henna Tattoo Moon Face PlaqueHenna Tattoos

Please click on any image for a full-sized photo.

I love creating realistic, highly detailed, finely shaded images with my pyrography.  The introduction of affordable hot tipped pen woodburners to the craftsman, over the last few decades, has opened a new avenue, allowing many of us to bring our fine art skills to new medias as wood, leather, watercolor paper, and even fabric.  Hours and hours of carefully pulled strokes, layered shading, and fine line detailing can create images that are almost photographic.

But once in a while I just want to kick back, relax, and have a little fun with a pattern or design where I don’t have to be so very careful or absolutely accurate.  Once in a while I just want to play with my wood burning!  Henna tattoo patterns are just perfect for a play session of burning.

Quoting from Wikipedia: “Henna has been used to adorn young women’s bodies as part of social and holiday celebrations since the late Bronze Age in the eastern Mediterranean. The earliest text mentioning henna in the context of marriage and fertility celebrations comes from the Ugaritic legend of Baal and Anath, which has references to women marking themselves with henna in preparation to meet their husbands, and Anath adorning herself with henna to celebrate a victory over the enemies of Baal. Wall paintings excavated at Akrotiri (dating prior to the eruption of Thera in 1680 BCE) show women with markings consistent with henna on their nails, palms and soles, in a tableau consistent with the henna bridal description from Ugarit. Many statuettes of young women dating between 1500 and 500 BCE along the Mediterranean coastline have raised hands with markings consistent with henna. This early connection between young, fertile women and henna seems to be the origin of the Night of the Henna, which is now celebrated worldwide.”

Henna Tattoo Patterns by Lora IrishWhy use Henna Tattoo patterns in our pyrography?

Fine line henna designs as body art dates back to the Bronze Age.  As we work through today’s steps in our Henna Moon plaque pattern, we are following in the foot steps of an art style that is at least 4000 years old.  These simple line patterns are hand created on a flexible, moving surface – skin.  They are seldom perfect either in the execution or in the repetition of a pattern element.  Circles are not perfectly round, lines often wobble, and some flowers may have eight petals while the next repeat of that flower has only seven.

This makes Henna Tattoo patterns perfect for the beginning pyrographer – you can’t make a mistake working a Henna design!  You are guaranteed success because you are following the hand-crafted look of the real tattoo. You can practice pulling long curved lines with your pen tip, adding light shading, and controlling the depth and tonal value of your burn without worrying about being accurate and true to your pattern lines.

For the advance wood burner, Henna patterns give you a chance to relax while working a image.  Photo-realism is often the goal of an advanced burner, but that style of work is executed with intense concentration and tight muscle control over the pen tip movement.  Henna patterns remind you, the advanced pyrographer, to relax your hand and muscle control, to re-experience free flowing motions, and to ‘just let the pyrography happen’.

henna-2

RELAX!

As we work through the Henna Moon plaque I will be reviewing the performance of the Walnut Hollow Woodburner Detailer.  I will also be focusing on how a relax hand position, and a relaxed attitude during any burning session makes your line work smoother, more even, and more alive. For my beginners, remember that you just can’t make a mistake with a Henna Pattern.  The worst that can happen is that you drop your hot pen tip and it rolls across the face of your plaque leaving a long smug mark.  And if that happens, fear not!  I will be teaching you how to give your finished work a vintage/antique look that will make that accident into a wonderful finished effect!

So, lets begin with preparing your board and tracing your pattern in the next post to this free pyrography project.

Disclaimer: I am not associated with nor work for Walnut Hollow.  I am receiving no financial compensation for this post. My review of their product, the Walnut Hollow Woodburner Detailer, is just my personal opinion and experience in using this tool.


Walnut Hollow Woodburner Detailer – 2 Read More »

Scroll to Top