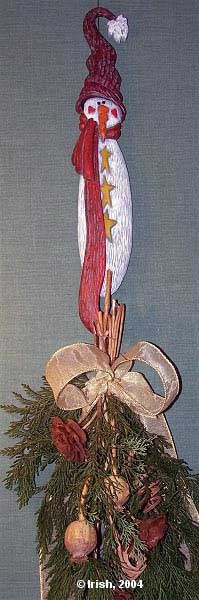
Country Snowman Wall Hanger
By L. S. Irish
Dry Brushing Acrylic Paints
 Acrylic Craft Paints:
Ultramarine Blue
Titanium White
Black
Cadmium Red
Yellow Ocher
Burnt Umber
Cadmium Orange
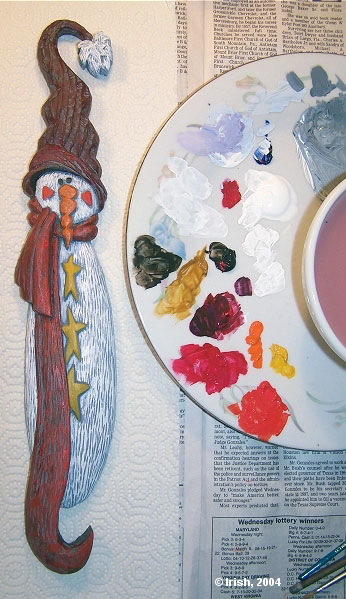
flat tile or plate for your colors
clean water
paper towels
small assortment of brushes
1/4″ flat shader brush.
Basics to Dry Brushing
Dry brushing is a simple coloring technique that is excellent for heavily detailed or textured surfaces. The entire piece is first base coated with a medium to dark color. This base coat creates the dark color that remains in the deep areas of the carving. Layers of brighter colors are next applied to the high areas of your design. The dry brushed colors are applied in gradually lighter shades to create variation in the areas toning, usually two to four different color tones are used in each area of the project.
On a clean tile or dinner plate place a small amount of each acrylic color that you will be using. You will also need clean water and soft flat shader brushes.
Once the base coat has dried wet a soft flat shader with water, then blot off the excess water on a paper towel. The brush should barely be damp. Now pick up a small amount of the darkest shade of color for the area that you are working. Work the color into the brush so that your bristles show … you want just a very small amount of paint on the brush. Drag the brush across the grain of the carving details. The high areas will receive color but the deep incised areas will not. It takes just a little practice to learn how much color to load into your brush. Now repeat the dry brushing using a medium shade of color for each area. Don’t cover up all of your first dark layer. Finally add the lightest color to your area of work. When completed small amounts of all three dry brushed colors should show.
As you work each layer of dry brushing some color may hit other areas of your project … some of the dry brushed white you are using for the Snowman’s body may end up of his scarf. After that layer of dry brush color dries use you base coat to color over any accidentally colored areas.
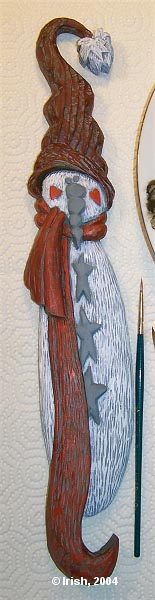
I chose to do my Country Snowman in darker color tones to give him an antique look.
Color Placement
Base Coat:
Mix Titanium White, Ultramarine Blue and Black together to create a dark Wedgwood blue color. Brush two coats to the entire Country Snowman. Be sure to work the color into the texture so there is no raw wood left exposed. Allow this base coat to dry well.
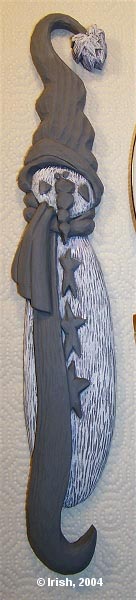
Snowman’s Body, Face and Fuzzy Hat Ball:
The snow areas of the Snowman are first dry brushes with pale blue by mixing Ultramarine Blue and Titanium White. Next a light dry brush layer of pale lavender is added by adding a small amount of Cadmium Red to the pale blue mix. The final coloring for the snow is done with Titanium White.
Hat and Scarf:
The first dry brush layer for the hat and scarf is done with Burnt Umber. Once this dries mix Burnt Umber and Yellow Ochre together to create a dark mustard yellow-brown. Dry brush this color mix for the second layer.
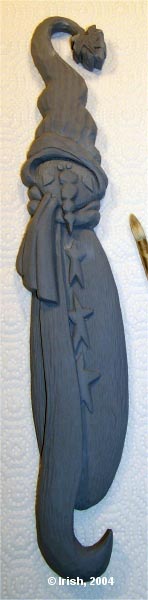
Click the images for a close-up view.
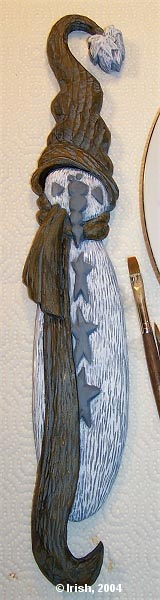
Hat and Scarf:
A third dry brush coat is added to the hat by mixing Cadmium Red, Ultramarine Blue and Black to create a burgundy red tone.
Scarf and Hearts:
Cadmium red is now dry brushed to the scarf. The hearts are painted solid red using a small detailing brush, keep this color just on the high surface of the hearts. Cadmium Orange and Cadmium Red can be mixed for a final laying on the scarf.
Stars: Use Yellow Ocher with a detailing brush to paint the stars. Again, just the high surface of the stars is colored.
Carrot Nose:
Cadmium Orange is used for the high areas of the carrot nose.
Eyes:
Black is used for his eyes.
Once your Country Snowman has dried well one or two light coats of spray polyurethane can be applied.


 Other ideas for your country snowman

- This project can easily be made into a 3-D design by cutting the Snowman from a 2″ thick basswood board. You will need to change the pattern slightly by shortening his scarf so that it stops a the bottom edge of his body. Then cut the bottom edge of the design to create a flat area to rest the carving when completed.
- You can carve the hat and scarf areas with little or no texturing. During the painting stage you can then add brightly colored patterns or designs to these portions. Example – the hat could have painted snow flakes or the scarf could be done with bold stripes of red, green and white.
- The long end of the scarf would be a great area to personalize this Country Snowman. A name, date, or saying as “Baby’s First Christmas” can then be added by either carving or painting in the lettering.
- For a compliment carving reversed the Country Snowman pattern. Now make the cheeks into stars and the buttons into hearts. You will then have two Snowman, each just a little different yet definitely a pair. Your matched pair would be great for holding a long ribbon from which Christmas Cards could be hung.