A note about securing your paper stacks
 There are several methods that you can use to secure your stacks of paper together and to the bag. My preference is small dots of hot glue placed where they will be covered by another paper. You may also use double stick tape dots or paste craft glue. White and yellow liquid glues are water based and can wrinkle or buckle your papers.
I find that during the construction stage of a project I get the best results by securing a paper in just a few places as along an upper edge. This allows the paper to float freely along three sides and avoids small buckles in the paper as more elements are applied. After the construction is complete I can add glue or double stick tape spots to secure any remaining edges in the work.
Step 6
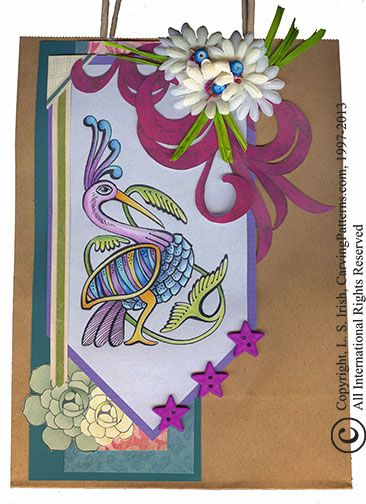
Stack the dark green, medium grey green and frosted pink paper strips with the top edges flush. The medium grey green is placed 1″ from the left hand edge of the dark green. The frosted pink is placed 1 1/2″ from the same edge. Using hot glue or double stick glue spots secure these three papers together in the upper corners. Do not secure the lower sides or edges at this time. Place the top edge of the stack onto the paper bag with the top edge of the stack 1/8″ from the top and the side of the stack 1/2″ from the folded edge of the bag. Secure the stack at the top corners.
Step 7
Center the vellum colored pencil drawing over the mauve strip, 1/4″ of the mauve will show around the vellum. Secure the vellum to the mauve paper at the upper corners. Slide one plaid corner over each top corner of the stack. Fold the scored edges of the corners to the back and glue into place.
Place the vellum stack on top of the background paper stack with its top edge 1/2″ below the background stack and 1/2″ from the left hand side of t he background stack. Secure into place with hot glue in the upper corners.
Step 8
Create an arrangement in the upper right hand corner of the vellum stack with your fushia swirls, gluing them into position where the swirl tucks into the corner or under another swirl.
Slide your cut large flowers under the vellum stack in the lower left hand corner of the background stack. Glue into place where the flowers tuck under the vellum stack.
Tuck the beige and green strip stripe under the left hand corner of the vellum stack, allowing it to cover the left edge of the vellum.
Step 9
Once you have the paper stacks, swirls, and large flowers in place and free of buckles use a small amount of hot glue under each area to secure the remaining free floating corners or edges. You do not need to completely glue an entire side of any paper, a few well placed spots will do nicely.
Step 10
Hot glue three cream colored silk flowers to the top right hand corner of the vellum stack, placing the glue spot at the center of each silk flower. Cut the three white daisies in half and tuck them under the cream daisy petals, glue into place.
Working one cream flower at a time place a small spot of hot glue in the center of the flower. Immediately sprinkle fine seed beads onto the glue, press lightly to secure the beads. When all three flowers have bead centers, turn your bag over a paper towel and lightly tap to release any unglued beads. Hot glue one flat disc turquoise bead on top of the seed beads in each cream flower center.
Cut eight 3″ pieces of green raffia. Tuck and glue the raffia under the silk flowers to create leaves.
Hot glue three purple 1″ star buttons along the bottom right diagonal of the vellum
Step 11
With a fine point black marking pen sign and date your project in the bottom edge of the grey green strip! Your bag is ready to fill.
Pingback: nav page sitemap 6/7/2021 | LSIrish.com