wood carving

Extreme Foam Pumpkin Carving

Snow Gnome Pyrography
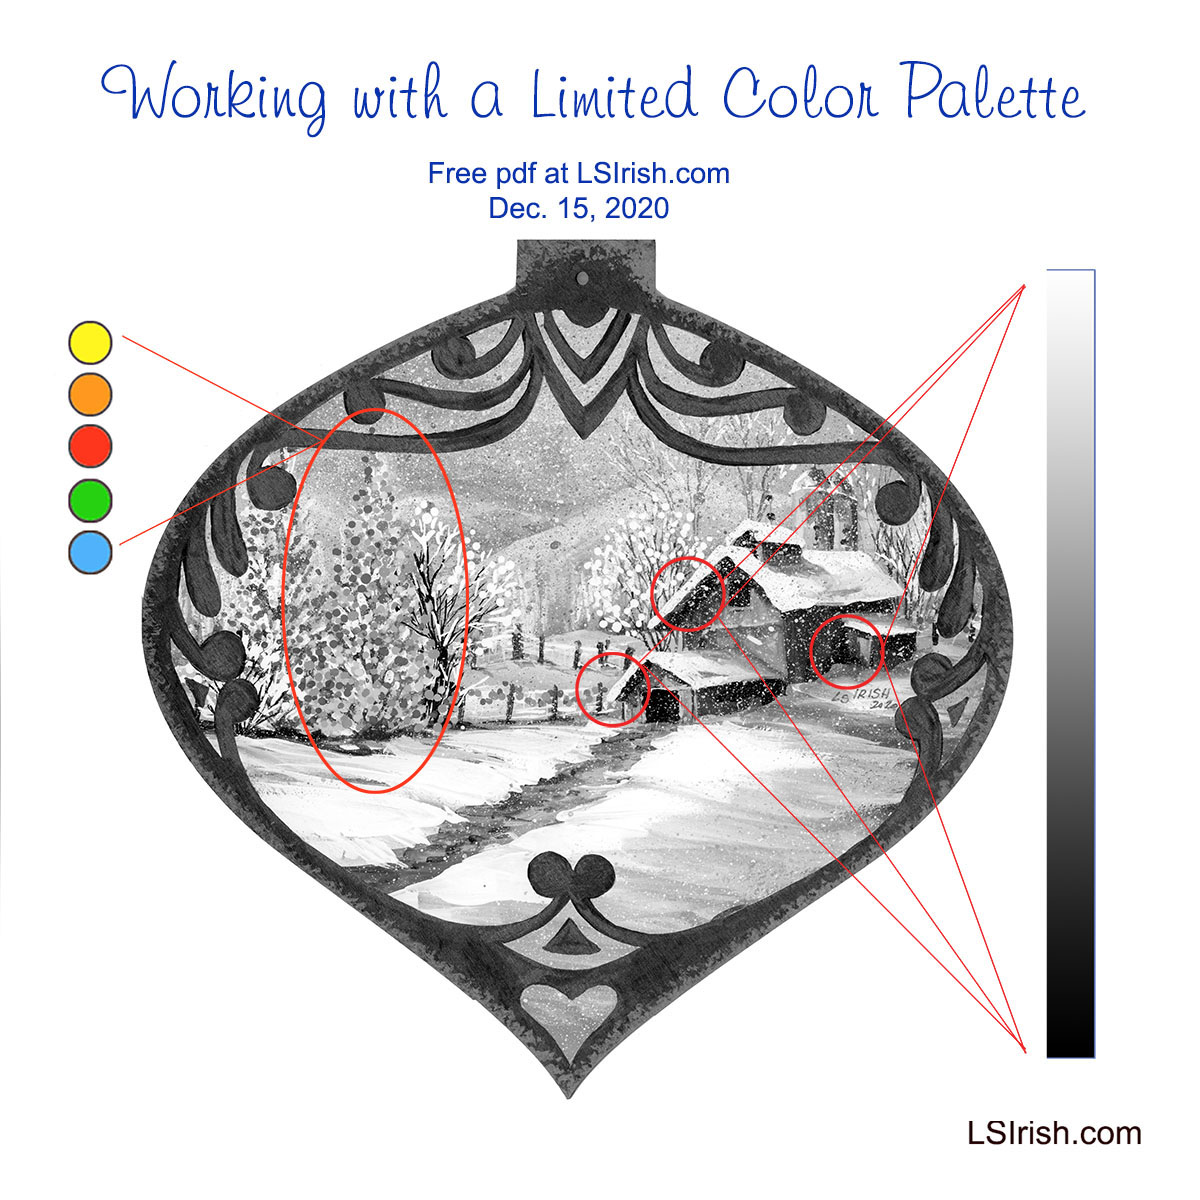
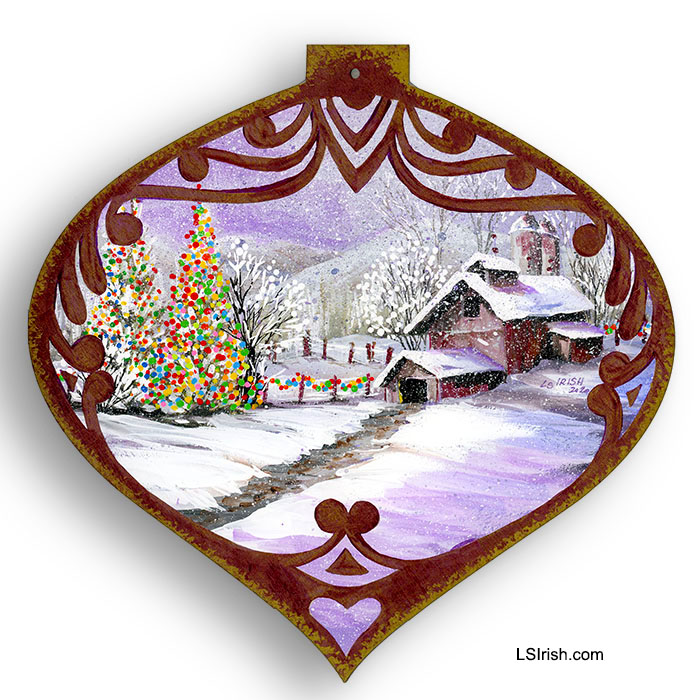
Have a little free pyrography fun with this step-by-step PDF.

Our Best Discount of the Year
ArtDesignsStudio.com

Adult Coloring E-Project
Available at our pattern website – ArtDesignsStudio.com

If you enjoy Adult Coloring, Wood Carving, or Pyrography this E-Book, by Lora S. Irish, will teach you the techniques to create vibrant skin tones in your colored pencil works.  As an added bonus the patterns inside of the Adult Coloring Portrait E-Book are shown in a medium gray coloring, not as black outlined designs, so that your coloring will cover the pattern outlines.

  • Learn how to create new color tones through the use of a color wheel
  • Create your own skin shading practice grid using your colored pencil pack
  • Discover how to determine your light source and how it effects the highlights and shadows on the face
  • Practice using black cherry, indigo blue, deep forest green, and burnt umber as your shading base
  • Explore the different art papers that you can use with your printer for your portraits

146 pages of instructions, patterns, and ideas including 6 in-depth step-by-step portrait projects and 62 patterns for wood spirits, greenmen, shamans, wizards, vampires, dragons, and assorted designs.


Halloween Pumpkin E-Project
Available on our pattern website – ArtDesignsStudio.com

$9.95

Have you tried carving rigid XPS foam yet?  It is a construction product used for home insulation that is created with densely packed particles of polystyrene and it carves like a dream.  Light weight, water proof, and can be colored with acrylic craft paints.  This pdf by Lora S Irish will take you through all the steps needed to carve your own Extreme Pumpkin face.


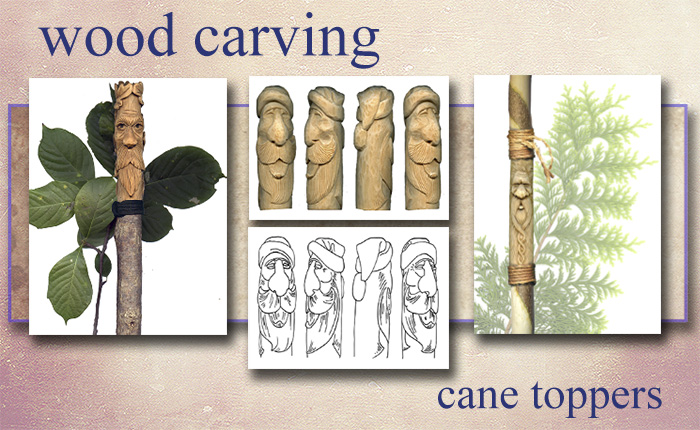
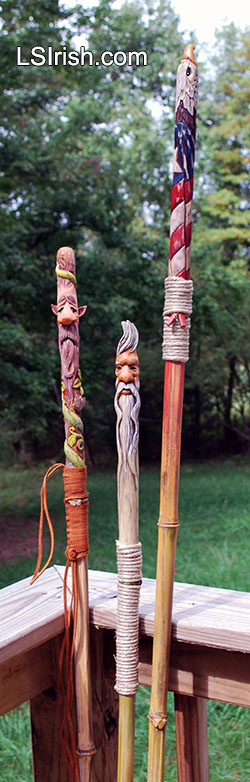
In the northern hemisphere, this is the perfect time of year to harvest your walking sticks and hiking canes.   As the saplings along your fence lines, road side, or field edges begin to lost their leaves their trunk profile becomes visible.

Learn more about How to Harvest Your Walking Sticks


Autumn is a great time to start a new wood carving project.

Our free, online, step-by-step Canada Goose Relief Carving Project includes all the instructions a new carver needs to complete this realistic, painted waterfowl plaque.


Did you know that you can work your pyrography on many more surfaces than just wood.  Watercolor paper, vegetable-dyed leather, cotton canvas, and paper mache make great backgrounds for your next work.

Learn more about Pyrography on Paper
Pyrography on Leather
Wood Burned Paper Mache Mouse Box

wood carving wooden spoons
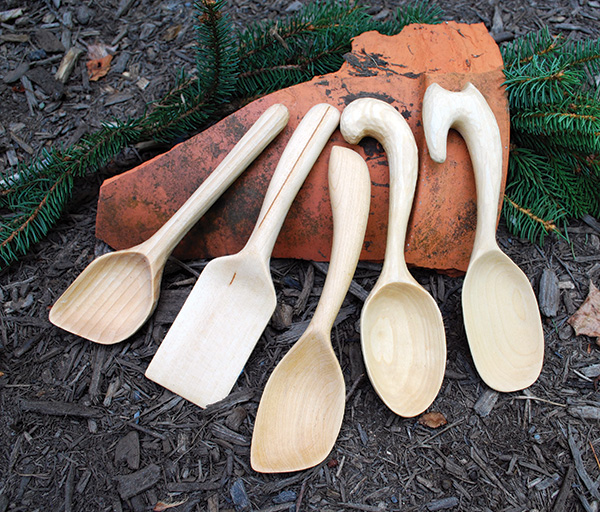
Are you ready to  start spoon carving?  This traditional whittling projects is quick, fun, and so easily adapted to new designs.

Learn more about Spoon Carving
Wood Carving
Cutting a Wooden Spoon Blank
Spoon Styles for Wood Carving
The Art of Spoon Carving by Lora S. Irish
Wood Carving a Basic Wooden Spoon

Wood Carving Wooden Spoons
Wooden Spoon Burning Patterns
Beginner’s Wood Carving, Spoon Carving
Wood Carving a Basic Wooden Spoon
Styles of Wood Carved Spoons

free painted blue jean patternsGet out your permanent marking and gel pens to have a fun evening of decorating our old blue jeans.  After the design is completed, iron your pants on a hot temperature to set your colors.

Learn more about Blue Jean Painting


Extreme Foam Pumpkin Carving Read More »

Wood Carving Canes, Walking Sticks, & Wizard Wands


carving walking sticks and canes

Walking Sticks and canes are a favorite wood carving project for both beginning carvers to the most advanced woodworker. This free, online project by Lora Irish will take you through the basic techniques used in choosing your wood staffs and sticks, wood carving cane toppers, cane construction, and finishing used for walking sticks. Learn how to use wood burning in your cane carving to clean the joint lines of your carving and add fine details. Explore the different steps you can use to add bright, bold painted coloring.

cane, walking stick, and wizard wand carving

Wood Carving, Relief Carving, Carving Techniques, Wood Carving Projects
Canes, Walking Sticks, Chip, Spoon, Scroll Saw, Carving Techniques


how to carve canesAvailable at Amazon.comwood cane carving patternsCane Handles & Walking Stick Pattern Package at ArtDesignsStudio.comcane carving pdfWood Carving PDF E-Project at
ArtDesignsStudio.com

Wood Carving Canes, Walking Sticks, & Wizard Wands Read More »

Limited Color Palette for Wood Crafts

A limited color palette allows you total control over which elements in your painting become dominant; which become secondary; and which fall into the foreground, mid-ground, or background.  So whether you do fine art paintings, wood carvings, or pyrography, understanding how  limited palette can work for your craft makes the painting steps so much easier.

You probably are already using a limited color palette but may not realize that the way you chose your colors has a name and purpose. So let’s do a little art color theory exploration.

What captures your attention first?
   1. The barn scene.
   2. The path and background mountains.
   3. The Christmas tree and fence lights.

It is the Christmas tree and fence lights that catch my eye. The barn scene becomes a secondary element which simply tells the story of where that Christmas tree is located.  The reason the tree is dominate is because I have used a limited color palette.


PLANNING YOUR PALETTE
Limiting your color palette does not necessary mean using just a minimal number of colors, although that is one method of creating a limited palette painting.

This painting used fifteen different colors but specifically limits where each color can be used.
For this sample it means that I have carefully planned in advance where I would use my colors and what type of color – neutral, pure, or tonal value – I would use for each element.

I began by categorizing each element in the painting as a neutral area, natural area, man made area, tree lights area, and the main feature of the design. This gives me five types of elements in the pattern.

ASSIGNING TONAL VALUE PALETTES
Neutrals are my blending and shading tones for my natural and man made elements. These are simple white, black, and mid-tone brown.

Naturals are my snow, sky, mountains, and trees. For this palette I chose mid-tone gray-scaled colors of medium blue-gray, medium purple-gray, and medium green-gray. All three have the same muted mid-range gray tone which unities them on the tonal value scale.

Man made elements include the barns, the silos, and the fence posts. To make these areas slightly different from the natural tones I have added a medium red-gray to my colors. This color is only used in those man made objects.

Tree light elements use a total new palette of only primary and secondary pure colors that contain no white, gray, or black toning.

Highlights of pink and pale bright green are used only in the primary element of the main Christmas tree to make it the dominant feature of the entire design.


GRAY SCALE V. PURE COLOR
Gray-scaled tonal value colors are used throughout this scene, with the exception of the tree light color palette.
The greatest contrast of those tones are found in the barn roof overhangs where the pure white of the snow meets the darkest black tone of the barn wall shadows. The strength of this black-white contrast is most often found in the front elements of your mid-ground area.

As you come forward in a scene, into the foreground, more colors can be distinguished and therefore there are less black-toned elements. A foreground tree trunk has shades of brown and gray where a mid-ground tree trunk tends to lose that coloring therefore going into the black-tones.

Background scene elements tend to be in the white-toned area of your colors. Distant trees, mountains, and the sky area of worked in the pale white-gray tones.


PURE COLOR TONAL VALUES
Pure colors as primary and secondary hues have no added white, gray, or black tone and therefore no real tonal value.

Those bright pure colors become mid-toned with only as much visual impact to the design as the background mountains.
In the gray scaled painting what has become dominant are the areas of greatest tonal value contrast – those areas where the blackest tones lies directly against the brightest white tone.

Home Sweet Home- Jewel-Toned Dark Value Palette
This Home Sweet Home hen uses a limited palette of only dark-toned valued colors – dark red-brown, dark green-blue, dark yellow, and dark brown. The dark toned colors are often called jewel tones.
As a folk art design the elements in the pattern are simple and a very limited color palette emphasizes that simplicity.
Pattern available in Hens, Roosters, and Chickens


Snow Day
My final example of limited palette coloring for your wood crafts uses only primary
and secondary colors. No tertiary hues are used.  Since this is a wood burning this small wall heart
was painted using watercolors which allow all of the sepia burning to show underneath the hue.
The full tutorial and pattern are found here …


WHAT DOES THAT MEAN FOR OUR PAINTING?
It means that color dominates tonal value, that dramatic changes in tonal value dominate over mid-toned values, and that by choosing to limit our color palette we, the artist, decide which elements we want to have the strongest impact in the final design.

I can push an area forward by using pure color hues or I can set the element firmly in the mid-ground range by using dramatic tonal contrasts, or I can push the area into the far background by using closely related mid-toned values.

Ceremonial Mask – Transparent Wash-Tone Palette
Only very water-thinned, pure color make the limited palette for this Ceremonial Mask relief carving.
By only using transparent coloring and coloring without a gray-tone addition,
the wood grain and antiquing remain dominant.
Pattern available in Ceremonial Masks


HOW DO I GIVE EXTRA IMPACT?
Our original limited palette contains only two pastel tones – pink which is red plus white, and pale Caribbean green which is green plus white. Neither of these colors contain gray or black.

Those two pastels, used only in the main Christmas tree are enough color change to separate this tree from the other lit pine tree and the fence line lights.

Click on the image below for a free, full-sized, printable pattern.


Limited Color Palette for Wood Crafts Read More »

Harvesting Saplings for Cane Carving

Fall is for harvesting. cutting, and storing your tree saplings for cane carving, waling sticks, and wizard wands.

From early fall to late winter is the time for trimming your fruit trees and cleaning the saplings along your fence line. Those wonderful cuttings are perfect for walking sticks and canes. Because of the season the branches and trunks have a lower sap content than you find during the growth months.

With this winter’s storms there is a large supply of downed tree branches waiting to be harvested by the weekend wood carver. It is easy to strip the bark from a green wood stick.

Begin by trimming any small branches from the main stick as close as possible. With a bench knife make several small cuts in the bark at one end of the branch. The knife blade can be teased under the nicked area and then used to pull thin strips of bark off the walking stick branch.

If you are not going to carve your stick directly after harvest paint, the ends with any latex paint to seal the wood. Hang the sticks using bailing twine in a cool dark space and allow to dry until next year.

Green wood can be carved if you keep the exposed end grain liberally soaked with a mixture of linseed oil and turpentine – a half and half mix that is thin enough to soak deeply into the fibers. After each carving session, soak the end grain with oil and loosely cover the stick with a plastic bags to control the moisture content.

When the carving is complete, keep it in a loose plastic bag and store the carving in an area where the stick will be out of direct sunlight and that has a consistent temperature, to avoid dramatic changes that will cause rapid drying. Allow your carving to dry completely before adding any finishing products – approximately one year for each inch of wood.

Even with these precautions checks, and splitting can occur. This is just a natural part of green wood carving and can add drama to your carving as it emphasizes the delicate, living nature of the wood. If the checking is sever you can use butterfly splints or a hardwood dowel to secure the two sides of the split.

With any green wood or winter storm harvested wood, please be aware that your branches can bring unexpected visitors into the house. Insect eggs can hatch if the wood is stored in a warm area.

LEARN MORE:

https://lsirish.com/tutorials/woodcarving-tutorials/woodcarving-projects/wood-carving-walking-sticks-adding-extras/

https://lsirish.com/tutorials/woodcarving-tutorials/woodcarving-projects/wood-carving-walking-sticks-common-tree-species/

https://lsirish.com/tutorials/woodcarving-tutorials/woodcarving-projects/wood-carving-walking-sticks-harvesting/


Harvesting Saplings for Cane Carving Read More »

Wood Carved Ice Fishing Decoys

During the  America Depression ice fishing decoys were a major way to put food on the table.  Today they are a fun, delightful carving subject that lends themself to brilliant coloring.  This post will look at a coloring/painting technique called Rouging, as shown on our middle red-orange metallic goldfish.

Below are three samples of ice fishing decoys, all worked off the general body shape of a comet goldfish.  Measuring between 6″ x 4″ to 7 1/2″ x 4″, worked in basswood, the top fish is sprayed with a copper metallic finish.  Our second fish has been roughed using oil paints and linseed oil over the same copper metallic, and the bottom fish is painted using craft acrylics over a lime green spray base.


Ice decoys were made from what ever materials the carver had on hand.  A scrap of wood, maybe an old license plate or piece of scrap metal for the fins, and roofing nails for the eye; these decoys are a major part of American folk art.

My carved samples are worked in basswood for the body shape.  The fins are cut from 30 gauge copper sheeting, which can easily be cut using a pair of craft scissors.

To insert the fins into the body I use my shading tip of my wood burning tool on my hottest temperature setting to literally burn a thin trough into the decoy.  While I have my burning unit on the table I can add small details to the body as scales, center lines, and even cross hatch patterns.

Remove any burned dust from your fin troughs then insert and set the copper fins with super glue.  To fill in the small gap between the burned trough and the metal fins I use Liquitex Modeling Paste – an air-dry polymer mixture that dries extremely hard without shrinking.   You can see the white line of modeling paste between the top fin and body, below.

After the decoy was thoroughly dry, sanded and dusted, I gave the fish two light coats of copper metallic spray paint.  Allow that primer layer to dry for several hours. I used t he spray paint as my base to avoid any brush strokes that might come from a hand-brushed primer.

Rouging is worked over a heavily antique project or a metallic base using artist oil paints, boiled linseed oil, and gloss acrylic spray sealer.

Place a small amount of each oil paint on a palette – I am using lemon yellow, cadmium yellow, cadmium orange, and cadmium red.  Oil paints are transparent colors that have no white, black, or gray base.  So as we work the color of the paint will clearly allow the color and sheen of the metallic spray to show through.

1  Lightly dampen your ox-hair brush in boiled linseed oil.  Blot as much of the oil off the brush as you can.  Next, pick up a very small amount of color on your brush tip.  I like to rub the color into the tip on the same area of paper towels as I just blotted the oil from my brush.

2  Gently rub one coat of linseed oil thinned color onto each area of your project.  I use a circular motion where the brush just barely touches the fish … just like applying your make-up rouge.  You should barely be able to see any color application with this first coat.  Let the oil paint dry for about 15 minutes.

3  Now, give your fish a light coat of gloss acrylic spray sealer.  Let the sealer dry for about 1/2 hour.

4  Repeat steps 1 through 3 over, and over, and over again.  And now repeat some more.

With each repeat you add an extremely thin layer of transparent oil color followed by a layer of gloss shine all on top of your metallic base.  The decoy below has about 8 to 10 coats at this stage.


The finished technique gives you this deep layering of bright color, sparkle and shine, that also allows the metallic sheen to come through the work.  This is similar to Chinese lacquer ware or enameling, in its effect.

For a little contrast I did add solid acrylic black eyes, black and white dots along the spine, and a little splatter of metallic gold paint to the fin ends.  With one last coat of gloss spray sealer this little bit of folk art is ready to hang.


Wood Carved Ice Fishing Decoys Read More »

Scroll to Top