There is no question that adult coloring is such a success … it’s fun, it’s fast, and it’s easy.
But aren’t you ready for something more? Aren’t you losing interest in filling in little tiny areas of nonsense doodle designs? Have you had enough of coloring in one repeated pattern a hundred times across a sheet of paper?
You know you can do so much more than just fill-in-the-blank!
Let’s break out of the boundaries, let’s color outside the box, and let’s take on a new challenge … Adult Coloring Portraits.
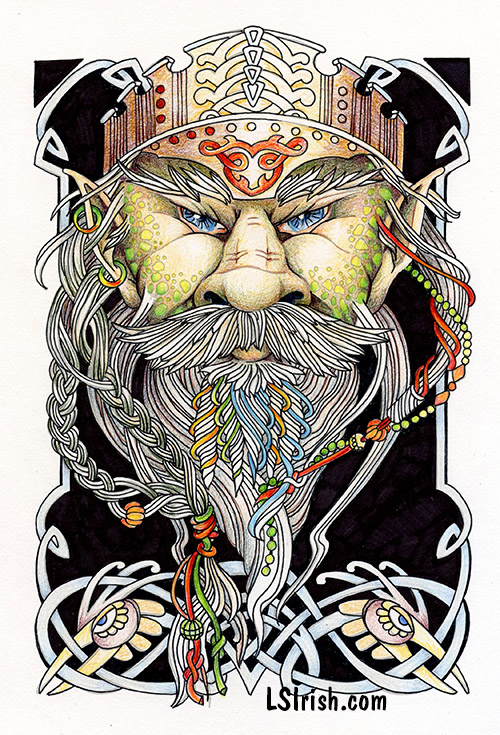
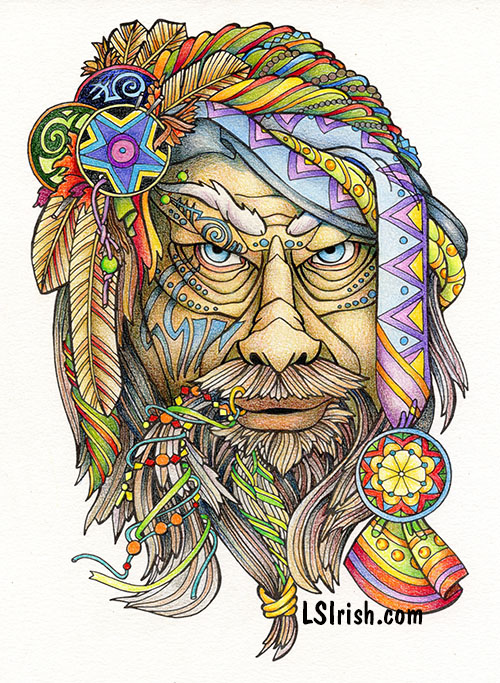
Our new 149 page PDF E-Book, by Lora S Irish, Adult Coloring Portraits is now ready for download to your computer. It includes 6 step-by-step projects for creating brilliant, vibrant skin tones; 62 patterns for wood spirits, greenmen, pixies, elves, vampires, feathered shamans, dragons, and a small assortment of fun designs.
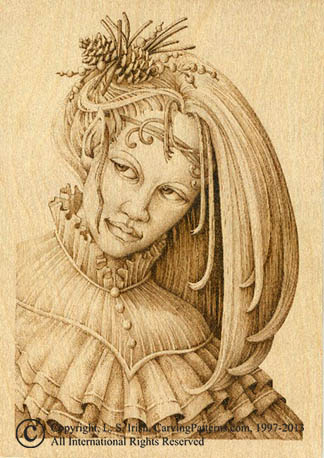
Let’s look at a sample portrait from our new E-Book.
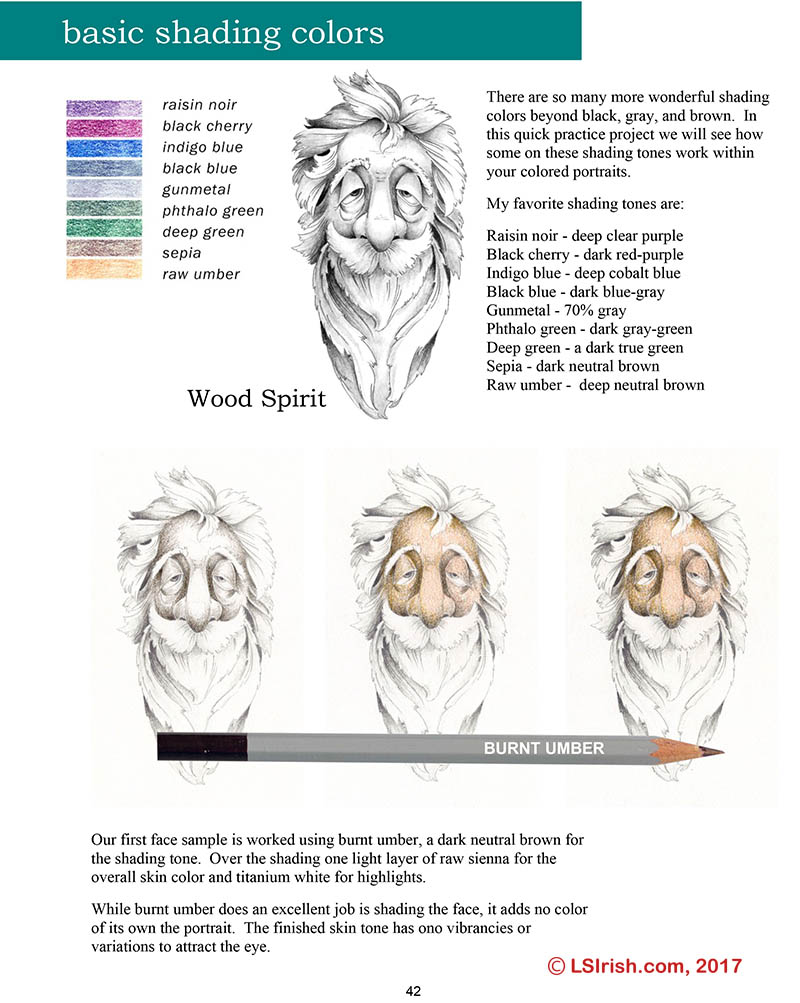
We think of skin tones as shades of white, black, brown, red, and yellow … but all skin coloring is simply a shade of orange. From very pale orange to deep, rich red-black, every human skin color can be created using the same set of colored pencils – a pale yellow-orange, medium golden orange, medium cadmium orange, red-orange, deep rust-orange, and burnt umber orange.
And we often think of skin shadow colors as shades of deep brown or black. Yet in colored pencils using a plain medium or dark brown dulls and dirties the face color.
So let’s start by exploring what other colored pencil shades you may have in your kit that will create those vibrant shadows in your portrait work.
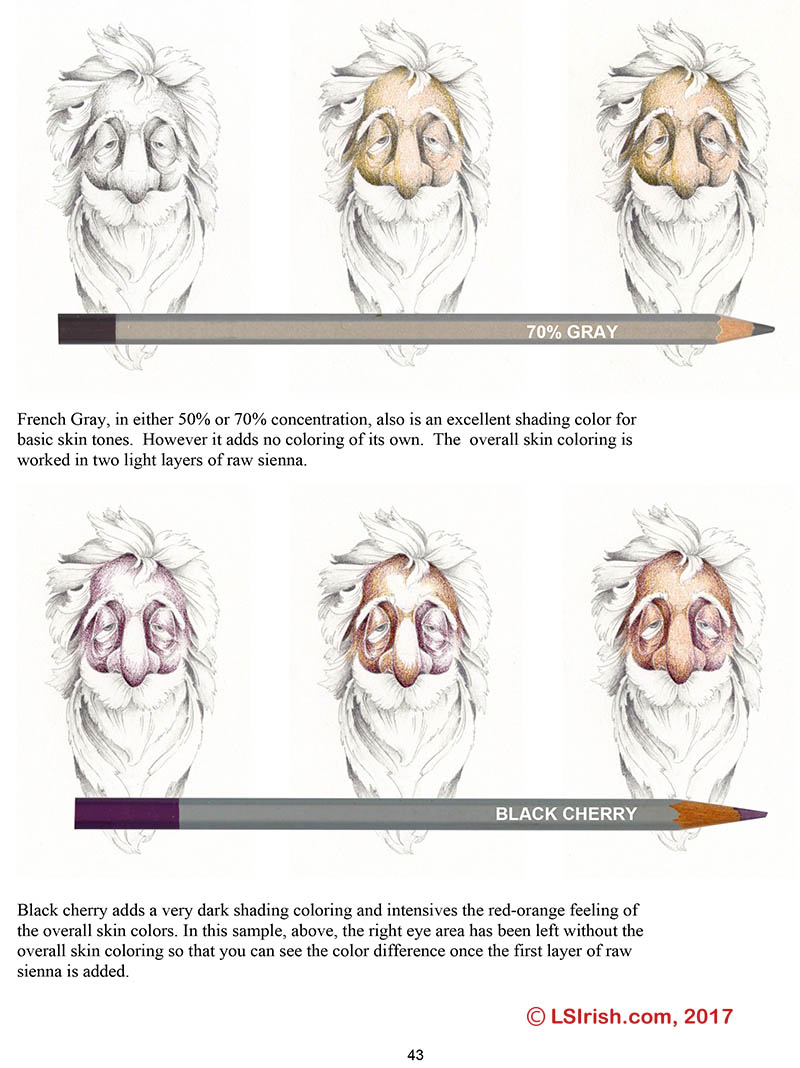
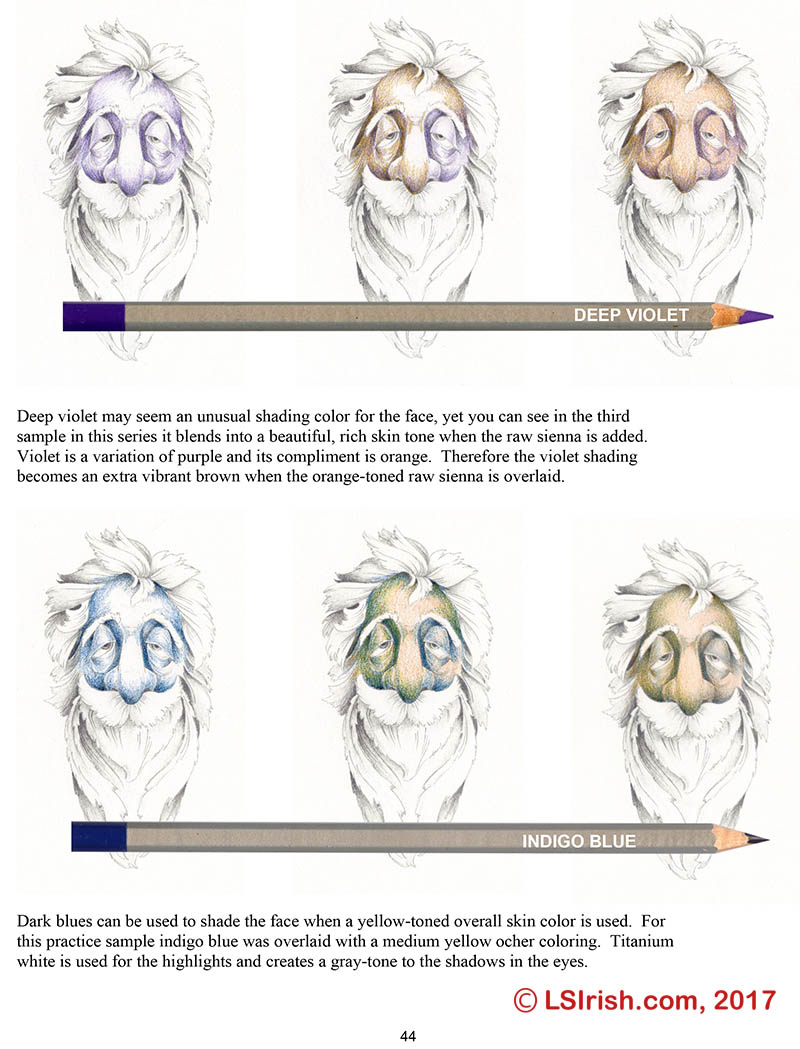
Here are five pages, directly from the E-Book, that show a few of the different shading colors you can used for your face – burnt umber, 70% gray, black cherry red, deep violet, and indigo blue – and how these colors interact with your overall skin color.
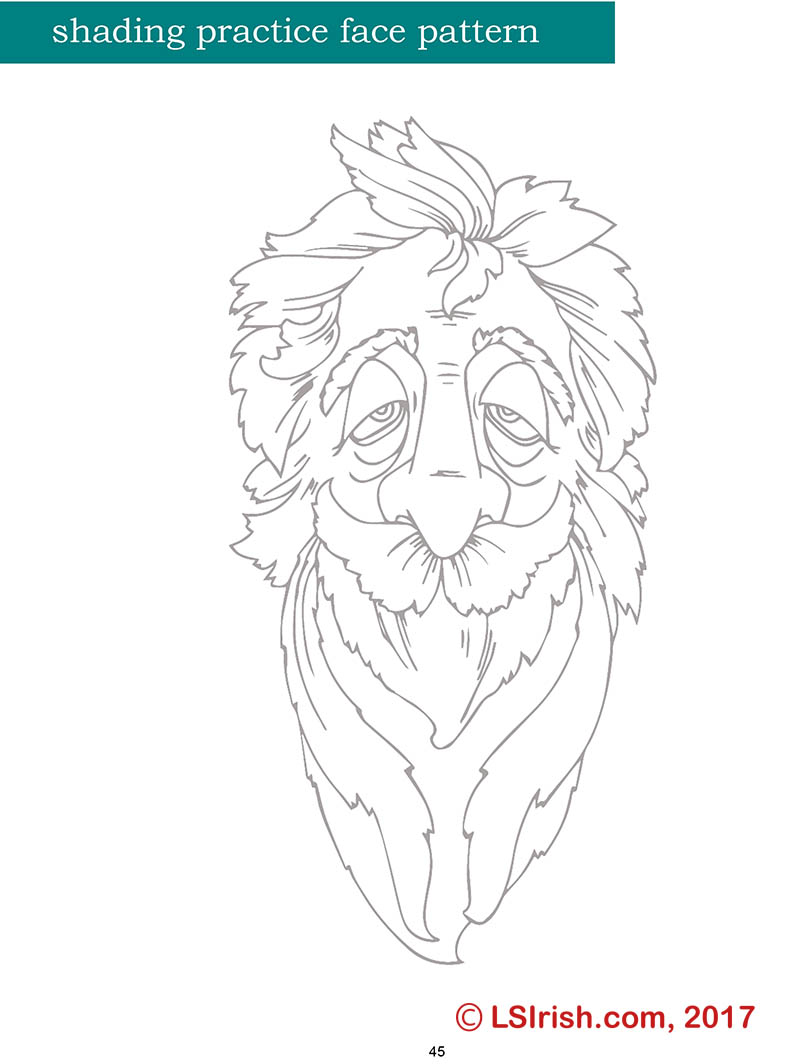
Click on the images, below, for a full-sized, 8 1/2″ x 11″, printable copy directly from our new E-Book, Adult Coloring Portraits.
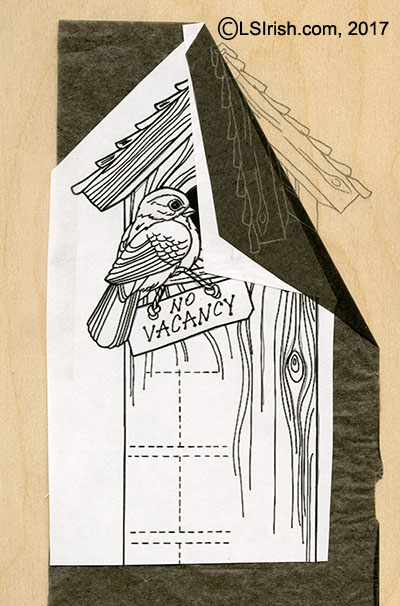
Preparation – Begin by cleaning, and sanding your wood to create a smooth surface on to which you can transfer your pattern. Remove all sanding dust using a dusting brush and clean, dry cloth.
Chose Your Tracing Media – There are three primary tracing products which are graphite paper, carbon paper, newspaper, and a soft #4 to #8 artist pencil.
Please share on Facebook and Pintrest!
Graphite Paper – Graphite paper can be purchased through both office supply and craft stores. It comes in several colors, including gray, white, and blue for easy tracing onto different colors of wood. Graphite leaves a very fine line on the wood and can be erased with a white artist eraser after you have completed your project.
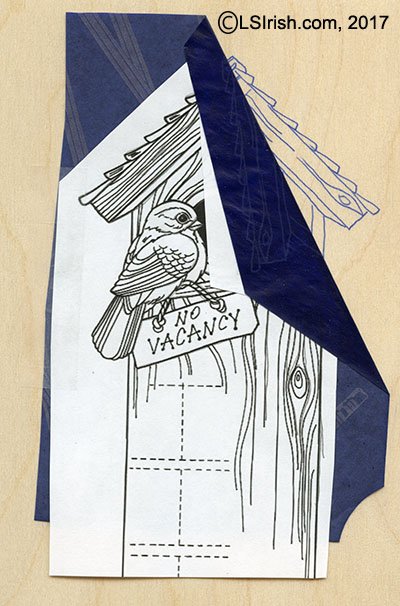
Carbon Paper – Carbon paper comes in 8 1/2″ x 11″ sheets and has a very dark, heavy layer of tracing media on the back surface. It is available in deep blue and black colors. Carbon paper lines do not erase easily and should be carved or scraped away as your work your project. Use this media on projects that will receive excessive handling or for long-term projects as it holds up very well. Because carbon paper was primarily used with typewriter to create multiple copies, you may need to do a little searching to find it.
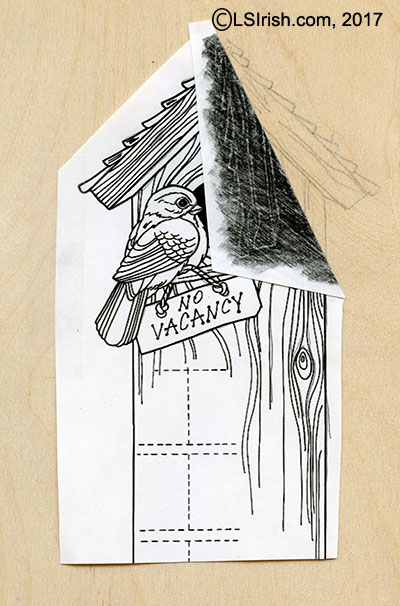
Pencil Rubbing – My favorite way to trace my pattern to the wood is to rub the back of the pattern paper with a #4 to #8 artist pencil. This creates a layer of graphite that will easily transfer to the wood surface as your copy the pattern lines with an ink pen. Pencil rubbings work extremely well for wood, gourds, and even leather. Woodless pencils work wonderfully for tracing.
Newspaper – Heavily printed sheets of newspaper works wonderfully as a tracing media. As you trace along the pattern lines the printer’s ink from the newspaper will leave a dotted line on the wood. This process is especially good for extra large projects as out door signs or long, wide mantel boards. The ink is easily erased with a white artist’s eraser.
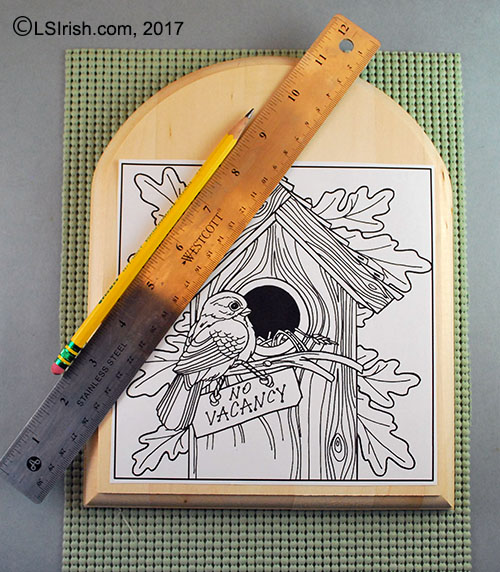
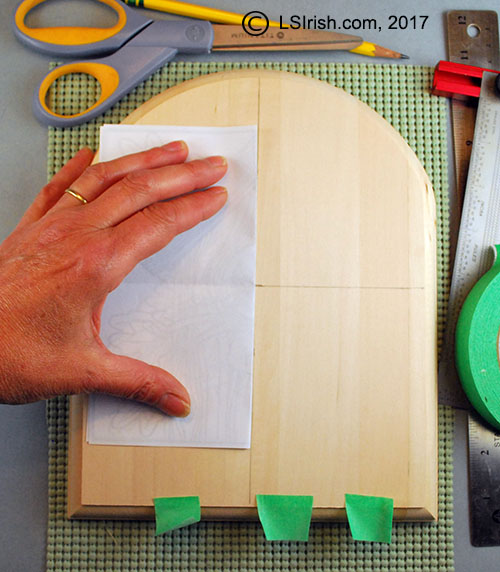
1. Adjust your digital pattern as necessary to fit your project piece. Print several copies of your pattern – one for the main tracing, one for cutting and tracing small areas of the pattern, and one for a reference to the detail lines of the design.
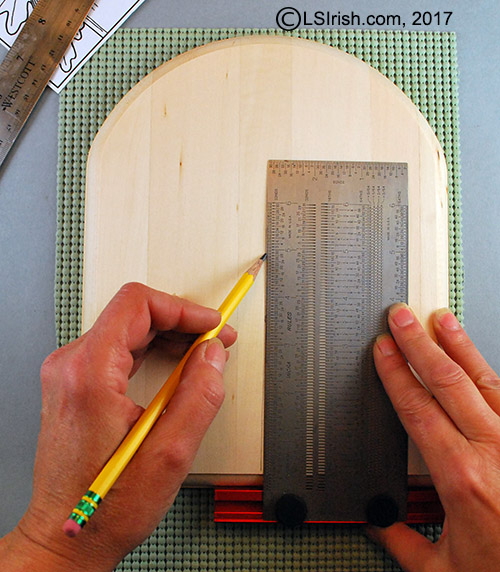
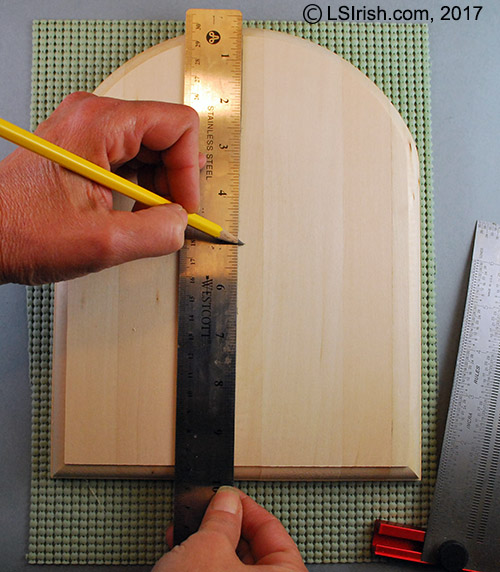
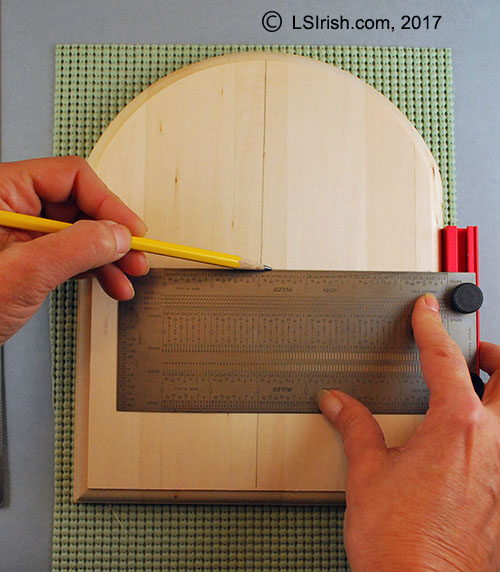
2. With a right angle triangle or small t-square mark the center vertical line of your project’s surface.
3. Use your ruler to find and mark the center point of your vertical line.
4. With the t-square or right angle triangle, draw a horizontal line across the project surface at the center point of the vertical line.
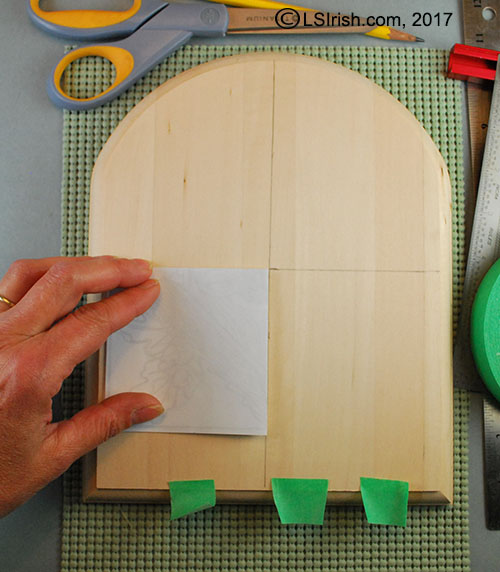
5. Fold your printed pattern into quarters, matching the outer pattern lines on the sides of the pattern. Place the folded pattern on to the wood, aligning the paper folds to the marked lines on the wood.
If you will using a pencil rubbing for your tracing media, open the folded pattern and rub the back of the pattern to completely cover it with pencil graphite. Refold your pattern and begin the positioning steps.
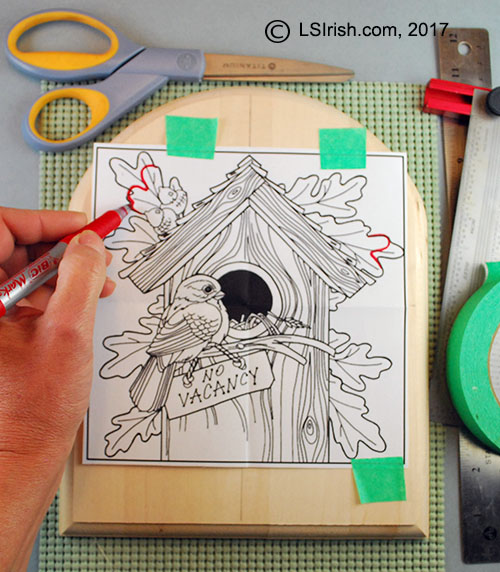
6. Unfold your pattern, continuing to match folds in the pattern paper with your guidelines. Cut several small strips of painters tape. Use the tape to secure two sides of the pattern paper to the wood surface.
7. Use a colored ink pen to mark any changes you want to make in the pattern, so that you will follow your changes during the tracing process.
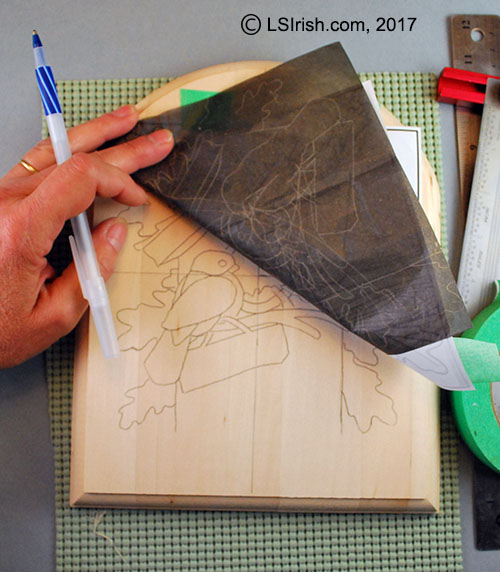
8. Slide your tracing media – graphite paper, carbon paper, newspaper – under the printed pattern with the tracing surface against the wood. Trace along the pattern lines with a colored ink pen. Use a light pressure, just enough to transfer the pattern line without leaving an indented score line from the ink pen’s point. When your tracing is complete lift the pattern paper at one of the un-taped corners. Check your work before you remove the pattern paper and tape.
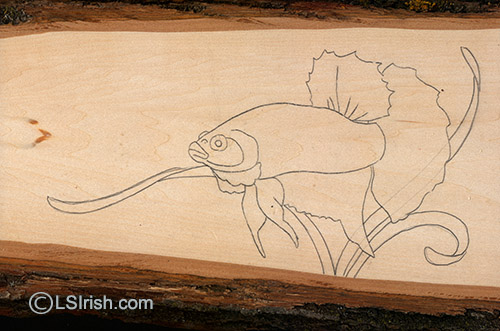
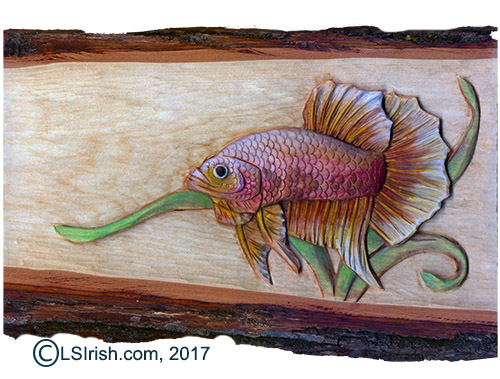
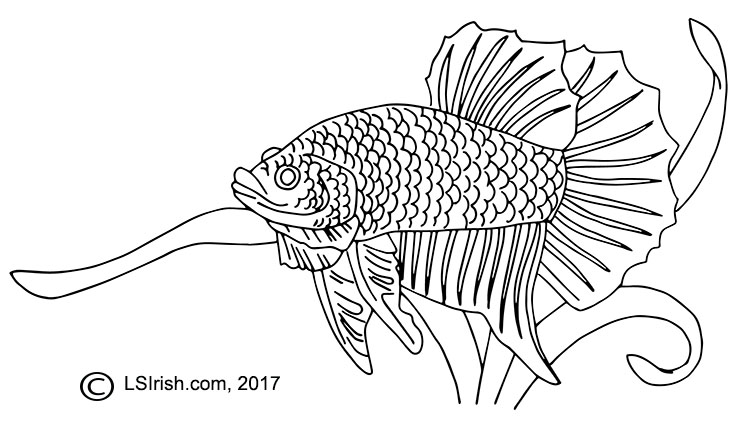
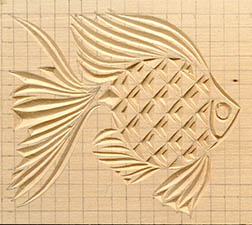
9. Trace only those lines that you really need for your initial working steps. For my Beta Fish relief carving I needed only the outlines of each area of the fish and the outlines of the grass to work the rough out carving steps.
10. When your project work is done, remove any remaining tracing lines using a white artist’s eraser. Avoid colored erasers that can leave dye streaks on your carving or pyrography work.
11. Click on the small image on the right for your free full-sized, printable Beta Fish pattern – a design from Relief Carving Workshop, by Lora Irish.
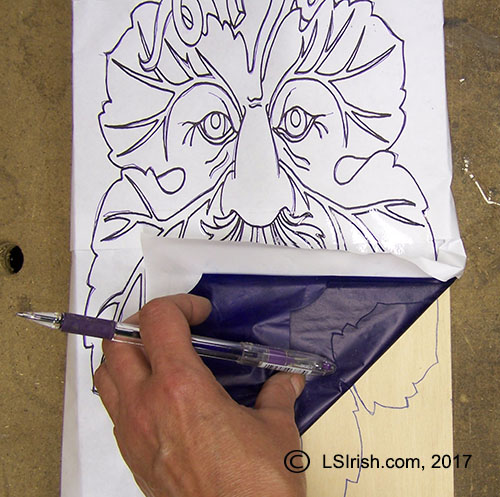
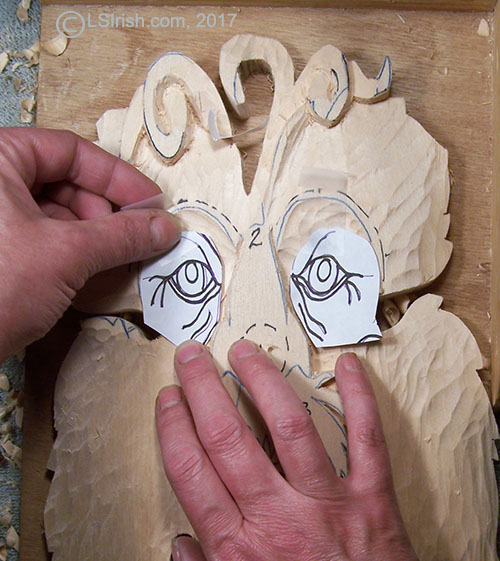
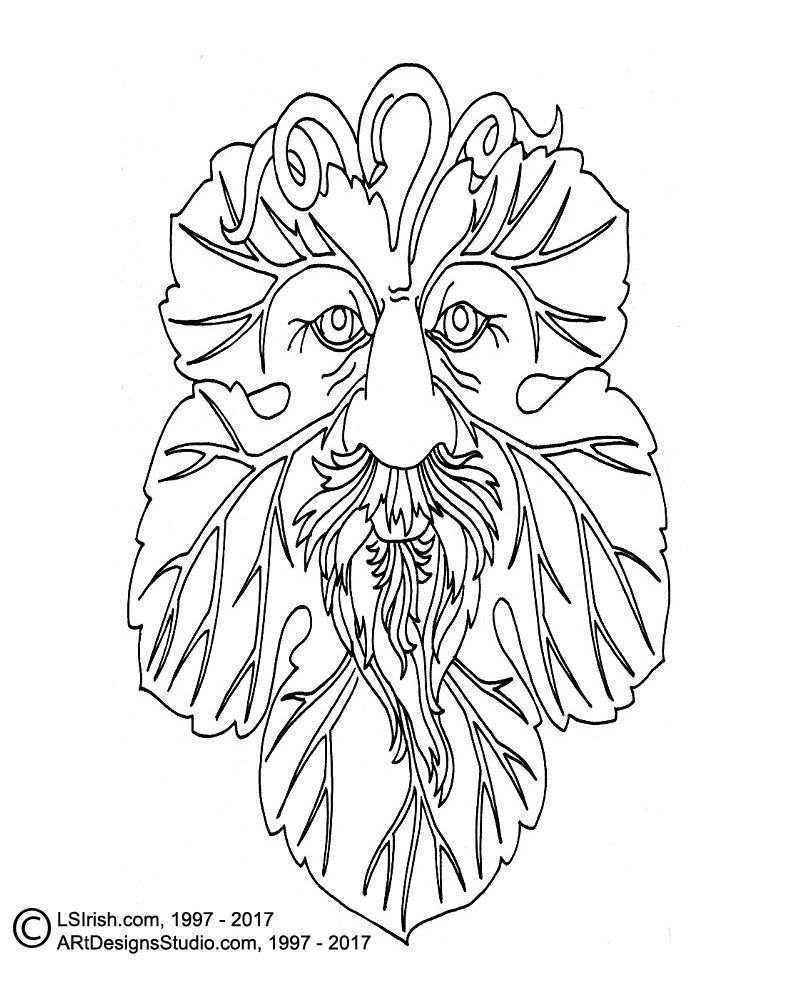
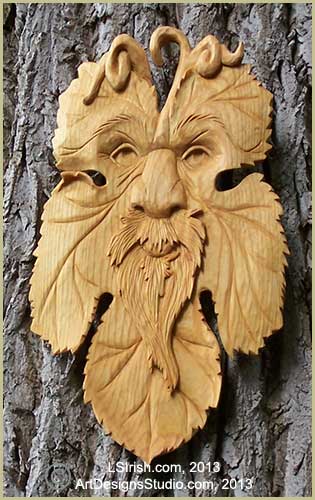
12. This second example is from the Wood Spirit Carving project posted on the Wood Carving Illustrated Forum. The pattern was transferred to the wood using typewriter carbon paper because the project would require intense handling.
Relief Carving Wood Spirit Grape Man WIP – Over 250 detailed, close-up photos with step-by-step instructions of relief carving the wood spirit, green man face. This thread has had over 69,000 views!
13. After the levels where established in the carving I cut my paper pattern into small sections that could be easily re-traced to the project.
14. Click on the small image to the right for a free full-sized printable pattern.
Whether you are a wood carver, a pyrographer, or a gourd artist eventually you will be using color. Color is part of everything we see and understanding how color works – the basics to color theory – insures that your project is vibrant, vivid, and bold each and every time.
Over the next few days we will focus on how the eye sees color v. how the eye sees shadows and light, primary colors v. complimentary colors, and color combinations that create intense skin tones.
So, grab your freebie now and have fun reading through the basics. Tomorrow we will start a fun, step-by-step Mystic Shaman portrait!
Since Mike and I came to the web in 1997 I have posted a free, online, step-by-step seminar each year. Many of those seminars are posted right here on our blog at LSIrish.com, and some were posted to other wood carving, wood burning community forums. I thought you would enjoy a list with links to some of our favorite past projects.
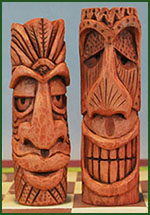
Whittle Tiki Chess Set – Wood Carving This beginner’s wood carving project will guide you through the cutting strokes that create those wonderfully expressive Tiki faces. Includes the free patterns to make your own chess set.
Basics to Painting – Painting your Wood Carving and Wood Burning Have fun exploring the numerous techniques you can use to add coloring to your wood burnings, wood carvings, and scroll saw projects.
Postage Stamp Pyrography – Pyrography and wood burning Have a little fun tonight working through how easy it is to wood burning Celtic interlocking lines and knots.
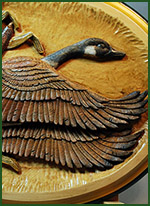
Relief Canada Goose Carving Seminar – Relief wood carving, pyrography, and painting Explore the basic techniques used in relief wood carving, including working in layers and levels, undercutting, and smoothing the background. Then add fine detailing using your wood burning tool. Finish this step-by-step project by creating realistic coloring using the dry brushing technique.
Whittle Fish Seminar – Wood carving Ice fishing decoys are quick, easy, and extremely fun to carve. All you need is a bench knife, a few pieces of basswood, some scrap leather or copper sheeting, and some imagination. Since these are primitive art, anything goes when carving fish decoys.
Chip Carving Seminar – Chip Carving, wood carving Chip carving is a specialty area in wood carving. With the use of a short-bladed chip carving knife, small triangular cuts create intrigue motifs and designs. Includes a full-sized sampler pattern.
Celtic Dragon Plaque – Relief wood carving This is an entry-level carving project for both relief carving and for working the interlocking patterns of the Celtic Knot
Wood Spirit Carving – Wood carving, cane and walking stick carving Carving a human face into your next walking stick or cane is quite easy when you follow the step-by-step cuts shown in Carving the Planes of the Human Face.
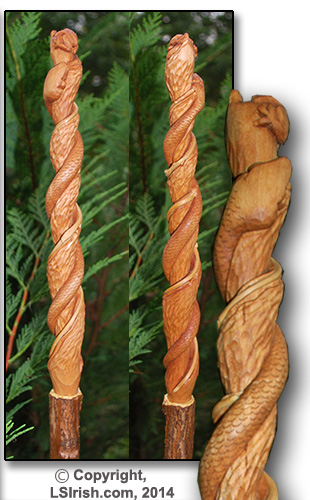
Twistie Snake Carving – Wood carving, cane and walking stick carving Not all of us are blessed to have a backyard wood lot where we can cultivate sassafras trees and honeysuckle vines for twistie stick canes. So in this in-depth tutorial learn how to carve that twisted stick pattern using a bench knife, a few small gouges, and basswood.
Pyrography Doodles – Pyrography and wood burning If you have the burning desire to try your hand at the zen doodle craze or modern tribal tattoo look, you will want to read through this step-by-step wood burning project that uses textures, line designs, and fill patterns to create the finished mushroom design.
Pyrography Steps to Portrait Burning – Wood burning and pyrography Learn how to create realistic shadows and highlights in the human face in your next wood burning project.
Cougar Pyrography Project – Wood burning and pyrography Learn how to create the fine fur in an animal portrait that incorporates realistic shading and shape to the animal’s face.
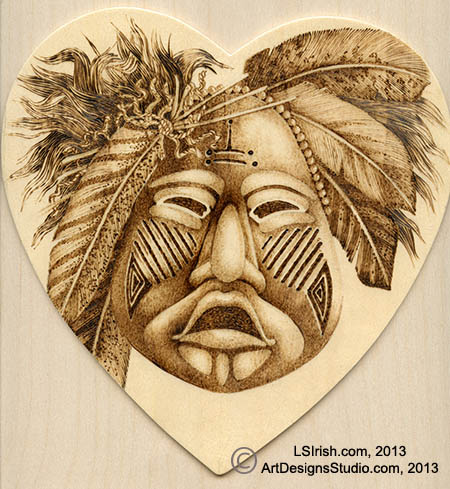
Ceremonial Mask Pyrography – Pyrography and wood burning This step-by-step project uses lots and lots of photos to guide you through an in-depth design created for first-time wood burners.
Pyrography Leather Burning – Leather burning and leather pyrography Want to try your hand at leather burning? Then this tutorial is just what you are looking for. Includes not only the step-by-step photo instructions but also includes the binding steps for making your own leather artist journal.
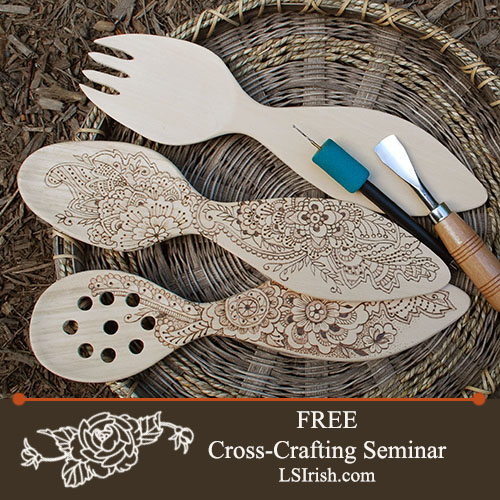
Cross-Crafting Seminar Introduction – Step by Step Instructions for your first wooden spoon carving from scroll saw cutting to adding the oil finish
Please note that you will need to sign-up as a member of these forums to have access to the photos included in each of the tutorials.
If you have questions about these projects please contact me directly, here at LSIrish.com or on my Facebook account, as I can not reply to you on this forum. If you do reply of any of these free tutorial, it will bring these threads to the front of the message board where other members may answer you.
Relief Carving Wood Spirit Grape Man WIP – Over 250 detailed, close-up photos with step-by-step instructions of relief carving the wood spirit, green man face. This thread has had over 69,000 views!
Levels in Relief – Learn how to break you carving pattern into levels for easy carving. This project will teach you how to identify the sky, background, mid-ground, and foreground of any design.
Burning your carvings – Pyrography can be an important technique for your wood carving. So learn how to use your wood burner to clean-up fine wood fibers, add detailing, and even add fine shaping to your next wood carving project.
African Mask Low Relief Carving – The African Mask project focuses on how to establish the levels of a relief wood carving during the rough-out stage of work.
Irish Pyrography Seminar – This in-depth pyrography project shows over 250 detailed, close-up photos, step-by-step instructions, and in-depth explanations of texturing, shadings, and fine line work used to create the Advertising Barn landscape.
Walnut Hollow Versa-Tool – Looking for that first wood burning tool, then take a few moments and read through this tutorial for an in-depth review of the Walnut Hollow Versa-Tool used to wood burn a Toucan Family.
Winter Birdhouse Wood Burning Tutorial – This in-depth, step-by-step project focuses on a winter bird house wood burning scene. The project takes you from the initial tracing of the design to the final coloring steps.
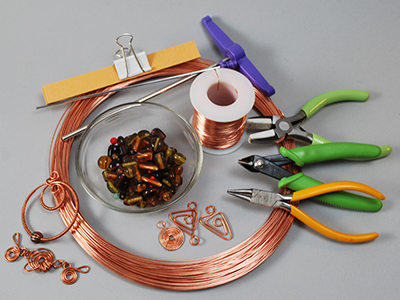
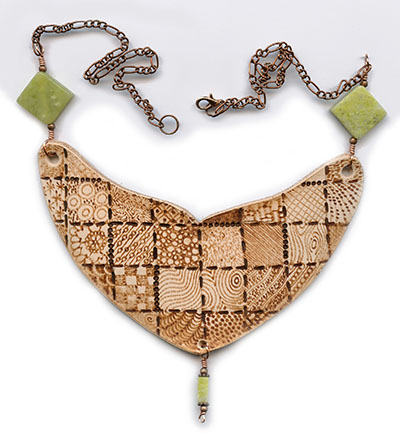
Wire-bent and wire-wrapped jewelry is an art that is currently in high favor among crafters. Jewelry supplies are readily available at most large box craft stores and through online shopping.
For my leather burnt necklaces I chose copper wire and findings, but there is a wide variety of wire types that you can use as silver, silver-coated, black, and colored aluminum. Personally, I prefer copper as it is a soft, easy to bend metal that can be tempered through gently hammering into strong, secure links and chains.
Glass beads and lamp work beads are also a favorite for me in jewelry work, but you will find a wonderful selection of gemstones, cut crystal beads, resin beads, and even bone or shell beads that you can use.
Completing your necklace
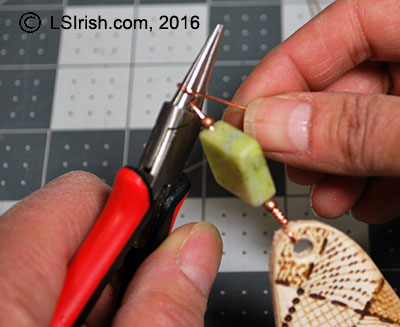
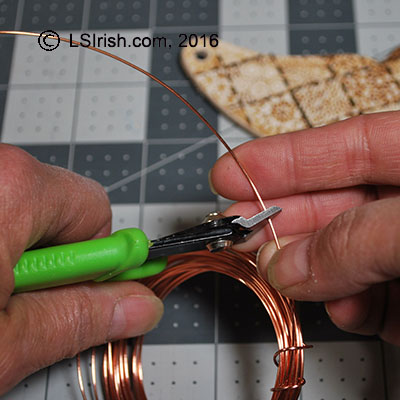
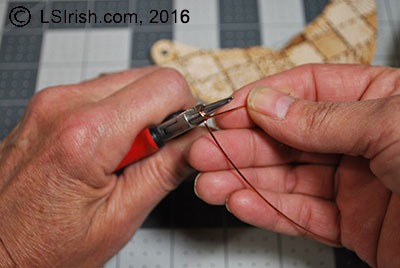
1 Cut an 8” length of 18-gauge copper wire with your flush cutters.
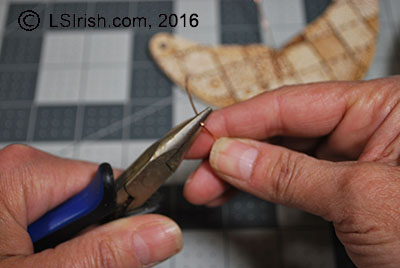
2 Grip the wire about 3” from one end in your straight pliers. Bend the wire to a 90 degree angle. Move the wire to your round-nose pliers, gripping the wire at the 90 degree angle. Roll the 3” end around the round-nose pliers to create a small loop.
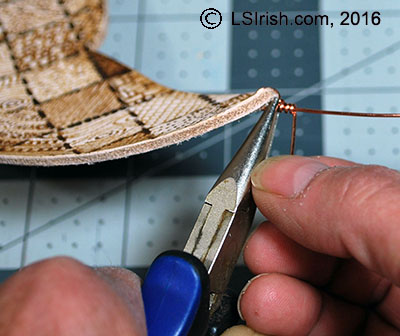
3 Slide the short end of the wire through one of the holes in your leather burnt necklace. Move the wire to center the leather inside of the small loop.
Secure the loop
4 Grip the top of the loop, where it overlaps the long working end of the wire in your straight pliers. Roll the short end of the wire around the long working wire two to three times.
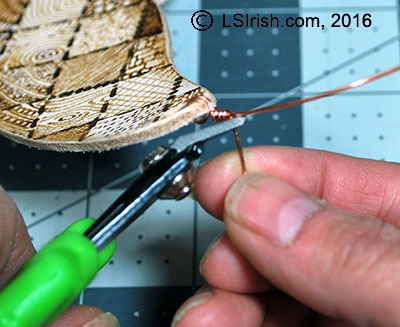
5 Clip the excess short wire with your flush cutters.
6 With your straight pliers crimp the cut end tightly against the long working wire.
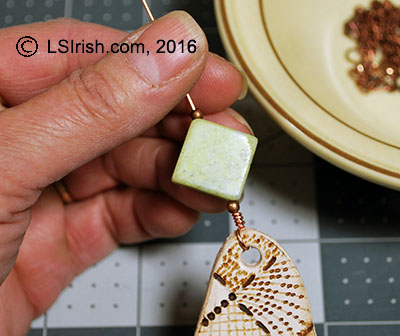
Adding beads
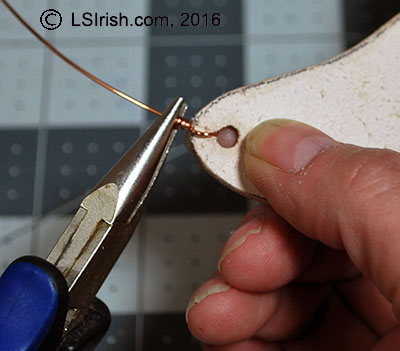
7 Slide your chosen beads onto the long working wire. In my necklace I used one 2-mm copper bead, one 16-mm square yellow jade bead, and one 2-mm copper bead.
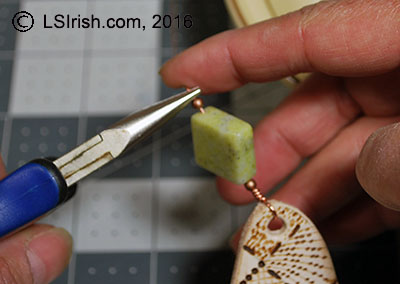
8 Grip the working wire in your straight pliers, with the tip of the pliers against the last bead. Bend the working wire into a 90 degree angle.
9 Place the 90 degree angle into your round-nose pliers and roll the working wire into a small loop.
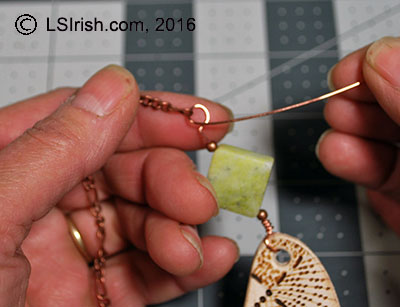
Adding the chain
10 The second small loop should be created by holding the wire in the same spot or area of the round-nose pliers as you did the first loop. This keeps the two end loops of the bead dangle the same size.
11 Cut two sections of 2- to 3-mm copper chain 7” long each. Slide the last open link of the chain onto the short end of the loop wire. Move the chain link to the center of the loop.
12 Complete your wire wrapped bead dangles by gripping the small loop in your straight pliers and wrapping the short end wire around the base of the loop two to three times.
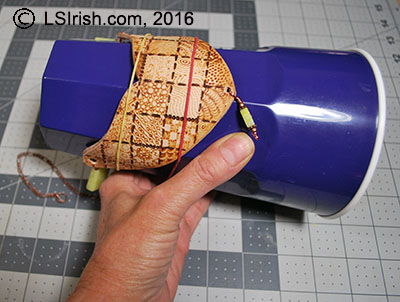
Shaping the leather
17 Your leather burned necklace can easily be shaped by simply placing your finished necklace under your kitchen faucet for a few moments, allowing the leather to become wet. Pat the leather necklace dry on a clean cloth. While the necklace is still damp and pliable, lay the necklace on a large, plastic soda glass and with loose (oversized) rubber bands lightly secure into place. Let the necklace dry overnight.
Completed necklace
In the next post I will be sharing five more ideas for this leather burned necklace project, with the free patterns. But here is a preview …