Its that time of year, time to start our Free Online In-depth wood carving Winter 2014 Seminar, taught by Lora Irish, wood carving and pyrography book author and line art pattern maker.
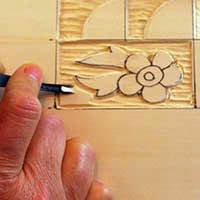
For this year’s seminar I have chosen Chip Carving, also called Spoon Carving! This wonderful style of wood carving uses geometric and free form cut chips to create intricate designs. This free seminar is only being offered here on my blog, so please lets your friends and fellow carvers on your favorite message boards know! Post a link today.
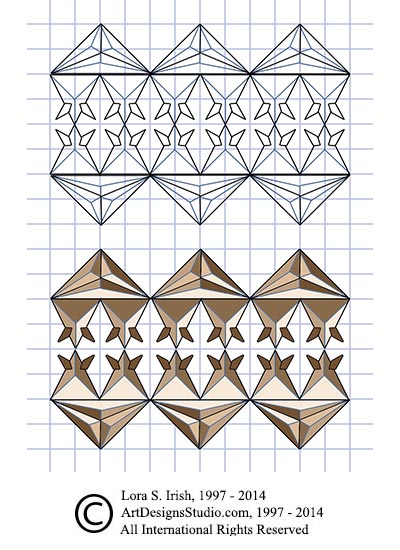
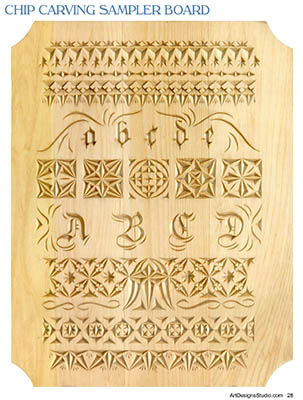
Over the next week or so we will take an in-depth look at this wood carving technique, create several chip carving practice boards, and take a close look at a classic needlepoint sampler layout, shown above, that you can use to carve multiple chip carved projects. The pattern and photo sampler for this Needlepoint Layout is available in both our new Chip Carving Pattern Package and in the Chip Carving E-Project.
We will explore:
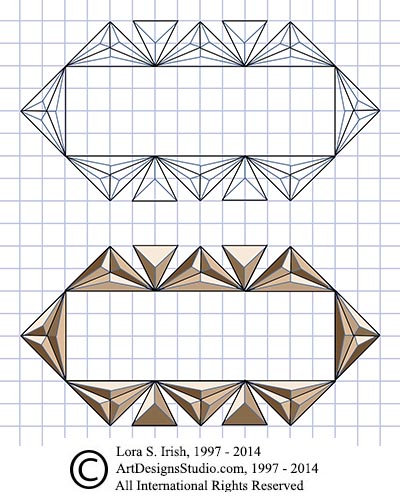
Supplies needed for chip carving Creating basswood chip carving practice boards Wood preparations Knife sharpening Transferring a chip pattern to your board Knife angle Common problems Positive and negative space How to cut the different styles of chips Learn triangles, square, straight-wall, curve-edge, free form, and accent chips Using chip styles in your patterns Work a set of chip progressions How to turn a corner
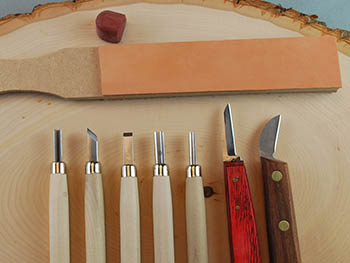
To get ready for this seminar you will need the following supplies:
basswood practice boards – 3″ to 4″ wide x 18″ long, 1/4″ basswood is available at most hardware stores
11″ x 14″ basswood plaque – needlepoint sampler pattern
14″ x 14″ basswood plaque – chess game board pattern
large chip carving knife
stab chip carving knife
detail wood carving bench knife
sharpening stones and leather strop
graph paper
removable spray adhesive
pencil
320-grit sandpaper
white artist eraser
boiled linseed oil
turpentine
paste wax finish
Class begins Wednesday, January 15th! I’ve saved a chair at the teaching table just for you!
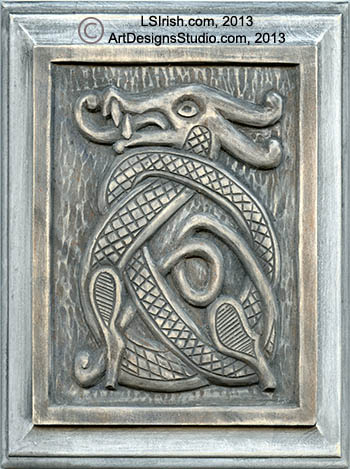
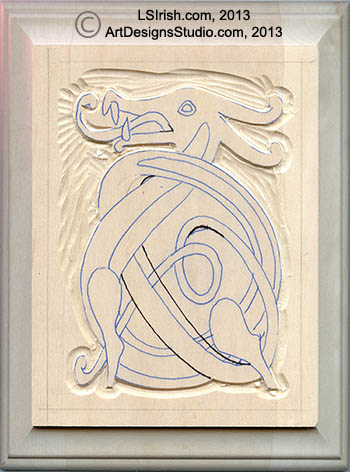
This quick, easy, and fun Celtic Dragon pattern is perfect for your first endeavor into relief wood carving. It uses a very basic set of carving tools, a bench knife, and a pre-routed basswood plaque. Your dragon carving can be completed in just one weekend.
Over the next several days I will be posting all of the step you need to create your own Celtic knot relief carving project. Please bookmark our blog so that you don’t miss any of the fun. I hope that you will share this link on your favorite wood carving forum or message board.
Please take a moment and download our free PDF e-book, Your First Carving. This is an in-depth look at the woods, tools, terminology, and techniques used in relief wood carving, written and shared by Lora S Irish.
8” x 10” x 3/4” (203 x 254 x 19mm) router-edged basswood plaque Bench knife Large and small round gouges Wide sweep round gouge V-gouge Straight chisel U-gouge Sharpening tools and strop 220-grit sandpaper Graphite tracing paper Painter’s tape Pencil Ruler and/or compass Soft, clean cloth Stiff toothbrush or brass wire brush Thick terry cloth towel or non-slip mat Depth Gauge
Preparation of the carving board
1. Most of the supplies used in this project can be obtained online at your favorite wood carving supply house, through Amazon.com, or at your local large craft store. The sandpaper, painter’s tape, ruler, compass, and brass wire brush are available through most hardware stores.
2. Using 220-grit sandpaper lightly sand your plaque, working the sandpaper with the grain of the wood. Avoid sanding against the grain or in circular swirl strokes. This will leave fine scratches that can appear during the painting and staining steps.
3. Sand again using 320-grit sandpaper. Remove all of the sanding dust using a dry, clean cloth.
Transferring your Pattern
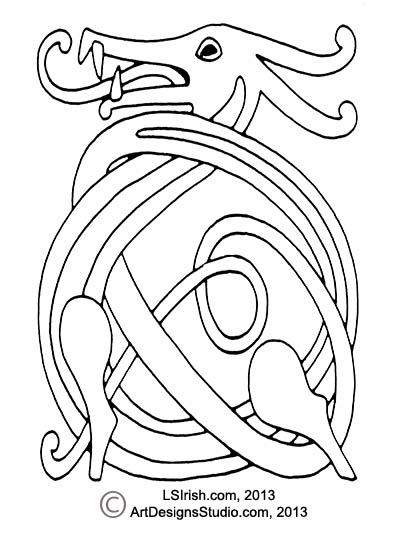
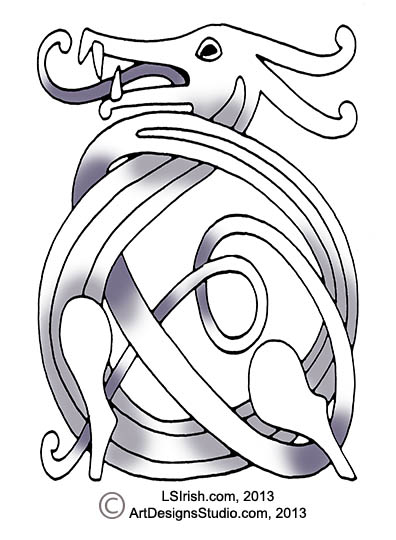
Click on the pattern images to the right and save a copy to your Desktop. Print one copy of each pattern – the outline tracing pattern and the shaded contour pattern.
Center the pattern to the board, secure one side using painter’s tape. Slide a sheet of graphite paper under the pattern paper with the graphite side against the wood. Using an ink pen and light hand pressure trace along the outer boundary lines of each element of the dragon. Remove the pattern and graphite papers.
For this carving I am using a nice quality Japanese carving tools set which includes a large round gouge, small round gouge, straight chisel, skew chisel, and v-gouge. Carving tool sets can cost between $25 per set up to several hundred dollars. I strongly advise any beginner to start with an inexpensive tool set while you discover which style of wood carving will be your favorite.
1. Mark a 1/4″ margin using a pencil and ruler along the outer raised carving area of your plaque. This 1/4″ area will remain uncarved, at the original level of the wood. During the next two steps treat this margin line as if it were a boundary line to your pattern.
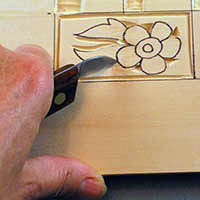
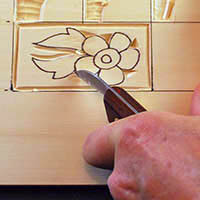
2. This project begins with dropping the background area of the plaque to free the dragon pattern for carving. With a bench knife or large chip carving knife, cut along the outer boundary lines of the dragon pattern. Hold the knife vertical to the wood and slowly pull along the tracing line. Stop cuts are made in several shallow cuts instead on one deep lunge of t he knife tip.
3. Using the small or large round gouge, rougehout the background. Lay the center of the gouge about 1/2″ to 1″ from the stop cut tracing line. Glide the gouge into the stop cut. This will release a small chip of wood.
1. The background rough-out step begins with a stop cut made with a bench knife or chip carving knife.
2. Hold the knife vertical to the wood and make several shallow cuts along the tracing lines.
3. Use a round gouge to carve from the background area into the stop cut line at the pattern edge.
4. The rough-out stage may take several layers of round gouge cutting. As you deepen your background re-cut the stop cut along the outer pattern line to slowly drop the straight-edged wall along the dragon. My final layer of round gouge cuts was worked with the grain (vertical to the plaque) to set all of the carving strokes in one direction. More about Background treatments for your relief wood carving.
Determining the depth of your relief carving
The depth of your carved background and carved design is determined by how thick your carving board is. As a general rule the carving is cut to approximately 1/2 the depth or thickness of the wood at the deepest point. For a 3/4″ board this makes the background drop about 3/8″ deep. More about Determining the depth of a carving.
Please join me tomorrow, November 16, 2013, as we work through the shaping and contour steps for this Celtic Dragon Knot pattern. Thank you, Lora Irish
Sharp carving knives, gouges, and chisels are a must for any wood carving project, whether it is a 3-dimensional little cowboy, relief landscape, or a whittled animal.
If your bench knife seems to drag through the cutting stroke or if it leaves behind fine, thin scratch marks in the cut it is time to get out your sharpening stones, leather strop, and rouging compound. Dull knives and rough cutting edges can be dangerous as they cause you to apply excess pressure to make the stroke.
I start every carving session by first checking the sharpness of my tool edges. You can do this several ways. First, make a few cuts on a basswood practice stick. Your tool should push through the cut smoothly, if it seems to drag or hang-up on the wood it needs sharpening. You can also look at the cutting edge of the blade under a bright light. If your tool is dull the cutting edge will appear as a white line or you may see white spots where there are dings or dents.
I also check my sharpening stones on a regular bases as they can become bellied or bowed in the center from use.
Let’s look at the simple steps to sharpening your wood carving knives, gouges, and chisels.


 To get ready for this seminar you will need the following supplies: