I know that August has just begun and that it is still a month before the kids go back to school, but this is the perfect time to start collecting the patterns and projects that you will want to work this fall.
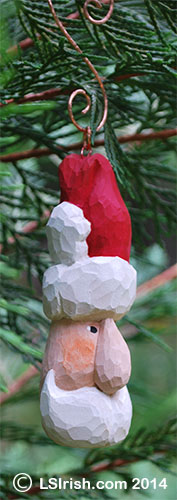
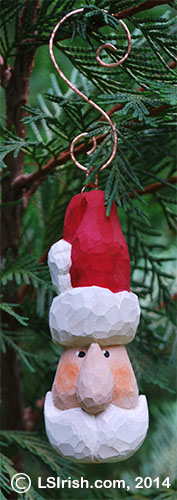
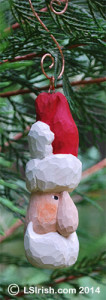
This “Oh So Easy Santa Ornament” is a great beginner’s project and a real quick carve for any advanced carver. He takes only two carving knifes – a bench knife and a v-gouge. Make a dozen or more, place them in a basket of straw with a few extra Christmas balls and have them ready and at hand to give away as instant Holiday gifts!
Estimated Carving Time: less than 2 hours
Estimated Painting Time: 1/2 hour
Supplies:
bench knife or large chip carving knife v-gouge sharpening tools 1″ x 1″ x 4″ basswood block 320-grit sandpaper Acrylic craft paints titanium white burnt sienna cadmium orange deep cadmium red Acrylic or polyurethane spray sealer 20-gauge copper wire 16-gauge copper wire
Please, check in often as Lora is doing her yearly pattern closet cleaning! Lots of free wood carving and pyrography patterns are headed your way.
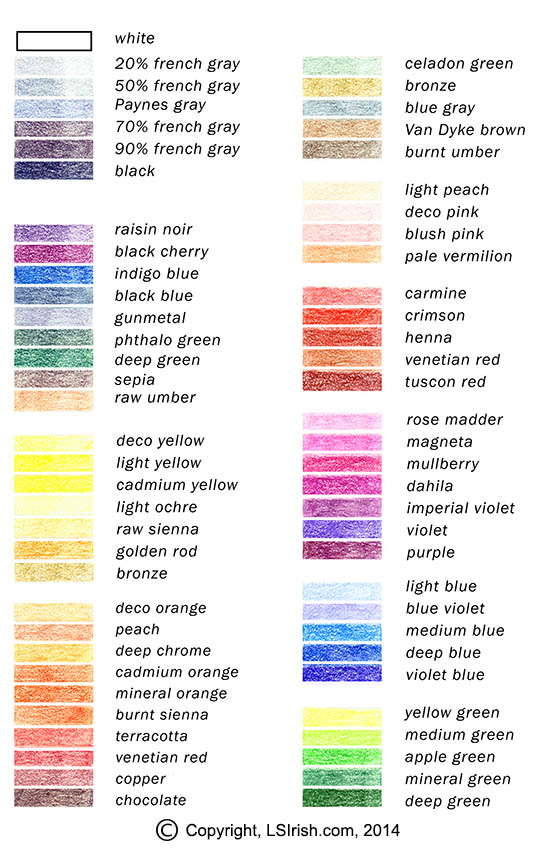
Mike A., Hooker green is equal to the phthalo green shown in the left column, second grouping. A medium red-brown earthtone is equal to the venetian red, right column, third section!
Mike A. and his wood carving club are currently working as a group through our Canada Goose Relief Wood Carving Project – a great step-by-step project for any beginning wood carver. He sent an email yesterday asking several questions on the paint colors used in this tutorial. So, I am posting my favorite color chart guide here on our blog for Mike.
The chart is grouped into several areas for easy reference.
Left hand column, top shows the basic gray tones for neutral shading. French gray tends towards a beige-gray or brown-gray coloring, and Paynes gray tends towards a glue-gray or gunmetal tone. The second group shows the dark color tones used in colored pencil work for complimentary shading, where the compliment of the final color of an area is used to create the shadow tones. The third section is my favorite graduated colorings for yellow. The bottom group in the left hand column shows my skin tone colors.
In the right hand column, the top section shows my muted tone shading colors. The remaining sections show my chosen graduated tones for pink, red, purple, blue, and green.
Every paint, pencil, and pastel company has their own unique names for their colors. I would recommend that you keep a copy of this painting guide on your computer. You can print a copy, then write the manufacturer’s names of the paints you already own beside the matching color swatch.
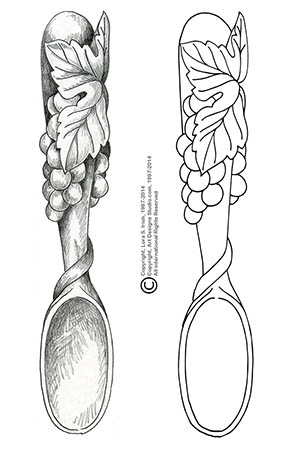
Welsh Love Spoons have long been a favorite carving theme for wood carvers. Tradition says that this original art style for wood carving came from the seamen of the British Isles that brought small pieces of wood and a carving knife with them on their ocean voyages to fill the long hours. Many of the designs and patterns were symbolic of the sailor’s love of home and family, but they also used some of our favorite whittling trick carvings as the ball and chain or ball in the cage. Today any relief carving pattern can become the design for the handle of your Welsh Love Spoon. For my sample I chose a simple grape design with a double stem that wraps around the spoon handle. With another upcoming stormy weekend it seems like a perfect time to share my carving and pattern for you to enjoy.
For your Free Welsh Love Spoon Pattern Pack by Lora Irish, please visit our wood carving, & pyrography patterns website, Art Designs Studio.
To learn more about Welsh Love Spoon carving, please visit Lora S. Irish’s free online tutorials.
In today’s free online Chip Carving Seminar by Lora Irish, we look at the wood carving cuts used to create straight-wall, curve-edge, and free form chips in your chip carving patterns.
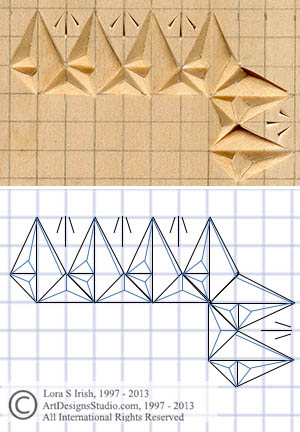
Straight-wall chips have two sides of a triangle chip cut at or near 90 degrees to the board. The third side of the triangle is cut by laying the knife blade extremely low to the board and slicing the blade back to the intersection point of the other two sides. This creates a sloped floor the chip well.
A straight-wall chip can have several layers of straight-wall work within one larger chip. In the photo example to the right, after the chip area was worked as a straight-wall and second straight-wall chip was laid inside the first. The second small chip has a deeper slope to the chip floor. You can use either a large chip carving knife or a detail bench knife to cut the third wall sloping floor.
CUT 1
Holding the knife at or near 90 degrees to the board cut along one of the sides of the chip that will be the wall of the deepest point of the sloped floor.
CUT 2
Cut the second wall of the deep side of the chip floor at or near 90 degrees. The deepest point of the cut for both straight walls are at the intersection of those lines.
CUT 3
Lay the knife blade low to the wood along the third side of the chip. Push the knife towards the intersecting corner of the straight-wall sides.
Cutting Double Straight-Wall Chips
Straight-wall chips can contain multiple wall levels worked in the direction of the first wall or worked on a new diagonal line. Each new straight-wall is worked exactly as the first, main straight-wall of the chip. Both chips of a double straight-wall chip share the same sloped third side of the cut.
Cut 1
Cut your the main walls of the larger straight-wall chip. With a pencil mark where the new, inner straight-wall will fall inside of the larger chip. Cut the first side or leg of your smaller, inner wall at a 90 degree angle to the wood.
Cut 2 and 3
Cut the second straight-side of the inner, smaller straight-wall chip at a 90 degree angle to the wood.
Lay your bench knife or chip knife low to the wood and slice the third wall into the straight-wall corner of the inner chip.
Curve-Edged Chips
Adding a curved edge to a triangle or square chip breaks the design out of the angular effect that chip carving can have. The curved side of the chip is treated exactly as a straight side by angling the knife blade point towards the center point or center line of the well. As you cut the curved side of the chip, roll the blade of your knife along the pattern line to create.
CUT 1
The heart pattern, above, uses triangles with three curved sides to establish the heart in the negative space of the design. Cut one side of this curved chip, following the pattern lines, and angling the blade point to the center of the chip well.
CUT 2
Cut along the second side, following the curve of the pattern, and angling the blade point to the center of the chip well.
CUT 3
The third side is cut as the first two and will release the chip from the board.
Free Form Chips
Free form chips use two to three sides to create long, curved v-trough lines. Entire patterns as roosters or dancing figures can be create using just free form work.
CUT 1
Place the point of the chip knife at the beginning of the free form line at or near a 45 degree angle to the wood, angled away from the line. Using increasing gentle pressure, push the point of the knife deeper into the wood as you pull the cut until you reach the mid-point of the line. Slowly lift the knife from the wood as you complete the second half of the line cut.
CUT 2
Turn the board 180 degrees to make the second cut. Work the second side of the free form cut exactly as you worked the first.
CUT 3
Small oval-shaped leaf cuts can be made by laying the knife blade at a closer angle to the wood. In the photo above, the central motif uses two free form oval-shaped leaf cuts with adjoining sides. It also contains long, curved accent free form lines below the motif.
Stab Knife Accents
The stab knife is held in an upright position, 90 degrees, to the wood. The metal at the blade tip is tapered from a wide area at the point which slowly narrows along the cutting edge as it nears the handle. By pushing the knife point directly into the wood you can cut small wedge-shaped accent lines.
Some stab knives have both sides of the blade point angle sharpened. This style of chip carving knife can be used to push the blade into the triangle or square chip pattern lines to cut the walls of the chip.
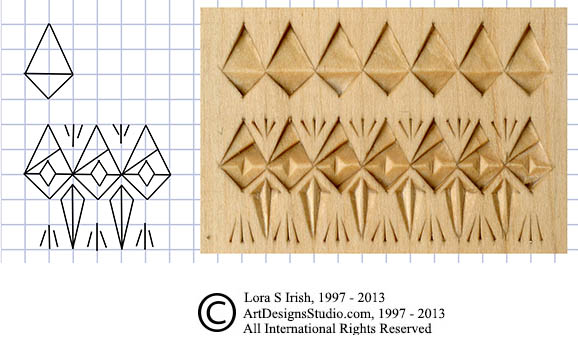
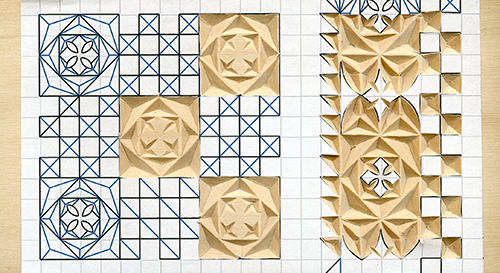
Sample Chip Carving for Straight-wall, Curve-edge, and Free Form Chip Carving
You now know how to cut all of the chips in the sample chip carving to the right. This particular chip carving design, by Lora Irish, contains triangle chips, square chips, straight-wall chips, curve-edge chips, free form chips, and stab knife chip accents.
Today’s Practice Board Pattern
Tomorrow we will work through a Chess Board – Game Board Chip Carving Pattern.
In today’s Chip Carving Free Online Seminar by Lora Irish we will discuss how to prepare your wood board, how to transfer your pattern, and how to set up a chip carving practice board.
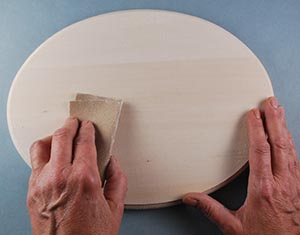
Any wood surface will require a light sanding using 320-grit sandpaper. Rough surfaces can cause your chip knife to grab or hesitate as you make the cutting stroke. Sand in the direction of the wood grain to avoid adding fine scratch lines from the paper. Wipe the board well with a lint-free dry cloth to remove the sanding dust.
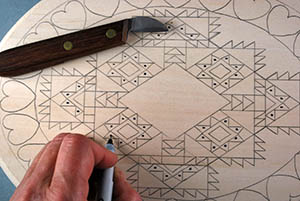
Pattern tracing using graphite paper
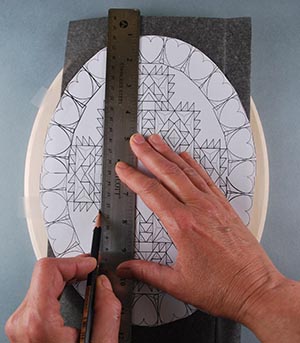
If the pattern is small and you have a printed copy of the design you can use graphite paper to trace the image to the wood. Center the printed pattern to the wood and tape it into place along one edge. Slide the graphite paper under the pattern. Using a ruler, compass, or straight edge and a hard pencil, mark along each line. After the cutting is complete the tracing lines can be erased.
Advantages – Tracing has the advantage when you are transferring your pattern to curved surface or when you want your chips in one oddly shaped area on the wood. In the photo sample the carving board is oval and the pattern has that same oval. Tracing with graphite paper made it easy to cut the pattern along the oval shape and align it properly with the board.
Disadvantages – Hand tracing, even when you use a ruler and compass, does not always give you perfectly matched chip sizes or perfectly straight cutting lines. Take time to double-check your line accuracy before you begin cutting. After the chip carving is complete you will need to remove any remaining tracing lines using a white eraser. For stubborn lines a light sanding with 320-grit sandpaper may be necessary.
Graphing directly to the wood
Because most chip carving patterns are geometric they can easily be graphed direct onto the board.
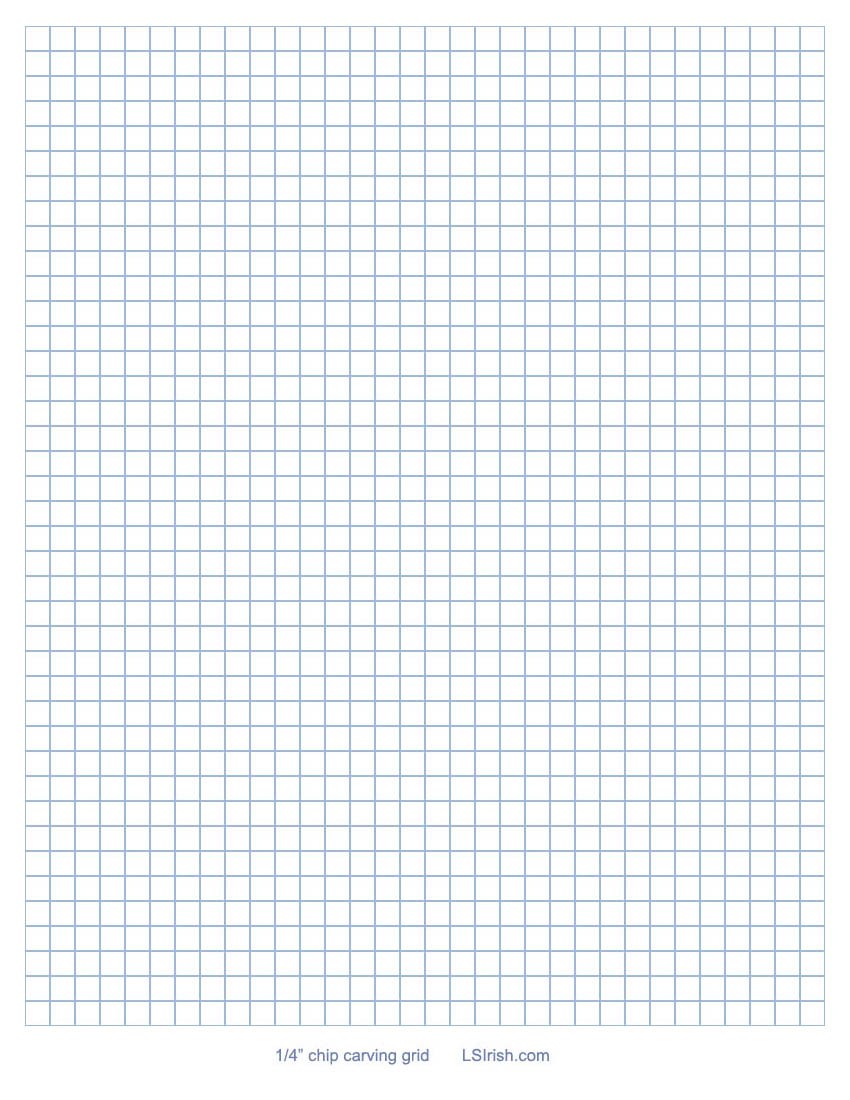
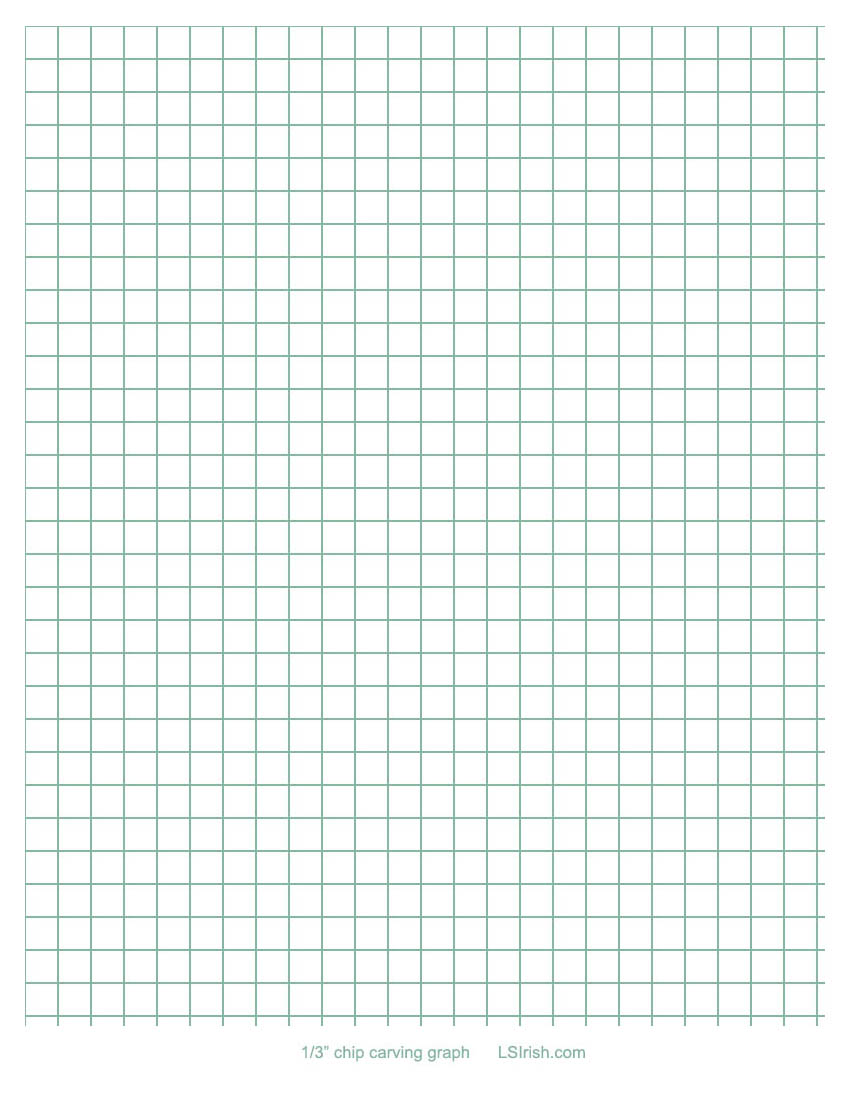
Using a small t-square, a ruler, and hard pencil mark the grid to your board. The size of each unit determines the final size of the chip motif – a 1/3” space will create larger chip motifs than a 1/4” spacing. With a soft pencil, to mark darker lines, pencil in your motif using the grid guidelines.
Advantages – Creating the pencil graph directly to the wood means that your knife is cutting directly into each chip wall. There is no graphite paper that might slide as you create the chip lines and there is no pattern paper between you and the wood as you work.
Disadvantages – Your final chip carving will only be as accurate as your pencil grid. Use a small t-square to mark all of your grid lines, sliding the square across one edge of the board. After the chip carving is complete use a white eraser to remove the pencil grid. A light sanding using 320-grit sandpaper will remove any stubborn lines.
Applying a graphed pattern with removable spray adhesive
Spray adhesives allow you to temporarily glue the printed pattern directly to your wood board. You can cut your chips following the printed paper lines. After the chip carving is complete the remaining pattern paper can be lifted from the wood, leaving a clean, unblemished background.
Read and follow the directions of the label for the best results when using spray adhesives. After the pattern has been affixed to the wood allow the paper to dry completely before you begin your cutting steps.
Advantages – By using a printed, adhered pattern you know that each chip cutting line is absolutely accurate. The bright white of the paper and the black chip outlines makes it easy to know where you have cut and where you still need to work. When the pattern is removed the background wood is clean, there will be no tracing or pencil lines to remove.
Disadvantages – Spray adhesives can become permanently affixed to your wood. Do a test sample on a practice board before you use this method on your larger project. Be sure to clean the nozzle of your spray adhesive can before you coat your pattern paper, a clogged nozzle can cause your spray to become uneven in coverage and it can leave small clumps of adhesive that are hard to cut. Spray adhesive patterns can come loose during the cutting steps.
This often happens where one chip lies against another. The loose side of paper can both block your view of your next cut as well as get in the way of the knife blade. If this happens lightly score the pattern paper along the outer lines of the chip you are cutting. This releases just the paper chip so that you can remove it. Now cut along the score lines.
Simplifying the Pattern
As you view the free chip carving patterns that are being offered with this seminar you will note that the outer lines of each chip is marked with a black line. The inner cuts that make the well of the chip are marked with blue lines. If you are tracing or graphing your pattern the inner lines do not need to be transferred to your board. Instead, after the outer lines have been graphed with a #4 soft pencil or a fine point marker, place one small dot inside the chip to note where the center point of the chip well will be. One dot, centered in the chip well will note a three or four-sided chip cut. One dot placed in one corner of the chip well will note a straight-wall cut where the third chip wall slopes into the corner.
Chip Carving Graph Paper
The two square girds below are 100 dpi for accuracy. Please click on each image to view the full-sized pattern. Save to your computer. You can Click and Print as many copies as you need. As we work through the practice board grids over the next few days I will be using a blank grid and pencil marking the chip motifs.
1/4″ chip grid
1/3″ chip grid
Today’s Free Chip Carving Pattern
Next we will look at hand positions for cutting your chips, common problems, and positive and negative space in chip carving. We are getting very close to cutting a few chips. Thank you for reading!

 Supplies: