altered art

Mulberry Paper Collage for Wood Working

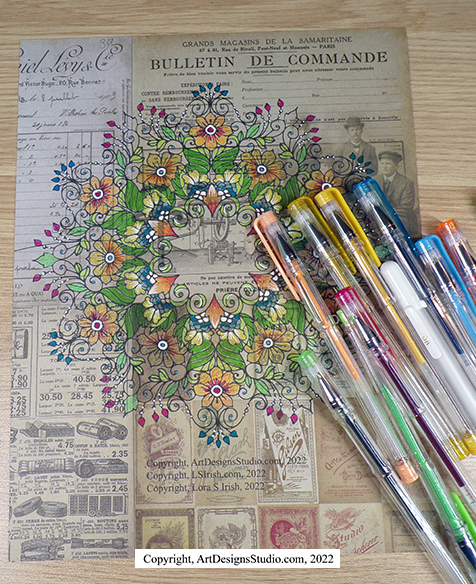
Collage is the art of using small scraps or pieces of paper, fiber, and printed material to create an image.  Its a favorite for scrap booking, altered art, and fine arts.  It can also be used for your wood and gourd crafts.

Supplies:  mulberry paper, rice paper, hand-crafted art paper, an acrylic based glue, a home computer printer, and a digital pattern.

ArtDesignsStudio.com and LSIrish.com are affiliates of Amazon.com.  Your purchases through these links helps me to keep LSIrish.com blog free for your fun.  Thank you for your support!

Mulberry and rice papers have little to no grain.  Instead they have a random fibrous base that allows the papers to bend, and adjust to the surface upon which they are applied. They are often semi-transparent which allows the media to show through the paper fibers – you don’t lose your wonderful wood grain of your basswood slab when you lay printed mulberry paper over top the surface.

Plus! They can be used with your home printer.  It is so much easier to print a complicated mandala pattern on art paper and then glue that paper to your board, then to try and trace each and every line of the design.

Acrylic-based glues and pastes keep the printed paper from becoming water saturated, which will cause the paper to buckle.  Try Yes! Glue, or PVA bookbinding acid-free glue instead of Elmore’s.

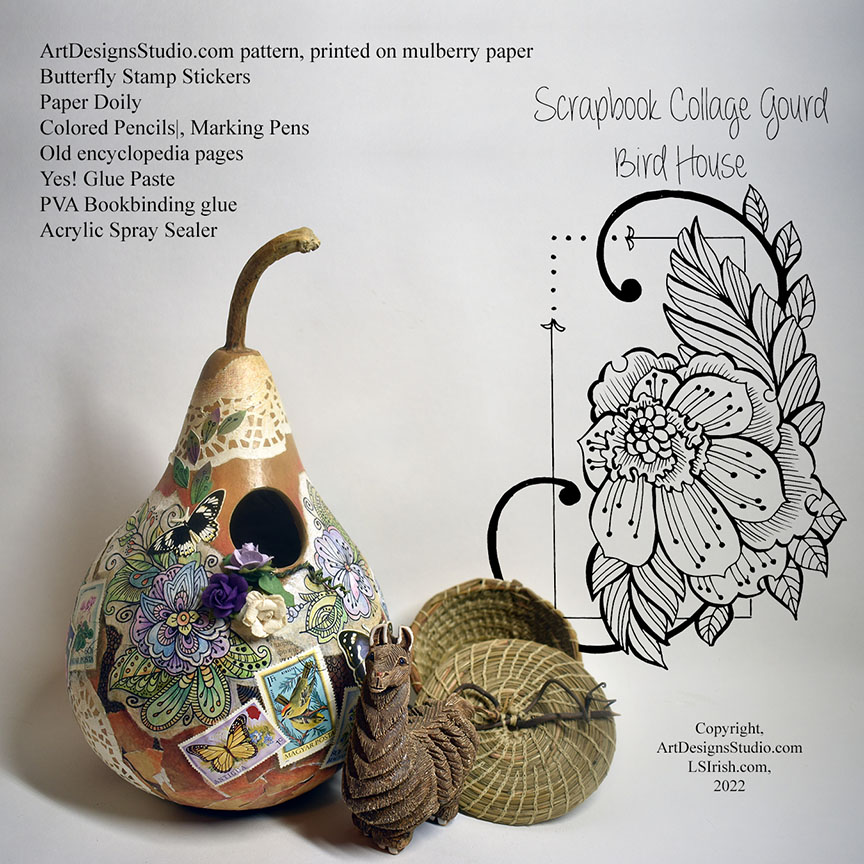
I have two new pattern packages on my pattern website, at ArtDesignsStudio.com, that are perfect for collage work.

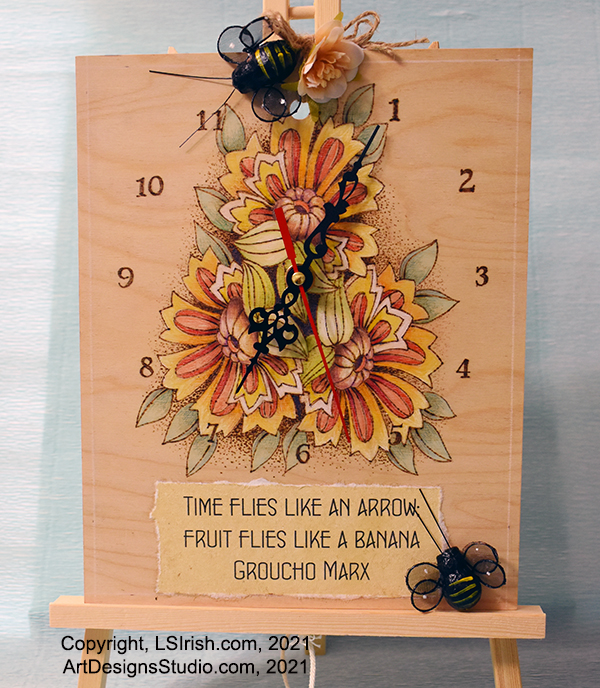
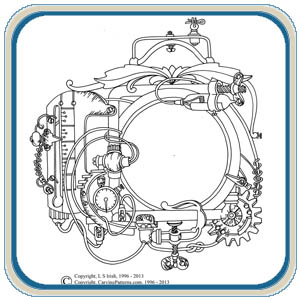
I have also posted a new E-Project for creating a Mulberry Paper covered collage wood box, with step-by-step instructions.  Currently, July 13th, 2022, there is a Try It Before You Buy It free mandala pattern for the clock shown below posted on ArtDesignsStudio.com’s homepage.

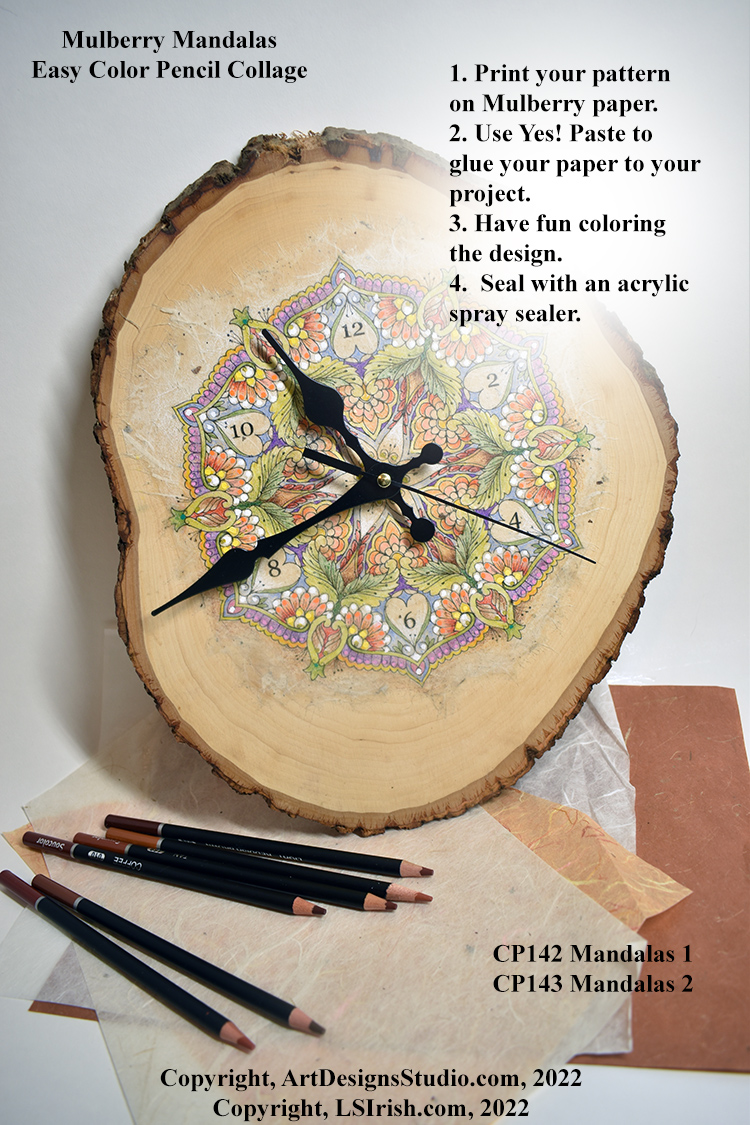
This is a 1/2″ thick, end slab of basswood.  Sand the slab with 220-grit sandpaper and remove any dust.  Measure for the center point to create the 3/8″ hole needed for the clockworks.  Print your free pattern on Mulberry paper.  Use YES! glue with a palette knife on the back of the paper.  Center the mulberry printed pattern over the clock hole and with your fingers gently rub from the center out on the paper to remove any air bubbles.  Let the basswood collage slab dry overnight, then color your mandala with your favorite coloring agent – colored pencils, gel pens, watercolor crayons, soft pastels, and even watercolors.  Seal the finished clock with acrylic spray sealer … That’s it, quick, simple, and fun.


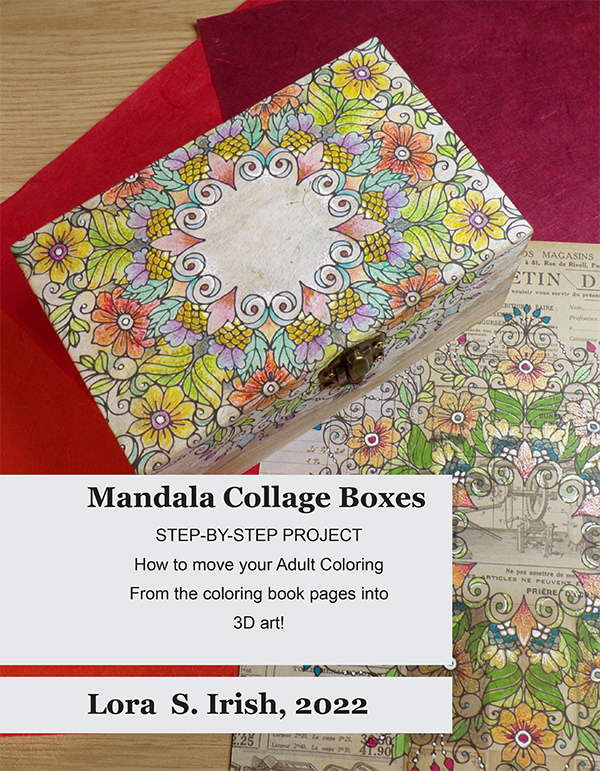
My new E-Project focuses on creating a collage covered wood craft box with a mandala design that flows over the top and sides of the box.
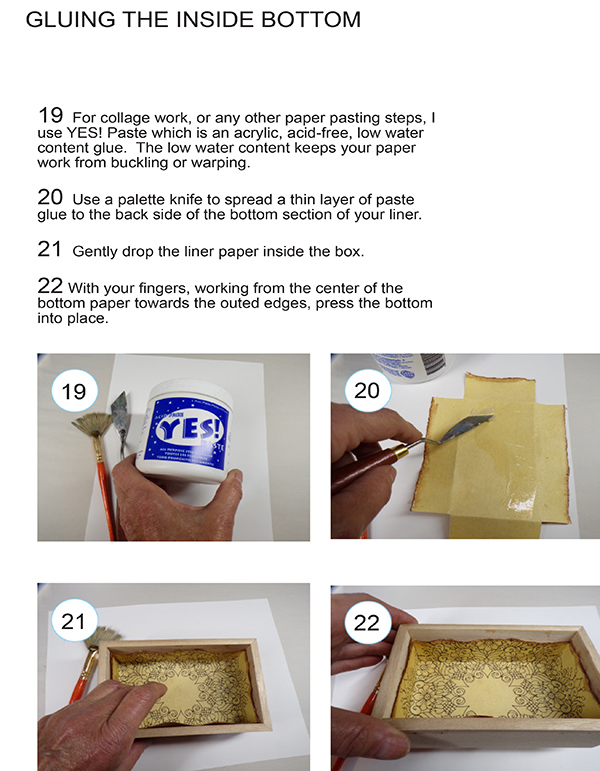
You will learn:

how-to print the pattern to your art on mulberry paper,  rice paper, or hand-crafted art paper
how-to remove the pre-made box hardware
how-to measure the paper to fit the inside and outside of the box
how-to apply the acrylic-based YES! glue
how-to roll the paper over the sides of the box
how-to cut the lid free from the bottom
how-to create a secret inside lid trap door.


Of course, the E-Project covers basic instructions on using colored pencils to highlight your design.

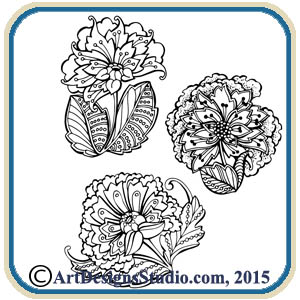
Plus, there is a large, bonus, peony design, shown printed on medium-beige mulberry paper, ready for framing.

The new E-Project, Art Paper Mandala Collage E-Project, includes both mandala pattern packs – Mandala 1 Collage Patterns, and Mandala 2 Collage Patterns.  $14.95 for all.

Mulberry Paper Collage for Wood Working Read More »

Coloring Wood Carving, Pyrography & Gourd Projects

Painting Wood, Water Colors, Colored Pencils, Marking Pens


Coloring Your Projects

Painting with Eye Shadow for Wood Carving and Pyrographyfree pyrography clock pattern
Coloring Your Project
Color Chart for LSIrish.com
Basics to Painting
Adding Skin Colors with Watercolors
Basics to Painting
Acrylics over a Primer for Wood Carving
China Painting with Acrylics for Wood Carving
Dry Brushed Acrylics over Oil Stain for Wood Carvings
Marbling and Splatter Painting
Simple Dry Brushing for Wood Carving and Pyrography
Vintage Painting
Wood Carving and Burning Painting Supplies
Paint Kit Supplies for Painting Your Wood Carving
Steps to Success, Painting Your Wood Carving
Burnishing Your Wood Carving
Simple Blending with Acrylic Craft Paints
General Techniques Used in Wood Carving Paintingfinishing and paintinf techniques for wood
Basics to Painting for Pyrography and Wood Carving
Painting Eyes
Watercolors and Wood Burning
The Color Wheel, Who Is R. G. Biv?
Dry Brushing, Wood Painting Techniques by Lora Irish
Colored Pencil Let’s Talk Color
Marking Pen Quilts
Adult Coloring – Colored Pencil Application
Adult Coloring – Working with Colored Pencils
Adult Coloring Portraits
Colored Pencil Let’s Talk Color
Colored Pencil Pyrography
Color, Shadow, and Light in Pyrography
Coloring your Pyrography using Colored Pencils
Painting a Color Wheel for Pyrography, Gourd Art, Wood Carving
Working in Layers, Colored Pencils
Color Chart for LSIrish.com
Painted Blue Jeans 2, Free Craft Patterns
Painted Blue Jeans, Free Patterns
Sepia Toned Crayons

LSIrish.com

L S Irish Mission Statement
Free Wood Carving, Pyrography, Painting PDF Files
Selling Your Finished Work – Art and Craft Shows
Copyright, Can I sell my finished projects?
Lora Irish Copyright Article
How to Download

Coloring Wood Carving, Pyrography & Gourd Projects Read More »

Redwork Embroidery Christmas Angel

Redwork Embroidery Christmas Angel
Christmas Calicos Pattern Pack

Supplies:
14″ square of unbleached muslin
large embroidery hoop
embroidery needles
your favorite shade of red embroidery floss
Christmas Calicos angel pattern
scrap booking gel pens
white acrylic craft paint
embroidered rose accent

Our great-grandmothers didn’t have acrylic paints and gel pens in their embroidery craft kit but we do!

So after you have finished your embroidery stitching get them out onto your craft table and have fun adding bits and accents of bright colors to the inside areas of your design.  You can use layers of gel pen colors to create intense color tones, add darker or lighter shades of gel pen over an area to make highlights and shadows … and even use different colors to make your own calico fabric patterns.

Some pale gel pens do require multiple colors.  For my white I chose to use acrylic craft paint.

If you get a little out of the line with the gels or if you have small openings in your stitch word, use a matching red gel pen to go over the embroidery floss.  Use embroidery patches, accent flowers, small bows and ribbons, and even tiny buttons to dress her up.

Once everything is completed and your redwork angel has dried over night, give it a nice ironing to permanent set the colors.  She is ready for her permanent hoop frame and to be placed on your mantel !!!!


Have fun ~ Lora

Redwork Embroidery Christmas Angel Read More »

Painted Blue Jeans 2, Free Craft Patterns

Doodle Days #13 –  Blue Jean Painting, Wood Burn Spoons, Wood Carved Spoons, Leather Work, Free Lora S. Irish Patterns to Download, DIY Bookmaking, Bullet Journals, Scrap Booking, Card Making, Applique Quilting, Pyrography, Wood Carving

Painted Blue Jeans using our Free Doodle Patterns

how to paint blue jeans

Supplies:

1 pair of medium-blue blue jeans
1 cork-backed ruler
1-3 fine-point black fabric pens
1 set of 18 to 24 colors, medium-point fabric marking pens
1 set of assorted color fabric marking pens
1 piece of scrap cardboard, large enough to slide inside the pant’s leg
steam iron

Colore Dual Tip Fabric Markers

Super Markers Fabric and T-Shirt Permanent Ink Pens

Best 24 Colors Fabric Markers

Sharpie Fine Point Markers, 36 piece set

Apple Barrel Acrylic Paint Set, 18 Piece


how to paint blue jeans

Step 1:  Pre-wash your jeans to remove any starch or stabilizing chemicals.  Dry the jeans thoroughly before you begin painting.

free craft patterns
Free Doodle Pattern #043

Step 2:  Download your copies of our Free Doodle Patterns, here on LSIrish.com.  Type doodles into the search box in the header.  We are on numbers 043 to 045 today, which should give you a nice selection of designs to use.

Step 3:  Cut the scrap cardboard to fit inside of the pant’s leg, so that one end of the cardboard comes out the pant’s leg at the bottom.  You can move this cardboard as you work to protect the jeans from color blending through to the other side of the jeans.

Step 4:  With a black fabric marking pen begin doodling … use a light pressure on the pen tip for the smoothest and fullest line coverage.  Mix your main designs with long flowing line breaks and fill patterns.

free craft patterns
Free Doodle Pattern #044

Step 5:  Use a cork-backed ruler, laid along the inner leg seam line for your measurements for the edge trim design.  The cork will grab the fabric, keeping the ruler in place as you work.  My inner leg trim was worked at 1/2″ measurements.

Step 6: Have fun adding colors to your design.  Fill in some areas with a solid coloring, and in others just add a touch of line work.  Let some areas remain unpainted to allow the blue jean color to become part of your design.

Step 7:  Set your fabric pen colors according to your package directions.  My set only required a hot, steam pressing to become permanent coloring.

free craft patterns
Free Doodle Pattern #045

Step 8:  Flip your jeans over and do the back side of the leg.

Step 9:  You can create doodle designs on  the 6 1/2″ square white cotton fabric pieces using this same method and add them to your pants.  Fill in some areas of your pattern with the bright colors from your set.  After the patch has been hot, steam ironed it is ready to sew into place, anywhere on your doodle jeans.


how to paint blue jeans

Steam Punk Pattern Pack at Lora S. Irish’ pattern website, ArtDesignsStudio.com

Painted Blue Jeans 2, Free Craft Patterns Read More »

painted blue jeans

Painted Blue Jeans, Free Patterns

What could be more perfect for our Free Doodle Patterns than a pair of blue jeans?  How about the fact that I picked up these brand-new, never worn jeans at my local church thrift shop for $1 !

Doodle Days #13 –  Blue Jean Painting, Wood Burn Spoons, Wood Carved Spoons, Leather Work, Free Lora S. Irish Patterns to Download, DIY Bookmaking, Bullet Journals, Scrap Booking, Card Making, Applique Quilting, Pyrography, Wood Carving

free painted blue jeans patterns

Why wear your slogan or favor designs on the sleeve of your t-shirt when you can paint them onto the legs of your favorite pair of blue jeans?


Supplies:

1 pair of pale-blue or medium-blue blue jeans
1 fine-point black fabric pen
medium-point fabric marking pens – black, medium-blue, and pale-blue
1 set of assorted color fabric marking pens
several 6 1/2″ squares of white cotton fabric
needle and thread
1 piece of scrap cardboard, large enough to slide inside the pant’s leg
steam iron

These are the specific sets of colors that I used to create my Painted Blue Jeans:

Colore Dual Tip Fabric Markers

Super Markers Fabric and T-Shirt Permanent Ink Pens

Best 24 Colors Fabric Markers

Sharpie Fine Point Markers, 36 piece set

Apple Barrel Acrylic Paint Set, 18 Piece


free painted blue jeans patterns

Step 1:  Pre-wash your jeans to remove any starch or stabilizing chemicals.  Dry the jeans thoroughly before you begin painting.

Step 2:  Download your copies of our Free Doodle Patterns, here on LSIrish.com.  Type doodles into the search box in the header.  We are on numbers 040 to 042 today, which should give you a nice selection of designs to use.

Step 3:  Cut the scrap cardboard to fit inside of the pant’s leg, so that one end of the cardboard comes out the pant’s leg at the bottom.  You can move this cardboard as you work to protect the jeans from color blending through to the other side of the jeans.

Step 4:  With a black fabric marking pen begin doodling … use a light pressure on the pen tip for the smoothest and fullest line coverage.  Mix your main designs with long flowing line breaks and fill patterns.

Step 5:  With the pale-blue fabric pen, fill the areas around your main designs with a tight dot pattern.  Let the space between the dots increase as you move away from the central line of the design.

Step 6:  With the medium-blue fabric pen, re-work the central area of the background with tightly packed dots.

Step 7:  Using a fine-point black fabric pen, work a fill pattern over the pale-blue and medium-blue dot patterns.  I used small, tightly packed circles.

Step 8:  Set your fabric pen colors according to your package directions.  My set only required a hot, steam pressing to become permanent coloring.

Step 9:  Flip your jeans over and do the back side of the leg.

Step 10:  You can create doodle designs on  the 6 1/2″ square white cotton fabric pieces using this same method.  Fill in some areas of your pattern with the bright colors from your set.  After the patch has been hot, steam ironed it is ready to sew into place, anywhere on your doodle jeans.

free painted blue jean patterns


Free Doodle Pattern #040


Free Doodle Pattern #041


Free Doodle Pattern #042


Art Designs StudioFor more great pattern ideas for your painted blue jeans, please visit ArtDesignsStudio.com


Painted Blue Jeans, Free Patterns Read More »

Scroll to Top