DIY Eclectic Primitive Pallet Dresser
 Eclectic means to derive an idea, style, or taste from a broad and diverse range of sources. In this case, my primitive bureau is a conglomeration of some of the many ‘someday’ bits, pieces, boards, and hardware that have accumulated in the shop over the years. You probably have boxes of them, those little parts that you know someday you will need or want.
Over the many years of wood carving and wood working I have enjoyed trying my hand at a smattering of furniture projects. Our woodworking shop is well equipped with the basic power tools, as well as many fun specialty tools that are used to create precision cuts and glass smooth finishes. Unfortunately with my husband’s illness and my Mom’s advanced age I seldom can take the time away from the family to dedicate to the hours of work that it takes to produce a classic piece of furniture.
But I will admit that I have missed that part of wood working tremendously. So this weekend I decided to indulge myself in a little back porch wood butchery … grin!
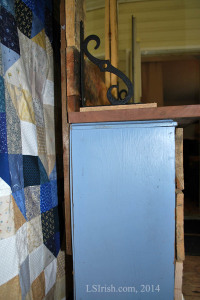
This all began with a Friday afternoon yard sale purchase of a 24” wide, 36” high, 8” deep used, battered bookcase. It was painted wedgewood blue, with lots of scratches and dents, and had a broken kick board (toe board). I knew I didn’t need another bookcase when I bought it, but it is solid wood and priced at only $5.
 Sunday morning came and I headed to the shop to grab a board to replace the kick board … that seemed a good place to start. Passing the tractor shed, which is an add-on to the workshop, I noticed a bunch of old pallets that I had picked up somewhere for one of those ‘someday’ projects. I stopped, looked the pallets over carefully, and made the decision that today was that someday! That yard sale bookcase did not have to stay a bookcase, it could become the carcass for a set of dresser drawers made out of the pallet wood.
Since I really couldn’t hide out in the wood shop this weekend I grabbed up the zaw-zaw, the jig saw, and the disc sander. With a few hand tools – dovetail saw, rough cut saw, screw drivers, that sort of thing – I turned the back porch into a weekend work area where I could be close at hand for the family while doing some fun wood butchering.
 The first goal was to convert the bookcase into a chest of drawers without purchasing anything – I wanted to use the wood and hardware that I had on hand. My second goal was to accept that this would not be perfect – I knew that using the tools that I could carry to the porch I would not be making precise, accurate cuts or joints. So this project started out as an eclectic primitive project.
- Using the zaw-zaw, hammer, and a crow bar, I cut the pallets apart. A nail set and hammer removed the cut nails from the boards. A light sanding with 80-grit paper removed the worst of the splinters and fuzz bunnies.
- I decided that I wanted a series of small drawers, so I used some ½” x 1” framing strips to make the drawer supports. These strips were left-overs from a repair for a door frame. The bookcase has three shelves, so I divided each shelf area into space for two drawers. Some wood glue and a few screws secured the drawer supports to the inside of the bookcase.
- The drawers are just simple butt-joint boxes with ¼” plywood floors. I made each box ½” less wide than the inside width of the shelf and ½” shorter than the height of the drawer area. No two drawer areas turned out to be the same. The drawer sides were made out of pallet wood and the plywood was left-over from my pyrography projects.
- The drawer fronts were cut from pallet wood at the full width of the bookcase and tall enough to cover the ½” of the shelf support. I tried to allow about ¼” air space between each drawer. The fronts were attached with screws, working from the inside of the box.
- Because pallet boards are often cracked, split, or broken, I quickly realized I would not have enough boards to create six 24” wide drawer fronts. But going through the cut pieces left from the first several drawers I did have enough to turn one large drawer area into two small drawers.
 I removed the broken kick board and replaced it with pallet wood.
- I needed drawer pulls, so while rooting through my someday boxes I came across five old glass knobs from Mike’s father’s woodworking days. Two ceramic knobs turned up in one of my Dad’s boxes.
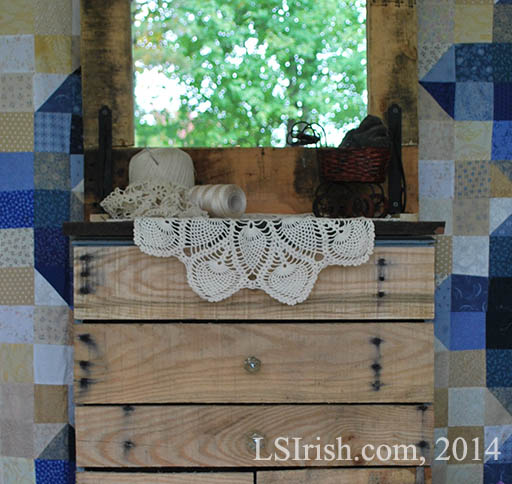
- The top of the bookcase was in very bad condition, so I cut a new top from an old walnut table leaf. The table was long gone, but I had held onto the extension leaf for years. The top is held in place with screws working from the inside of the bookcase – dresser carcass.
- While looking for drawer knobs I stumbled across an old, discarded bathroom mirror and then found a pair of wrought iron shelf brackets. The brackets were so old the plastic packaging had turned yellow, and cracked. A simple butt-joint frame made from pallet wood scraps became the mirror support. Two long pallet boards were mounted to the back of the frame to attach the mirror to the back of the case. For a little added pizzazz I used the iron shelf brackets on the top of the dresser to also attach the mirror.

So … the photos show you where I am. The woodworking is done except to sand off a few really rough areas. I know that I am going to paint over the wedgewood blue with first a medium tan and then black. With sandpaper I will rough up the corners and edges to let all three paint colors show.
 The whole family has become involved in this project. Mom would like to see me paint lettering to the pallet boards – fragile, this side up, or even hazardous waste. I am thinking adding luggage stickers or packing slips to the boards, then roughing them up so it looks as if the dresser is made from antique shipping crates. Mike, my beloved hubby, wants me to remove the glass knobs and carve wood spirit faces as my drawer pulls and he wants it for his knife collection storage. All my son will say is, “Gee, that will look awfully good in the corner of my room!” I’ll let you know when we decide where this project goes from here.
I just may keep this one for me. Whosits! A gal needs some special place to store her doily crochet books, hooks, and pineapple work.
In the meantime, have some fun this coming weekend doing your own eclectic primitive pallet wood project! Oh, and the total cost of this project was $5 for the bookcase and a full day of absolute fun, plus the joy of putting some of those ‘someday’ bits and pieces to work.