Leather Pyrography

leather burning by Lora Irish

Leather Burned Jewelry

Step 2 – Creating the Copper Jewelry

Leather Burned Jewelry, Day One
Leather Burned Jewelry, Day Two
Leather Burned Jewelry, Day Three

wire-bent copper jewelry


Wire-bent and wire-wrapped jewelry is an art that is currently in high favor among crafters. Jewelry supplies are readily available at most large box craft stores and through online shopping.

For my leather burnt necklaces I chose copper wire and findings, but there is a wide variety of wire types that you can use as silver, silver-coated, black, and colored aluminum. Personally, I prefer copper as it is a soft, easy to bend metal that can be tempered through gently hammering into strong, secure links and chains.

Glass beads and lamp work beads are also a favorite for me in jewelry work, but you will find a wonderful selection of gemstones, cut crystal beads, resin beads, and even bone or shell beads that you can use.


Completing your necklace

1 Cut an 8” length of 18-gauge copper wire with your flush cutters.

leather burned necklace
2 Grip the wire about 3” from one end in your straight pliers. Bend the wire to a 90 degree angle. Move the wire to your round-nose pliers, gripping the wire at the 90 degree angle. Roll the 3” end around the round-nose pliers to create a small loop.

leather burned necklace
3 Slide the short end of the wire through one of the holes in your leather burnt necklace. Move the wire to center the leather inside of the small loop.

leather burned necklace

Secure the loop

4 Grip the top of the loop, where it overlaps the long working end of the wire in your straight pliers. Roll the short end of the wire around the long working wire two to three times.

pyrography leather jewelry
5 Clip the excess short wire with your flush cutters.

pyrography leather jewelry
6 With your straight pliers crimp the cut end tightly against the long working wire.

pyrography leather jewelry
Adding beads

7 Slide your chosen beads onto the long working wire. In my necklace I used one 2-mm copper bead, one 16-mm square yellow jade bead, and one 2-mm copper bead.

how to make beaded copper jewelry
8 Grip the working wire in your straight pliers, with the tip of the pliers against the last bead. Bend the working wire into a 90 degree angle.

how to make beaded copper jewelry
9 Place the 90 degree angle into your round-nose pliers and roll the working wire into a small loop.

how to make beaded copper jewelry

Adding the chain

10 The second small loop should be created by holding the wire in the same spot or area of the round-nose pliers as you did the first loop. This keeps the two end loops of the bead dangle the same size.

11 Cut two sections of 2- to 3-mm copper chain 7” long each. Slide the last open link of the chain onto the short end of the loop wire. Move the chain link to the center of the loop.

how to make copper jewelry
12 Complete your wire wrapped bead dangles by gripping the small loop in your straight pliers and wrapping the short end wire around the base of the loop two to three times.

how to make copper jewelry

Shaping the leather

17 Your leather burned necklace can easily be shaped by simply placing your finished necklace under your kitchen faucet for a few moments, allowing the leather to become wet. Pat the leather necklace dry on a clean cloth. While the necklace is still damp and pliable, lay the necklace on a large, plastic soda glass and with loose (oversized) rubber bands lightly secure into place. Let the necklace dry overnight.

shaping leather jewelry

Completed necklace

wood burned leather jewelryIn the next post I will be sharing five more ideas for this leather burned necklace project, with the free patterns.  But here is a preview …

leather burned jewelry by Lora Irish

Leather Burned Jewelry Read More »

leather burning by Lora Irish

Leather Burned Jewelry

Art of Leather Burned Jewelry

Leather Burned Jewelry, Day One
Leather Burned Jewelry, Day Two
Leather Burned Jewelry, Day Three

I love combining my crafts and hobbies, and in this project we will be working on a quick, fun design that uses leather working, jewelry making, and, of course, pyrography.  Today we will get together the supplies, cut out our leather necklace shape, and do the pyrography steps.

In the next post you will find the steps for creating the copper, wire-bent jewelry.  Then on day three of this mini-project I will show you how to create 10 quick necklaces out of one pyrography burning that is perfect if you are a craft seller or need a group of Holiday presents this years.

So … let’s get started!

leather burning and pyrography by Lora IrishQuilted Jade Necklace Supplies:
5 1/2” x 3 1/2” (14 cm x 9 cm ) medium weight vegetable-tanned leather
bench knife or craft knife
leather hole punch
cotton swab applicators
gum tragacanth edge finish
wooden edge slicker
#4 – #8 soft pencil for tracing
pyrography pen tips – ball, loop, or micro writing tip
white artist eraser
2 – 16 mm square yellow jade beads
1 – 5 mm x 8 mm yellow jade rectangle bead
6 – 3 mm antique copper round beads
2 – 4 mm copper rosettes
2 – 7” ( 18 cm ) long copper chain
2 – 6 mm split rings
1 – lobster claw latch
18” – 20-gauge or 18-gauge copper wire
satin brush-on leather finish

Tracing the pattern

1 Make a printed copy of the pattern for the Quilted Jade Necklace. Cut the pattern out using scissors.
Lay the paper pattern on the raw-hide side of the leather scrap. Using a soft, #4 – #8 pencil, trace around the outside edge of the paper pattern.

leather burning by Lora Irish

Working the leather

2 Place the leather on a cutting mat with the raw-hide side up. Using a craft knife or bench knife, cut the necklace free from the scrap leather. Save the extra scraps from the cut leather block for smaller bracelet shapes and earrings.

leather pyrography by Lora Irish

3 With a white artist eraser, remove any remaining pencil guidelines from the raw-hide side of the leather necklace.

leather pyrography by Lora Irish

Creating the grid lines

4 Using the cutting mat ruler marks as your guidelines, create a diagonal 1” square grid on the tanned side of the leather with a soft, #4 – #8 pencil.

leather working and pyrography

5 – 6 With a leather hole punch, cut a 3/16” or 1/4” hole in each side of the necklace to receive the jewelry chain and beads. Create one hole at the center point of the bottom edge of the leather necklace to receive a bead dangle.

leather jewelry DYI

leather jewelry DYI

Finishing the raw edges

7 With a cotton or wool swab applicator, apply one coat of gum tragacanth along one edge of the leather necklace.

pyrography on leather
8 Briskly rub the damp edge with a wooden edge slicker. The handle of a large wooden spoon works well in place of a slicker. The gum tragacanth and slicker will polish and round the raw cut edge of your necklace.

pyrography on leather

Burning the fill textures

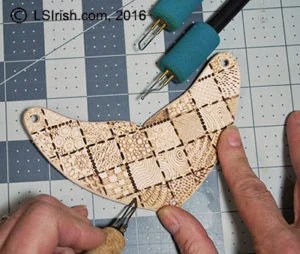
9 The pyrography burning for this project is worked as a texture and fill practice board, where each 1” square is filled with a different, small pattern. Have fun creating your own fill patterns or refer to the Fill Pattern Chart with our Mushroom Doodle Pyrography Project.

pyrography zen doodles
10 As you work each 1” square, vary the temperature setting of your pyrography pen to create some squares with pale tonal values, some with medium values, and some with dark toned values.

pyrography zen doodles

Adding borders

11 With a ball-tip or loop-tip pen, on a hot temperature setting, work along some of the pencil grid lines with a series of evenly spaced, small dots. With the straight edge of a shading pen tip, work the remaining grid lines with evenly spaced, short dash lines.

wood burning on leather
Shading the lower edge

12 You can add a little touch of shading along the bottom edge of your leather necklace using a shader-tip and a medium temperature setting. Work this layer of shading right over the fill and texture patterns that you have already burned. Rub a white artist’s eraser over your burned surface to remove any dirt, oil, or remaining pencil lines from the leather. Dust with a dry cloth.

leather burning by Lora Irish

Pyrography close-up

wood burned leather jewelryClick on the leather cutting patterns below for a full-sized pattern.

leather cutting pattern for jewelryHere are two more ideas for your leather burned jewelry necklace, worked with patterns from our Henna Tattoo Pattern Pack.

leather burned necklace


And, this one!

leather burned necklace
In the next post I will be showing you how to add your jewelry chain, bead dangles, and copper findings.  So, check back soon!

Leather Burned Jewelry Read More »

Leather Burning Wrist Bracelets

Pyrography on Leather

I am spending some time this morning working on my Holiday gifts which will include a few leather wrist bands, leather bracelets, and leather crafted hair barrettes.  You can purchase pre-made leather items for your pyrography at most large craft stores at very reasonable prices.

Since I already had some leather scraps left over from a half-side hide I cut my own leather shapes. These are pieces of 8 ounce leather that are either irregular shapes or that have some imperfections, and therefore got regretted from another project.  But for what I am doing this morning they are just perfect.

Cattle Brand Leather Burned Bracelet
Please click on the image for a full-sized photo.

Cattle Brand Leather BurningMy first sample, the Cattle Brand Bracelet, measures 1 1/2″ wide by 8″ long.  Through the middle left side of the scrap there is an obvious tear in the surface of the leather.  There are many ways this tear could have happened. In examining the scrap to see if it was ‘save-able’ it appeared to look like a scar made by barbed wire, which is exactly what sparked my idea for how to decorate it.

I used a stylized barbed wire design to accent the scar appearance of the flaw in the leather.  In the center of the lower barbed wire design I added my cattle brand and for my main design I used a classic long horn steer icon with stars.  My finished burning now makes that scratch in the leather surface into part of the overall design and gives the finished bracelet a real Wild West look.

I finished off this piece  by using a mid-sized hole punch along the bottom edge of the leather to create two holes, plus one hole at the outer edge of each side of the bracelet.  An 8″ piece of braided leather cord was used to secure my buffalo skull charm and two 12″ pieces were added to the side holes for tying.

To learn more about Cattle Brands, and to snatch a few free Lora S. Irish patterns for branding please visit our blog page about Cattle Brand Layouts.  This page also features the Long Horn Steer pattern.  If you wish to explore more Wild West ideas, you might enjoy our Western and South West themed pattern packages at ArtDesignsStudio.com.

Lady Bug Hair Barrette
Please click on the image for a full-sized photo.

Lady Bug Pyrography Leather Hair BandSearching further in my leather scrap bag for my wood burning projects I came across several pieces that were perfect size for hair barrettes.  My sample barrette uses a 4 1/2″ x 2″ wide piece of 8 ounce leather, a bamboo kitchen skewer, and an assortment of jewelry making supplies.  The arch along the top edge of the barrette was cut by placing a salad plate, evenly centered, over the leather and then cut using my bench knife. The side arches were created using large medicine jar lids.

This particular piece of leather had one very odd, dark-colored spot – just were my ladybug now resides.  That spot was not big enough to be a problem in burning the design, but obvious enough I could not ignore it.  My solution was simple, any spot in leather can be hidden using acrylic paint or permanent marking pen.  So I needed a design that would allow me to color over the spot once the pattern was burned.

My choice was to do a fun Henna Pattern project and add one little, brightly colored Lady Bug to hide that blemish.  Once the burning was completed I used black and red permanent pens to color my Bug!  She was so fun, and outstanding that I returned to my scrap bag to find more little scraps to add more little Lady Bugs to the beaded decoration of the piece.

If you want to try your hand at Henna Tattoo burning, check out our two newest pattern packs at ArtDesignsStudio.com in our New Release section.

So, the lesson for today … don’t avoid problems in your burning media, use them to your advantage!


Pyrography on Leather Read More »

Scroll to Top