Woodworking Instructions
By L.S. Irish
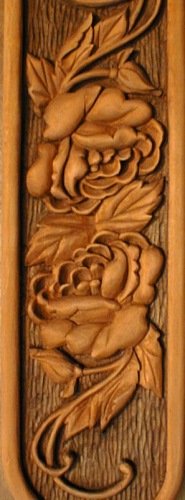
This quick and easy woodworking project has been created for our new “Floral Clocks” package. Requiring only basic woodworking skills and common tools, the Floral Clock blank can be prepared in just a hour or so in your wood shop, ready to carve this afternoon.
Supply List
- Wood Blank:
- 1″ x 5″ x 20″ basswood
- Supplies:
- compass
- carbon paper
- sand paper
- battery clock
- stiff toothbrush or brass wire brush
- clean rags
- small sable brushes
- Equipment:
- table saw
- saber saw or band saw
- drill and 3/8″ drill bit
- palm sander
- 120, 180, & 220 sand paper
- Carving Tools:
- bench knife
- skews, 1/8″ to 3/8″
- gouges, ¼ ” to 3/8″
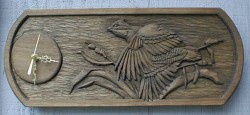
Click here for a variation on this idea, our Bobwhite Clock.
Creating the Clock Blank
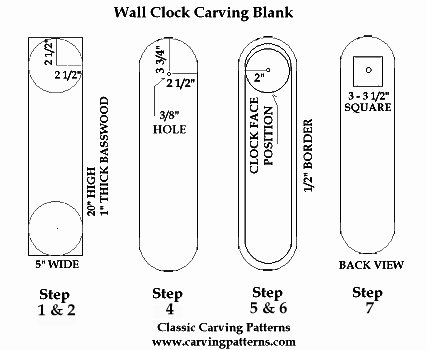
- Create the dimensions of the blank.
- Cut the blank to a length of 20″ on the table saw. Cut a small amount off of each end to keep the blank square.
- Measure and mark the arched edges along the top and bottom
- Measure 2 ½” from the top edge of the blank and mark with a pencil line.
- Measure 2 ½” from the side edge and mark with a pencil line.
- Open the compass to a measurement of 2 ½”.
- Place the point of the compass at the intersection of the two pencil lines and draw an arch along the top of the board.
- Repeat these steps to make the arch on the bottom of the blank.
- Cut and Sand the arched edges
- Cut along the arch lines with either a saber saw or using the band saw.
- Sand the entire blank first with 120 grit sandpaper, then again with 180 grit, and finally with 200 or 220 grit to remove any cutting marks.
- Mark the clock face placement
- From the top center point of the arch measure down 3 ¾”.
- From the side of the blank measure in 2 ½”.
- Open the compass to 2″.
- Place the point of the compass into the tape at the center point of the hole.
- Mark the circle that will become the clock face.
- Establish the placement for the battery clock shaft
- At the intersection of the two points in Step Four drill a 3/8″ hole with either a hand drill or drill press.
- Drill from the face of the clock toward the back of the clock to keep any splitting on the back side of the blank.
- Roll a small piece of sand paper into a tube shape to clean the edges of the hole.
- Mark the border area for the edge of the clock
- Set a marking guide to ½”.
- Run the guide along the outside edge of the clock to score the border line.
- Mark over the score line with a pencil.
- Creating a well for the clock works
- Working on the back of the blank mark a square area that will be carved out to receive the clock works.
- Measure and mark a line 1″ from each side of the clock. This marks to sides of the sides of the well.
- Measure down from the top of the arch 2 ¼”. This marks the top of the well.
- Measure from the top well line down 3″, this is the bottom line of the well.
- Measure the depth of your battery clock works.
- Subtract this measurement from the thickness of your board, 1″.
- The difference between these two numbers is the depth that you will need to chisel out the well.
- Example: If your clock is 5/8″ thick and your blank is 1″ thick, you will need to drop the level of the well by 3/8″.
- Check that the shaft of the clock is exposed enough to receive the brass nut on the face side of the clock.
- Transfer the carving pattern
- Cut the pattern paper so that it fits the carving area of your clock blank.
- Tape the pattern in place along one edge of the clock.
- Using carbon paper, trace the pattern outlines.
Click here for the woodworking layout plan.
Pages: 1 2