Supplies:
Wood, 3/4″ Basswood blank 5″ wide x 15″ long
Tools
Carving Tool Set that includes a v-gouge, round gouge, chisels, and veining tool
Basic Bench Knife
Scroll Saw or Band Saw
Fine Grit Sand Paper
Sharpening stones and strop
Acrylic Paints
Ultramarine Blue
Titanium White
Black
Cadmium Red
Yellow Ochre
Burnt Umber
Cadmium Orange
Assorted Brushes for the dry brushing technique
Polyurethane Spray Sealer
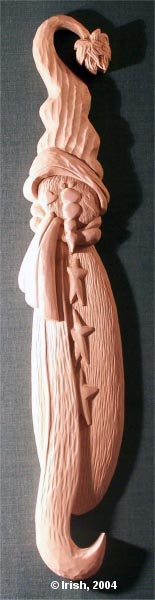
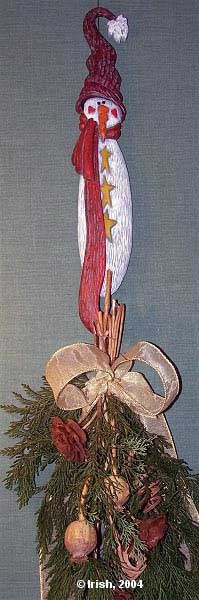
Click on the Country Snowman for a Close Up.
Working with your pattern
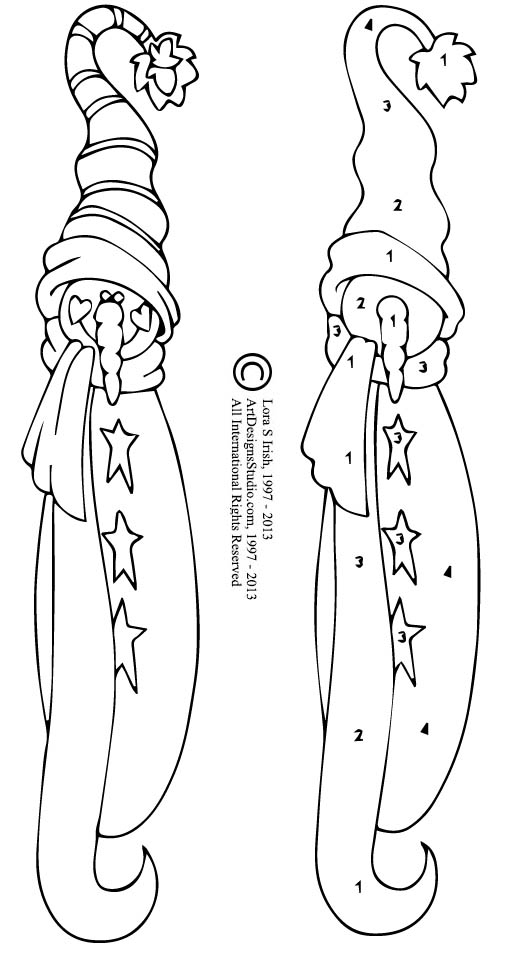 Click on the images to the right. This will open a new page that has a full sized printable pattern for this project. The large pattern for this project is sized to print on standard 8 1/2″ x 11″ printer paper.
To save a copy of this design to your computer right hand click on the large pattern. From the drop down menu click “Save As”. A new menu will open that asks “Save In”, choose “Desktop” then click “Save”.
The pattern on the left is the detailed outline pattern and the pattern to the right is the levels pattern. The levels pattern is numbered with the highest level as #1 and the deepest level as #4.
With an Image Editing – Graphics Program you can re-size your Country Snowman design. I have enlarged my copy so that the Snowman is 14″ long from the top of his hat to the bottom of his scarf. I personally use Paint Shop Pro but there are many fine graphics programs available. Because a 14″ long pattern is too long for a standard sheet of paper I cut the pattern in the graphics program into two section, each a little more than one half the full size. These two pieces could then be printed and the printed sheets taped together for tracing the new larger sized Snowman pattern.
Cut the snowman shape
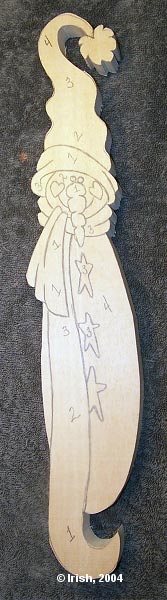
Lay a copy of your Country Snowman pattern onto your wood blank. Align the design so that the grain runs from the top of the hat to the bottom of the scarf. Use masking tape to secure the pattern paper along one side of the design. Slide a sheet of carbon paper under the pattern and trace along the pattern lines to transfer a copy to the board.
Using a Scroll Saw or Band Saw cut the Country Snowman along the outside lines.
Please follow basic safety rules and the manufacture’s instructions for your particular machine!
Basic round-over carving
This Country Snowman was carved using levels and a simple round over carving technique.
Use a pencil to mark the level’s number to each section of your Snowman. Level #1 is the highest and includes his carrot nose, the center of the hat brim, the fuzzy hat ball, and the bottom section of his scarf. Level #4 is the deepest part of the carving and includes the top of his hat where it touches the fuzzy ball and his body.
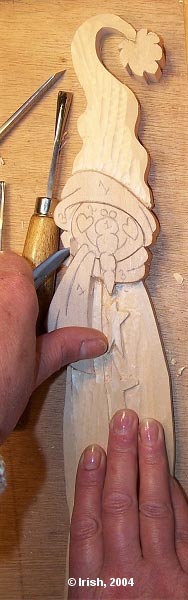
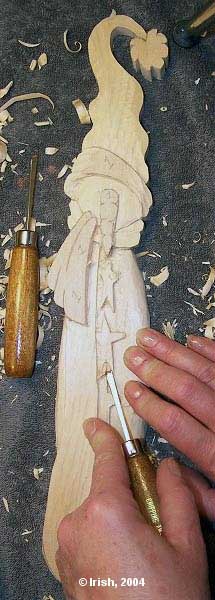
Use your bench knife to stop cut each section then go to your round gouges and chisels to rough out each area. Once each area’s level is established round over the edges of carving. Because we will be dry brush painting this project you do not need to be extremely smooth in your rough out carving work.
Once the levels have been established and rounded over start creating lots of texture strokes to your Snowman. For his hat I used my largest round gouge to create deep ridges. A smaller round gouge was used for his scarf and my veining tool (a very fine round gouge) was used to texture his body and the fuzzy ball. His carrot nose, heart cheeks, and stars were left smooth. The more texture you create in your carving the more color you will get when you dry brush him with paint.
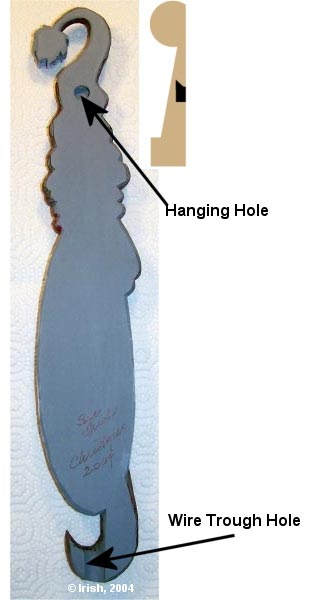
Once the carving is completed turn your Country Snowman over so that you can work on the back. You will want to create a hanging hole in the top center of his hat. Use a large round gouge, hold the gouge at a 90 degree angel to the wood and roll the tool with your fingers. This will score a nice round circle into the wood. Continue scoring until the circle is about 1/8″ deep. Use a small gouge to remove the wood from the circle area. Repeat this until your hole is about 1/4″ deep. Next, using the same large round gouge place your tool inside the hole, slice into the upper section of the hole to cut free a small section of wood. This will create a small lip or shelf that reaches into the wood above the hole. Your Snowman can now be placed over a hanging screw and the head of the screw will catch the lip enough to secure him to your wall.
As I want my Snowman as a hanger I carved a deep trough through the back of his scarf using my largest round gouge. This trough will hold a ribbon or wire from my pine swag yet let my Country Snowman lie flat against the wall.
Please click on the images below for a close up.