Wood Block Prints
By L.S. Irish
Incised Carving Project
Supplies and tools needed:
- basswood blank several inches larger that your design pattern, one inch or thicker
- small v-gouge for background work
- small u-gouge for background work
- bench knife for detailing
- pattern copied in reverse of the final printing
- tracing paper
- sanding board -large flat board with a large sheet of sand paper attached
- small piece of hardwood as maple to burnish the block surface
- block printing ink
- sheet of glass about 9″ x 12″
- ink roller
- clamping board
- drying board for paper prints
- c-clamps
- soft clean cloths and cotton swabs
- paper, heavy weight without a glossy surface (print making paper is available through most arts and crafts stores)
- soft lead pencil for signing your prints
The intrigue of incised carving is highlighted with the classic woodcut prints of the Renaissance era. Fine artists such as Durer used the incised line to create finely detailed paintings with exquisite perspective and dimensional effects.
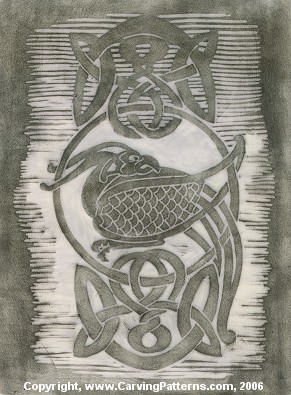
In the woodcut print block the incised carved technique is used to remove the background of the designs, leaving only the pattern lines at the original wood surface level. This is the reverse of the incised carving for decorative purposes, here the surface is your final pattern.
With wood block prints it is important to note that the design you carve will print in reverse. What you carve on the left of the block will appear mirrored on the right side of the print. Therefore any writing that you want on the final print must be carved into the block in reverse. Otherwise you will end up with wonderful holiday cards that have Happy Holidays on them backwards!


Follow the basic techniques as described in Incised Carving above. For wood cut block prints chose a wood the will be easy to work, as basswood, since you will be creating fine details within the design. Also chose a thick slab for the carving, as least one inch or more in depth. This carved slab will be subjected to repeat layers of moisture from the printers ink, the thicker the slab the less likely warping will be a problem. Trace the pattern with a light pressure on your pencil. Only the pattern lines will be left when you have completed the work and you do not want impressions from the pencil tracing in your fine detail.
Keeping a uniform and even carving depth in wood cut block may not seem as important as with incised carving work, however keep the carved work both neat and even. By the time you have finished printing form the block you will discover that you are left with a beautiful stained piece of woodworking well worth displaying. So take time during the carving process to insure a finely finished piece of art carving.
Once the carving is completed the block is turned faced down onto a sanding board to insure an absolutely flat finished surface. Keep the sanding to a minimum.
 Using a smooth piece of hardwood, burnish the face of the carving by rubbing the hardwood over the surface of the block. This will make the carving block appear shiny and seals the surface of your work. Rub the surface, do not press with the
hardwood burnisher so hard that it indents the surface of the block. Light pressure is enough to seal the wood.
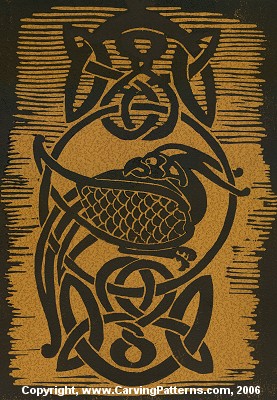
Using print block ink that you can obtain from most arts and craft stores, a water soluble coloring agent, coat the surface of the block. Rollers are available for this purpose and avoid excessive ink from collecting in the grooves of the wood, creating a clearer print. To use a roller, place a small amount of ink on a sheet of glass. Push the roller over the ink several times, changing the angle of the stroke each time to evenly distribute the color.
Next, coat the surface of the block exactly as you did the roller, changing directions to insure an even coloring. The block is now turned face down onto the paper that is to be prints. A larger board is placed on top of the block and clamped to create pressure against the paper and carved block. The most simple clamping can be done by placing your hands with out stretched fingers onto the board. Center your body over the middle of the board and push down slowly. Leave this assembly together for a slow count of ten, that is all the time it takes to transfer the ink.
Remove the board, flip the block over with the paper still in place. Gently lift the paper from the block. Begin at one corner and peal the print away from the wood with a slow even pressure. The paper print will need to dry overnight on a flat surface.
 Wipe the excess ink away from the block surface. Any ink that has puddled in the carved lines may be removed with a cotton swab, be sure to check the wood afterwards for cotton fibers left from the swab. Do not wash the surface with water, this will cause swelling of the wood and distort your design.
Repeated prints can be made from one wood cut block, but each successive print will become a little less clear. Chose how many prints you will be making off the wood block before you begin, let us assume that you will be making 25 copies. Test the block with a print, the first ones can be unclear or smeared because the wood block has not yet be seasoned with ink. When you make your first crisp print, mark it in the margin of the paper on the left side with the number 1/25. Write the name of your design in the center of the margin area, and sign and date the the right side of the margin. You have just created the first print in your Limited Edition wood block design. Twenty five prints may seem a lot for your first wood block but you will soon come to discover that everyone you know will want one.

The printing can be done over a long period of time, many days or weeks, as long as the block is stored flat to avoid any warping. When your printed edition is complete, gently wipe the surface with a slightly damp cloth, do not saturate the wood with water. Now frame and hang the wood block. With this technique you get both beautiful printed pictures and the wood block carving.