By L. S. Irish
Using a Depth Gauge
In relief carving of any style, there will be large amounts of excess material to remove from the background areas of your work. Using a depth gauge will make this work easier by removing the guesswork as to when enough wood has been carved away. Many relief carvings begin with determining the depth of your total carving and by dividing the pattern into predetermined levels of work – background, mid-ground, and foreground areas.
A common woodworking depth gauge has a small 6″ metal ruler with a right angle slide that is adjustable. Set the slide to the desired depth measurement then put to tip of the ruler into your carved area near an uncarved area that is still at the original wood surface. When the slide arm rests on the original wood surface and rests on the floor you have carved to your set depth.


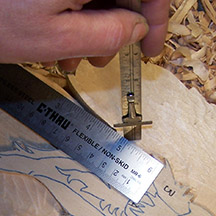
Multilevel Depth Measurements
It can be difficult to find an uncarved area on which to rest the slide of a slide ruler in larger works or multilevel works. You can lay a large ruler across your carving so that it rests on two edges or sides of the wood blank. When you drop the slide rule into the carved area you can compare the slide to the side of the large rulers.
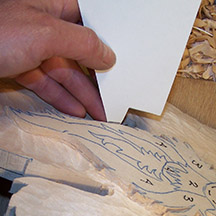
Homemade depth Gauges
There are several quick depth gauges that you can make at home and throw into your carving kit. Take a new pencil and whittle the end to a long taper on one side of the pencil, mark the depth on the final cuts with a pencil along the taper. This can be dropped into the background cuts and used to judge how much more wood needs to be removed. For detail work as incised lines use a toothpick for depth gauge. Even a piece of cardboard can be cut and saved in your kit. The cardboard can include ‘ears’ on the side of the edge that can be slide along the high areas of the carving.

This homemade depth gauge was cut from an index card. It can be easily cut to a fine point to tuck into the tightest areas of your work. If you need to establish the same depth measurements in several areas of the work you can make a pencil mark on the index paper noting that measurement.
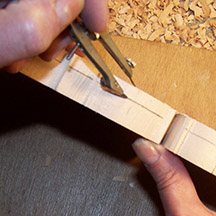
Using a Compass as a Depth Gauge
Open a compass to the measurement for the deepest point in your carving. Place the compass point of the top surface of the wood and the pencil point along the side. As you pull the compass along the edge of the cut-out the pencil will leave an even, accurate line for your final depth.
If you need to compare two are for accurate measurements in small areas of the work open the compass legs. Place the point on the high level that you are measuring and drop the pencil point in the low level area. Without changing the positions of the compass legs place the compass points on a ruler with the point at the zero mark. The pencil point will touch the ruler at the depth of that areas work.