Developing your burning with layers
There are many ways to approach a wood burning project. You might chose to separate your design into several distinct tonal values as the Bengal Tiger project is worked or you may wish to map the design working from the darkest tonal values to the bright highlights just as the Flamingo portrait has been burned. As the Sea Dragon is worked you may wish to focus of the basic shapes of each area to create your finished project.
No matter which approach you chose the burning process is developed by laying one layer of burning over another to slowly bring each area up to its final tonal value. Working the entire design in low or medium temperature burnings then adding new layers of burning over the first gives you total control over your final tonal values.
Step 1: First, low temperature burn
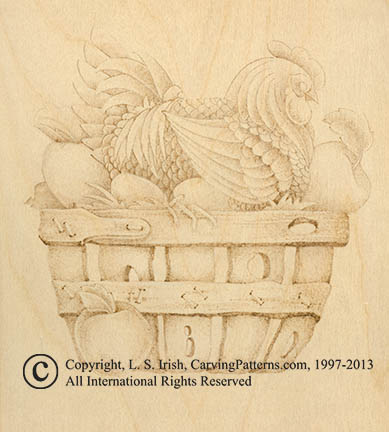
This little red hen has chosen an old apple basket for her egg nest. Because of the number of elements within this design this fun, folk art style pattern is a great practice piece to learn layer work. The first layer of burning has been done on a low temperature setting, 5.5 for my wood burning unit, and with the standard writing tip. I have used a tight short line stroke in the basket and the hen feathers. The apples are worked using a tight random doodle stroke.
I have worked to establish the basic shading areas that will shape the hen’s round body, the basket’s curve and the round shape of the apples. The spokes of the basket lie behind the horizontal ribs, so they also need an early shading to place them towards the background of the pattern.
As this is a folk art styled design I want lots of detail and texture so I have begun working a little shading into each of the hen’s feathers. As I deepen the tones in this area later with more layers of burning this early detailing will also become darker.
Notice that there are no extremely dark or pale tones. This first layer falls in the pale mid-range of your sepia value scale. For me this early work gives me a chance to think through the design considering where my darkest tones will be needed to push elements back into the final burning and where my highlights will fall to bring areas forward.
Step 2: Second, medium temperature burn
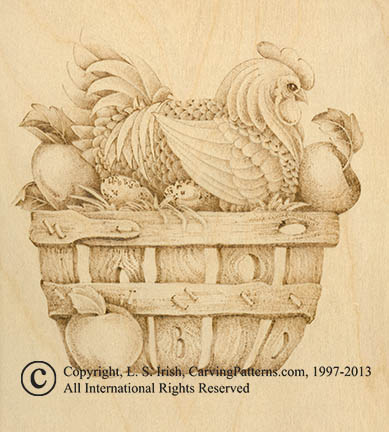
I have established the general shape and positions of the elements with the first layer of burning. Now I begin to refine those shapes and position shadows with deeper tones towards the mid-tone range of the sepia scale. I have turned my burning unit up to a 6.
I have darkened the hen’s body where she sits against her eggs, the straw and the apples. This darker tone pushes her body down into the basket. The bottom areas of the apples have been worked to a dark mid-tone value to push them behind the hen’s body. The hen’s eggs now have a few random doodle speckles added.
The spokes and ribs of the basket have had some wood grain texture added. I have used a very tight short line stroke to create the grain lines. I have used that same stroke to create the sides of the holes in the wood spokes. The staples that bind the ribs are not burned. Instead I have worked the area around them by adding a shadow to the ribs and a small dark spot where the staple enters the wood.
Even though I have burned right over the first burn layer I have not list this early work. Instead the new layer of burning simple darkens the first burn adding to its tonal darkness.