Creating a practice board before you begin your project allows you test you tip points, experiment with your temperature settings, and explore the textures that you can use on any pyrography project. If you are starting a new project work your practice session on the same media on which you will burn your design.
Library of ideas
As your hobby into pyrography grows your practice boards will become a library of ideas and possibilities that you can use on new projects. Each pyrography surface has its own properties. Basswood tends to burn quickly, giving you bold, strong lines at low temperatures. Birch, a harder wood surface, is a slow burn and higher temperatures will be needed to create those dark chocolate tonal values.
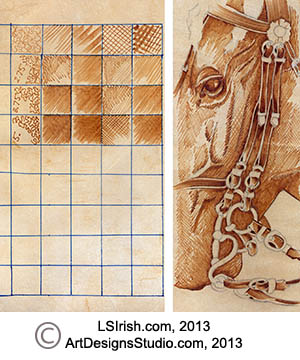
In the sample pyrography below, Civil War, Lee and Longstreet, is worked on a 12″ x 12″ vegetable tanned leather. Just like wood, each piece of leather burns just a little bit different than another. I started the project by cutting the 12″ square from a side which created several scrap pieces of leather trim. Using one of the trim pieces I created my practice board, the horse portrait close-up below, to establish my tonal values, temperature settings, and which texture strokes would give me the strongest shadows and detailing.

Work the board on the media you will be burning
This sample shows a scrap of vegetable dyed leather that was used in preparation for the large Civil War leather burning, above. The large horse portrait is also a practice board, worked from a second scrap of trimmed leather, and provided the opportunity to work out the shading and tonal value of the horses in the larger finished project.
Experiment with small pattern areas
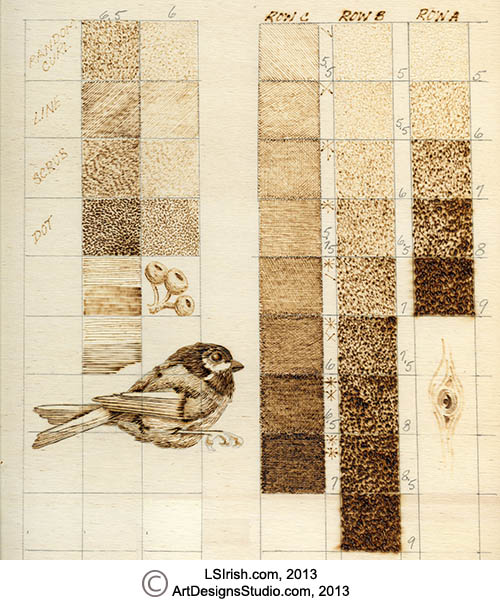
This sample practice board was worked on poplar plywood in preparation for a large bird house project. The left hand scale focuses on the different texture patterns that were to be used within the design – random curls, lines, short scrubbie strokes, and tightly packed dot patterns.
The three tonal values scales, shown on the right side of the board, were worked to establish the sepia color range that were needed to create a well shaded design. I often make pencil notations on my practice board to show the pen tip used, the temperature settings, and the direction of the strokes.
Grid layout
Begin your practice board exactly as you would any other project. If you are working on wood lightly sand your board using 220- to 320- grit sandpaper to remove any loose wood fibers and to smooth the surface. Wipe the sanding dust from the wood using a clean, dry cloth.
Using a pencil rubbing on the back of your pattern paper or graphite paper, trace any small portion or element of your main pattern that you want to burn before you go to your larger project.
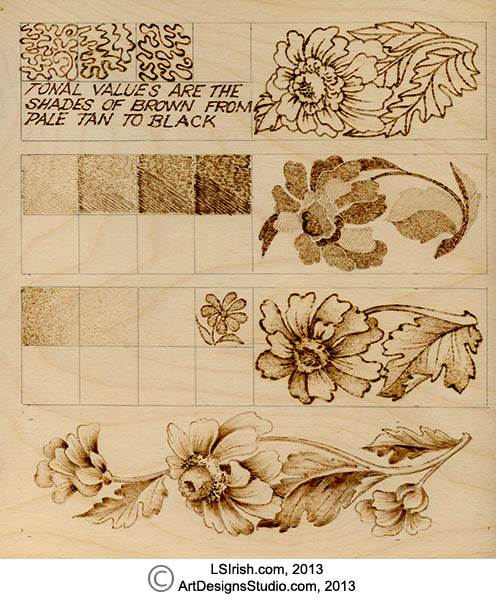
With a pencil and ruler, create a 1″ square grid pattern on your board. The sample practice board, below, is worked on a 9″ wide by 10″ high piece of 3-ply birch plywood. I allowed a 1/2″ margin along all four sides. The top three practice areas measure 8″ wide by 2″ tall, with two rows of 1″ squares on the left of the board for texture and stroke practice, and a 4″ wide by 2″ tall area on the right for a small practice pattern.
Experiment with your goals and options for your larger project
This practice board was the preparation work for a large wicker basket of Ox Eyed Daisies. Daisy petals are white which in our craft of pyrography means they are left in raw, unburned wood. Unburned, white daisy petals will never show against an unburned, raw wood background. I could have solid filled all of the background air space around the daisies with a dark to black tonal value to define the petal edges but that would have made the final burning extremely dark and taken a great deal of time.
To discover another method of creating white daisies on a white field I worked a small portion of the pattern several times, each time treating the pattern with a different burning technique.
Row 1 Working the daisy wicker basket as a silhouette or outline design was the first option. Working with a ball tip or looped tip pen and a medium-hot setting you can burn any pattern. The three filled practice grid squares were worked at different temperature settings to find the cleanest, darkest tonal value for the line burn that did not halo because of excessive heat.
Row 2 The second practice burning was to plan and map where I would use my tonal values to push petals to the background or to bring petals forward in the pattern. One option to the white daisy petals was to not make them white but to use an extremely pale tonal value with an open spaced texture stroke. The grid squares were worked in the top half with a lose scrubbie stroke and the bottom half with a long, straight line pattern.
Row 3 This practice shows a combination of the first two rows. The pattern tracing was outlined using the ball tip pen. The shading in the petals and leaves was added using the touch-an-lift dot fill pattern that we use in pointillism.
Row 4 The last section of this practice board shows a full shaded and accent line work – the method that I finally chose for the finished project. In this portion of the practice board I used my spear shader and long. pull strokes to create the shadows in the petals and leaves. I began this shading on a medium-low temperature setting then added layers of slowly increased heat setting strokes to darken the shadows.
Having complete four small practice samples I chose the last, row 4, simple shading for my final project. This practice board took less than an hour’s work, gave me the choice of how I wanted to approach the designs, and literally saved me the cost of the large basswood board by avoiding mistakes.
Click on the image below for a larger copy of the pattern. This pattern is worked using long, pulled shading strokes – see the steps to create your own daisy line in Simple Shading in Wood Burning, Daisy Pattern.
Pingback: First Pyrography Project - 5 Practice Boards | LSIrish.com