Redwork Embroidery Patterns and Redwork Embroidery Quilts
Let’s take a 1740 discovery, an 1920’s embroidery style, a 1950’s Retro Owl pattern, and today’s trends of adding establishments to our needle arts and see what we come up with.
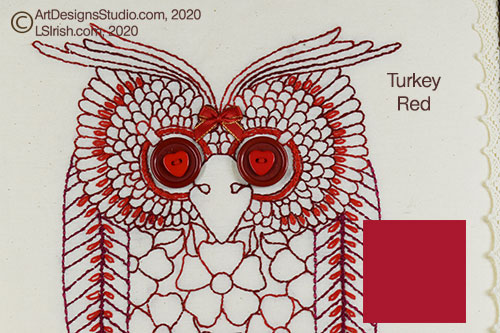
Around 1850 in the United States the Redwork embroidery style began because of an amazing process that created a colorfast red dyed for cotton fibers. Colorfast means that the dye in the thread would not fade, wash out, or cause the dye to bleed onto the background fabric.
 Today, Redwork is seeing a serge in popularity and has
begun branching out from traditional, vintage, and antique patterns.
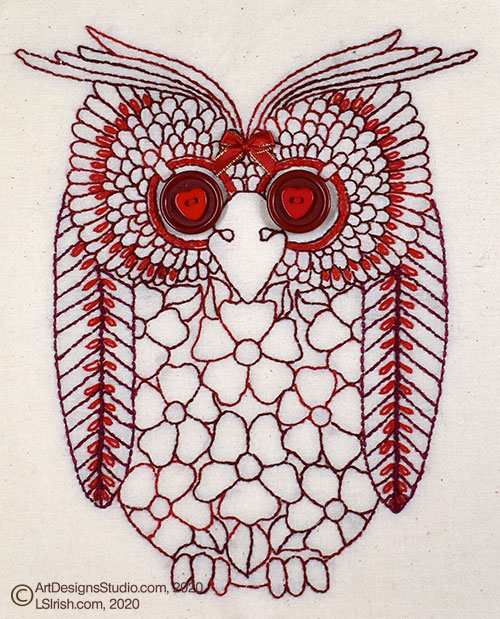
My owl is worked, centered, on a 16″ square of muslin, which fits
a 12″ frame and allows extra fabric to turn over the frame’s
backboard. The owl pattern measures 9″ high x 8″ wide.
Retro Owls Pattern Package
ArtDesignsStudio.com
This colorfast process, creating what was called Turkey Red dye for cotton fibers is believed to have begun in either Turkey or India before 1740, using the rubia plant as its color base. 1740 sees the introduction of the Turkey Red dye to Europe and in 1786 is referrenced in a text by a Manchester England dyer.
By the 1870’s a second innovation in the needle arts was developed with the availability of iron-on transfer patterns. As an embroiderer you could purchase pre-printed, pre-cut squares of muslin fabric with your pattern already transferred to the fabric or you could purchase the transfer paper with the pre-printed patterns and iron them onto your fabric yourself.
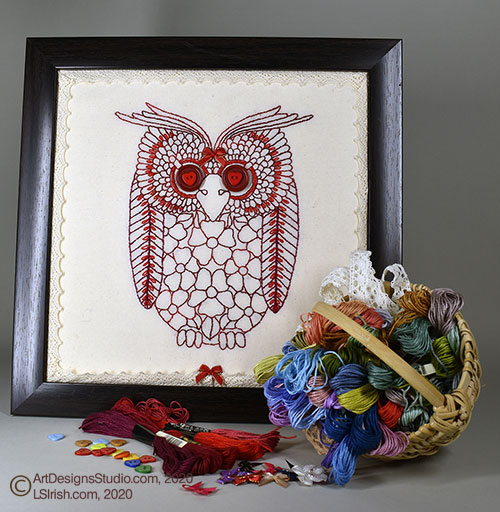
I chose to frame my Redwork Owl. I cut three pieces
of quilt batting – one the inside measurement of the frame, one a
1/2″ in measurement smaller, and one an 1″ in measurement smaller.
Stack the three sheets of batting with the largest on top,
directly onto your frames’ backing board.
Lay your Redwork owl, centered onto the batting layers.
Place the frame over the fabric, batting, and backing board,
securing it into place along the inner routed edge of the frame.
Your framed owl now is puffed, giving it a quilted effect.
I chose to add a 1″ wide cotton lace trim to my design by
gently tucking the inner edge of the lace under the frame’s
edge and securing with a few drops of Fabric Fusion glue.
By the 1920’s the colorfast process had spread throughout the color range of floss, yarns, and threads so that any color could be safely used without concern that all of your work could be ruined with just one washing. So we see what is today referred to as Redwork or Turkey Red work being done in blues, blacks, and even the deep greens.
I still remember as a child looking through my grandmother’s stash of Work Basket magazines which always had one or two new Redword patterns in them along with the current patterns for crochet doilies or tatted color designs. State birds, state flowers, children’s fairy tale stories, and an alphabet of animal designs were commonly stitched then quilted into a larger finished work.
Click on the image above for a larger sized version – easier to read.
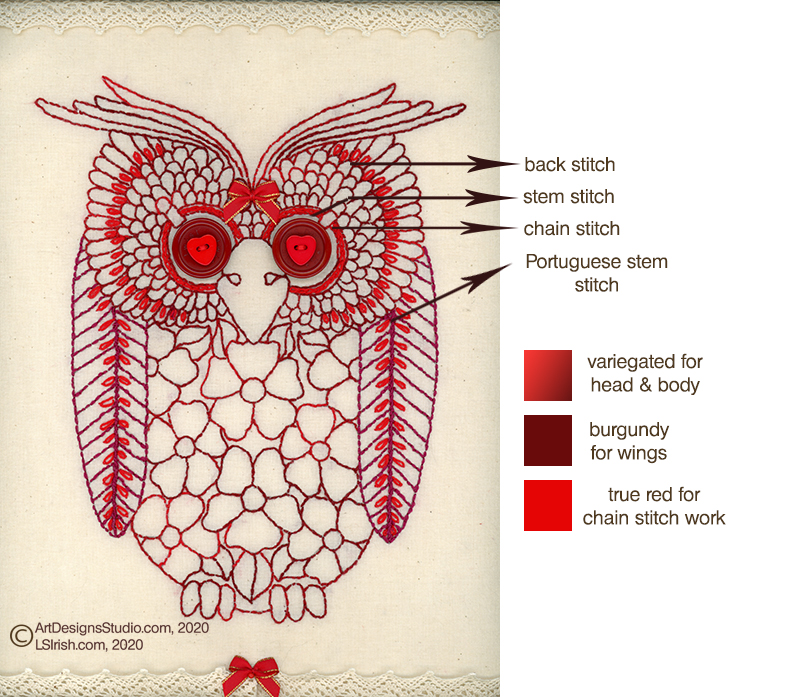
I did not stick to tradition which is creating the pattern
using one color cotton thread and one stitch pattern. Instead, I used
a red to burgundy variegated thread for the body and head; a
dark burgundy thread for the wings; and a bright true red for
the chain stitch accents.
Plus I used four different stitch patterns – the stem stitch,
the back stitch, the chain stitch, and the Portuguese stem stitch.
A bright red 1/2″ heart button tops a 1″ dark red button for my owls eyes …
and I thought she needed just a little tiny gold trimmed bow!
Retro Owls Pattern Package
ArtDesignsStudio.com
Three primary embroidery stitches were used to create the Redwork pattern – the stem stitch, the back stitch, and the slip stitch which was also called the Kensington stitch after the Royal School of Art Needlework in England.
As noted above just the original process, 1786 Manchester England dyer’s notes, of colorfast Turkey Red dye is fascinating and goes as follows:
1. Boil cotton in lye of Barilla or wood ash (LYE)
2. Wash and dry
3. Steep in a liquor of Barilla ash or soda plus sheep’s dung and olive oil (LYE + OLIVE OIL = SOAP)
4. Rinse, let stand 12 hours, dry
5. Repeat steps 3 and 4 three times.
6. Steep in a fresh liquor of Barilla ash or soda, sheep’s dung, olive oil and white argol (potassium tartrate) (a salt of tartaric used in food additive, especially as baking powder, tartar obtained from wine fermentation).
7. Rinse and dry
8. Repeat steps 6 and 7 three times.
9. Treat with gall nut solution (leather tanning tannin leached from medicinal gallnuts is oak trees)
10. Wash and dry
11. Repeat steps 9 and 10 once.
12. Treat with a solution of alum, or alum mixed with ashes and Saccharum Saturni (lead acetate).
13. Dry, wash, dry.
14. Madder once or twice with Turkey madder to which a little sheep’s blood is added.
15. Wash
16. Boil in a lye made of soda ash or the dung liquor
17. Wash and dry.[2]
Today’s embroiderer can use their imaginations of color combinations,
embroidery accents, and the addition of laces, ribbons, and buttons
to modernize Redwork Embroidery.
For more reading, please visit:
America’s Quilting History at WomenFolk.com – An easy to read history on Redwork Embroidery
NordicNeedle.net – Offers excellent stitch guides and some free patterns
The Quilter’s Community, History of Redwork – Features wonderful examples of antique Redwork quilts
Wikipedia.org – Redwork – A history of this embroidery style
Wikipedia.org – Turkey Red – A detailed look at the process of creating colorfast Turkey Red dye
Since my
Redwork Embroidery Owl Pattern is all done and
placed on the fireplace mantel, here’s whats in my
embroidery hoop now.
Another fun owl available in
Retro Owls Pattern Package
ArtDesignsStudio.com
