Quick Review
When working with a line art pattern that has no shaded drawing you have several options to help you develop the design.
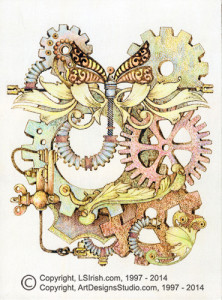
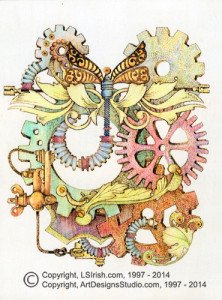
1. Look for repeated elements that can all be worked in the same manner at the same time – for this pattern we had six repeated elements.
2. Use the same texturing stroke or the same tonal value coloring to unite similar elements – all of the organic leaf elements were worked in long line strokes in a pale tonal value.
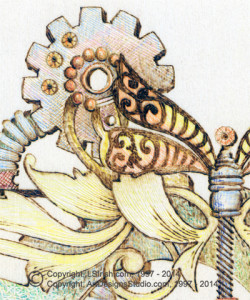
3. To separate similar elements use a different texture stroke for each element – each of the six gears have their own, unique texture.
4. Determine where you might need to add perspective depth in the pattern and work that depth burning on all the elements at one time – the open holes of the gears and the gear teeth were worked on the same side of the gears at the same tonal value.
5. A pale or medium tonal value outlining will allow you to use unburned areas in the design for highlights – the electrical junction box uses unburned highlights surrounded by a light or pale tonal value outlining.
6. Add a second layer of burning work where you want your shadows to fall. Adding layers of burning deepens the tonal value of the area. For many fun designs as this one shading falls on the background element where it tucks under or goes behind another element.
7. Use dark tonal value accent outlining in just a few areas of your pattern to strengthen an area that seems undefined or needs extra emphasis.
8. Develop your burning slowly beginning with pale tones. You can always add more shading or darken an elements tonal value as needed and as more of the design is worked.
 Adding Color:
Step 1: Colored pencils are wonderful for adding coloring to pyrography projects worked on wood, paper or gourds. I personally prefer artist quality watercolor pencils. These pencils contain little or no clay or wax base so they create clear transparent coloring. A set of twelve or twenty four pencils is a well worth the investment for any pyrographer.
Adding a transparent coloring agent as watercolors, watercolor pencils or oil paint glazes does not change or alter your wood burning strokes in any manner. However adding color can diminish the impact of your wood burning strokes. To the eye color is stronger and more important than shading. Balance your coloring work with your burning tonal values using darker colors over dark tonal value areas and pale colors on pale tones.
When using colored pencils, either wax based or watercolor, keep your pencil extremely sharp. Use a gentle, light pressure to apply the color over the burned area. This keeps the coloring on the high areas, unburned areas, within the element. Develop the coloring slowly by applying repeated layers of pencil work.
 Watercolor pencils are applied dry from the pencil point then blended with a slightly damp soft bristle brush. Use several different colors in one area to add more interest to the coloring. When the pencil has been washed with the damp brush the coloring in that area will deepen. So work in light layers of coloring at a time. New layers of pencil can be added then washed to give an area more color.
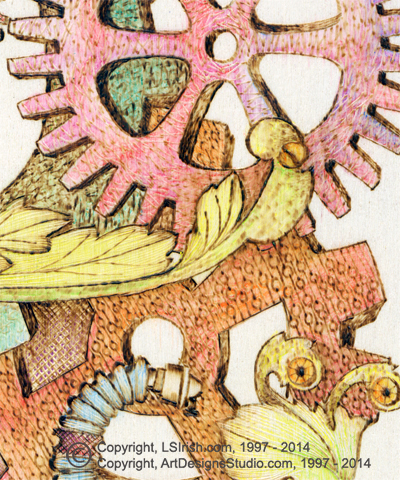
In our project I have used three to four colors in many elements. The upper left gear shown in the photo is worked using medium blue, medium purple and sienna brown. The large gear below it has medium blue, medium teal, dark green and yellow. These mutli0ple colors are applied in a random manner.
Step 2: Dampen a soft bristle brush with clean water. Wash a coating of water over the watercolor pencil working one element at a time. The more water you carry in your brush the more the pencil colors will blend. Allow each element to dry before working an adjacent element with the damp brush. This will help avoid the chance of the color from one element from bleeding into the next area.
Allow the completed project to thoroughly dry. Use several coats of polyurethane or acrylic spray sealer to add the finishing coat to your burning.
 |  |