
WOOD BURNING SYSTEMS
A wood burning is created with five elements – the wood burning unit, the pen tips, the media on which you are working, the pattern or design you will burn, and the art style you will use to create the design. Lets look at the pyrography systems first.
There are three styles of wood burning units: one-temperature tools, rheostat-controlled tools, and variable-temperature tools. Which you chose depends on both your interest in this craft, your pyrography budget, and the media on which you will be working.
ONE-TEMPERATURE
 Walnut Hollow Introductory Wood Burning Tool
Shown above is a regular one-temperature tool the reaches around 950 degrees.
The one temperature tool has the heating elements inside of the handle of the tool and comes with a variety of brass interchangeable tips that are placed in a threaded receptacle at the end of the tool. Tool tips for this style of burning system include the universal tip, calligraphy tip, cone tip, large ball shader and large flat shading tip.
Once plugged into an electrical outlet the tool quickly reaches an even but high temperature so the tonal value work in your project must be controlled through the textures or strokes that you use and the speed of the stroke. Very pale tonal values are burned by using a light pressure to the tip against the wood and moving the tool tip quickly through the burn stroke. Darker tones use a medium pressure and slower motion.
 Walnut Hollow Creative Woodburner Detailer
The one-temperature tool on the right has a low-temperature setting around 750 degrees.
One temperature burning tools are inexpensive, readily available at your local craft or hobby store and excellent for first time wood burners to give our craft a try. I began wood burning twenty-five years ago with this style of tool. Several years ago I purchased a new one temperature unit so I would have two tools on the table, each with a different tip, ready for use in my projects. Today, although I now have two variable temperature systems I still find that I use my one temperature system on a regular bases.
 A low-temperature, one-temperature tool is perfect for your leather, and cloth burnings.
A full range of tonal values can be burned using a one temperature tool. Burn your pale tones as the tool tip begins to heat and save your darkest tones for when the tool tip has reached its full setting.
RHEOSTAT TOOLS

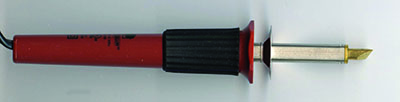
This inexpensive beginner’s wood burning pen has a rheostat on the power cord which allows you to control the temperature of the burning tip. It allows you full control over the pen tip’s heat setting.
The sample rheostat burner, shown below, uses the same interchangeable brass tips as the one temperature tool.
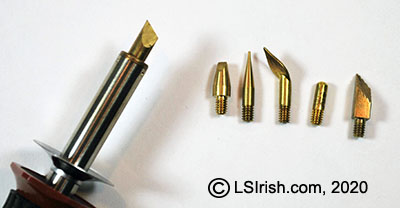 The screw-in brass burning tips shown here fit both the one-temperature burning unit and the rheostat unit. From left to right are shown a calligraphy tip, cone tip, flat shader tip, large ball tip, and a texturing tip. The universal writing tip is inserted in the burning pen.
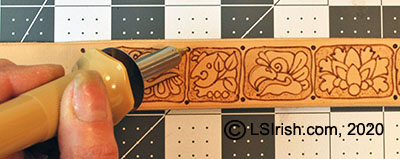
Brass tips can take quite a bit of pressure and abuse at very hot temperature settings which make them perfect for wide, thick black line work on heavily sapped woods as white pine, sugar pine and cedar.
The tonal values in the practice board are worked by controlling the pressure of the tip on the wood, the speed of the stroke, and the density of the lines burned as well as by adjusting the rheostat temperature settings.
VARIABLE-TEMPERATURE

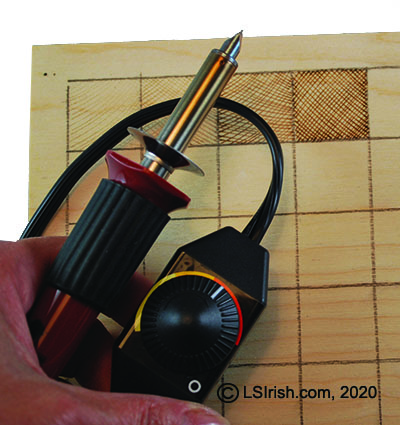
For the projects and practice board shown in this book I am using the Walnut Hollow Creative tool – a variable-temperature tool with four interchangeable pen tips.
Variable temperature systems have a dial thermostat that allows you to control how cool or hot your tip is. You can adjust the temperature setting quickly making it easy to control your tonal values in your project. This style has two types of pens – the fixed tip pen where the tip is permanently set in the hand grip and the interchangeable pen where different wire tips can be used with the hand grip.
Because the temperature controls for variable-temperature tools are located in an independent case from the burning pen, the pen handle shapes are much thinner, light-weight, and easier to grip for long term burnings. A long cord from the control unit to the pen gives you free movement of your pen as you work your burning strokes.
HIGHEST QUALITY WOOD BURNING TOOLS
The high end, high quality wood burning units available to our craft have fixed-tip pens that transfer the heat of the unit through the pen tip uniformly. There is little or no variation in temperature burn settings between one project and the next. So when you need a medium-high tonal value of 5 you can rely on these units to give you the same tonal value time after time.
My tow favorites are shown below and both have been put through extremely hard use for over ten years. Both have preformed outstandingly.

The second high-quality wood burning unit that I purchased was a Colwood Detailer. This one burning tool has been used to create over ten years of pyrography pleasure and in the writing of five pyrography books. I highly recommend any Colwood product.
 Optima 1 Dual Pen System
The third high-quality tool that I added to my kit is the Optima 1 with a duel pen system. This unit has given years of hard work and was used in my latest two publications of pyrography. You can’t go wrong with an Optima.
I will note here that my first high-quality wood burning tool was a RazorTip that I used in the creation of my first pyrography book, The Great Book of Wood Burning. Personally, I find that RazorTip’s pen tip wires are not as durable or long lasting as those of the Optima or Colwood units.