2018

carving knives

Which carving knife is right for you?

In an Amazon review a reader was distressed that I don’t teach spoon carving using a Sloyd knife, a very traditional knife used in this craft.  I believe this is a fair and honest question that I could address here.

There are many different styles and shapes for the straight cutting knife that we often group under the name of ‘bench knives’.   Some bench knives have long blades that may extend up to 4″ from the handle, others as chip knives may only have a 1″ long blade.  Some blades are flat – straight – along the cutting edge from handle to knife tip while others may have a curve at the top 1/3 of the blade.  Some are sharpened on one side only while others are sharpened on both sides.

While Sloyd knives are a traditional, Old World technique tool for spoon carving, why don’t I use or recommend them … because they don’t fit my hand!  More at the bottom of this page ….

bench knives

What is important in your choice of bench knives?

There are two specific aspects to your bench knife that determine which is best for you.

1. The quality of steel which determines the quality of the sharpened edge that you can achieve and keep during a carving session.

Cheap steep will never sharpen to a bright, clean edge and if you do achieve a usable sharpened edge that edge will not last very long during any carving session.  Be prepared to pay about the same amount for one good bench knife as you would a full 5 to 6 piece beginner’s carving set.

2. The fit of the handle inside of your hand.

No knife, no matter how wonderful the steel, who manufactured it, how sharp an edge it keeps, or how it has been traditionally used in wood carving is worth a tin dime if it doesn’t properly rest inside your hand.

Notice here that I did not mention the piece or project that you are carving or the length of the bench knife blade.  A good bench knife, one with high quality steel and a proper fit, will carve about 90% of the straight cuts that you need for any project.  While many wood carvers have a variety of bench knives in their kits, most return over and over again to just one or two favorite tools.

Wood Carving SpoonsWhat length of bench knife do you need?

For most carving projects today your bench knife only needs to make a clean slice of wood 1/2″ or less wide.  If you need to take larger slices then you most likely need to move to a draw knife.  Today’s carvers are working with milled wood that has been kiln dried.  The bark has already been removed and the heartwood cut away from the blank.  Few of us need to rough cut a split piece of bark wood that needs to be dressed down to a flat, squarish shape before we begin carving either of which could require a longer blade length.

Let’s return for a moment to the discussion about using a Sloyd knife as compared to a standard bench knife or chip carving knife.  A Sloyd knife is wonderful if you are de-barking a long walking stick that you have cut from a sapling.  The extra long blade does allow you to glide the cutting edge down the sapling, releasing very long strips of bark.  This is very important if you are removing the bark after the stick has dried.

You can also debark while the stick is green using a shorter bladed knife by lifting the top edge of the bark and pulling the bark off the stick.

If I am carving details in my work, as shaping the side of a spoon bowl or cutting the facial planes of a wood spirit that long blade on the Sloyd pushes my hand several inches away from where I am cutting.  A short blade, as a 1″ chip blade, places my hand, and therefore my control of the cut, right at the point of the cut.

wood carving the wood spirit pattern
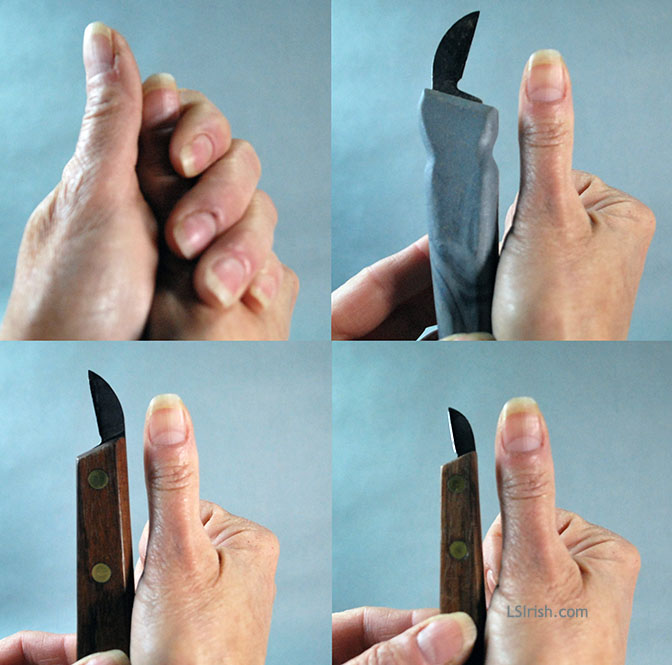
Does it fit your hand?

For me this is as important as the quality of the steel.  If a knife does not properly fit your hand I will guarantee that it will spend most of your carving life in the box of your tool kit … quietly rusting away!!

A well-fitting knife handle lays across your palm between the major fold wrinkle of the fingers and the major fold wrinkle of the thumb palm.  The fattest part of your thumb rests nicely into this space, which means that the fattest width of your thumb is an excellent gauge for the thickness of your bench knife handle.

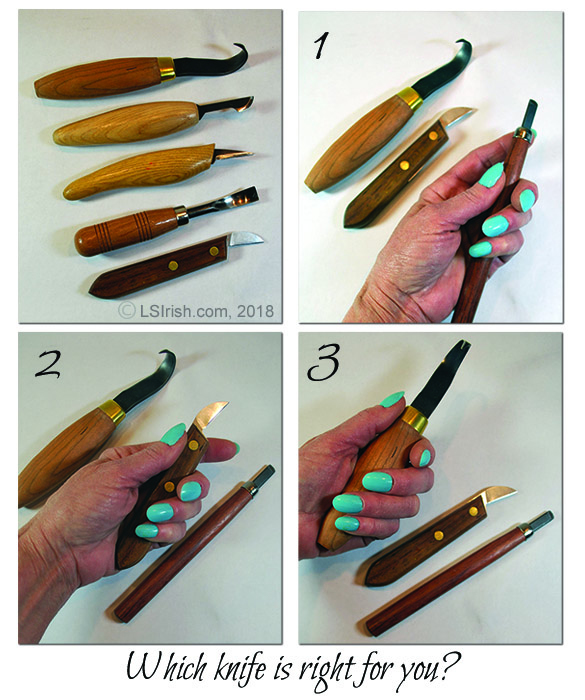
In the photo, right, the bottom left knife handle is the most appropriate for the size of my hand.  The top right shows a handle that is too wide, and the bottom right one that is too narrow.

When you roll your hand around the handle, the tips of your long and ring finger should just lie about 1/4″ away or just against the side of the thumb palm.  This fit lets you have free motion of your fingers, your thumb, and your wrist during any cut – not too tight, and not too open.  Your fingers hold the knife handle to the palm without the need of excess pressure.

Too narrow or to thin a handle and your finger tips will need to curve into a clenched shape to hold the knife steady.   That clench causes extra tension in the hand which over time becomes tiring.

Too wide a handle and your finger tips will not touch the thumb palm area.  With this grip you need extra pressure to steady the knife through the cuts.  Again, this can cause fatigue and stress on your hands.

bench knives
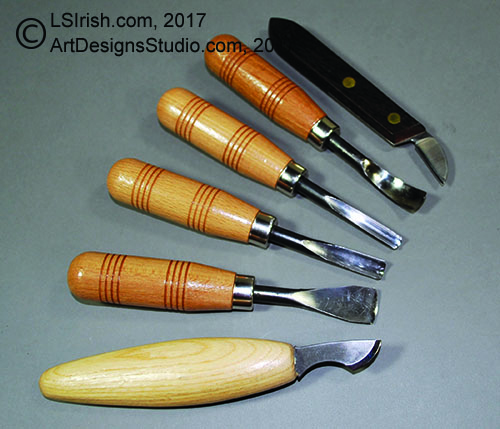
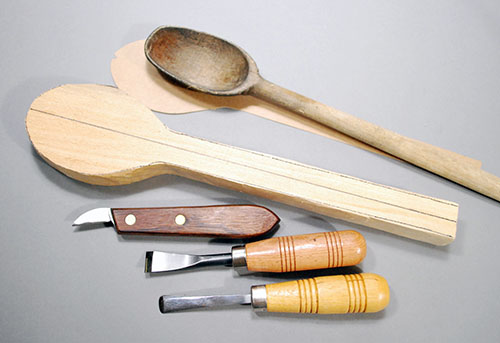
Looking at the first photo on this post.

Upper left shows five different tools and knives that are commonly used in spoon carving.  From top to bottom are a FlexCut Carving Hook, a FlexCut hooked skew, a FlexCut bench knife, a wide bent round gouge, and a Moor Chip Carving knife.

1 Upper right – Shows a bull nose chisel with a narrow handle.  The handle sets forward in my hand, allowing the fingers to move the tip of the blade through detailing work.

2 Lower left – Shows a Large chip carving knife that fits my hand perfectly.  The finger roll completely around the handle without the need for extra tension to secure the handle in my palm.

3 Lower right – Shows a large handled carving hook which is too large for a good fitting grip for my hand.  The handle has been pushed into the palm area and my finger need a tighter grip to secure the handle during use.

Old World v. Modern Day

Yes, sloyd knives, carving hooks, and scoops are traditionally used in the Old World style of spoon carving. Traditionally these knives and tools have extra wide handles as shown in the top three tools in the upper left photo above.  Those wide handles were made to fit a medium to large man’s hand, because until about 100 years old traditionally woodworking and wood carving was done by men.

Today what is necessary is having and using a bench knife that fits your hand properly.  Today it is reasonable to estimate that one half of all carvers are women, with smaller hands and therefore narrower grips than men.

While writing this and talking with my husband, a long time woodworker, we did a small comparison.  His hand, a medium-sized man’s hand, measures 7 3/4″ long from the finger tip to the wrist bone of the thumb … mine measures 6 1/2″.  His hand measures 3 3/8″ wide across the knuckles, mine measures 2 7/8″.   While his hand is large enough to comfortable hold a Sloyd knife, mine simply isn’t.

Humans are a dimorphic species – males tend to be about 10% larger than females.  Therefore in general what was used for centuries by a male population of woodworkers and wood carvers may not be appropriate for today’s mix of hobby carvers.

Conclusion

It’s not what knife you use, it’s not about a particular manufacturer’ or Old World style … it’s all about whether that knife fits YOUR hand. 

PS … And that is why I never recommend ergonomic grip tool handles as they only fit one person’s hand, he who made the handle mold in the first place.

Which carving knife is right for you? Read More »

Art of Spoon Carving

Art of Spoon Carving

Art of Spoon Carving

Please share with your family, friends, and fellow spoon carvers on reddit, facebook, and twitter.

A few simple additions to your spoon carving project will make you work stand out from the crowd.

This right-handed stirring spoon, worked from a 1″ thick, 3″ wide, 12″ long basswood blank, features a small scroll line and leave design that has been relief carved with gentle roll-over edges.

To make the relief designs snap off the spoon handle a 3/8″ round gouge was used to texture the background area behind the scroll and leaves.  Cut very shallow gouge marks that follow the grain of the handle.

Ears on either side of the top of the spoon bowl add a little extra touch to the joint area where the bowl transitions into the handle.

This wonderful Holiday present is perfect for any chief in your family and takes only one or two evenings of carving to create.

Learn more about spoon carving in the Art of Spoon Carving by Lora S. Irish.


The Art of Spoon CarvingWood carving is coming back into style, and making kitchen utensils is among the easiest ways to learn the craft. This beautifully illustrated guide by master woodcrafter Lora S. Irish teaches the basics of wooden spoon carving.

Perfect for beginners, the book presents 12 step-by-step projects that illustrate a variety of historic carving styles.
A selection of mix-and-match patterns offer suggestions for creating dozens of unique designs for spoons and other implements — forks, ladles, dippers, spatulas, knives, pie servers, and scoops. In addition to clear, detailed directions accompanied by helpful drawings, inspiring photographs illustrate decorative ideas for using the carved spoons in kitchen wreaths, centerpieces, and other ornaments.

A great gift for crafters seeking a new hobby, this book is loaded with stylish designs for handmade treasures.

“Incredible full color photographs detail each step in creating this classic art-form. Learn what you need to know about carving sets, knives, and what type of wood is best to start out with. You are going to love The Art of Spoon Carving. Get a copy today.” — Texas Kitchen and Garden and More”


Art of Spoon Carving

Click on the free image below for a full-sized printable pattern.free Lora S Irish free spoon carving pattern

Art of Spoon Carving Read More »

gourd art musical instruments

Creating Gourd Art Musical Instruments – Banjo

gourd art banjo

What happens when …

…you unite the joy of gourd art crafting, the joy of bright and vibrant colors, and the joy of music?  You create this joyous gourd banjo with copper wire strings.

An extra large kettle gourd with some damage around the stem area inspired this fun gourd musical instrument project.  While I did not take step-by-step photos … I was too involved in the fun of creation to remember … I will share four easy ‘secrets’ that made the construction quick and accurate.

Supply List:

The general supply list is posted on the image below.  Please click on this image and save it to your desktop.

Arteza Bone Folders (Set of 4)
Bare Copper Wire, Bright, 14 AWG, 0.064″ Diameter, 80′ Length
Bare Copper Wire, Bright, 18 AWG, 0.04″ Diameter, 195′ Length
Bare Copper Wire, Bright, 20 AWG, 0.032″ Diameter, 315′ Length
Jameco Valuepro 24BC 24 AWG Solid Bare Copper Bus Bar Wire 205′
Heavy Duty Muslin Clamps 4 1/2 inch 6 Pack
Liquitex Professional Flexible Modeling Paste Medium, 16-oz


gourd art banjo1. How to cut any gourd along a perfectly level, accurate circumference line.

Clean and prepare the outer surface of your gourd as you normally would.  Wipe any sanding dust from the outer surface with a damp cloth, then allow the gourd to dry completely.

Visually estimate where you want the cut line along the circumference.  Make a mental note as to which area of the gourd you will be using (the down side) and which area you will be removing (the up side).

Fill your kitchen sink 2/3’s full of water.  Hold your gourd throughout this step as level to your visual cut line as possible.  Place the down side – the side of the gourd that will become your project – into the water.  Push it down until the bottom is covered with water and the surface of the water is at your visual cut line.

Lift the gourd up from the water carefully.  Your gourd will have a perfectly level, perfectly straight, perfectly even wet line around the circumference of your gourd.  With a soft #2 to #4 pencil mark the edge of the wet line.  You are ready to  cut.

This is a great technique when you have an odd shaped gourd that has an un-level top.  Plunge your gourd into the sink water until the bottom sits firmly against the bottom of the sink.  The water line will now be an even measurement from the bottom of the gourd, making a perfectly level cut line.

gourd art banjo2.  How to sand any gourd top cut evenly and level.

While you are at the hardware store buying birch plywood for the face of your banjo, purchase three or four extra pieces.  You will also need two sheets each of 100-, 150-, and 220-grit sandpaper, spray adhesive, and 1″ wide masking tape.

Work in a well ventilated area. Lay a strip of masking tape along one edge of the plywood.  Your plywood is 12″ wide, while your sandpaper is only 11″.  The tape protects the extra plywood from the spray adhesive.

Spray an even coating of adhesive over the 12″ x 12″ sheet of plywood.  Lay one sheet of 100-grit sandpaper onto the board, aligning along the top edge – opposite of the tape.  Lay a second sheet of 100-grit sandpaper against the first, so that the entire board is covered with sandpaper.  Press firmly into place.  Remove the masking tape.  Let the adhesive dry well.

Cut off  the extra 4″ strip of extra sandpaper that extends off the board.

Repeat these steps for your 150- and 220-grit sandpapers.

Clamp the board to a firm surface, your work table.  You can lay your cut edge of the gourd onto the board and move the gourd in circular motions to evenly, and quickly sand the edge perfectly flat.  Work the gourd through the three stages of sandpaper grit, starting with the 100-, then the 150-, and finishing up with the 220-grit.

3. How to fill the joint line between the gourd’s cut edge and the plywood face.

Even with the most careful cutting and sanding you can have small gaps in the joint between the plywood face and the gourd walls.  Fill the gaps with Modeling Paste, also called Sculpture Paste.  This is a water-soluble, acrylic-based, medium thick paste that dries quickly and can be sanded smooth.

Follow the directions on your jar.  I prefer to lightly dampen the area that I will be filling.  I let the area dry until there are no shiny, wet spots then fill the area with a light layer of modeling paste.  Let this layer dry completely and lightly sand.  If the area is not completely filled I repeat the application.  Thin layers are easier for me to control, shape, and sand.  Plus thin layers dry more evenly than thick applications.

Modeling paste – sculpture paste – can be painted using your craft acrylic colors.  It’s perfect for those gourds that have rough or pitted areas on the surface!

A quick trick to insure that your jar of modeling paste lasts a long time is to thoroughly clean the jar rim and the inside of the lid after every use.  Cut a square of plastic clinge wrap about 2″ larger than the jar opening.  Place the plastic clinge wrap onto the jar’s opening, then put on the lid.  The wrap seals along the jar’s rim, preventing your paste from drying out.

Lora S. Irish patterns4. Save yourself time, worry, and fuse by using ArtDesignsStudio.com patterns!

Like many crafters you have only so much limited time to create and craft.  Do you want to spend that time actually working on your project or on researching, designing, and refining the pattern you will use?

We have over 3000 line art and craft patterns, ready to download directly to your home computer, in a huge variety of themes, ideas, and designs – Wildlife, Celtic, Wood Spirits, Architectural Accents, Landscapes, and so much more.

I use CP139 Henna Tattoos 1 and CP140 Henna Tattoos 2 from our Special and Miscellaneous Patterns Category for my Gourd Art Banjo.

Creating Gourd Art Musical Instruments – Banjo Read More »

back to the basics of wood carving

Back to the Basics of Wood Carving

Wood Carving Tools for Carving a Wooden SpoonWhat tools do you need to start carving?

This common question is very hard to answer because the tools and knives you may be using one year from now could well be very different than those that I suggest for a newbie carver.

Shown right is a set of spoon carving tools that include several sizes and profiles of round gouges.


Relief Carving Workshop by Lora S. IrishRelief Carving Workshop: Techniques, Projects &
Patterns for the Beginner (Fox Chapel Publishing)
Comprehensive Guidebook from Lora S. Irish with
Easy-to-Learn Step-by-Step

Instructions & Exercises
Paperback – Illustrated, March 1, 2013


wood carving toolsYour First Carving Tools

If you are just starting wood carving I strongly suggest a simple set of carving tools.  Sets are available in 6 to 12 tools, and often come with a storage box or cloth roll.  Select a medium-sized tool profile set of 1/2″ wide or less that includes at least a straight chisel, skew chisel, large round gouge, small round gouge, and a v-gouge.

A mid-quality beginner’s tool set of five to six tools will cost between $40 to $75.

To this set add the best bench knife or large chip knife that you can afford.  Your bench knife is your primary tool in carving and the better quality steel makes all the difference in how easy your carving flows through the cuts.  A high-quality bench knife often runs around $35 to $60.

Interchangeable blade sets are also excellent for the new carve.  As an example I use the FlexCut 11 piece Interchangeable set all the time for whittling, relief, and cane carving.  This set has every tool profile that a new carver needs while keeps your initial costs low.  I also have used the same Ramelson Beginner’s Set for nearly twenty years with great success.

You will also need a sharpening set to keep the edge of your new tools crisp.  Sharpening tools can include ceramic stones, a leather strop, honing compound, and a slipstrop.  Estimate another $50 to $75 for your sharpening set.

All of these tools are explored in Beginner’s Whittling and Relief Carving Tool Kit.

What I do not recommend for the beginning carver!

1. I don’t use any sets that are available from the large arts and crafts box stores.  These sets are very inexpensive because they are not manufactured from high quality steel.  Often they come un-sharpened or only partially sharpened, which means that you must conquer sharpening techniques before you ever put a knife into the wood.

2. I don’t recommend high-end, extra-high quality tools for a beginner.  I know, those sets are just beyond beautiful and the very best you can buy.  And I know that I just told you to buy the best bench knife you can afford … But … neither you nor I know whether you will love wood carving with the intensity that I do at this point in your new hobby. We also can not predict what style of carving you will finally chose.

These tools can be purchases after you discover that you are addicted to carving!  You can purchase high-end tools individually which means you can add to you beginner’s set one tool at a time.

So, at this time, save that money to purchase wood.

3.  While I do list utility knives as a possible starting tool kit I do not recommend them.  Utility knives are made to be disposable and do not have the steel strength that true wood carving tools do.  Utility knife blades can crack, split, and pop at any moment, and create a danger of injury.

Cutting the slope of a wood spirits mustacheCarving Styles

There are many different styles of wood carving and each has its own set of specialty tools.  In the next year, as a new carver, I strongly recommend that you give all of these carving styles a try.  Most long-time carvers work several different styles on a regular bases.

Whittling is often done with one medium-length bench knife or pocket knife.  A few extra tools may be in your whittling kit and could include a small v-gouge, a small u-gouge, and perhaps a medium or large round gouge.


Chip Carving uses a set of three short blade knives, often set on a slight angle from the handle.  I personally use a large chip carving knife as my primary bench knife.

Hardwood Old World style carving uses heavy handled, large bladed tools that are moved through the wood using a leather or wood mallet.  The straight chisel, skew chisel, round gouge, and v-gouge are the main tools used.

3-D Carving uses a basic set of tools that include chisels, round gouges, v-gouges, and a pocket knife, bench knife, or utility knife.

Relief Carving uses a very similar set of tools to 3-D carving with the addition of bent-back gouges, dog-leg gouges, and the bull nose chisel.

Cane Carving, as relief and 3-D, uses a basic tool set with the inclusion of a draw knife, dowel sets, and clamps.

Power Carving is a style that uses rotary tools with diamond, steel, or ruby bits to do the basic work.  A basic 3-D or Relief Carving set of tools is then used to dress out the carving.


The Art of Spoon CarvingBeginner’s Whittling and Relief Carving Tool Kit

This in-depth tutorial explores all the tools, knives, and carving aids that I have accumulated over twenty years of wood carving.

Some were inherited from my father, who was a gun stock carver.  Some are sets that I have purchased and used over the years.  Of course, some are just fun specialty tools that I have added to my kit.

While you may need to purchase your bench knife, chip knife, and carving tool set to begin your new hobby, many of the tools listed in this tutorial you may already own in your woodworking or craft supplies.

Browse through the tutorial, consider what you already have on hand, and then make your selection.

Back to the Basics of Wood Carving Read More »

ArtDesignsStudio.com

Free Relief Carving Tutorial

free wood carving wood spirit project

I want to take a moment and thank Fox Chapel Publishing, and the Wood Carving Illustrated Magazine forum’s moderator BobD for helping me get the Relief Carving Wood Spirit Grape Man WIP tutorial re-posted with all of the original images, photos, patterns, and guides.

I am grateful for the privileged that BobD has granted me, that of “super moderator” status, which allowed me to go over the normal posting levels so that you could have the entire thread back together at one time, ready for you to begin carving.

It was originally posted in 2006 and during the forum crash lost the photo content of the project.

On 12/26/2017 I was able to re-upload the project in its entirety – 262 steps, 351 photos, and lots of great ideas and comments from the forum members that worked along with me.

If you have any questions, please post them to this thread. Please include the number of the post, which is in the upper right hand corner of each post, and if appropriate the photo number so that I can know exactly where you are in the project.

Over the next few weeks I will be working on re-posting the photos to some of the other in-depth projects that Fox has allowed me to share here with you.

Please be patient as I think there are more than a dozen large tutorials and quite a few small step-by-step to redo.

Go to: https://forum.woodcarvingillustrated.com/
Log In: Create an account so that you can view the images and post comments.
Scroll down to: Wood Carving tutorials
Click on: Relief Carving Wood Spirit Grape Man WIP

See ya there!  Lora Irish

Free Relief Carving Tutorial Read More »

Scroll to Top