Chip Carved Chess and Game Board
 Today we are going to put it all together as we work through a Chess Board – Game Board Chip Carving layout. We will use triangle, square, curve-edge, and free form chips to cut this 13″ square board. I will be working a small practice board using 1/4″ basswood. This small sample allows you to learn and experiment with each chip style used to create the larger board.
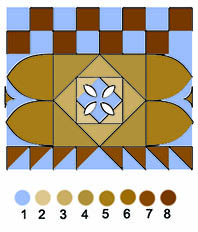
The finished sample, right, is a composite image made from my smaller practice board to show how your finished large board will look.
Chip Carving Seminar by Lora Irish
Chip Carving Seminar
Chip Carving Supplies
Chip Carving Graphed Patterns
Chip Carving Hand Positions and Grips
Chip Carving – Triangles and Square Chips
Chip Carving – Straight-Wall Chips
Chip Caved Game and Chess Board
Chip Carving Sampler Pattern Layout
Chip Carving Common Mistakes
Chip Carved Shortbread Cookies
Supplies for a practice board
4″ x 8″ x 1/4″ basswood practice board
printed copy of the practice pattern
removable spray adhesive
large chip carving knife
320-grit sandpaper13″ x 13″ x 1/2″ to 3/4″ basswood plaque is needed for a full-sized board.
 Practice Board Pattern
Click on the practice board pattern to the right for a full-sized, printable pattern.
Step 1
Lightly sand your practice board with 320-grit sandpaper. Work the sanding with the direction of your wood grain to avoid fine cross-grain scratches. Remove any dust with a clean, dry cloth.
Step 2
Make a printed copy of the practice pattern. Following the directions on the label, spray the back of the pattern paper with an even coating of spray adhesive. Place the paper pattern onto the board, aligning the edge of the pattern with the edge of the board. Rub the paper gently to insecure that it is in full contact with the wood. Allow the spray adhesive to dry thoroughly, about one half hour.
Step 3
Begin your practice session by checking the sharpness of your chip carving knife. Work your knife over your sharpening stones as needed to create a low bevel to the cutting edge. As you work through steps 4 to 6, try to keep the angle of the chip knife the same for each side of the triangles. This will keep the depth of the chip wells consistent throughout the motif.
We will work the border motif square from the center out towards the curve-edge chips.
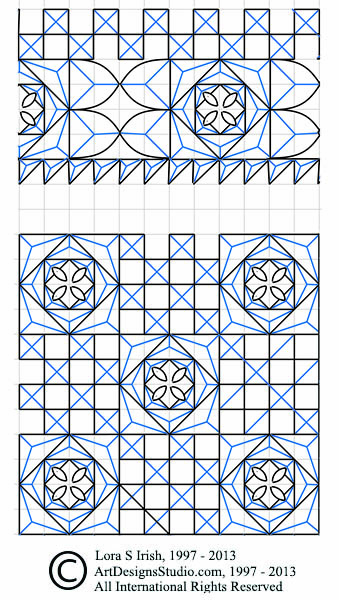
 Full-sized Chess Board Chip Carving Pattern
This pattern shows one quarter of a full-sized chess board layout. Please click on the pattern for a full-sized printable pattern.
 Step 4
The first area that we will work is the square motif created with triangular chips. This motif is made up of three rows of alternating triangles around a diamond shaped negative central area. Following the directions for cutting Triangle Chips, working one triangle chip at a time, cut the three sides of each inner row triangle.
 Step 5
Work the next row of triangle chips in the square motif. Cut the side of the new triangle that shares the side of the inner triangle first, then cut the remaining two sides. By cutting along the side of a triangle that has already been worked in a previous chip you reduce the minimize the chances of that side breaking or chipping out.
 Step 6
Work the remaining, outer row of triangles in the square motif. Again, work the side of the new triangle that shares a pre-cut side with the previously worked triangle first. Then cut the remaining two sides.
 Step 7
Next we will cut the small square chip rows that create the side border of the pattern. These small squares are worked holding the chip knife at the same angle to the wood as you did for the larger square motif triangles. For this design the small squares are alternated with small squares of negative space.
 Step 8
The curved edge chips on the sides of the large square motif are worked next and treated at three individual chips to make to complete chip pattern. There are two three-piece curved edge chips on each side of the large square motif. Begin by cutting the straight sided triangle that joins the large square motif. Cut the side of this triangle that touches the cut area of the large square motif first, then cut the remaining two sides.
 Step 9
Work one curve-edge triangle at a time. For the first curve-edge triangle cut along the straight side that touches the triangles cut in step 7 first.
Next, gently roll or curve the direction of the knife blade to match the curve of the pattern line for the next side of the curve-edge triangle chip. Cut the remaining curve-edge side of this triangle.
 Step 10
The inner row of this border pattern is created using small triangles and is cut in the same method as the large triangles in the design. So far we have cut each triangle as an independent chip, working through all of the sides of one complete chip before moving to the next.
You can gang cut chip shapes instead of working them one by one. In gang cutting you cut all of the matching sides of the triangles in an area or group at one time. Example, you can cut all of the small triangle accents along the side that touches the large motif first. Then, rotating the board you cut all of the sides of the row that are at 90 degrees to the main border pattern.
The last cutting session works all of the diagonal line cuts for each of the small triangles.
Gang cutting reduces the time need to cut each triangles individually, and reduces the time needed to rotate the board for each and every cut.
 Step 11
The inner negative space diamond in the large square motif is worked next by making a small two-cut chip that cuts the inner leg of the inner row triangles.
Lay your blade, at the 45 degree angle, onto the wood at the center point of this inner triangle leg. Push the knife down to cut a small line that goes through the chip wall and into the un-carved diamond area. Turn the knife blade over in your hand and angle the blade away form the first cut at the 45 degree angle. Cut along the same line. This releases a small triangle of wood from the diamond.
 Step 12
Repeat steps 3 through 11 to cut the game board squares. Work the large square motifs first, followed by working the alternating squares areas.
 Step 13
When all of the chips have been worked remove the paper pattern from the wood.
Check your work for any small problems and correct as necessary. I will note here that in my experience no two chips will ever be exactly alike. In any chip carving there always seems to be a few chips that are not exactly on the pattern line, or perhaps have a little deeper or shallower well.
Unless you are placing your chip carving into a contest or carving show, you are the only person that will ever inspect each and every chip that you carved in a full design.
Make what adjustments that you need to but do not become over obsessed with re-working each and every chip that you have carved.
Consistency comes with practice. So for the new chip carvers I suggest that instead of spending a great deal of time re-working one practice project that you move onto your next. In time most of the small problems or errors will resolve by repeated chip carving.
 Step 14
I finished my practice board by applying two coats of linseed oil mixed 1 to 1 with turpentine. The oil finishes deepens the wood and sharpens the shadows in the chip wells. Allow the oil to dry overnight. Work the wood with two to three coats of paste wax, allowing each coat to dry
Chip Carving Workshop
Available at Amazon.com!
Chip Carving Workshop by Lora Irish takes you through all of the essential chip carving techniques, from tool sharpening and preparation to hand positions, chip cutting, and finishing. You’ll discover how to use both geometric shapes and free form designs to create wonderfully detailed patterns. Practice projects will have you decorating household items and creating artistic pieces in a variety of original designs. Hope chests, wooden  spoons, jewelry chests, clocks, candle plates, serving trivets and decorative plaques are just a few ideas for your new chip carving skills.
Tomorrow, our last day for this Free Online Chip Carving Seminar by Lora Irish, we will look at a basic needle art style Sampler Layout using the free chip carving patterns that are posted to this thread. Thanks for reading today!